You can use calculation syntax when creating custom documents in Microsoft Word. When you first download your template, the document will appear with tables containing field names and field tokens in curly brackets. For the most part, field names and calculations look and function the same as they do in Cognito Forms.
{ each }
The each tag is used when referencing repeating sections and regular sections. For example, if your repeating section is named My Order, and you have a field in the section called Product, you can reference the Product field like so:
{ each MyOrder }
Product: { Product }
{ end each }
Wherever you use the each tag, be sure to close it with { end each }.
The each syntax also allows you to sort multiple items in a repeating section. For example, using the OrderBy function, you can sort a field in alphabetical order by last name:
{ each ContactInformation.OrderBy(Name.Last) }
Name: { Name }
{ end each }
If you want to filter items, you can use the Where function. So, if you had a repeating section for event attendees, you could filter the list down to people who plan on ordering a T-shirt, along with their shirt size:
{ each Attendees.Where(TShirt = "Yes") }
Name: { Name }
Shirt Size: { ShirtSize }
{ end each }
{ if }
The if tag is used to create conditional if/then statements. If you have a field that conditionally appears depending on what your customers selects, your syntax might look something like this:
{if (DidYouFindOurCustomerServiceSatisfactory = "No")}
Please explain.
{PleaseExplain}
{ end if }
Wherever you use the if tag, be sure to close it with { end if }. Within the tag, you can use any of the same calculation properties that you use in the Cognito Forms builder, such as .Contains:
{if (Checkboxes.Contains(“First Choice”))}
First choice was made!
{end if}
{ image }
When displaying images in your generated documents, we recommend using PNG or JPG files instead of SVG files.
The image tag is used to display images that are uploaded to your form via the File Upload field. Normally, these images will just display as a text list (i.e. Picture1.png, Picture2.gif, Picture3.jpeg). In your Word template, the default code will look like this:
{ each FileUpload }
{Name}
{ end each }
To make your uploaded images appear as actual pictures, use the following image syntax anywhere in your document outside of the default image code:
{ image FileUpload }
Make sure to replace “FileUpload” with the name of your File Upload field. With this syntax, you can control the width and height of your displayed images:
{ image FileUpload, width=5in, height = 3in }
As well as the max width or max height to constrain the size of your images:
{ image FileUpload, max-width=6in, max-height=5in }
The image ratio will always be maintained when images are resized. You can specify widths and heights in points (pt), pixels (px), inches (in), or centimeters (cm). If you don’t specify the unit, all sizes will be in inches. The image tag does not need to be closed.
To display just one image from a File Upload field, use the Where function to target the name of the specific image:
{image Pictures.Where(Name = Picture1.png)}
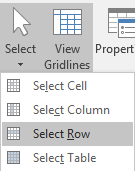
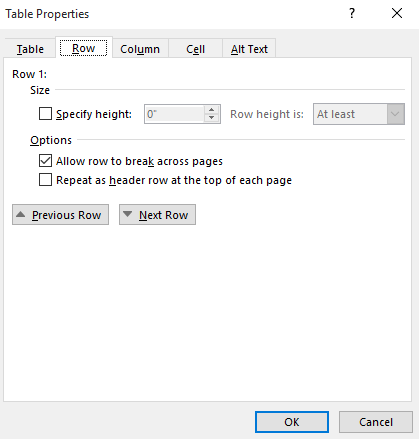
If you’re displaying your images in a table, your table properties should be set to allow rows to break across pages. If not, your images will be cut off when they reach the end of the page. To select this option, click inside your table and go to the Layout section in Table Tools. Next, find Select and choose Select Row:
In the Table Properties dialog, make sure that “Allow row to break across pages” is checked:
Signatures
Electronic signatures appear as images in your generated documents. Similar to images collected via the File Upload field, you can control the width and height of Signature fields.
To adjust the size of signatures on your custom documents, simply include your preferred dimensions next to the name of your Signature field.
Default size
{ Signature }

Adjusted size
{ Signature, width=2in, height=1in }

The image ratio will always be maintained when images are resized. You can specify widths and heights in points (pt), pixels (px), inches (in), or centimeters (cm). If you don’t specify the unit, all sizes will be in inches.
Subfields
For field types that have multiple subfields, such as Name fields and Address fields, specify the field name followed by a period and the subfield:
| Field Type | Subfields |
|---|---|
| Name | {Name.First}, {Name.Last}, {Name.FirstAndLast}, {Name.Prefix}, {Name.Suffix}, {Name.Middle}, {Name.MiddleInitial} |
| Address | {Address.Line1}, {Address.Line2}, {Address.City}, {Address.State}, Address.Country}, {Address.PostalCode}, {Address.CityStatePostalCode} |