Add a fully functional, beautifully styled form to your Squarespace site in just a few steps, with no coding required. With Cognito Forms, your form instantly blends in no matter how your site is built.
Build Time & Skill
15-20 min
Beginner
What you'll learn
How to embed a custom form on your Squarespace site using Cognito Forms' Seamless or Iframe method, with no coding required. This guide also covers how to style your form to match your site's design and how to automate your workflow after submission.


Squarespace is known for beautiful, design-forward websites, but its native form builder is limited to basic fields and simple notifications. Embedding a form you created in Cognito Forms gives you access to advanced features like conditional logic, payment collection, multi-step forms, and automated workflows, all while keeping the polished look your site is known for.
With Cognito Forms, you can embed forms on your Squarespace site that:
- Actually handle real intake workflows. Create multi-step forms with conditional logic that shows or hides fields based on what someone selects, so clients only see what’s relevant to them and you get the information you actually need.
- Collect payments, e-signatures, and file uploads in a single submission. No more patching together three different tools; one form can take a deposit, get a signed agreement, and receive documents all at once.
- Feed directly into your business processes. New submissions can trigger automated follow-ups, generate pre-filled Word or PDF documents, and connect to the tools your team already uses. No more emails sitting in your inbox waiting for manual follow-up.
How to Embed a Form on Your Squarespace Website: Step-by-Step
Follow these three steps to get your form live on any Squarespace page. You’ll start with a few quick style settings, grab your embed code, and finally add it to your site through a Squarespace Code block.
Step 1: Configure how your form appears on your site
Before finding your form’s embed code, take a second to configure how your embedded form looks. To access these settings, hover over the form name in the Cognito Forms sidebar and select Publish Form.
From the Form Styles tab on the Publish page, you have a few options to get your form looking how you want it to before you add it to your site:
- Customize your form’s style: Change button colors, choose a new font style, add your logo, and more.
- Field styles: This option controls the visual style of your form’s fields. You have several different options that tend to work well for most people, but you can also select Chameleon to automatically match your site’s fonts and colors. See below for more information on Chameleon mode.
- Hide form header when embedded: Check this box to hide the logo, title, and description when your form is embedded. These elements will still appear when someone visits the form via a direct URL.
- Adjust embedded form margins: Set the margin around your embedded form anywhere between 0 and 80 pixels to control spacing within your page layout.

Chameleon field styles
For the most seamless visual integration, enable Chameleon mode. It automatically adopts the surrounding page’s fonts, colors, and styles, with no CSS knowledge required. This is especially useful on Squarespace, where your site’s design is a core part of the experience.
To enable Chameleon mode:
- From the form’s Publish page, select the Form Styles tab.
- Expand the Field Style dropdown and select Chameleon.
- Click Save and your form is now ready to inherit your site’s styling automatically.
Note: Chameleon field styles work only with Seamless embedding. If you plan to use an Iframe embed, see the Custom CSS section below.
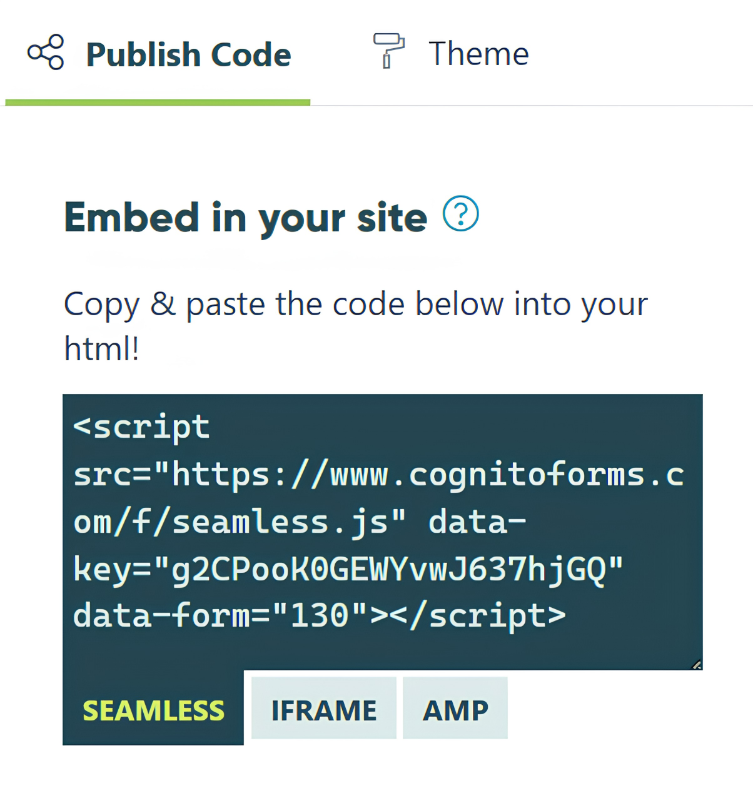
Step 2: Copy your form’s embed code
Once your form is styled and ready, it’s time to grab the code you’ll paste into Squarespace. Here’s how:
- From the form’s Publish page, click the Publish Code tab.
- Under Embed in your site, select the type of embed code you want to use.
- Click inside the code’s text box to copy it to your clipboard. This is what you’ll paste into Squarespace.
Seamless vs. Iframe embedding: Which should you use?
The main difference between the two is how the form interacts with your site’s existing styles. In short, we recommend starting with the Seamless embed for most Squarespace sites. If you run into styling conflicts or slow load times, switch to the Iframe embed.
| Seamless Embedding | Iframe Embedding | |
|---|---|---|
| Setup | Integrates the form directly into the page, making it look and feel like a natural part of your site | Loads your form inside a contained frame, keeping it visually separate from the surrounding page |
| Best Used When | Recommended for most sites | Seamless embed causes styling conflicts or display issues |
| Styling | Inherits your site’s styles naturally (especially with Chameleon Mode) | Isolated from page styles; requires CSS to match your site’s styles |
Step 3: Add the embed code to your Squarespace page
No matter which embed code you choose, you’ll add it through a Code block inside Squarespace. Here’s how to set it up:
- Log in to Squarespace and select the site you want to add your form to.
- Click Edit Site, select Pages, and open the page where you want the form to appear.
- Click Edit, scroll to the area on the page you want the form to be, and then click + Add Block.
- In the block picker pop-up, scroll down and select Code.
- Paste your embed code into the Code block editor.
- Save your changes and preview your page to see the form live.

Squarespace’s editor may not show your embedded form while you are in edit mode. Click Preview or visit your live site to see the form as visitors will. All forms built on Cognito Forms are mobile-responsive; you can toggle the device you’re previewing with in Squarespace to confirm how the form looks on mobile before publishing.
Customizing Your Form’s CSS
If the Chameleon field style doesn’t fully close the gap between your form and your site’s visual design, Custom CSS lets you fine-tune it.
Custom CSS gives you precise control of specific elements like button colors, input borders, error messages, and fonts using CSS variables or traditional selectors. On Squarespace, you add custom CSS through the site’s Custom CSS editor rather than the Cognito Forms embed code directly.
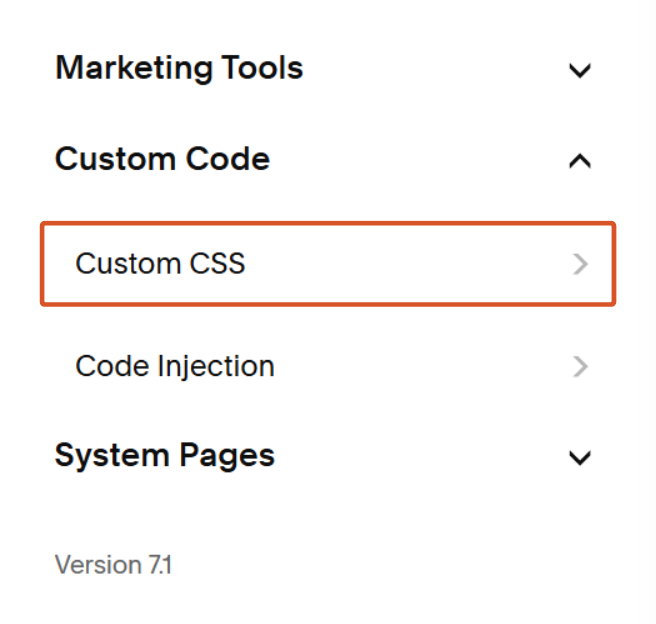
To add custom CSS to your embedded form in Squarespace:
- Select the website you want to edit.
- Click on Pages.
- Expand the Custom Code accordion at the bottom of the screen, and then select Custom CSS.
- Add your CSS variables to the text box on the page.
- Don’t forget to Save all your changes.
As you adjust your custom CSS, you can view real-time style changes by simply saving your changes and refreshing your browser.
After Embedding: Get More Out of Your Embedded Form
Once your form is embedded onto your Squarespace site, take advantage of features offered by Cognito Forms that turn submissions into a fully automated business process:
- Automate your follow-up with Workflow.
Set up multi-step Workflows to assign tasks to the right team member, trigger approval processes, or move submissions through defined steps automatically. This works well for requests or inquiries that require internal review before a response goes out. - Send confirmation and notification emails automatically.
Configure email notifications to be sent immediately after a form is submitted, such as confirmation emails to the customer and internal alerts to your team. You can personalize the content with information from the customer’s submission and set up conditional emails that send different messages based on what someone selected. No manual effort on your end, and your customers get immediate reassurance. - Generate documents from form submissions.
Use Cognito Forms’ document generation feature to automatically produce PDFs or Word documents from submitted data. This is useful for sending order summaries, quote confirmations, service agreements, or invoices directly from your form without preparing documents manually. - Collect e-signatures directly in your form.
Add a Signature field to collect legally binding electronic signatures for contracts, service agreements, or client onboarding documents, without sending files back and forth.
Add a Form to Your Squarespace Site Today
With Cognito Forms, it only takes a few minutes to embed a form on your Squarespace site. Meanwhile, the result is a form that looks like a natural extension of your business while also automating and improving your business processes.
Whether you’re collecting client inquiries, processing payments, or automating an intake workflow, your form is live and ready to work as soon as you add the embed code. From there, layer on e-signatures, workflow automation, email notifications, or document generation to create more efficient processes for you and your team.
Get started in minutes with our fully customizable form templates.
-
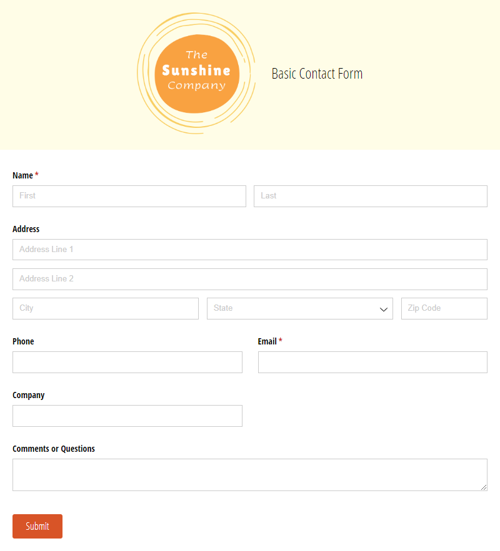
Basic Contact Form
Use our free contact form template to get notified whenever customers, sales leads, media representatives and others reach out online.
Preview -
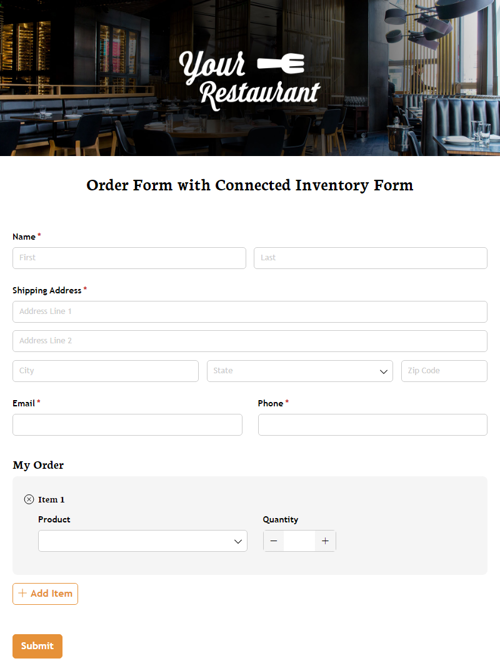
Order Form with Connected Inventory Form
Use our free product inventory form template to limit the number of times a specific product may be selected based on available quantity.
Preview -
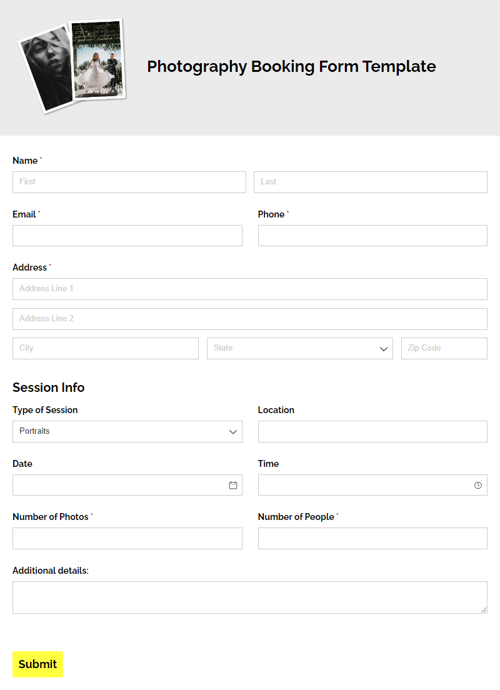
Photography Booking Form Template
Make booking clients easier with our free photography booking form. Collect important session details, including session type, date, location, and more.
Preview
FAQ
If you want to collect files (like PDFs, images, videos, and other documents) through your form, simply add a File upload field to your form in Cognito Forms. From there, you can adjust what file types and sizes you want to allow, and even restrict the number of files allowed. Learn more about File Uploads in our Help Topic.
Embedding a form built in Cognito Forms requires a Squarespace Business or Commerce plan, as these are the only plans that support adding custom code to your site. If you’re on a Personal plan, you’ll need to upgrade before you can add a Code block and paste your embed code.
Yes. Add a separate Code block for each form you want to embed and paste each form’s unique embed code into its own block. We recommend using the same embed code type if you’re embedding multiple forms on the same page. (e.g. all forms embedded with a Seamless code or all Iframe).
If you need to style multiple forms differently when using the Seamless embed, wrap each embed code in a div with a unique ID and target them individually with CSS. Learn more about adding custom CSS to your form in our Advanced CSS Guide.