Connect every form submission to the person behind it. With Cognito Forms, you can pull up any client and see their full history, across every form, in seconds.
Build Time & Skill
15-20 min
Intermediate
What you'll learn
How to enable Track Submissions by Person, choose the right person type for your workflow, and view a complete client submission history across all your forms.
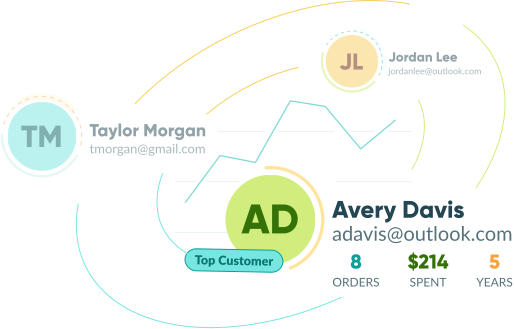
When a client comes back for the second or third time, you shouldn’t have to dig through dates, emails, and old entries to figure out who they are and what they’ve asked for before. But that’s exactly the problem when form submissions are treated as disconnected events. Each one stands alone, with no link back to the person who sent it.
Track Submissions by Person connects every form submission to a real person’s record. When someone submits one of your forms, their entry is linked automatically. Pull up a client, and you see everything (past submissions, open requests, payments, signed agreements) without touching a spreadsheet or switching to a separate tool. This makes client tracking simple and keeps everything in one place.
This setup is ideal for:
- Service businesses managing ongoing client relationships that need to see a client’s history before a meeting, call, or follow-up.
- Teams handling repeat submissions like service requests, appointment bookings, or monthly check-ins that need to connect back to the same person each time.
- Organizations that track contacts internally and want a clean client record without giving external users any login access.
- Small teams that have outgrown spreadsheets but aren’t ready for the overhead of dedicated client management software.
How Tracking Submissions Works
Track Submissions by Person matches each form submission to a person using their email address. When someone submits a form, Cognito Forms searches your Contacts list for a matching email. If a match is found, the submission links to that person’s record. If no match is found, a new contact is created for them automatically.
Once submissions are linked to a person, you can view their full cross-form history in one place. The Submissions tab on their contact record shows every form that person has submitted across your organization, with filters for form, status, and date range.
Key Takeaways
- Cognito Forms’ Track Submissions by Person feature matches each form submission to a person using their email address.
- Setup is as easy as adding fields to your form and Cognito Forms does the rest for you.
- Every submission is matched to a contact record using the submitter’s email address. If no match is found, a new contact is created.
- View a client’s full submission history across all forms in one place, directly from any linked entry, without spreadsheets or separate tools.
Two Ways to Track Form Submissions by Person
Choose the method that fits how your form identifies people. If you’re starting from scratch or want the simplest path, add a Name and Email field and Cognito Forms handles the rest. If your form already uses a Person field to identify submitters, use that to link submissions to existing person records instead.
| If your form… | Use this method: |
|---|---|
| Collects a name and email from the person submitting | Method 1: Use a Name and Email Field |
| Uses a Person field to identify the submitter | Method 2: Use a Person Field |

Visit our support page to learn more about tracking submissions by person.
Method 1: Using Name and Email Fields
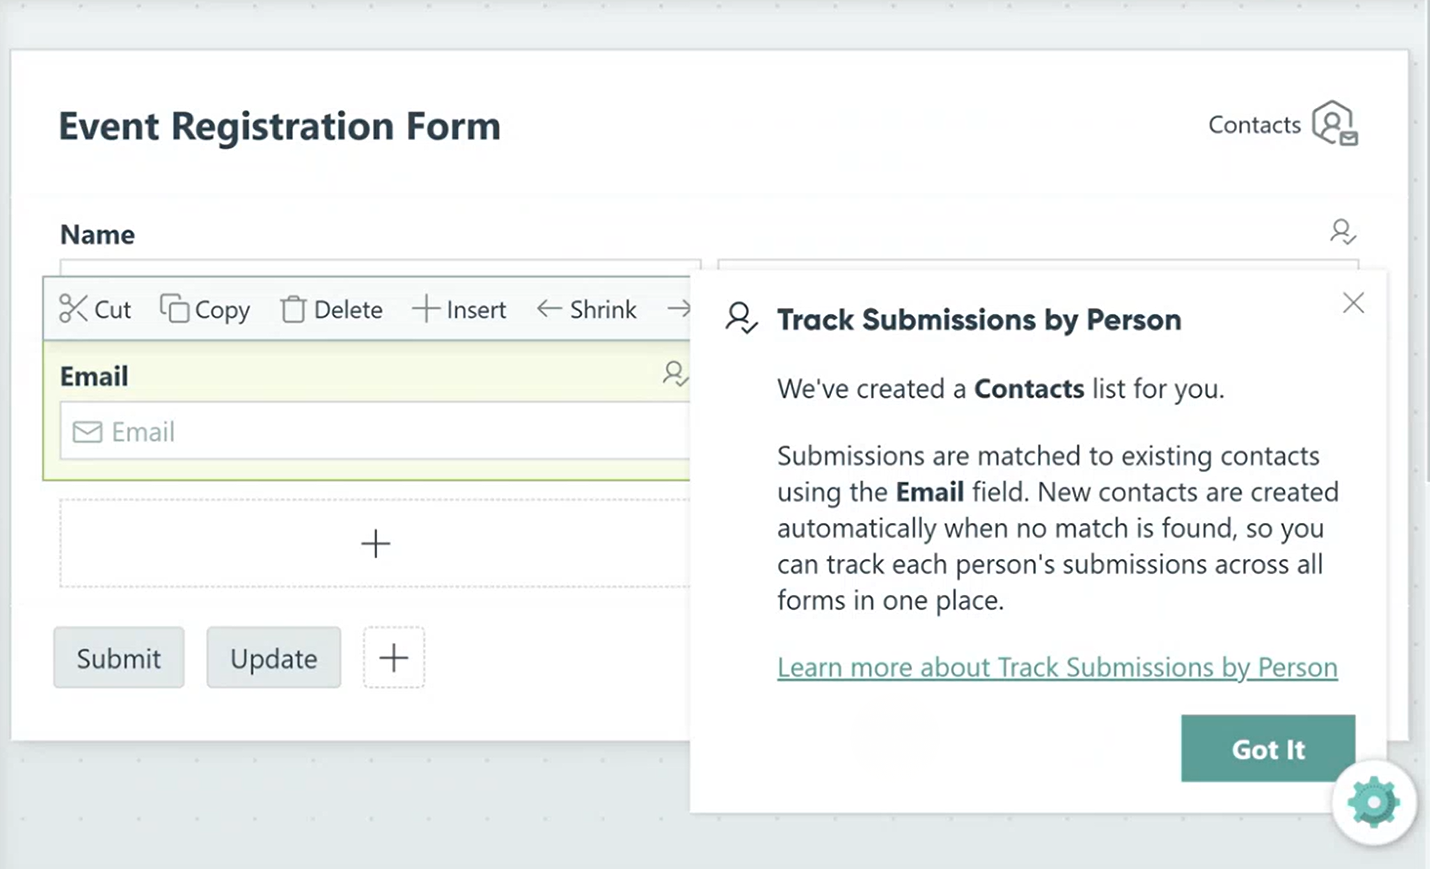
Adding a Name field and an Email field to your form is the fastest way to start tracking submissions. The moment both fields are present, Track Submissions by Person enables automatically. If your organization doesn’t have a Contacts list yet, Cognito Forms creates one for you — no configuration needed.
Setup steps
- Open your form on the Build page.
- Add a Name field and an Email field. Track Submissions by Person enables automatically once both are present.
- A notification appears confirming that a Contacts list has been created and that submissions will be matched by email going forward. Click Got It to dismiss.
If your form already has a Name and Email field when you first open it, Track Submissions by Person may already be active. Check your form’s Settings and look for the Track Submissions by Person setting to confirm. A Contacts icon in the top right of the form builder also appears when tracking is enabled.
Method 2: Using a Person Field
If your form already uses a Person field to identify the submitter, like a dropdown that references a client list or staff directory, you can connect Track Submissions by Person to that field instead. Submissions are linked to the person selected in the field.

Step 1: Add a Person field
- Open your form on the Build page and add a Person field.
- A pop-up will appear. Click the Create Person Form button. You can also select from existing Person Forms, if you have any.
Step 2: Choose the type of person
After adding a Person field, you’ll choose how to classify the people being tracked. Picking the right type determines whether those people can log in, access a portal, and how they interact with your forms.
- In the Person Form Name field, specify what type of people this form is for.
- You’ll see three options for the Who’s Submitting This Form? setting. Choose the option that best matches the type of person your Person Form will represent. Read the section below “More about the Person Type” for more details on what each option means and when to use each one.
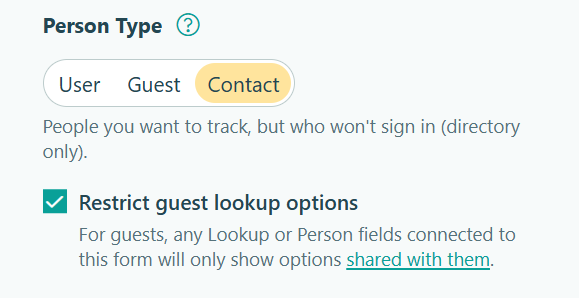
More about the Person Type
The Person Type option is available when setting this feature up after adding a Person field to your form, or when adjusting any Person Form’s Track Submissions by Person setting in the Form Setting panel. In this setting, you’ll select the type of person this form represents. Field mappings and available settings update based on your selection.
- Contact: Use this option for anyone you want to track who won’t sign in to Cognito Forms as users or guests.
- Guest: Use this option for external people who may sign in to your organization’s portal to submit forms and view their submissions. Learn more about Guest Access.
- User: Use this option for people who may sign in to your Cognito Forms organization as users. They can log in and may be able to manage entries or build forms, dependent on permission level.
Viewing someone’s submission history
Regardless of which method you used, viewing a client’s cross-form history works the same way. Open any entry linked to that person, click their name to open their contact record, and see everything they’ve submitted across all your forms, in one place.

You can view someone’s submission history from two locations:
From the person’s entry on your Person Form
- Go to the Person Form where the customer’s information is stored. For example, your “Contacts” form.
- Open the entry for the person whose history you want to see.
- Click on the Submissions tab to see every submission linked to that person across all forms with tracking enabled and connected to the same Person Form.
- Use the filters at the top to narrow results by Form, Status, or Submitted date range.
- Click any row to preview the submission. From the preview, click the chevron icon at the top to open the full entry on that form’s Entries page.
From a form the person submitted
- Go to the Entries page for any form the contact fills out.
- Open an entry and click the person’s name in the top right corner to open their profile and submission history.
- Select the Submissions tab to see every submission linked to that person across all forms with tracking enabled and connected to the same Contacts list.
- Use the filters at the top to narrow results by Form, Status, or Submitted date range.
- Click any row to preview the submission. From the preview, click the chevron icon at the top to open the full entry on that form’s Entries page.
Configure Entry Summary across all your forms to make the Submissions tab easy to scan and identify at a glance. The Entry Summary shows as the sub-heading that appears under each form name in the Submissions tab. This allows you to show a meaningful detail, like the client’s name, project title, or a key field value.
Real-World Examples
Here’s how three service businesses track their clients’ form submissions:
- Agency client management: A marketing agency enables tracking on their project request and invoice forms. When a returning client submits a new project, the account manager clicks their name from an entry and immediately sees their original intake form, past revision requests, and previous invoices, all before the kickoff call.
- Health & wellness practitioners: A wellness coach tracks clients across session intake forms, goal-setting questionnaires, and monthly check-ins. Before each appointment, they pull up the client’s contact record and scan the Submissions tab. They walk into every session with full context, without maintaining a separate notes system or client tracker.
- Nonprofits & social services: A nonprofit tracks service recipients as Contacts, internally and without giving anyone portal access. When someone comes in for assistance, staff check their Submissions tab in seconds: what services were provided, when they last came in, and what’s still open. Continuity improves without adding any overhead.
More Ways to Enhance Client Tracking
Once you’ve set up client tracking, a few Cognito Forms features can make your team’s workflows even more powerful:
- Set up a Client Portal with Guest Access. You can set up a custom portal where customers can log in, view their submissions, and complete outstanding tasks. Portals are ideal for client relationships that involve multiple rounds of back-and-forth.
- Add Workflow to keep submissions moving forward. Route entries to the right team member, trigger automated email notifications, and build approval steps. Your workflow stays connected to the person’s record.
- Generate professional documents automatically. With Document Generation, instantly create polished contracts, invoices, reports, or summaries using your form submission data.
Start Tracking Your Clients Today
Every form submission has a person behind it. Track form submissions by person to ensure that you always know who submitted each entry and what history they have with you, without extra tools, extra steps, or spreadsheet maintenance.
FAQ
Yes. Contacts are tracked entirely on your end. They submit forms like any public respondent and are matched by email address. No login or account is required from them. Their submission history is visible only to you and your team in the Contacts list.
Alternatively, the Guest person type is used for people who log in to your custom portal using Guest Access. The User person type is meant to track people who have full user accounts in your Cognito Forms organization.