Stop moving files by hand. Connect your form’s File Upload field to OneDrive and every document your team collects goes straight to the right folder — organized, named, and ready to find.
Build Time & Skill
10-15 min
Beginner
What you'll learn
How to connect your form's File Upload field to OneDrive so submitted documents land in the right folder automatically, sorted by employee, department, or any other data from the form.


Forms asking for uploaded files carry a hidden cost. A vendor submits a copy of their company information or proof of insurance. It lands in Cognito Forms. Then, for every single submission, your team downloads it, opens OneDrive, finds the correct folder, and re-uploads it.
Cognito Forms’ File Sync feature takes this step out of the process entirely. Connect your form’s File Upload field to OneDrive only one time, and submitted files go right where they belong.
This setup is a strong fit for teams that:
- Run internal workflows where employees, contractors, or vendors upload documents as part of a structured or multi-step process.
- Work out of a shared OneDrive folder and need submitted files to land there without a manual handoff step.
- Manage multiple document types across submissions where consistent naming and folder organization matters for retrieval and compliance.
- Support high submission volume that makes manual filing unsustainable.
Understanding File Sync
File Sync creates a direct, one-way link between a File Upload field on your form and a destination folder in your OneDrive account. As soon as someone submits an entry, any files they attached are automatically transferred to your designated OneDrive folder. No third-party tools, no manual steps, and no integration middleware required.
Take an employee onboarding workflow as an example. A new hire submits their paperwork (signed offer letter, direct deposit form, and ID verification) through a Cognito Forms onboarding form. Without File Sync, someone on your HR team has to download each file and drop it into the right OneDrive folder manually. With File Sync, those documents appear in the correct folder the moment the form is submitted.
Before getting started, there are a few key behaviors worth knowing:
- The original file is always preserved. Files are copied to OneDrive, not transferred. The source file remains in Cognito Forms and OneDrive receives its own independent copy.
- Resubmissions only send new files. If a user updates and resubmits a document, only the replacement file is synced. Whatever was previously delivered to OneDrive stays there, unchanged.
- Deletions in Cognito Forms have no effect on OneDrive. Removing a file or entry on the Cognito Forms side does not touch anything that has already been synced.
- You decide how files are organized. Send everything to a fixed folder, or set up a dynamic subfolder structure that builds itself from form data (i.e. organizing files by employee, department, or submission date).
How to Send Files to OneDrive: Step-by-Step Setup
Connect your form to OneDrive by enabling Sync Files to Cloud Storage in your File Upload field’s settings, connecting your Microsoft account, and customizing file naming and organization. Once created, the integration can be used across your entire organization and other forms can connect to it without authenticating again.
Step 1: Enable File Sync on your File Upload field

Turn on the setting that allows you to connect your File Upload field to your OneDrive account. To do this:
- Open your form’s Build page and select the File Upload field that will collect documents.
- In the field settings, enable Sync Files to Cloud Storage.
- Select OneDrive as your storage provider.
- Authorize access to your Microsoft account when prompted.
Step 2: Choose your destination folder

After authorizing OneDrive, configure where your files will go:
- Under Connected Folder, select the OneDrive folder where synced files will land.
- Optionally, select Change Account to use a different connected Microsoft account.
If your team works out of a shared OneDrive folder, you can select that folder here as long as your Microsoft account has editor permissions on it. This means files submitted through your form will land directly in a location the whole team can already access, with no extra sharing steps required
Step 3: Choose which fields to sync
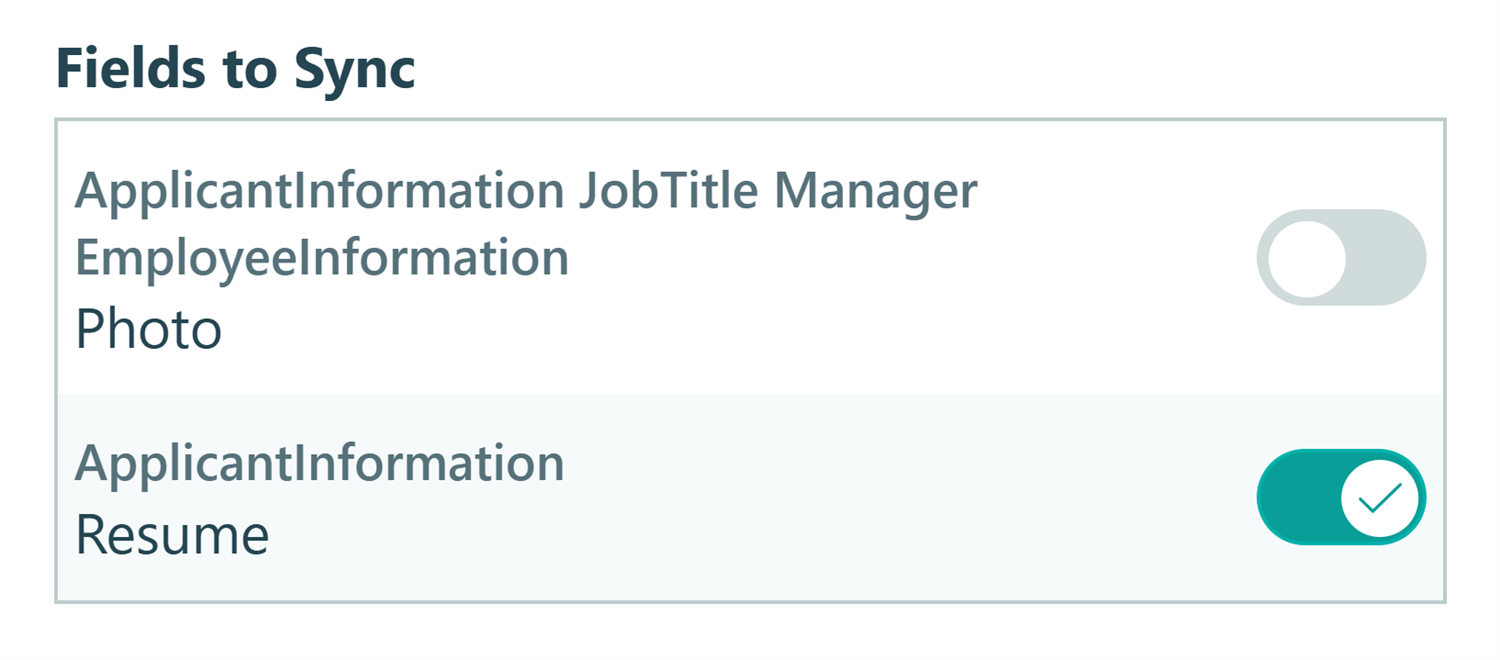
Use the Fields to Sync section to choose which File Upload fields on your form should send files to OneDrive.
- If your form contains more than one File Upload field, you have the option to sync all of them or limit syncing to specific ones.
- If you do choose to sync multiple File Upload fields from the same form, they must all route to the same folder in OneDrive.
- To prevent a particular field from syncing, turn off the toggle for that field. Any files submitted through that field will still be saved in Cognito Forms — they just won’t be sent to cloud storage.
Once an integration exists, any form in your organization can connect to it, without creating a new integration or re-authenticating your Microsoft account. Just remember, form Administrators can connect forms to an existing integration, but only Organization Administrators can create or delete integrations.
Step 4: Set up dynamic folder paths and file names
This is where File Sync moves beyond a simple file collection tool and becomes a self-organizing filing system. Instead of dumping every document into a single static folder, you can define a folder structure and file naming convention that automatically populate based on the actual data submitted in each entry.
Folder Path determines the subfolder hierarchy within your connected folder. File Name dictates what each synced file is labeled. Both fields support tokens, which are dynamic placeholders that pull live values directly from the form at the time of submission.

A real example
Say your HR team runs a new hire onboarding form. Employees enter their name, department, and the type of document they’re uploading before attaching the file. You could configure File Sync like this:
Say you’re hiring several new positions across multiple departments. Applicants enter their information and attach their resume to your File Upload field. You could configure File Sync like this:
- Folder Path:
Recruiting & Hiring/[Department]/[Job Title] - File Name:
[Employee Name] - [Field Name] - [Entry.DateSubmitted]
When Jordan Lee applies for the Senior Data Analyst position with her resume attached on April 21, 2026, the file lands at:
📁 Recruiting & Hiring > Operations > Senior Data Analyst > Jordan Lee - Resume - 2026-04-21.pdf
Even though she was the first person to submit an application and the ‘Operations’ subfolder didn’t exist before, your configuration told the form to create it. The file was named and filed without anyone touching it.
How can I organize my files and folders?
The right structure depends on how your team retrieves files. Here are several approaches that work well for internal operations/workflows:
- Folder Path:
[Form Name]/[Employee Name] - Entry [Entry Number] - File Name:
[Field Name] - [File Name]
You could give each form its own top-level folder in OneDrive. Within it, every submission gets a subfolder with the employee’s name and entry number. The folder name is easily identifiable. The entry number ensures two employees with the same name are never filed in the same location.
Adding the Field Name to the file name means an onboarding form collecting multiple documents (a signed offer letter, a tax form, and a direct deposit authorization) will send all documents to the same folder, but each named clearly by document type.
- Folder Path:
Employees/[Email Address] - File Name:
[Form Name] - [Field Name] - [Date Submitted]
If the same employee fills out multiple forms over time (such as onboarding, an annual review, a benefits update), this structure routes all their uploaded documents into a single folder identified by their email address. The file name captures which form and field the document came from, so context is never lost even when everything is in one place.
- Folder Path:
HR Records/[Department]/[Employee Name]
= File Name:[Employee Name] - [Field Name] - [Date Submitted]
Useful when your team retrieves files by department rather than by individual. All records for the Operations team are grouped together, with each employee’s documents nested within. Works well for compliance reviews that cover an entire department at once.
- Folder Path:
[Form Name]/Entry [Entry Number] - File Name:
Entry [Entry Number] - [Field Name]
For workflows where keeping names and email addresses out of folder paths is a requirement (like certain healthcare, legal, or privacy-sensitive processes), entry number alone gives you a unique filing reference that traces back to the full submission in Cognito Forms without surfacing any personal details in OneDrive.
Managing and Monitoring Your OneDrive Integration
Organization Administrators have full visibility into all active integrations via Organization Settings > Integrations. From this page, you can review which forms are linked to each integration, update your default folder paths and file names, and remove integrations.
How do I confirm a file was successfully delivered?

To verify that a particular file made it to OneDrive, open the relevant entry and check the activity log. This log tracks the delivery status of every synced file, including the timestamp and whether the sync completed successfully. If your workflow has compliance requirements where documenting receipt of a file matters, the activity log serves as a dependable audit trail without needing any additional tracking tools.
Additional Features to Explore
File Sync handles the delivery, and these features extend what you can do with that foundation:
- Show or hide specific File Upload fields based on earlier answers, using Conditional Logic. Clients only see and upload what’s relevant to their situation.
- Send an automatic confirmation email when files are received, so everyone knows the submission went through without following up manually.
- Create a secure document portal. Use Guest Access to give employees, contractors, or vendors a private login where they can submit documents and track their own uploads, without email links or shared inboxes
Start Sending Your Files to OneDrive Today
Your form already collects the documents your team needs. File Sync makes sure they land where your team actually works, organized, named, and ready to find in OneDrive without anyone moving them manually. Set up the integration once, configure your folder structure, and every future submission handles its own filing.
FAQ
Files deleted from Cognito Forms are not deleted from your OneDrive account. All files sent from Cognito Forms to OneDrive will stay there indefinitely. If you want to remove a file from OneDrive that has been automatically sent from Cognito Forms, you will need to delete it manually.
All restrictions to the size and type of files and the number of files allowed follow the limits on our File Upload field, which you can read more about on our File Upload Field reference page.
Organization Administrators can create new integrations and delete them. After the integration has been set up, anyone in your Cognito Forms organization who is an administrator on a form, folder, or organization level can connect forms to it.