Cognito Forms can automatically send files uploaded through your forms to a connected cloud storage provider – either Google Drive or Microsoft OneDrive (including shared workspaces and SharePoint sites).
Once connected, any file submitted through a File Upload field is sent to your storage account when an entry is created or updated, without manual steps or third-party integration tools.
How it works
When an entry is created or updated on a connected form, Cognito Forms automatically sends all files from connected File Upload fields to your storage account:
- Only new files are sent on updates. Files already synced to the storage provider are not re-sent.
- Original files remain in Cognito Forms. The connection is one-way: files sent to your storage provider are independent copies, and changes or deletions made in the provider don’t affect your Cognito Forms entries.
- Files are organized by folder path and file name. You can use tokens to build dynamic paths based on form data, including the form name, field name, and original file name.
- Files deleted from Cognito Forms are not deleted from the storage provider.
Set up a file integration
Organization Administrators can create and manage file integrations. Form Administrators can connect a form to an existing integration, but cannot create new ones.
Create a new file integration
For step-by-step setup instructions, see the how-to guide for your storage provider:
To set up a file integration from a File Upload field:
- Open your form’s Build page and select a File Upload field.
- In the field settings, enable Sync Files to Cloud Storage.
- Select your storage provider (Google Drive or OneDrive) and authorize access. Note: If you see a “Need admin approval” message when authorizing access, an admin for your organization may need to approve Cognito Forms before you can connect.
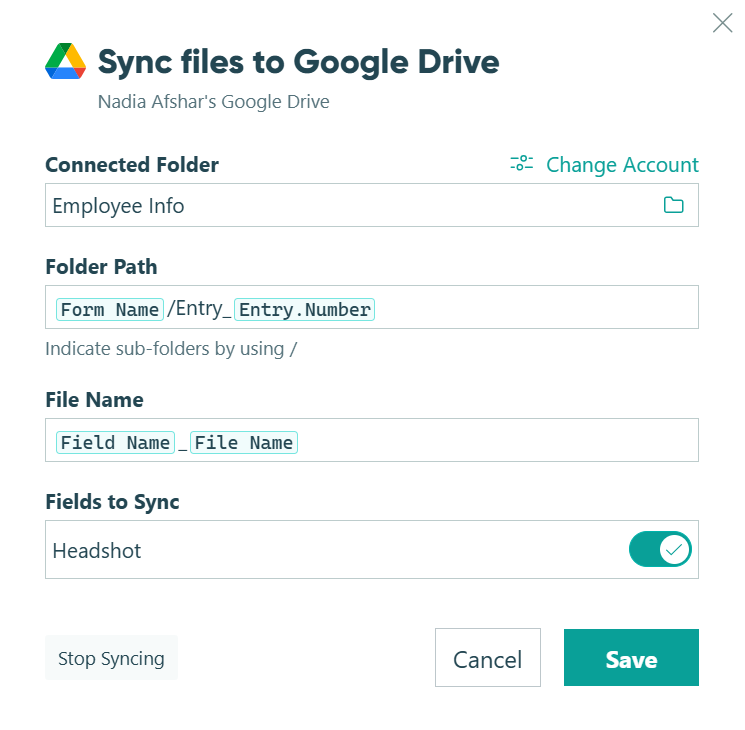
- In the dialog, configure the file integration:
- Connected Folder – The folder in your Google Drive or OneDrive account where synced files will be sent. Optionally, select Change Account to use a different connected account.
- Folder Path – The subfolder structure within the connected folder. Click Insert Field to use tokens to build a dynamic path based on form data, such as the form name or field name.
- File Name – The name applied to synced files. Use tokens to generate a dynamic file name, or leave as the default to use the original file name.
- Fields to Sync – The File Upload fields on this form that will sync files to the connected provider. Deselect a File Upload field from this list to stop syncing files from that field.
- Save the field settings.
The integration is now available across your organization and can be connected to other forms without re-authenticating. You can check the status of synced files at any time in the entry activity log.

To sync files for entries submitted before the integration was set up, perform a status update on multiple entries at once to trigger a bulk sync.
Only new files are sent each time, so files won’t be duplicated across every status change.
Connect to an existing file integration
- Open your form’s Build page and select a File Upload field.
- In the field settings, enable Sync Files to Cloud Storage.
- Choose from the list of existing integrations in your organization. A File Upload field can only be connected to one account at a time.
- Optionally, customize the folder path or file name for this form. This overrides the global default only for this form.
- Save the field settings.
Folder path and file name tokens
When configuring a file integration, you can use tokens to build dynamic folder paths and file names.
In addition to form fields, the following tokens are available:
| Token | Value |
|---|---|
| Form Name | The name of the form. |
| Field Name | The name of the File Upload field. |
| File Name | The original name of the uploaded file. |
Manage file integrations
Organization Administrators can view and manage all file integrations from Organization Settings > Integrations.
From there, you can:
- See which forms are connected to each integration
- Adjust the global default folder path and file name
- Delete an integration
Deleting an integration disconnects all forms that use it. Files already synced to the storage provider are not affected. Learn more about managing integrations.
Stop syncing a field
There are a few ways to stop syncing files from a specific File Upload field:
- Turn off Sync Files to Cloud Storage in that field’s settings.
- Click Stop Syncing in the bottom left of the Sync Files dialog.
- Deselect the field in the Fields to Sync setting in the Sync Files dialog.
Files uploaded via an unsynced field will continue to be stored only in Cognito Forms.
Pricing
Syncing files to cloud storage is available on Pro, Team, and Enterprise plans. Each file transferred counts toward your organization’s API usage. See Integration billing for details.