Build forms that adapt in real-time based on responses, showing each person only the questions and information relevant to them.
Build Time & Skill
10-20 min
Beginner
What you'll learn
How to use conditional logic to show and hide fields, route to different pages, and create personalized form experiences that guide people through the right questions at the right time
Long, static forms show the same questions to everyone, often overwhelming most people with irrelevant fields. With Cognito Forms’ Conditional Logic, you can create intelligent forms that adapt to each person’s answers, showing only questions that apply to their specific situation.
Whether you’re building order forms, patient intake questionnaires, or job applications, conditional logic makes forms more relevant to your audience. Using Conditional Logic to show different questions helps you:
- Reduce form abandonment. People are more likely to complete forms that are shorter and more relevant to them.
- Create personalized experiences. Each person follows a unique path through your form based on their specific needs, preferences, or circumstances.
- Simplify complex processes. Break down complicated multi-step forms into manageable, logical steps that guide people through the right questions at the right time.
What is Conditional Logic?
Conditional logic creates “if/then” rules that control what people see based on their previous answers. It helps you create smart pathways through the form where each person’s journey depends on how they respond. When someone selects “I need delivery,” they see one set of questions. When they select “I’ll pick up in store,” they see completely different questions, all on the same form.
The power of conditional logic is in its flexibility. You can create simple rules like “show this field when they select yes” or build complex scenarios with multiple conditions using “and/or” logic. You can control individual fields, entire sections, or whole pages, giving you complete control over the form experience.
What makes conditional logic unique in Cognito Forms is our easy-to-use Conditional Logic Builder. This provides a visual interface to specify rules, making complex logic easier to set up without technical expertise.
Try it out!
Four Methods to Build Dynamic Forms That Change Based on Responses
Now that you understand how conditional logic works, let’s explore the four main ways to show something different on the form based on previous answers.
Method 1: Showing or Hiding Fields
Dynamically show or hide individual fields or entire sections based on what someone selects in previous questions. This is the most common and straightforward way to make questionnaires adaptive. You can reveal follow-up questions, hide irrelevant sections, or display relevant content only when needed, all without creating separate forms for different scenarios.

Setup steps
Setting up conditional field visibility takes just a few clicks:
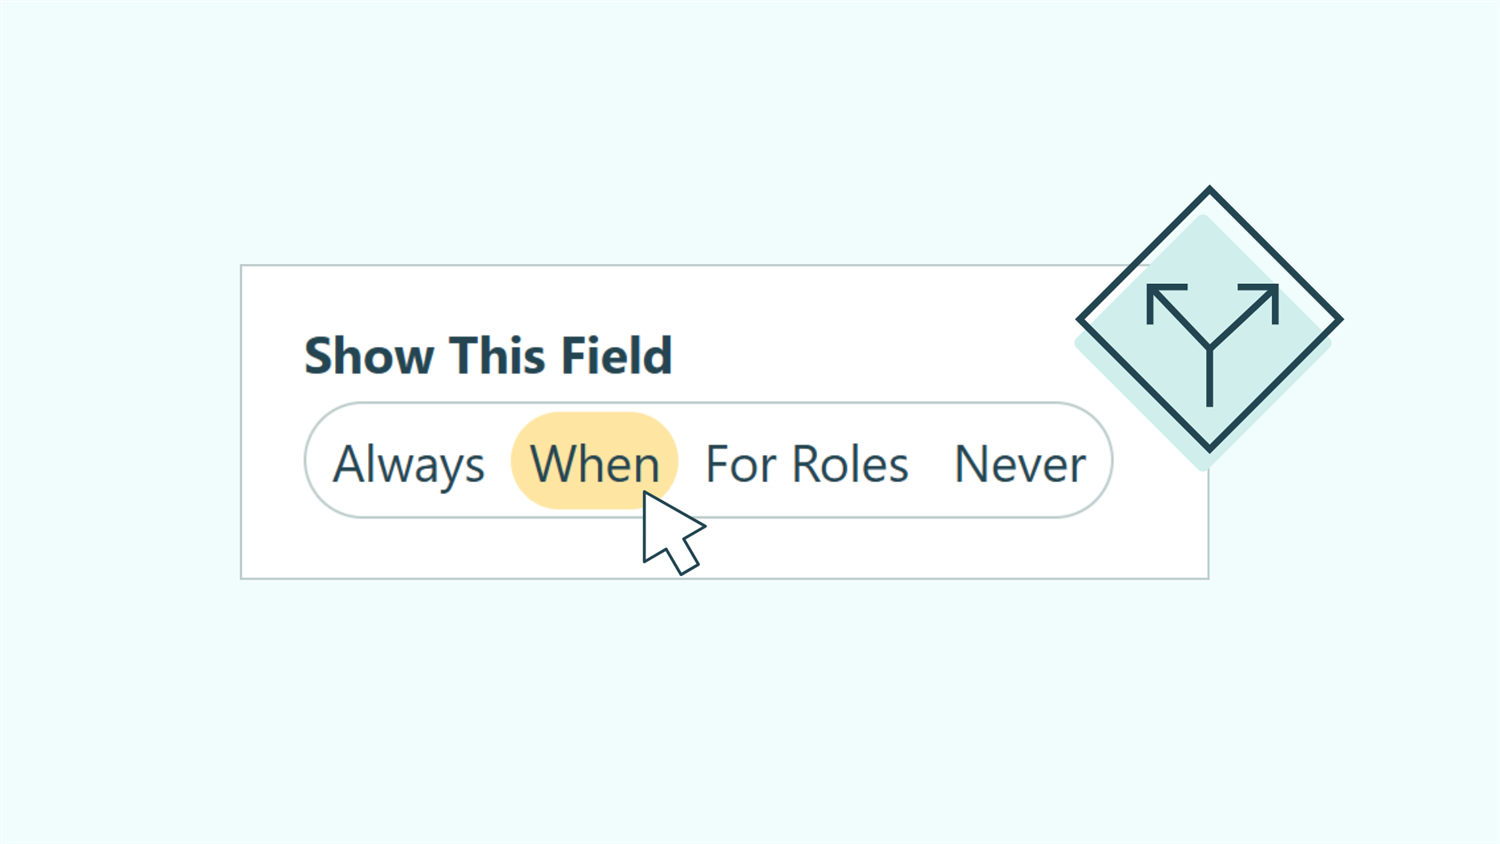
- Select the field you want to control.
- Find the Show This Field option in the field settings panel on the left.
- Choose When to open the Conditional Logic Builder.
- Specify the conditions that will trigger the field to appear. For example, set a field to appear when a Choice field equals a specific value.
The field will now appear only when your specified conditions are met. The person filling out the form won’t see any indication that hidden fields exist. They simply see a clean, streamlined form tailored to their answers.
Group related conditional fields into sections. When you set an entire section to show or hide based on conditions, all fields within that section follow the same rule automatically. If you have multiple related questions that should appear together, this will save you time when building or updating your form.
When to use this approach
Show/hide logic works best for straightforward branching scenarios where you need to:
- Collect relevant follow-up information. When someone selects “Other” in a Choice field, automatically show a Text field asking them to specify their answer. This keeps your form clean for most people while capturing additional details when needed.
- Skip irrelevant sections. Hide entire groups of questions that don’t apply based on initial responses. For example, skip shipping address fields for digital products, skip homeownership questions for renters, or omit payment plan options when someone pays in full.
- Personalize based on who is completing the form. Show different sets of questions for customers versus partners, new clients versus returning clients, or students versus professionals (all without creating separate forms).
Method 2: Branching to Different Pages
When you have a multi-page form, you can guide customers through completely different paths depending on their answers, with each path showing only the relevant pages. Instead of hiding a few fields here and there, page branching creates entirely separate experiences where different people see a different sequence of pages. Someone who answers “new patient” might see five pages, while someone who answers “follow-up appointment” might see just two, all from the same form.

Setup steps
- Add Page Break fields to divide your questionnaire into multiple pages.
- Select one of the Page Break fields you added and find the Show Next Page option in the field settings.
- Choose When to open the Conditional Logic Builder.
- Set conditions for when that specific page should appear. For example, make a “New Patient Information” page appear only when someone selects “New Patient” from an earlier Choice field.
- Repeat this process for each page that should appear conditionally.
Progress bars help people track their progress throughout forms with multiple pages, even when different people see different sets of pages. Cognito Forms automatically adjusts page numbers and progress indicators based on each person’s unique path, so everyone has a smooth form experience.
You’ll find progress bar and page count settings under the Form Settings tab in the top left of the Build page.
When to use this approach
Page branching excels at handling complex scenarios where different audiences need substantially different experiences:
- Route by category or role. Direct job applicants to pages with questions about their specific role based on the position they select at the beginning. Technical roles see technical assessment pages, while management roles see leadership evaluation pages. Similarly, order forms can show different product configuration pages based on the item category selected.
- Customize based on inquiry type. Show entirely different pages for different purchase types, service offerings, or appointment types. An order form can present different shipping option pages for domestic versus international orders, or different warranty pages based on product category.
- Create different paths for surveys or feedback forms. Send satisfied customers down one path with detailed feedback questions, while dissatisfied customers follow a different path focused on problem resolution and service recovery.
Method 3: Conditionally Requiring Fields
Make certain questions required or optional based on previous responses, ensuring you collect necessary information only when it’s actually needed. This approach adds another layer of intelligence to your questionnaire by adapting not just what fields appear, but whether they must be completed. A field can be visible but optional in one scenario, and visible but required in another.

Setup steps
Setting up conditionally required fields is done very similarly to how show/hide logic is set up:
- Select the field you want to conditionally require.
- Find the Require This Field option in the field settings.
- Choose When to open the Conditional Logic Builder.
- Set the conditions that make the field required. For example, require a phone number only when someone selects “Call me to schedule.”
When to use this approach
Conditionally required fields work best when you need to:
- Gather supporting documentation conditionally. Make File Upload fields required only when someone indicates they need to provide additional information, such as proof of purchase for warranty claims or receipts for expense reimbursement.
- Request specifics on “Other” selections. Require explanation fields only when people select “Other” from predefined choices. This lets you offer common options without forcing people to type when their answer fits a standard category.
- Ensure compliance based on selections. Require acknowledgment or consent fields only when someone chooses options that trigger regulatory requirements. For example, require HIPAA consent only when patients request records be sent to a third party, or require acceptance of terms only for paid orders.
Method 4: Reference Previous Answers in Later Questions
Insert answers from earlier questions directly into later field labels, creating conversational, personalized forms. Also known as “text piping” or “question piping,” this method displays what someone already told you within your follow-up questions, making the form experience feel intelligent and attentive.
Instead of generic questions like, “Rate your satisfaction with this product,” you can ask specific and more personalized questions, such as: “Rate your satisfaction of your [Plan Name].” The form remembers what they chose and references it, creating a natural and contextual experience.

Setup steps
- Click into the field where you want to reference a previous answer.
- Click in the field label and use the Insert Field option to add a previous field’s value directly into the question’s text.
- Examples: “How was your experience with
[DoctorsName]?” or “How many[ProductName]do you need installed?”
- Examples: “How was your experience with
- For the best results and the most professional experience, set this follow-up field to only appear after the first question is answered using Show This Field → When conditional logic.
The referenced value updates instantly as people fill out the form. If they change their answer to the first question, any fields that reference it automatically update to reflect the new selection.
Text piping works with any field type, not just Choice fields. Reference Name fields in email confirmations (“Thanks, [FirstName]!”), insert dates into scheduling questions (“Your appointment on [PreferredDate] has been confirmed”), or pull in numbers for calculations (“You requested [Quantity] units at $[UnitPrice] each”).
When to use this approach
Referencing previous answers creates more engaging, personalized experiences when you need to:
- Create conversational follow-up questions. After someone selects a service type, reference it in subsequent questions: “How many pages will your
[ServiceType]project require?” This reinforces their responses and makes the form feel attentive to their specific needs. - Personalize confirmation messages. Display customized summaries that reference their specific choices: “Your order for
[ProductName]in[SelectedColor]will ship to[ShippingAddress].” People can verify their selections at a glance without re-reading generic field labels. - Reduce confusion in complex forms. When forms have many conditional paths, referencing previous answers helps people remember their path: “Based on your
[CompanySize]selection, these pricing tiers are available to you.” This contextual reminder keeps them oriented throughout longer forms. - Build form engagement. Make form questions feel specific to each respondent: “Earlier you rated our customer service as
[ServiceRating]. What could we do to improve that rating?” Referenced answers make generic forms feel like personalized conversations, increasing completion rates.
Additional Features to Enhance Dynamic Forms
Once you’ve built your form, these additional features enhance the experience even further:
- Automate conditional email notifications. Send different confirmation messages or route submissions to different team members based on form responses. Route urgent requests to immediate response teams while standard inquiries follow normal processing or send order confirmations with different details based on product type.
- Lookup fields for dynamic, reusable choice lists. Create a single list form (like a product catalog or location directory) and reference it across multiple forms using Lookup fields. When you update the source list, all forms referencing it update automatically. Combine this with conditional logic to filter which choices appear based on previous answers. For example, show only products in the selected category or display only team members from the chosen department.
Start Building Forms with Conditional Logic Today
You no longer have to overwhelm people with irrelevant questions that don’t apply to their situation. By adding Conditional Logic to your forms, you’ll collect better data, reduce form abandonment, and deliver personalized experiences that respect everyone’s time.
Start building your first form with conditional logic today. The Conditional Logic Builder in Cognito Forms makes it simple to create sophisticated branching without any coding.
FAQ
You can layer multiple conditions using “and/or” logic to create sophisticated branching scenarios. The conditional logic builder supports unlimited combinations, letting you show fields based on multiple previous answers, numeric ranges, date comparisons, or any combination of factors. Start simple with single conditions and add complexity as you test and refine your form.
Yes, use the Preview feature in the form builder to test your conditional logic before going live. Preview mode lets you fill out your form as a user would, showing exactly which fields and pages appear based on different answer combinations. Test multiple paths by entering different responses to verify your logic works as intended.
Yes, every field type has some level of Conditional Logic available. You’ll find our powerful conditional logic builder available throughout the form builder wherever you see a “When” option available within a field’s settings.
Some fields have all types of logic (Show This Field, Require This Field, and Read-Only), while others only have Show This Field logic available. This is due to field-type limitations, such as Calculations being Read-Only by default and calculating in the background automatically.