Require a deposit up front and collect the balance later. No manual invoicing, chasing customers, or switching tools.
Build Time & Skill
20-30 min
Intermediate
What you'll learn
How to set up a deposit payment flow on your form using one of two methods: Card on File (Stripe or Square) or a second payment form (works with PayPal too).


Collecting a deposit protects your business and confirms customer commitment before you invest time or resources. Whether you run a service business, take event bookings, or manage project-based work, deposits give you a reliable way to secure revenue upfront while giving customers a flexible payment option. Cognito Forms lets you build this directly into your payment form – no third-party tools required.
Taking deposits with Cognito Forms helps you:
- Reduce no-shows and cancellations. A financial commitment upfront gives customers more reason to follow through.
- Improve cash flow. Collect partial payment at booking and the balance at completion, without manual billing.
- Give customers a choice. Let customers decide whether to pay in full or put down a deposit, all from the same form.
- Automate the balance collection. The remainder owed is tracked automatically, so nothing slips through the cracks.
Two Ways to Collect Deposits
Cognito Forms gives you two methods for collecting deposits, depending on your payment processor and how you want to handle the balance. Both methods let customers choose between paying in full or paying a deposit at checkout – the difference is how the remaining balance gets collected later.
| If you use… | Use this method |
|---|---|
| Stripe or Square | Method 1: Card on File |
| PayPal – or prefer a separate form for the balance | Method 2: Second Payment Form |
Method 1: Collect a deposit with Card on File
With the Card on File method, customers pay their deposit at checkout and their card is saved securely in Stripe or Square. When it’s time to collect the balance, you can simply charge the card on file.
This method works best when you want a streamlined experience for both you and your customer. The entire process happens on one form.
Set up your form
-
Connect your Stripe or Square account to your form.
-
Set up your payment form:
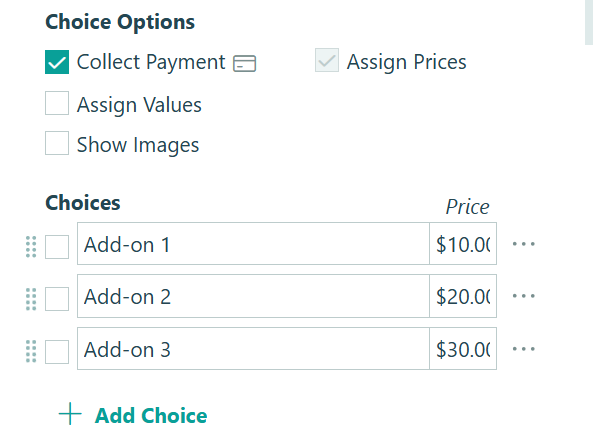
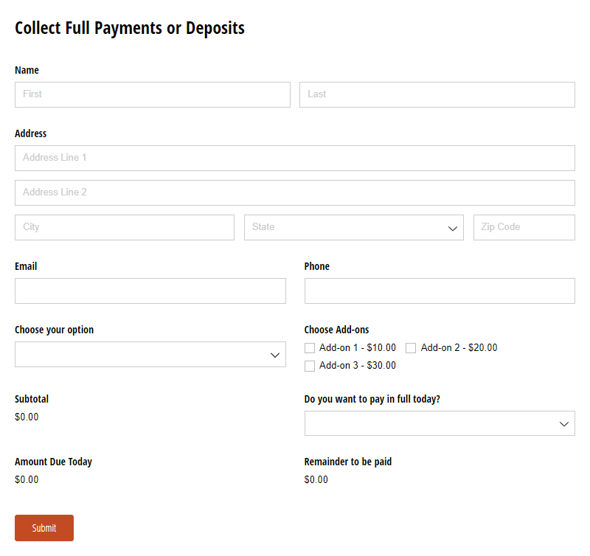
- Start from scratch or use the Collect Full Payments or Deposits template.
- If building your own, add the fields customers will choose from (like services or add-ons) and toggle on Collect Payment under Choice Options for each payment field.
-
Add a Calculation field, set it to the Currency type, and label it Subtotal. Set the calculation to add up all payment fields on your form. For example:
=ChooseYourOption_Price+ChooseAddons_Price -
Add a Choice field to ask the customer how they want to pay. For example: “Pay Total Now” or “Pay Deposit (50% of Total)”
Configure payment logic
-
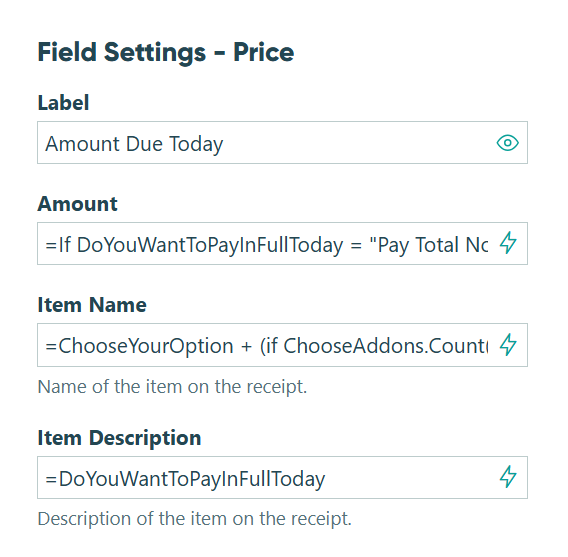
Add a Price field and label it Amount Due Today. Use a conditional calculation to charge the full amount or the deposit based on what the customer selected. For example:
=If DoYouWantToPayInFullToday = "Pay Total Now" then (Subtotal) else if DoYouWantToPayInFullToday = "Pay Deposit (50% of Total)" then (Subtotal)/2 else 0
-
Set the Item Name to reflect the customer’s selections. For example:
=ChooseYourOption + (if ChooseAddons.Count()>0 then " with " +ChooseAddons else null). Set the Item Description to reflect the payment option chosen. For example:=DoYouWantToPayInFullToday -
Add another Calculation field (Currency type) and label it Remainder to Be Paid. Set it to display the balance only when the customer chose a deposit. For example:
=if DoYouWantToPayInFullToday = "Pay Deposit (50% of Total)" then (Subtotal)/2 else 0 -
In Payment Settings, set Keep Card on File to When and add a condition so the card is only saved when the customer chooses to pay a deposit.

Charge the balance when you’re ready. Once a card is on file, you can charge the remaining balance directly from the entry in Cognito Forms. Learn more about collecting Card on File payments.
When to use this method
- Service bookings with a hold. Collect a deposit to reserve a date or slot, then charge the balance after the service is complete.
- Project-based work. Take a 50% deposit at the start of a project and charge the rest upon delivery — all without manually tracking what’s owed.
- Catering or event orders. Secure orders with a deposit well in advance, then charge the final amount closer to the event date.
- Recurring clients. Keep a card on file for clients who order regularly, making future charges faster and easier.
Method 2: Collect a deposit with a second payment form
With the Second Payment Form method, customers pay their deposit on the first form. When it’s time to pay the balance, they visit a second form, enter their email address, and the form automatically pulls in their name, address, and remaining balance from the original submission.
This method works with any payment processor (including PayPal) and is a good option if you prefer to keep each payment as a separate transaction.
Set up your forms
- Build your first payment form by completing the steps in Method 1 above. This form handles the deposit and calculates the remaining balance.
- Create a new form for the balance payment. Add an Email field where customers will enter the same email they used on the first form.
Configure the Lookup field
-
Add a Lookup field. Under Look Up Choices From, select your first payment form. For the Choice Label, use the Insert Field dropdown to select the Email field.
-
For the Include option, set the Email field on your first form to equal the Email field on this form. Set the Default Choices option to the same condition. This ensures the lookup matches customers by their email address.

-
Set the Lookup field to show Internally or Never so customers won’t see it.
-
In your Email field settings, select Show Custom Error – When and add a condition to display an error if the email doesn’t match any record on the first form. For example:
=(Lookup.Email != Email) -
Add a custom error message so customers know what to do if there’s a mismatch. For example: “We could not locate your email address. Please try a different address.”

Add payment detail fields
- Add Textbox fields for Name and Address. Set both to Read-Only – Always and use the Default Value setting to pull the information from the first form. For example:
=Lookup.Name.FirstAndLastand=Lookup.Address - Add a Price field for the balance. Set the Amount to reference the Remainder to Be Paid field on your first form. For example:
=LookupEmail.RemainderToBePaid - Set the Item Name to match the selections from the first form. For example:
=Lookup.ChooseYourOption + (if LookupEmail.ChooseAddons.Count()>0 then " with " +Lookup.ChooseAddons else null). - Set the Item Description to something like “Second payment”.

Share the second form link proactively. Consider sending the balance payment form link in an automated email notification after the customer submits the first form. This gives customers everything they need to complete the second payment without having to ask you for a link.
When to use this method
- PayPal users. Card on File isn’t available with PayPal, so this method gives you a clean way to collect balances with any processor.
- When you want separate transaction records. Each payment appears as its own transaction in your payment processor, which can simplify accounting and reporting.
- Businesses that invoice in stages. Send the second form link at a natural milestone (project completion, delivery, or service date) rather than charging automatically.
- Teams that prefer manual control. You decide when to share the balance form, giving you flexibility over timing without setting up automatic card charges.
Enhance Your Deposit Workflow
Once your deposit setup is running, these Cognito Forms features can take it further:
- Send automated email confirmations. Use email notifications on your Submit action to send customers a receipt with their deposit amount, balance owed, and the link to pay the remainder later.
- Use Guest Access to give customers a self-service payment portal. Instead of manually sending balance form links, invite customers to log in and view their submissions, track payment status, and complete outstanding payments on their own schedule.
- Add coupons or discounts. Use coupons and discounts to offer promotional pricing on the total before the deposit amount is calculated.
- Generate a payment summary document. Use Document Templates to automatically generate a PDF receipt or invoice that includes the deposit paid, balance remaining, and service details – ready to send to the customer.
Start Collecting Deposits Today
Deposits don’t have to mean extra admin work or awkward follow-up emails. With Cognito Forms, the entire process (from collecting the deposit to tracking the balance) is built into your form. Pick the method that fits your payment processor and get started with the Collect Full Payments or Deposits template.
Collect Full Payments or Deposits
- Accept full payments or deposits with a free, ready-to-use template
- Securely store card info with Stripe or Square via Card on File
- Customize and embed on your website to start collecting payments
FAQ
Yes. The deposit amount is fully customizable. Use a conditional calculation in your Price field to set any fixed amount or percentage as the deposit. For example, you could collect a flat $100 deposit or charge 25% of the total – whatever makes sense for your business.
Yes, if you include the Remainder to Be Paid Calculation field on your form. You can also include this amount in the confirmation email so customers have a clear record of what’s due and when. Making this field read-only ensures customers can see it but can’t change it.
No. You can use a single payment form with Choice fields to let customers select from multiple products or services. The deposit calculation adjusts automatically based on what they choose. Only the payment processor method determines whether you need a second form – not the number of options on your form.