Get sign-off from multiple people at once – no waiting, no bottlenecks, and no chasing approvers in sequence.
Build Time & Skill
20-30 min
Intermediate
What you'll learn
How to build a job offer approval form that collects signatures from two approvers simultaneously, then automatically marks the workflow complete when both have signed.

Most approval processes force people to wait. One approver must finish before the next can start, so a single delayed signature can put the entire process on hold. A parallel approval workflow eliminates that problem by allowing multiple approvers to act simultaneously, in any order, so nothing stalls when someone is out of the office or slow to respond.
In Cognito Forms, you can build a parallel approval workflow using a single form. Each approver gets a secure, role-based link to the form that shows exactly what they need to sign, with everything else either read-only or hidden. The workflow automatically moves to Complete once every required approval is in – with no manual tracking on your part.
This setup is ideal when you need to:
- Collect independent sign-offs simultaneously. Both parties receive their approval request at the same time and can respond whenever it works for them.
- Protect sensitive details by role. Each approver only sees what’s relevant to their decision, not each other’s sections or internal HR data.
- Automate completion. Conditional logic detects when all required signatures are filled and closes the workflow automatically.
Step-by-Step: Building a Job Offer Approval Workflow
In this guide, you’ll build a Job Offer Approval workflow. HR submits a job offer for review, and the form is automatically sent to both the Hiring Manager and the Department Head for signatures. Either approver can sign at any time – they don’t need to wait for the other. Once both signatures are collected, the workflow completes automatically.
Want a head start? You can follow along using our pre-built Job Offer Approval template.
Step 1: Set Up Your Roles
Start by assigning a Role to each person involved in your workflow. Roles are the foundation of your workflow – you’ll reference them in your form sections, field visibility settings, and action logic throughout the rest of the process.
- Open your form and navigate to Workflow on the Build page.
- Click Roles.
- Add the following four Roles:
| Role | Role Type | Who It Represents |
|---|---|---|
| HR | Public | The person submitting the job offer for approval |
| Hiring Manager | Other | First approver that signs off on the candidate |
| Department Head | Other | Second approver that signs off in parallel with the Hiring Manager |
| Internal | Internal | HR admin team with full entry access |

Step 2: Configure Your Statuses
Statuses keep everyone informed about where a job offer stands in the approval process.
- In Workflow, click Statuses.
- Add or rename Statuses to match the following:
| Status | What It Means |
|---|---|
| Incomplete | Default Status – HR has started but not yet submitted the job offer |
| Submitted | The job offer has been sent to both approvers and is awaiting signatures |
| Complete | Both the Hiring Manager and Department Head have signed; the workflow is finished |
Next, configure the Complete status to trigger automatically. Open the status and set Automatically Assign Status to When, then apply the following condition:
| Status | Condition |
|---|---|
| Complete | Hiring Manager’s signature is filled out AND Department Head’s signature is filled out: =(HiringManagerApproval.Signature.Svg != null and DepartmentHeadApproval.Signature.Svg != null) |
This automatic status transition is what makes the parallel workflow feel seamless. The moment the last approver signs, the entry automatically moves to Complete.

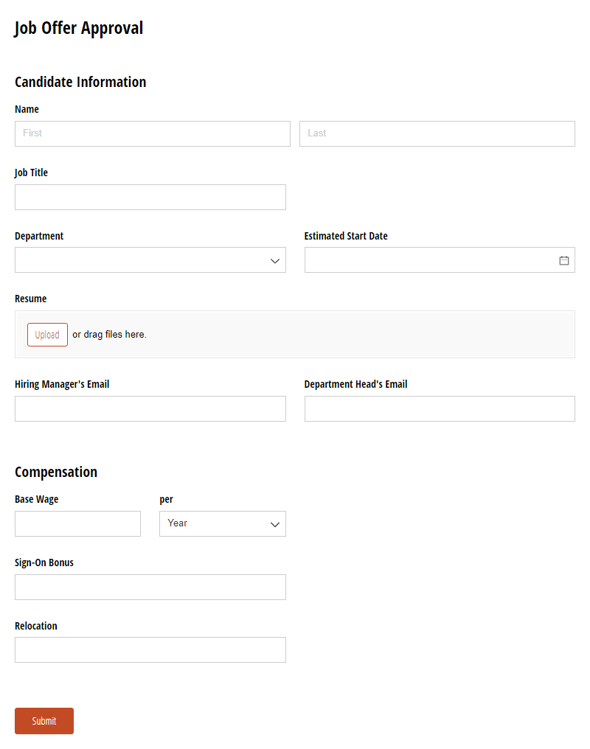
Step 3: Build Your Form Sections
The Job Offer Approval form is organized into four sections. Using sections lets you apply Read-Only and visibility settings to multiple fields at once, rather than configuring each field individually.
On the Build page, create the following sections in order:
- Candidate Information – Name field, File Upload field for resume, and other offer details filled out by HR. Include Email fields for the Hiring Manager and Department Head.
- Compensation – Currency fields for Base Wage, Sign-On Bonus, and Relocation
- Hiring Manager Approval – Signature field for the Hiring Manager and Date field with a Default Value
=if HiringManagerApproval.Signature.Svg != null then DateTime.Today else "" - Department Head Approval – Signature field for the Department Head and Date field with a Default Value
=if DepartmentHeadApproval.Signature.Svg != null then DateTime.Today else ""

Step 4: Configure Field Visibility by Role
Once your sections are in place, configure who can see and edit each one. This is what gives each person in the workflow a unique view of the same form.
For the Candidate Information and Compensation sections:
- Set Read-Only to For Roles > Hiring Manager + Department Head
This ensures HR can fill out these sections when submitting, but both approvers see the information as read-only.

For the Hiring Manager Approval section:
- Set Show This Section to For Roles > Hiring Manager + Internal
The Hiring Manager sees their own signature section. Internal (HR admin) can see it too for record-keeping. The Department Head never sees this section.
For the Department Head Approval section:
- Set Show This Section to For Roles > Department Head + Internal
The Department Head sees their own signature section. Internal can see it. The Hiring Manager never sees this section.
Step 5: Configure Your Actions
With Roles, Statuses, and field visibility in place, you can now configure the actions that move the workflow forward and trigger email notifications. This workflow uses three actions: Submit, Approve, and Update.
Submit Action
The Submit Action starts the workflow. HR uses it to send the completed job offer to both approvers simultaneously.
- Add the Submit Action in Workflow > Actions.
- Configure the following settings:
- Allow Action: Select When > set condition to
=(Entry.Status = "Incomplete"). This ensures only HR can initiate the workflow. - Change Status To: Select Submitted.
- Send Emails: Create two separate email notifications: one for each approver. The emails are identical in structure, but sent to different recipients with different workflow links.
- Email 1 – Hiring Manager Notification:
- Set To to the Hiring Manager’s email field (or a static address).
- Click Share Workflow Link next to the To field and select the Hiring Manager Role.
- Write a subject and message requesting their approval signature.
- Email 2 – Department Head Notification:
- Set To to the Department Head’s email field (or a static address).
- Click Share Workflow Link next to the To field and select the Department Head Role.
- Write a subject and message requesting their approval signature.
- Email 1 – Hiring Manager Notification:
- Allow Action: Select When > set condition to

Approve Action
The Approve Action is what each approver clicks after filling out their signature. It also triggers the completion notification to HR once both signatures are collected.
- Open the Approve Action (or create it) in Workflow > Actions.
- Configure the following settings:
- Allow Action: Select When > set condition to
=(Entry.Status = "Submitted"). This makes the button available to both approvers as soon as the job offer is submitted. - Send Emails: Create one conditional email notification to HR.
- Set To to the HR submitter’s email field.
- Set the Send When condition to trigger only when both signature fields are filled.
- Click Share Workflow Link next to the To field and select the Internal Role.
- Write a subject and message notifying HR that both approvals are complete.
- Allow Action: Select When > set condition to

Update Action
The Update Action allows HR admins to make corrections to a job offer entry when needed.
- Open the Update Action in Workflow > Actions.
- Configure the following setting:
- Allow Action: Select For Roles > Internal. This restricts updates to HR admins only – approvers cannot modify the job offer details.

Additional Features
Once your parallel approval workflow is running, these Cognito Forms features can help you get even more out of it:
- Task Views: Set up a Task View on the Entries page for HR admins so they can see all in-progress job offers in one place – filtered by status and shared with the current user.
- Workflow Link Authentication: Require approvers to verify their identity before accessing the form. Enable this under Workflow > Workflow Link Sharing > Require Authentication for an added layer of security on sensitive offers.
- Task Reminders: Configure automated reminder emails that nudge approvers if they haven’t signed within a set number of days – no manual follow-up required.
Start Building Your Parallel Approval Workflow
Parallel approvals remove the single biggest bottleneck in multi-person review processes: waiting. With Cognito Forms, you can collect independent sign-offs simultaneously, protect sensitive information by Role, and let conditional logic handle the rest.
Start with the Job Offer Approval template and customize the Roles, sections, and notifications to match how your approval process actually works.
Job Offer Approval Form
- Routes job offer approvals to two approvers simultaneously
- Automatically emails approval links
- Fully customizable to fit your existing workflow