Authenticated forms let you control who can access your forms and entries by requiring users and guests to log in. Use authentication to ensure the identity of participants, create personalized form experiences, and give external guests secure access to their own submissions.
Authentication settings do not apply to embedded forms, and authenticated forms cannot be prefilled.
Setting up users and guests
Organization members
Organizations on the Pro, Team, and Enterprise plans can add additional users. Your account must have Owner or Administrator permissions to invite new users.
Organization members are people with a Cognito Forms account who have access to your organization. Before you invite a new user, you must set their permission level. If you want to grant access to authenticated links without allowing them to build forms or manage entries, set their permission to Limited Access.
Once you invite a user, they’ll receive an email to accept the invitation. If you shared an authenticated link with someone before they accepted, they can access the form as soon as they join your organization.
Guests
Guests are external participants who log in to your organization’s guest portal to access forms and entries shared with them. You can give guests access by sending them an authenticated Save & Resume or Public Workflow link, or by setting up a guest list. Learn more about Guest Access.
Requiring authentication
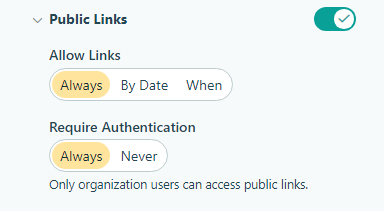
Public links

When you require authentication for public links, only logged-in users and guests can access your form. To enable authentication for public links:
- In the sidebar, hover over the form name and select Build Form.
- Select Workflow at the top of the form builder.
- Select Public Links from the Workflow menu and set Require Authentication to Guests & Users or Users Only.
- Save your form.
If your form is embedded on another webpage, requiring authentication for public links will replace the embedded form with an Open Form link.

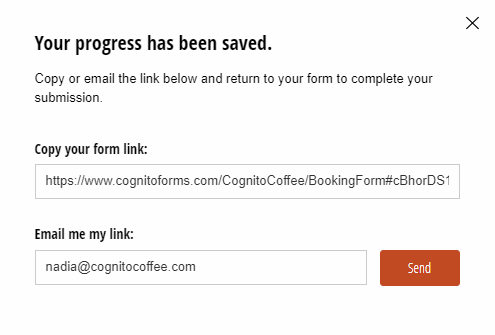
Save & Resume
The authentication settings for public links also apply to Save & Resume links. When authentication is required, the email address in the Save & Resume dialog is automatically populated with the user’s email address, and users must be logged in to access their saved form.
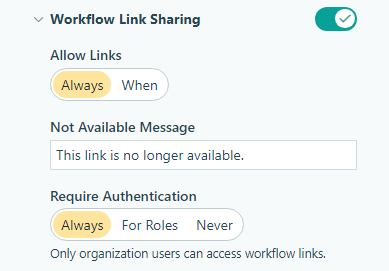
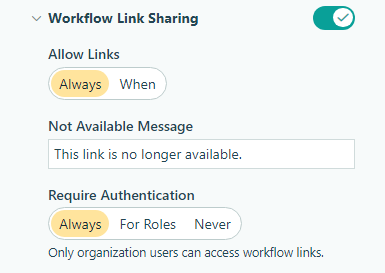
Workflow links
You can require authentication for workflow links to ensure the identity of workflow participants and prevent unauthorized access.
- In the sidebar, hover over the form name and select Build Form.
- Select Workflow at the top of the Build page.
- Select Workflow Link Sharing from the Workflow menu and set Require Authentication to Always or For Roles to only require authentication for specific roles.
- Save your form.
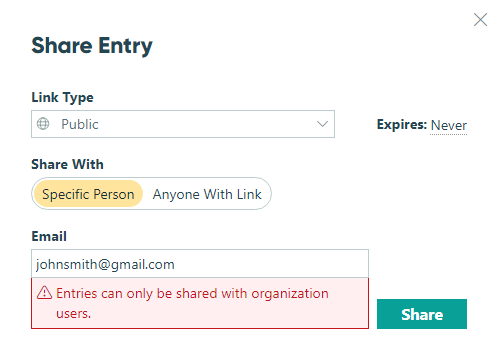
When authentication is required for workflow links, users must be logged in to the Cognito Forms account associated with that workflow link. Additionally, when you use the Share Entry option on the Entries page, you cannot share workflow links with users outside of your organization.
Testing authentication
Once you’ve enabled authentication, you can open the form preview to see how the form appears to logged-in organization members. To see how the form appears to guests or users who aren’t logged in, open the public link or workflow link in a private/incognito browser window.
The form preview is especially useful when you’re prepopulating fields with a member’s information (like name and email). You can reference values like name and email in calculations to create a seamless experience for workflow participants.
Entry.User.Name– Displays the name (first and last) associated with the user’s account.Entry.User.Email– Displays the email address associated with the user’s account. The email address can be a unique identifier in cases where users share the same name.
Creating authenticated workflows
Only allow organization members to access the form
- Select Workflow at the top of the Build page.
- Select Public Links from the Workflow menu.
- Set Require Authentication to Always.
Require authentication for all workflow participants
- Select Workflow at the top of the Build page.
- Select Workflow Link Sharing from the Workflow menu.
- Set Require Authentication to Always.
When you require authentication for workflow links, users must be logged in to the Cognito Forms account associated with that particular workflow link in order to access the form.
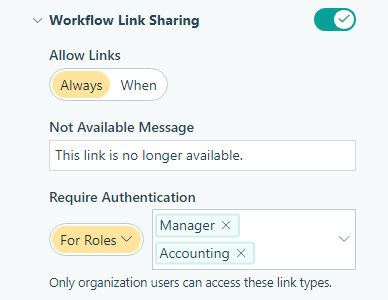
Require authentication for specific workflow roles
- Select Workflow at the top of the Build page.
- Select Workflow Link Sharing from the Workflow menu.
- Set Require Authentication to For Roles and select the relevant roles.
Show user-specific details when authenticated users access the form
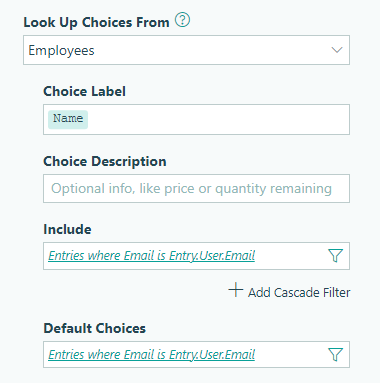
Organizations on the Team and Enterprise plans have the ability to create data lookups.
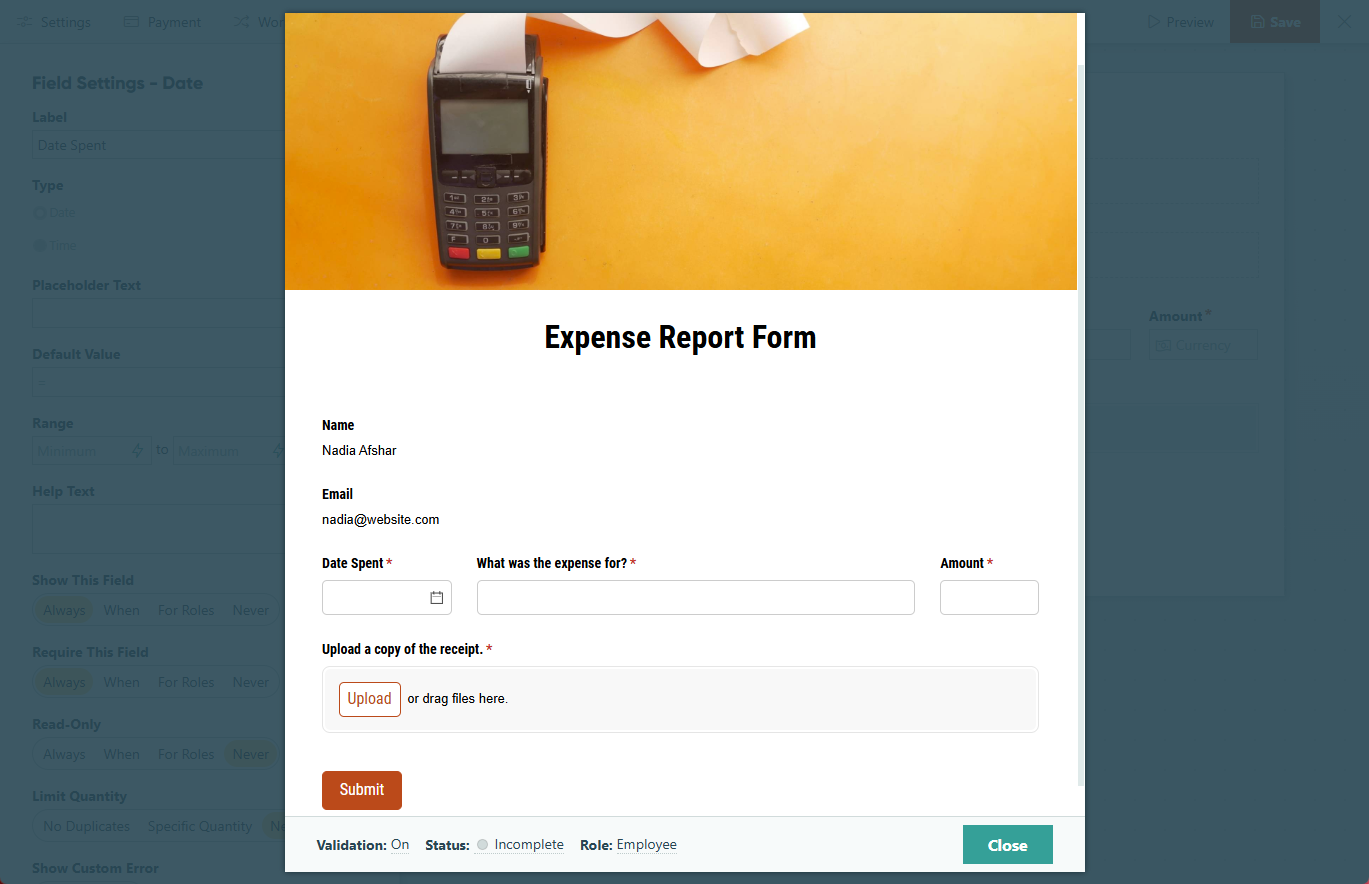
In some cases, you may want to prepopulate certain values (like name and email) for authenticated users. Using the Lookup field, you can pull information from one form (ex: an employee database) to another form (ex: an expense report form).
-
Select Workflow at the top of the Build page.
-
Select Public Links from the Workflow menu.
-
Set Require Authentication to Always.
-
Add a Lookup field to the form. In this case, we’re looking up information from list of employees.
-
Set Include and Default Choices to only include entries where the email address value from the Employees database form matches the authenticated user’s email address (
Entry.User.Email).

-
Set the Read-Only option for the Lookup field to Always.