Roles enable you to customize a form based on who is working with the form and its entry. You can use roles to drive your workflows in a number of ways, including:
- Sending secure, role-based workflow links via email
- Conditionally showing fields or sections based on role
- Allowing actions for specific roles
- Setting fields as required or read-only
Role Type
When considering those involved in your workflow, it’s helpful to specify each person’s responsibility in the process and how that informs their relationship to entry data. As a best practice, you’ll want to assign a role for each person involved in your workflow.
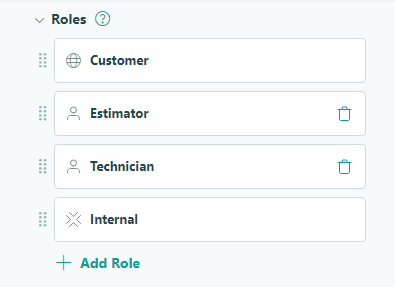
A workflow within Cognito Forms will include one Public role and one Internal role by default. You can assign as many Other role types as needed.
Public Roles
The Public role type is the default role for new form submissions. In other words, think of this role as an individual who kicks off the workflow process by submitting a new entry. Only one role can be assigned as a Public role type.
Internal Roles
The Internal role type is the default role for new entry views, meaning this role represents an individual who will be on the receiving end of an entry. Only one role can be assigned as an Internal role type.
Other Roles
The Other role type is available for any other individual that needs to be involved in the workflow after an entry has been submitted. As with all roles, you’ll be able to assign Other roles conditional form visibility, allow for specific actions, and share role-based workflow links.
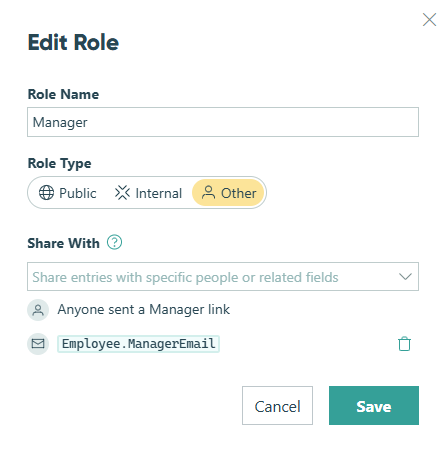
Share With
Choose how you want to share entries with people in this role:
- Entries are automatically shared with anyone sent a workflow link for that role.
- Select a member of your organization to share entries with.
- Select an Email field on the form (or an Email field connected via Lookup field) to share entries with.
- Select a Person field on the form to share entries with.
Adding a role
There is a maximum limit of 20 roles within a workflow.
You can add, change or remove roles from the Build page of your form:
- In the sidebar on the left, hover over the form name and select Build Form to open the form builder.
- Click Workflow in the top toolbar. Within the Workflow menu, click Roles. To edit an existing role, click on the name of the role type. To add a new role, select + Add Role. Each role name must be unique.
- For Role Type, select whether the role should be Public, Internal or Other.
- Click Save.
To rearrange the order of your roles, simply click and drag the role name within the Workflow menu. The order in which your roles appear won’t impact your workflow, however reordering them may be helpful in thinking through your process.
Changing a role
If you need to change the name of a role at any point within your workflow, you’re able to do so within the Workflow menu. All calculations and conditional logic will automatically update with the new name of the role once your changes have been saved.
If you need to change the type of a role between Public, Internal or Other, just remember to update any existing email notifications to include the adjusted role-based workflow link as needed.
Deleting a role
Before deleting a role you’ll want to consider if it’s referenced by anything within your workflow, such as:
If a role is included in a calculation or conditional logic, the calculation or logic referencing the deleted role will continue to work with the exception of the deleted role. Additionally, any existing workflow links for the deleted role will no longer work. Any document templates that reference a deleted role will default to display for the Public role instead.
To delete a role, click the trashcan icon next to the role name. Please note that roles that have been assigned as Public or Internal cannot be deleted.
Reviewer Roles
The Reviewer role is only relevant to forms created prior to September 26, 2022.
If you see a Reviewer role type under Roles in your Workflow settings, this means you had previously sent a View Link related to your form. Reviewer roles are reserved for these past read-only links, and will therefore default to a read-only view when the role is referenced throughout your workflow.