Describe your form in plain language and AI builds it for you — fields, conditional logic, and email notifications included. Connect Claude or ChatGPT to your Cognito Forms account and go from idea to live form in minutes.
Build Time & Skill
10-15 min
Intermediate
What you'll learn
How to connect Claude or ChatGPT to your Cognito Forms account and use plain-language prompts to build a complete form — fields, conditional logic, and notifications included.


Building a form from scratch means making a lot of small decisions before your form is ready for anyone to use (like what types of fields to use, whether to require fields, and setting up email notifications). With the Cognito Forms MCP Connector, you can save time by skipping a lot of that. Connect your account to Claude or ChatGPT, describe what you need, and AI builds the form directly in Cognito Forms.
This approach works especially well when you:
- Know what your form should do, but not how to configure it. AI translates your description into a complete, structured form.
- Want to move faster. Describing a form takes less time than clicking through several fields and setting i up manually.
- Need complex workflow steps and email notifications. AI sets these up as part of the initial build, no matter the process or complexity.
Don't use Claude or ChatGPT? Try our AI form generator instead.
Our AI form generator can get you started just as quickly.
Don't use Claude or ChatGPT? Try our AI form generator instead.
Our AI form generator can get you started just as quickly.
What Is the Cognito Forms MCP Connector?
The Cognito Forms MCP Connector links your AI assistant (like Claude or ChatGPT) directly to your Cognito Forms account. Once connected, you describe what you want in plain language, and AI handles the build. This includes creating forms, configuring fields, setting up notifications, and more. You don’t don’t have to write code or spend time building the form yourself.
Your AI assistant only sees what you can see based on your account access, and existing form validation rules and user permissions still apply.
Before you connect, confirm:
- Your organization is on a Pro, Team, or Enterprise plan.
- You have Admin access to the organization you want to connect.
- You have a paid account in Claude or ChatGPT (requirements vary by app).
Keep in mind: Actions performed through the connector use API requests, which count toward your organization’s usage. Downloading files or documents will use more API requests than standard queries. See Integration billing for details.
Step-by-Step: Building a Form with AI
Connect your account, describe what you want, review and refine what AI builds, then publish your form. These five steps walk you through the full process, from initial setup to a live form ready to collect submissions.
Step 1: Connect AI to your Cognito Forms account
Before you can build fillable forms with AI, connect your Cognito Forms account to your AI tool of choice. You’ll only need to do this once. Then, you’ll enable the connector directly in the conversation with your chosen AI tool.
The steps vary slightly depending on whether you use Claude (available now) or ChatGPT (coming soon). Use one of the set of instructions below, or create a custom MCP connection.
Availability Note: Creating forms in ChatGPT will be available soon.
Follow these steps to add the Cognito Forms app in ChatGPT:
- Click your account banner and open Settings.
- Click Apps and search for
Cognito Forms - Select Cognito Forms and click Connect.
- Sign in to your Cognito Forms account if prompted.
- Select your organization and authorize the connection.
Once connected, your integration appears in the Integrations section of your Organization Settings.
Follow these steps to add the Cognito Forms connector in Claude:
- Click the Customize icon (looks like a briefcase) and select Connectors.
- Click + Add Connector and search for Cognito Forms.
- Select Cognito Forms and click Connect.
- Choose your organization and click Authorize.
Once connected, your integration appears in the Integrations section of your Organization Settings.
Follow these steps to set up a custom MCP connection in another AI app:
- In your AI app, add a custom connector or MCP connection.
- Enter the Cognito Forms server URL:
https://mcp.cognitoforms.com/mcp - Set the OAuth Client ID:
366c9904-def2-451a-af2f-8e08d751088c - Log in to your Cognito Forms account when prompted.
- Select your organization and click Authorize Organization.
Once connected, your integration appears in the Integrations section of your Organization Settings.
Visit our support page for more information on our MCP connector and watch a tutorial on adding our ChatGPT App or Claude Connector.
Step 2: Describe the form you want


Start a new conversation and tell your AI assistant what you want to build. You don’t need technical language. Describe your form the way you’d explain it to a colleague. The more context you include upfront, the closer AI gets on the first pass, and the less back-and-forth you’ll need afterward.
What to include in your prompt:
- Your form’s purpose: Tell the AI what the form is for and who fills it out.
- The fields you need: If you know what information you want to collect, tell it exactly that. It’s okay if this is a rough guess for now because you can iterate on the form afterwards.
- Workflow details: Give many details to help the AI include confirmation emails, internal notifications, or follow-up approval steps for each submission.
- Required vs. optional fields: If certain fields should be required, let the AI know.
Prompting tips:
- Write it like you’re briefing a new hire, not typing a search query. Full sentences with context get better results than short keywords.
- Name your audience. “For new patients” or “for job applicants” helps AI choose the right field types and phrasing.
- Working from an existing form or document? Attach the file to your message. AI can use it as a starting point instead of building from scratch.
- Be specific about Workflow details. AI handles Workflow steps and email setup well, but only when you tell it what you need.
Prompt examples:
| Vague prompt | "Create a contact form." |
|---|---|
| Detailed prompt | "Create a contact form for a consulting firm. Include a field for their name, business email, phone number (optional), company name, and a larger text field to add additional details or a message. Their name and email should be required. When someone submits the form, send me a notification at hello@example.com. Also send the person who submitted the form an auto-reply letting them know we'll be in touch within one business day." |
| Vague prompt | "Build a job application form." |
|---|---|
| Detailed prompt | "Build a job application form for an office manager position at a small law firm. Include full name, email, phone number, years of relevant experience (dropdown), how they heard about the role (dropdown: LinkedIn, Indeed, referral, other), a short text field asking why they want to work with us, and a file upload for their resume. Name, email, and resume upload are required; all other fields are optional. Send me a notification to hello@example.com when a new application is submitted." |
| Vague prompt | "Build a job application form." |
|---|---|
| Detailed prompt | Build a job application form for an office manager position at a small law firm. Include full name, email, phone number, years of relevant experience (dropdown), how they heard about the role (dropdown: LinkedIn, Indeed, referral, other), a short text field asking why they want to work with us, and a file upload for their resume. Name, email, and resume upload are required; all other fields are optional. Send me a notification to hello@example.com when a new application is submitted. |
| Vague prompt | "Make a registration form for an event." |
|---|---|
| Detailed prompt | "Make me a registration form for a half-day professional development workshop with a cap of 40 attendees. Include full name, email address, job title, company name, session preference (morning, afternoon, or full day), and dietary restrictions (vegetarian, vegan, gluten-free, none). Close the form automatically when 40 people have registered. Send each registrant a confirmation email with the event date and location, and send me a notification to hello@example.com when a new registration comes in." |
| Vague prompt | "Create an online order form for customers to buy my products." |
|---|---|
| Detailed prompt | "Create an online order form for a bakery that sells custom cakes, cookies, and cupcakes. Add a repeating section where customers can select a product (custom cake, cookies by the dozen, cupcakes), enter a quantity, and include optional special instructions for that item. Include fields for pickup date, customer name, email address, and phone number — all required. Collect payment on the product selection field so customers pay at checkout. Send me an order notification email to hello@example.com when a new order is submitted." |
Step 3: Review what AI built


After AI generates your form, it will confirm what was created and give you a summary of the fields and workflow it configured. Click on the link it shares with you to open the form and review it directly in Cognito Forms.
What to check:
- Field names and type: Make sure the right input type was selected for each field. For example, is a “Name” field actually the Name field type or is it a Textbox field?
- Help text: Do fields that need help text have it? Do self-explanatory fields have help text they don’t need?
- Required fields: Are the right fields marked as required?
- Field order, sections, and pages: Does the grouping and order of fields make sense for the person filling it out? If the form is long, could it be helpful to break it up into multiple pages?
- Workflow and emails: Open the Workflow section of your form and confirm the Workflow Actions and Statuses make sense and that email notifications are in the right place with the right recipient(s).
AI generally gets the structure right. Be sure to carefully review details like exact field labels, specific dropdown options, and notification recipient email addresses before you go live.
Step 4: Refine with follow-up prompts
If something isn’t right, stay in the same conversation and ask for changes. Just describe what you want to adjust, and the AI will create a new form with your changes implemented.
Example refinements:
- “Add a section for billing information. Include company name, billing address, and preferred payment method.”
- "Group all fields that collect customer contact information into a “Contact Information” section.
- “Change the choices in the “Service Type” field to match the services on my website:
[URL HERE].” - “Adjust the Workflow to send our sales manager a notification when requests over $2k are submitted.”
Step 5: Customize and publish
You collaborated with AI to build the perfect form, and now it’s time to send it to your customers. After a few final customizations, you’ll be ready to collect submissions!
Design and style the form
Customize the appearance of your form to match your brand, event theme, or anything else you want. Here are a few highlights of what you can do when styling your form:
- Choose your own colors, backgrounds, fonts, and more.
- Upload your logo to show at the top of the form.
- Create custom style themes to save time and keep branding consistent.
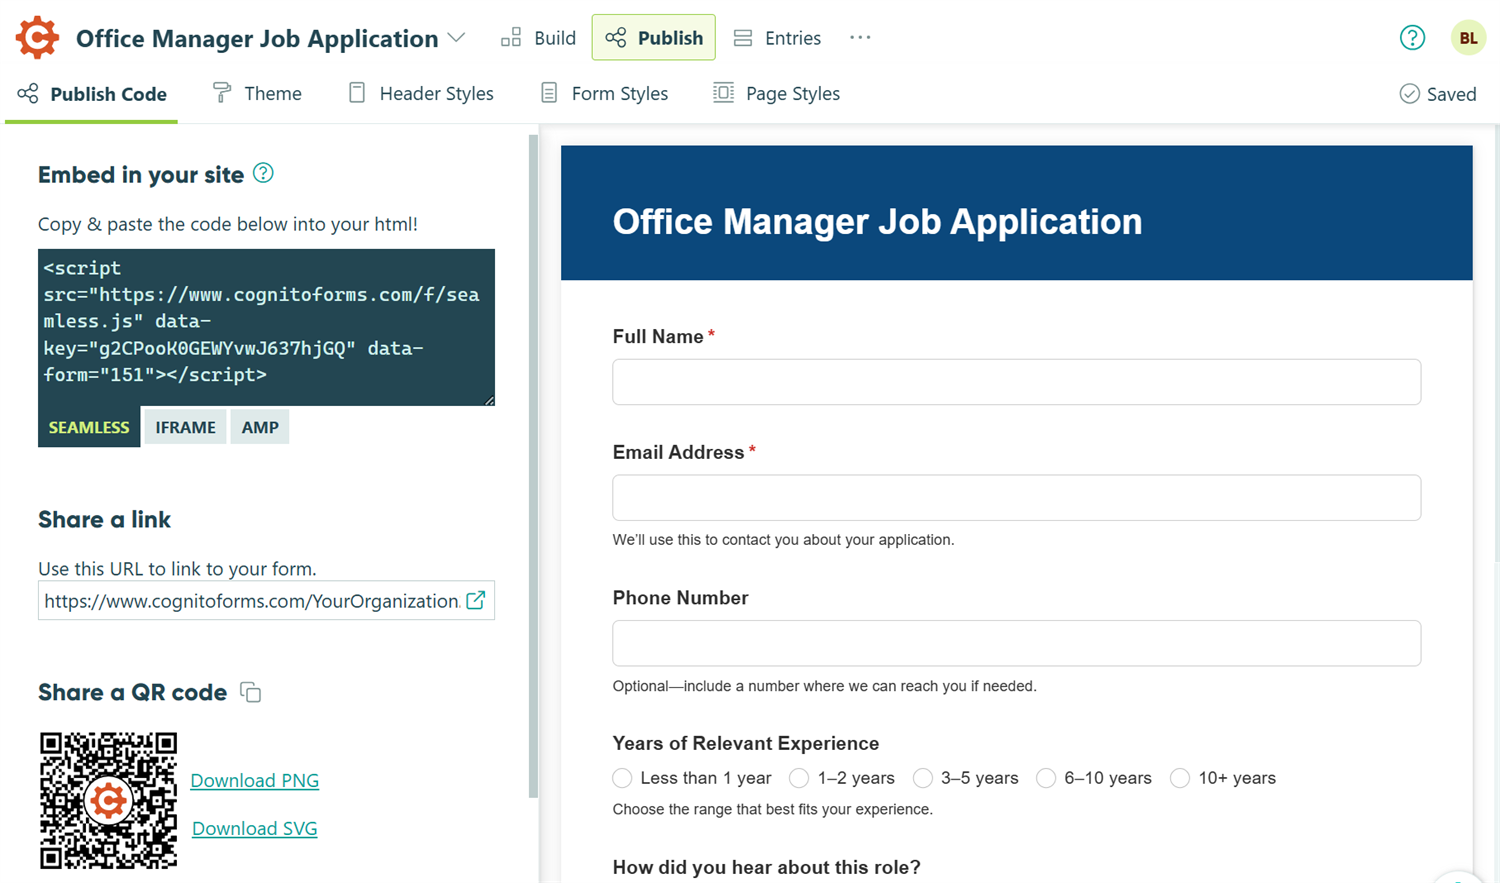
Publish your form
Share your form with your customers using a direct link, QR code, or embed it on your website. The more places you share the form, the easier it will be for people to find it.
- Go to the Publish page for the form.
- Select the Publish Code tab. You’ll see headings for the following options:
- Public Link: Copy the form’s URL to share directly or link it in emails, website buttons, or in your social media bio.
- QR Code: Copy the QR code as a PNG or click one of the Download options, then place it into a file you plan to display, like a brochure, a screen in your lobby, or an advertisement poster.
- Embed Code: Copy the embed code you want to use and paste it into your website. This lets customers fill out the form without leaving your site.
5 Forms to Build with AI
These five examples show how to put the prompting approach from Step 2 into practice for common business forms. Each one includes the key details worth mentioning in your prompt, so AI can build a complete, ready-to-review form from the start.
Create a client intake form
Client intake forms are complex and easy to oversimplify. You skip a field, work starts, and you end up chasing missing information by email.
Describe your intake process to AI: who your clients are, what information you need before work begins, what’s required versus optional. AI will structure the form around what you give it. You’ll capture what you need from every submission, without having to chase anyone down.
Build custom online order forms
Order forms are deceptively complex. You need line items, product details, pricing calculations, and a checkout flow that doesn’t lose customers halfway through.
Describe your products, pricing structure, and any other requirements to AI, and it will build the entire form in one pass. Even the most time-consuming parts, like setting up a an automated Workflow and hidden fields, are all created automatically from your description.
Make event registration forms
Event registration forms look simple until you’re actually building them. They include attendee details, session selections, meal preferences, payment for ticketed events, and a confirmation email that fires automatically on submission. This becomes a lot to build!
Describe your event and what you need to collect, and AI builds the entire form from that description. Use follow-up prompts to add workflow details like confirmation emails, task assignments, and automatic document generation.
Create a digital service request form
The hardest part of a service request form isn’t the fields. It’s ensuring requests reach the right person and don’t disappear into an inbox.
Describe your request categories, priority levels, and routing needs to AI, and it builds the form around those specifics. Iterate on the result by adding Workflow automation details to route incoming requests based on type or urgency. This helps your team always know what’s waiting and who should handle it, without anyone manually sorting submissions.
Build an online application
Application forms often fail in one of two ways: they ask too much upfront causing candidates to drop off, or they’re too sparse to help you evaluate anyone.
Describe the role or program you’re collecting applications for, what should be required to make a decision, and what’s optional. Then, AI builds he form around those priorities. The key details come together in the first pass, including required contact fields, optional work history, a file upload for resumes or portfolios, and internal notifications when new submissions come in.
Do More With Your AI-Generated Form
Once your form is live, these Cognito Forms features help you get more from every submission:
- Set up automatic Workflows that run in the background with every submission. You can trigger status changes, route submissions to the right people, and set up approval steps that are different for every form.
- Collect deposits, fees, or order payments directly in the form, without navigating elsewhere. Add Payment to your form and collect payments through Stripe, PayPal, or Square.
- Show or hide entire sections or pages based on form answers. By layering in conditional logic, you’ll provide respondents with a focused experience that only shows each person what’s truly relevant to them.
- Automatically generate professional custom documents using the data from each submission with Document Generation.
Start Building Forms with AI Today
The MCP Connector turns a plain-language description into a working form. The more clearly you describe what you need (the fields, the workflow, the notifications), the closer AI will get to what you need on the first try. Connect your account to the Cognito Forms MCP, describe the form you need, and you’ll have something ready to publish in no time.
Connect Cognito Forms to your Claude or ChatGPT account today.
Connect Cognito Forms to your Claude or ChatGPT account today.
FAQ
Stay in the same conversation and describe what’s missing or needs to change. AI refines iteratively, so you don’t need to start over. The updated form will be saved as a new form in your organization and the AI will link the new form for you to open directly in Cognito Forms.
Keep in mind: Specific requests get the most accurate results, but most AI models can handle more than one change at a time now. So feel free to tell the AI to make multiple changes in one message (within reason).
Any change made through the connector (like updating an entry or changing form availability) is recorded in one of two places:
- The Organization Audit Log: This is where you can view whether new forms were created with AI. This will list “Claude Connector,” “ChatGPT App,” or the name of your custom MCP connection as the source and the user who initiated it.
- The Entry Audit Log: This is where entry-level changes appear. This includes things like updating an entry, creating an entry, or updating the status of an entry.
Keep in mind: Read-only actions, like viewing your form structure, are not logged.
Any AI app that supports MCP connections can work with the Cognito Forms MCP Connector using the custom connection option. Claude and ChatGPT have direct app listings that make the initial setup straightforward. For other tools, use the server URL and OAuth Client ID listed in Step 1. Learn more about setting up a connection with our MCP server.