Set up one automated system that generates all three new hire onboarding forms, prefilled and ready in a secure portal the moment you add a new employee.
Build Time & Skill
45-60 min
Advanced
What you'll learn
How to build an automated onboarding system that generates three pre-filled employee forms as tasks in a secure portal when you add a new hire

Hiring someone new often means a flood of paperwork arrives all at once: personal information to collect, policies to sign, and payroll details to gather. For small and mid-sized businesses without a dedicated HR department, that usually means manually sending one form at a time, chasing employees for missing information, and copying data from one document to the next. On top of this, the new hire’s onboarding experience directly correlates to their likelihood of staying with your company. Ensuring your company’s onboarding process runs smoothly should be a top priority.
With Cognito Forms, you can replace that entire scattered process with one automated system. HR creates a new hire’s profile with basic information, then clicks a single button when it’s time to begin onboarding. The system instantly assigns the profile back to the employee to complete their personal details and generates their remaining onboarding forms, prefilled with what HR already entered. Your new employee logs into a portal and works through their tasks at their own pace, while the right people on your team are notified automatically. This setup helps you:
- Eliminate repetitive data entry. Enter a new hire’s information once and watch it populate across all their onboarding forms automatically, preventing errors and saving repetitive manual work.
- Ensure nothing gets missed. Every new hire moves through the same consistent process; no forgotten handbook signatures, missing payroll forms, or incomplete personal details.
- Make a strong first impression. A clean, organized portal with prefilled forms signals professionalism and sets the right tone before day one.
- Keep every team member in the loop. When an employee submits their banking details, your payroll team is notified automatically. No one has to check manually or wonder whether a form came in.
Understanding the Key Components
This workflow connects four Cognito Forms features into one seamless automation. Each feature handles a distinct part of the process: creating the forms, giving employees access, organizing their tasks, and routing work to the right internal teams. Understanding what each piece does before you start building makes the entire setup easier to follow and troubleshoot.
| Feature | What It Does | Role in This Workflow |
|---|---|---|
| Auto-Create Entries | Automatically generates new entries on target forms when triggered by an Action | HR clicks “Start Onboarding” to assign the Employee Profile as a task to the new hire and create two additional, prefilled onboarding forms |
| Guest Access | Gives external users secure, password-free access to forms and entries you share with them | Gives new hires a portal to log in, view their assigned tasks, and complete forms without needing you to send individual email links |
| Workflow Automation | Uses statuses, actions, and roles to control what happens at each stage of a process | Manages the internal side of onboarding and routes entries to your payroll team automatically when an employee submits their banking details |
| Task Views | Transforms entries into organized, actionable to-do lists for specific roles | Displays onboarding forms as clear tasks in the employee’s portal, automatically removing completed items as they finish each one |
Step-by-Step: Building Your Automated Employee Onboarding System
Building this system requires careful setup, but once it’s configured, it runs on its own. In the steps below, you’ll build three forms that work together:
- Employee Profile: The central record for each new hire. HR fills in basic job information, then triggers onboarding, which assigns the profile back to the employee to complete their personal details and auto-creates the two forms below.
- Employee Handbook Acknowledgment: An employee-facing form that presents company policies and collects a legally binding electronic signature confirming the employee has read and agreed to the terms.
- Direct Deposit & Payroll Setup: An employee-facing form that collects banking and tax withholding information. When submitted, it automatically notifies your payroll team and moves into their queue to process.
Step 1: Create your employee profile form
The Employee Profile form does double duty in this system. HR uses it to create a new hire’s record with basic job information, and the employee uses it to complete their personal details once onboarding is triggered. It also serves as the Person field source that the other two onboarding forms look up from, so everything stays connected through one central record.

Build the Employee Profile form
- Create a new Person Form and name it “Employee Profile.”
- The form will already include fields for Name, Email, and IsActive status. If you are creating your Person Form from a previously created form, be sure you have these fields.
- Add any additional fields for HR to fill in when creating a new hire, such as job title, department, and start date.
- Add additional fields for the employee to complete once they log into their portal. We recommend placing these in their own section to make the next step easier.
- Common additional fields for employee onboarding include home address, preferred name, date of birth, emergency contact information, and a File Upload field for a copy of their government issued photo ID.
- Adjust each section or field’s Show This Field and Read-Only settings, so employees can only edit what they’re allowed to. For example:
- Job Title and Department: Set Read-Only to For Roles and select the
PublicRole. Employees can see these but cannot change them. - Name, Email, and Phone: Leave editable for the Public Role so employees can correct any errors in their basic information.
- HR-only fields (like “Start Date” or “Is Active?”, if you’d prefer to keep them internal): Set Show This Field to For Roles →
Internalto hide them from the employee entirely.
- Job Title and Department: Set Read-Only to For Roles and select the
Enable “Use with Person field?”
- Go to the form’s Settings tab and enable Use With Person Field?
- Map your form’s fields to each Person Field setting:
- Name identifies the employee.
- Email must match the address new hires will use to log in.
- Is Active? controls whether an employee currently has access to the portal.
- Check Allow people to log in as guest users? This activates your Employee List as a guest list, allowing new hires to access their portal, once you’ve shared your portal link.
Set up this form’s Workflow
Here, you’ll add custom Workflow Actions and Statuses and ensure your Roles are set up appropriately. This is where you define what happens after you add an employee to the form and set up the foundation you need to automatically create entries on additional forms. Set up the following Roles, Statuses, and Actions on this form:
In this step, we'll adjust our settings to ensure the entry is automatically shared with the correct new hire:
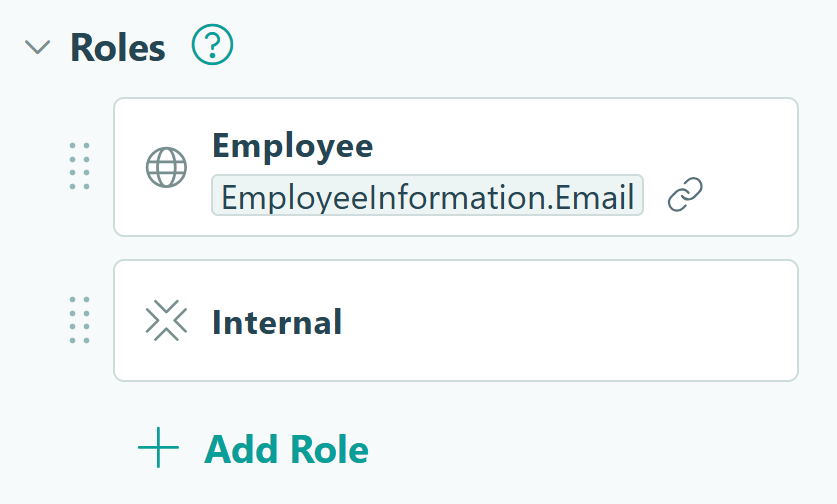
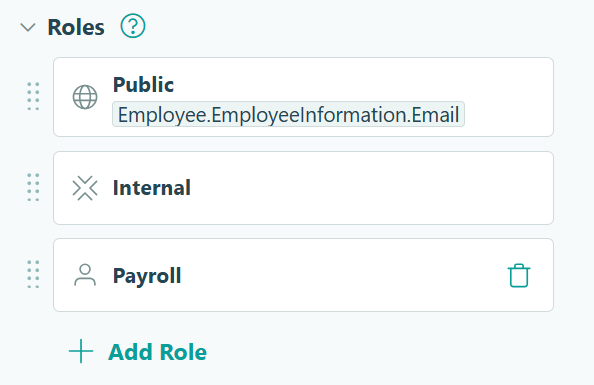
1. Go to Workflow and click on Roles. The Roles listed here will stay as-is, unless you want to rename "Public" to "Employee."
2. Open the Public Role and find the Share With setting.
3. Select the form's Email field. Since the Employee Profile is the guest list itself, entries are tied to employees by their email address rather than through a separate Person field.
In this step, we'll adjust our settings to ensure the entry is automatically shared with the correct new hire:
1. Go to Workflow and click on Roles. The Roles listed here will stay as-is, unless you want to rename "Public" to "Employee."
2. Open the Public Role and find the Share With setting.
3. Select the form's Email field. Since the Employee Profile is the guest list itself, entries are tied to employees by their email address rather than through a separate Person field.

In this step, we'll adjust and create Workflow Statuses:
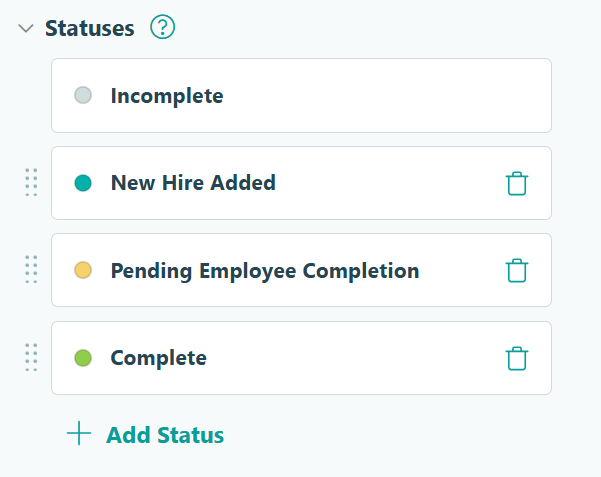
1. Go to Workflow and click on Statuses.
2. Change the Submitted Status to "New Hire Added".
3. Create two new Statuses:
- Pending Employee Completion: The Status that ensures the employee's Task View filters correctly
- Complete: The Status entries go to after the employee submits their completed form
In this step, we'll adjust and create Workflow Statuses:
1. Go to Workflow and click on Statuses.
2. Change the Submitted Status to "New Hire Added".
3. Create two new Statuses:
- Pending Employee Completion: The Status that ensures the employee's Task View filters correctly
- Complete: The Status entries go to after the employee submits their completed form
In this step, we’ll adjust and create Workflow Actions. Go to Workflow and find the Actions setting. Then, click into an Action to adjust its settings, or click + Add Action to create a new one. Be sure you have these Actions setup on this form:
| Action | Purpose | Change Status To | Allow Action Logic |
|---|---|---|---|
| Create Employee | Give your internal team an Action to create the new hire’s entry without assigning onboarding forms to them yet. | New Hire Added | When Entry.Status is "Incomplete" AND Entry.Role is "Internal" |
| Start Onboarding | Controls the entire automation; assigns the rest of this form to the employee and creates new entries on the additional onboarding forms. (Further setup in Step 5.) | Pending Employee Completion | When Entry.Status is "New Hire Added" AND Entry.Role is "Internal" |
| Submit | Gives the employee a way to submit their completed form | Complete | When Entry.Status is "Pending Employee Completion" AND Entry.Role is "Public" |
“Create Employee” Action
This Action gives your internal team a way to create the new hire’s entry without assigning onboarding forms to them yet. Adjust these settings:
- Change Status To: New Hire Added
- Allow Action: When
Entry.Status is "Incomplete"ANDEntry.Role is "Internal"
“Start Onboarding” Action
This Action controls the entire automation. It assigns the rest of this form to the employee and creates new entries on the additional onboarding forms. (Further setup in Step 5.) Adjust these settings:
- Change Status To: Pending Employee Completion
- Allow Action: When
Entry.Status is "New Hire Added"ANDEntry.Role is "Internal"
“Submit” Action
This Action gives the employee a way to submit their completed form. Adjust these settings:
- Change Status To: Complete
- Allow Action: When
Entry.Status is "Pending Employee Completion"ANDEntry.Role is "Public"
Step 2: Build your onboarding forms
Create the two additional forms that will be automatically generated for each new hire alongside their Employee Profile task. Together with the Employee Profile, these form the three tasks your employee sees in their portal.

Add Person Fields
Each additional onboarding form you include needs a Person field connected to your “Employee Profile” form. A Person field is essentially a lookup that connects an entry representing a person. This is what enables the automation to prefill new hire information and automatically share the entry with the right person.
Follow these steps for each additional form:
- Create a new form with a clear, employee-friendly name.
- Add a Person field at the top and label it “Employee.”
- Configure the following settings on the Person field:
- Look Up People From: Select your “Employee Profile” form
- Default To: None (you’ll set this up to prefill later)
- Read-Only: Always (prevents employees from changing who they are)
Prefill fields
For any fields where you want to display information pulled from the Employee Profile (like Email, Job Title, Department, or Start Date, you’ll need to set their Default Value to reference the Person field:
- Example:
=Employee.JobTitleor=Employee.Department - If you don’t want employees to be able to change certain fields, set Read-Only to Always. Otherwise, keep it set to Never.
This configuration ensures that when forms are auto-created and assigned to an employee, all their information from the “Employee Profile” flows into the right places automatically.
What makes each form unique
| Form | Purpose | Key Fields to Add |
|---|---|---|
| Employee Handbook Acknowledgment | Confirms the employee has read and agrees to company policies | Read-only policy summary text, Signature field for acceptance, Date field for the signature date |
| Direct Deposit & Payroll Setup | Collects banking and tax withholding information | Bank name, account type (checking/savings), routing number, account number, W-4 filing status and allowances |
Turn on the Encrypt Entry Data setting for the Direct Deposit & Payroll Setup form, securing the routing and account numbers or other sensitive fields.
Step 3: Set up Workflow details
Before connecting your forms, add custom Workflow Actions and Statuses to each onboarding form and ensure your Roles are set up appropriately. This is where you define what happens after an employee submits their portion, and how your internal teams pick up from there.
Employee onboarding almost always involves more than one person. An employee submits their banking details, then payroll processes them. Statuses, Actions, and Roles are how Cognito Forms tracks each handoff and keeps everyone moving without anyone having to ask “did they finish yet?”
Handbook & Agreements Form
In this step, we'll adjust our settings to ensure the auto-created entry is automatically shared with the correct new hire:
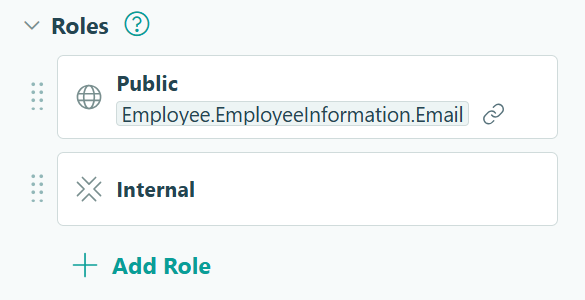
1. Go to Workflow and click on Roles. The Roles listed here will stay as-is, unless you want to rename "Public" to "Employee."
2. Open the Public Role and find the Share With setting.
3. Select the form's "Employee" Person field. This ensures the auto-created entry on this form is automatically shared with the correct new hire.
In this step, we'll adjust our settings to ensure the auto-created entry is automatically shared with the correct new hire:
1. Go to Workflow and click on Roles. The Roles listed here will stay as-is, unless you want to rename "Public" to "Employee."
2. Open the Public Role and find the Share With setting.
3. Select the form's "Employee" Person field. This ensures the auto-created entry on this form is automatically shared with the correct new hire.
In this step, we'll adjust and create Workflow Statuses:
1. Go to Workflow and click on Statuses.
2. Change the Submitted Status to "Pending Employee Completion".
3. Create one new Status titled "Signed & Complete" or something similar.
In this step, we'll adjust and create Workflow Statuses:
1. Go to Workflow and click on Statuses.
2. Change the Submitted Status to "Pending Employee Completion".
3. Create one new Status titled "Signed & Complete" or something similar.
In this step, we'll adjust and create Workflow Statuses:
1. Go to Workflow and click on Statuses.
2. Change the Submitted Status to "Pending Employee Completion".
3. Create one new Status titled "Signed & Complete" or something similar.
In this step, we’ll adjust and create Workflow Actions. Go to Workflow and find the Actions setting. Then, click into an Action to adjust its settings, or click + Add Action to create a new one. Be sure you have these Actions setup on this form:
| Action | Purpose | Change Status To | Allow Action Logic |
|---|---|---|---|
| Assign to Employee | This is the Action your Auto-Create Entries setup will use to automatically add the form to the new hire’s task list | Pending Employee Completion | When Entry.Status is "Incomplete" AND Entry.Role is "Internal" |
| Submit | Gives the employee a way to submit their completed form | Signed & Complete | When Entry.Status is "Pending Employee Completion" AND Entry.Role is "Public" |
“Assign to Employee” Action
This is the Action your Auto-Create Entries setup will use to automatically add the form to the new hire’s task list. Adjust these settings:
- Change Status To: Pending Employee Completion
- Allow Action: When
Entry.Status is "Incomplete"ANDEntry.Role is "Internal"
“Submit” Action
This Action gives the employee a way to submit their completed form. Adjust these settings:
- Change Status To: Signed & Complete
- Allow Action: When
Entry.Status is "Pending Employee Completion"ANDEntry.Role is "Public"
Payroll & Direct Deposit Setup Form
This form’s setup creates a simple, trackable handoff without requiring separate payroll software to manage the incoming submission. Your payroll team sees new submissions as soon as they arrive, processes them, and marks them done, all from within Cognito Forms.
In this step, we'll adjust our settings to ensure the auto-created entry is automatically shared with the correct new hire:
1. Go to Workflow and click on Roles. The Roles listed here will stay as-is, unless you want to rename "Public" to "Employee."
2. Open the Public Role and find the Share With setting.
3. Select the form's "Employee" Person field. This ensures the auto-created entry on this form is automatically shared with the correct new hire.
4. Create a new Role and name it "Payroll."
5. For the "Payroll" Role's Share With setting, you can select a specific user to share every entry with or use a different Email field or Person field to assign entries to.
In this step, we'll adjust and create Workflow Statuses:
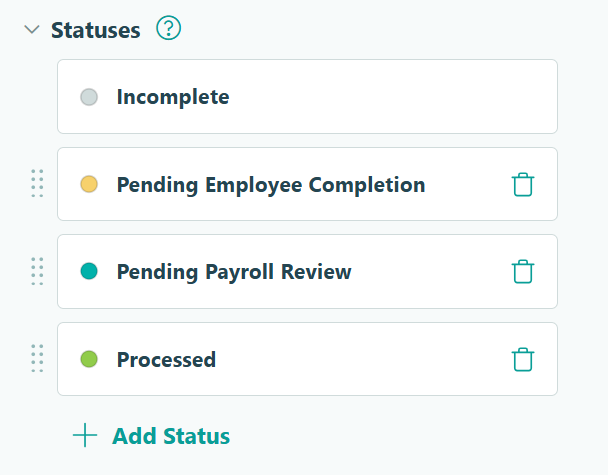
1. Go to Workflow and click on Statuses.
2. Change the Submitted Status to "Pending Employee Completion".
3. Create two new Statuses:
- Pending Payroll Review: The Status entries go to after the employee submits their completed form, but before Payroll looks at and processes the entry
- Processed: The final status of the Workflow after payroll has processed the entry

In this step, we'll adjust and create Workflow Statuses:
1. Go to Workflow and click on Statuses.
2. Change the Submitted Status to "Pending Employee Completion".
3. Create two new Statuses:
- Pending Payroll Review: The Status entries go to after the employee submits their completed form, but before Payroll looks at and processes the entry
- Processed: The final status of the Workflow after payroll has processed the entry
In this step, we’ll adjust and create Workflow Actions. Go to Workflow and find the Actions setting. Then, click into an Action to adjust its settings, or click + Add Action to create a new one. Be sure you have these Actions setup on this form:
| Action | Purpose | Change Status To | Allow Action Logic |
|---|---|---|---|
| Assign to Employee | This is the Action your Auto-Create Entries setup will use to automatically add the form to the new hire’s task list | Pending Employee Completion | When Entry.Status is "Incomplete" AND Entry.Role is "Internal" |
| Submit | Gives the employee a way to submit their completed form | Pending Payroll Review | When Entry.Status is "Pending Employee Completion" AND Entry.Role is "Public" |
| Mark as Processed | Used by your payroll team after reviewing and processing the submission | Processed | When Entry.Role is "Payroll" AND Entry.Status is "Pending Payroll Review" |
“Assign to Employee” Action
This is the Action your Auto-Create Entries setup will use to automatically add the form to the new hire’s task list. Adjust these settings:
- Change Status To: Pending Employee Completion
- Allow Action: When
Entry.Status is "Incomplete"ANDEntry.Role is "Internal"
“Submit” Action
This Action gives the employee a way to submit their completed form. Adjust these settings:
- Change Status To: Signed & Complete
- Allow Action: When
Entry.Status is "Pending Employee Completion"ANDEntry.Role is "Public"
“Mark as Processed” Action
This Action is what your payroll team will click after reviewing and processing the submission. Adjust these settings:
- Change Status To: Processed
- Allow Action: When
Entry.Role is "Payroll"ANDEntry.Status is "Pending Payroll Review"
Step 4: Route completed forms to the right internal team
When an employee submits a form, the right person on your team needs to know immediately. Rather than checking forms manually, you can set up automated email notifications that send the moment an employee submits. This lets your payroll team know the new hire has submitted their banking details as soon as it’s complete, without having to check manually.

You’ll add this notification to the Submit Action on the Direct Deposit & Payroll Setup form:
- Open the Direct Deposit & Payroll Setup form and go to Workflow settings.
- Under Actions, open the Submit Action.
- Find Send Emails and click + Add Email.
- Configure the email:
- To: Enter your payroll team’s email address or distribution list directly in the To field
- Subject: Something like: “New Direct Deposit Submission”
- Message: Include a brief note and use the Insert Field option to dynamically add the employee’s name, such as:
=Employee.Name
- Click Save.
Step 5: Configure Auto-Create Entries
This is where the automation happens. You’ll set up your Employee Profile form to automatically create all three onboarding forms the moment you click a single button on a new hire’s record.

- Open your “Employee Profile” form and go to Workflow settings.
- Under Actions, open the Action you created named “Start Onboarding.”
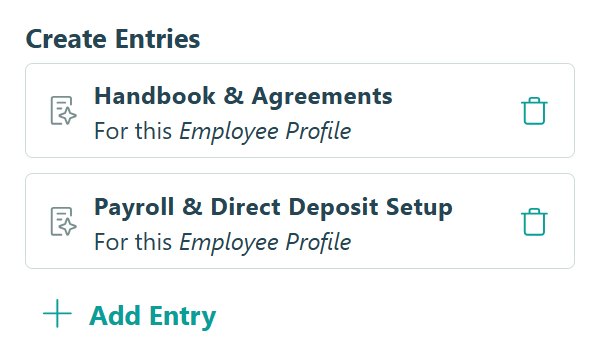
- Find Create Entries and click + New Entry. For each additional onboarding form, configure the following:
- Target Form: Select the onboarding form that you want to create an entry on (either your “Handbook & Agreements” form or the “Direct Deposit & Payroll Setup” form)
- Action: Select “Assign to Employee”
- Prefill Fields: On the left, select the “Employee” Person field. On the right, select “This Entry.” This will prefill the “Employee” Person field on the target form with data from the entry on the Employee Profile form.
- Repeat steps 1-3 for your second onboarding form.
When HR opens a new hire’s Employee Profile entry and clicks “Start Onboarding,” the system immediately moves the profile into the employee’s portal task queue, creates entries on both remaining forms prefilled with the employee’s information, and sends the welcome email you’ll configure in Step 8.
Using a separate “Start Onboarding” Action instead of triggering automation on submission gives HR control over timing. They can create the employee’s profile days or weeks in advance, verify the information, and trigger onboarding exactly when they’re ready.
Step 6: Set up Task Views
Task Views transform entries into organized to-do lists for whoever needs to act on them. You’ll set them up twice in this step: once for your employees, so they see their onboarding tasks in the portal, and once for your payroll team, so submitted banking details appear as an actionable task in their queue.
Employee-facing Task Views (all three forms)
You’ll create one Task View for each of your three onboarding forms. The setup process is the same for all three, only the form name and view name change.

For each form, follow these steps:
- Open the form and go to the Entries page.
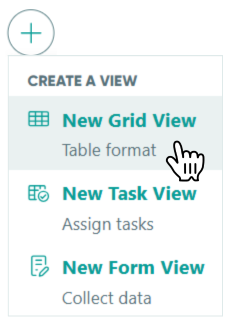
- Click the + icon at the top and select New Task View.
- Give the view a clear, employee-friendly name (this is exactly what they’ll see in their portal). For example: “Complete Your Employee Profile” or “Set Up Direct Deposit.”
- Set the Role to “Public.”
- Make sure Assign As Tasks is turned on.
- After saving the view’s settings, click Filter in the top menu.
- Add a filter to ensure completed tasks disappear automatically once the employee submits. For example: Status is
Pending Employee Completion(so completed tasks disappear automatically once the employee submits). - Check the Shared With Current User filter.
- Click the settings icon next to it and verify that Share With is set to the “Employee” Person field or the Email field (depending on the form). This works in combination with the Share With settings you configured on each form’s Public role in Step 3, ensuring each employee only sees their own tasks.
Optional: Let employees revisit completed forms
If you want employees to access their completed submissions after finishing (for example, to reference their handbook acknowledgment), add a Grid View to each form.
- From the Entries page, click (+) and select New Grid View.
- Give it a name like “My Submitted Forms.”
- Set the Role to “Public” and filter by Status is
Submitted - Turn off Allow New Entries if you don’t want employees submitting duplicate forms from this view.
Payroll team Task View (Direct Deposit & Payroll Setup form)
When an employee submits their Direct Deposit & Payroll Setup form, it should automatically appear as a task for your payroll team to process. This Task View is assigned to the Internal role, so only your team sees it and not the employee.
To set this up, follow these steps:
- Open the Direct Deposit & Payroll Setup form and go to the Entries page.
- Click the + icon at the top and select New Task View.
- Give the view a name your payroll team will recognize, like “Payroll Submissions to Process.”
- Set the Role to “Payroll.”
- Make sure Assign As Tasks is turned on.
- After saving the view’s settings, click Filter in the top menu.
- Add a filter to ensure only newly submitted, unprocessed entries appear as tasks. For example: Status is
Pending Payroll Review
Once configured, your payroll team can log into Cognito Forms, open this view, and see every new submission waiting for them, complete with the employee’s banking and tax withholding details. When they’ve processed a submission, they click “Mark as Received” to close out the task and move the entry to its next status.
Your payroll team members need a Cognito Forms account with Editor permissions to see this view and initiate an Action on the form. Add internal team members under your Organization Settings > Users.
Step 7: Polish your employee portal
Before sending access to new hires, take a few minutes to customize their portal experience. These small details make the system feel intentional and professional rather than like a default tool.
Go to your Organization Settings and select Guest Access. From there, you can:
- Add a welcome message that new hires see on their homepage after logging in. Something like: “Welcome to the team! Complete the tasks below before your start date. Everything is prefilled with your information, just review and submit.”
- Add Terms of Service and Privacy Policy links so employees acknowledge your data handling practices on their first login.
- Confirm your Employee Profile appears under Allowed Guest Types and that the settings are correct.
- Add custom branding (Enterprise plan): Upload your company logo and brand colors under Appearance settings to make the portal feel like a natural extension of your business.
We recommend you preview your employee portal before sending invites. From the Guest Access settings page, find the guest table at the bottom and click the eye icon next to any active employee. You’ll impersonate that employee to preview exactly what they’ll see when they log in. Learn more about viewing the portal as a guest.
Step 8: Send new hires their portal access
The final step is letting new hires know their tasks are waiting. You’ll add your new hires to your Employee Profile form and set up an automated email on the “Start Onboarding” Action. The moment you trigger onboarding, the welcome email goes out automatically.

Add your new hires to the Employee Profile form
After following the steps in this guide and everything is ready to go, add each new hire as an entry before triggering onboarding.
- Go to the form’s Entries page.
- Create a separate entry for each employee with their information.
- You can create entries manually, import them from a CSV or Excel file, or use an integration (like Zapier or Power Automate) to sync from your CRM or another system.
Send new hires their portal access

- Open your Employee Profile form and go to Workflow settings.
- Under the “Start Onboarding” Action, find Send Emails and click + Add Email.
- Configure the email:
- To: Select the Email field from your Employee Profile
- Subject: Something clear, like: “Your onboarding tasks are ready. Here’s how to get started”
- In the Message, add your organization’s portal URL. Your unique portal link will look like:
www.cognitoforms.com/yourorganizationname. You can also send employees directly to their Task Dashboard:www.cognitoforms.com/yourorganizationname/tasks - Write a brief, welcoming message that tells them:
- They’ll be asked to verify their email with a one-time code when they first log in.
- Their information is already filled in where possible; they just need to review and submit each form.
- They have three tasks waiting, and they can complete them in any order.
Sending employees directly to your organization’s portal gives them the full Task Dashboard experience. They can see all three tasks in one place, track their overall progress, and access completed forms late, without you needing to send a separate link for every form.
What the Onboarding Experience Looks Like
Once everything is configured, triggering onboarding for a new hire only takes a single click.
Here’s what the process looks like across all three perspectives: you as the admin, your new employee, and the internal teams who handle their piece once the employee submits.
You initiate onboarding
HR creates a new hire’s Employee Profile entry with their basic job information, then clicks “Start Onboarding” when it’s time to begin. The system immediately assigns the Employee Profile as a task to the new hire, creates entries on both remaining onboarding forms, and sends a welcome email. No other forms to open, no additional emails to send.

Employees complete tasks at their own pace
The new hire receives a welcome email with a link to your portal. When they click it, they’re prompted to verify their email with a one-time code. After logging in, they see their Task Dashboard with all three onboarding tasks listed, each with a due date if you’ve configured one. Their personal information is already filled in where applicable. They’re simply reviewing, completing any remaining fields, and submitting. As they finish each form, it disappears from their task list and their progress updates in real time.

Your team takes it from there
When an employee submits their banking details, your payroll team receives an email immediately with a direct link to the entry. Your payroll team works from their own filtered Grid View to track incoming submissions, mark them complete, and close out their piece of the process. From your admin entry views, you can see overall progress across all three forms at a glance, and any automated reminder emails fire on schedule for employees who still have tasks pending.

Ways to Enhance Your Onboarding System
Once your core onboarding workflow is running smoothly, these Cognito Forms features can extend it further, without changing what’s already working:
- Auto-generate a signed PDF of the handbook acknowledgment. Set up a Custom Document Template on the Employee Handbook Acknowledgment form to produce a professional PDF with the employee’s name, date, and signature embedded. This gives you a clean record for compliance purposes without any extra steps.
- Set up automated task reminder emails. Configure reminder emails in each Task View to notify employees when their due date is approaching or has passed. For example, three days before their start date and again on start day if tasks are still incomplete. This keeps onboarding on track without any manual follow-up.
- Build a self-service employee portal for ongoing needs. Once you’ve set up Guest Access for onboarding, you can extend the same portal for ongoing HR self-service: PTO requests, expense reports, equipment requests, or performance reviews. Employees already know how to log in, and you already have their profile information in your system.
Start Automating Employee Onboarding Today
Manual new hire paperwork creates unnecessary friction when someone is forming their first impression of your organization. With Cognito Forms, you replace that scattered process with one automated system that handles document collection, e-signatures, task tracking, and portal access without a single line of code or a separate HR platform. Add an employee once, generate all their onboarding forms automatically, and give every new hire a consistent, professional experience from day one.
FAQ
Yes. All three tasks appear in the employee’s Task Dashboard at the same time, and they can complete them in whatever order works best for them. If you need a specific sequence (for example, requiring the handbook acknowledgment before the payroll form), you can configure Auto-Create Entries to only generate subsequent forms after the employee submits the previous one.
By default, any data you have with Cognito Forms is protected with data encryption in transit and at rest (with PCI-DSS Level 1 compliance) and accessed exclusively over HTTPS.
If you want extra layers of security, you have a few options available. You can choose to implement only one, multiple, or all options, depending on your needs:
- Set any sensitive fields to be visible only to the “Public” Role (the employee) and your “Payroll” Role, using the Show This Field option. Learn more about showing and hiding fields.
- Enable authentication for Public Links and/or Workflow Links, under so only verified employees can access payroll forms. Learn more about authentication.
- Enable Data Encryption and protect fields with an extra layer of encryption. You must encrypt any form and protect any field that contains sensitive information, such as: Social Security numbers, Driver’s license numbers, and other personally identifiable information. Learn more about Data Encryption.
Yes. Each form can have its own internal Workflow. Create different Roles and add different email notifications for the different people involved in your Workflow.
Read our guide that covers How to Create Role-Based Form Workflows.