Manage signups, dues, and renewals with a self-service member portal. All from one place, without spreadsheets or third-party tools.
Build Time & Skill
60-90 min
Advanced
What you'll learn
How to build a complete member management system, from self-registration and dues collection to automated renewal tracking and a secure member portal

Managing members manually is one of the most common pain points for associations, nonprofits, and professional clubs. You’re likely tracking renewals in a spreadsheet, chasing down membership dues over email, and manually updating records when someone’s information changes. It works at first, but things start slipping through the cracks as your organization grows.
With Cognito Forms, you can set up your own customized member management system without writing a single line of code. One connected setup handles everything: member registrations, online payments, automated renewal reminders, and a self-service member portal. Your members get a clean, professional experience, while you team gets hours back.
Here’s what this system does for your organization:
- Centralizes your membership database. Every member record lives in one place, is always up to date, and can be easily searched and filtered.
- Automates the registration and payment process. New members sign themselves up, pay their dues, and gain portal access immediately, with no admin involvement required.
- Tracks renewals without manual reminders. The system creates each member’s renewal entry automatically and sends timed reminder emails before their membership expires.
- Eases administrative burden. Members log in to view their membership status, update their profile, and manage their own tasks, so your team doesn’t have to.
Understanding the Building Blocks
This system brings together several Cognito Forms features that work in sequence. Before you start building, take a moment to understand each component and its purpose:
| Feature | What It Does | Role in This System |
|---|---|---|
| Person Form | Stores each member’s record as an individual entry and acts as your membership database | The foundation of the entire system: powers portal logins, dues collection, member IDs, and the data that flows into renewal forms |
| Guest Access | Gives people outside your organization secure, password-free access to forms and entries | Powers the member portal and allows new members to register themselves |
| Workflow | Automates actions, statuses, and email notifications across your forms | Handles registration confirmation, dues confirmation, and the trigger that creates each member’s renewal entry |
| Payment Collection | Accepts dues via Stripe, PayPal, or Square | Collects initial dues on registration and (with a Card on File option) can store cards for future renewals |
| Auto-Create Entries | Automatically generates an entry on a second form when an action is triggered | Creates each member’s renewal entry immediately after registration, pre-linked to them and dated one year out |
| Task Reminders | Sends scheduled emails before or after a due date | Automatically notifies members before their renewal is due, with no manual outreach needed |
Step-by-Step: Building Your Member Management System
Step 1: Enable Guest Access
Guest Access lets people outside your organization log in securely, see their records, and complete tasks. Enable it first before building anything else, so all your subsequent setup is ready to connect.

- Find your organization’s name in the top left corner of the sidebar and click Settings.
- Select Guest Access from the left menu.
- Toggle Guest Access on.
Step 2: Build your membership database and registration form
Your membership database is the foundation of this entire system. It stores every member’s record, generates their unique member ID, and collects their initial dues, all in one form. We refer to this type of form as a Person Form.
Every other part of this system (the portal, renewal tracking, and automated emails) connects back to this form.

Create the form
- From the Guest Access settings section, find the Allowed Guest Types section.
- Click the + New Person Form button.
- In the dropdown, find “Members” and then click Create.
- Name the form “Member Profile,” or something similar.
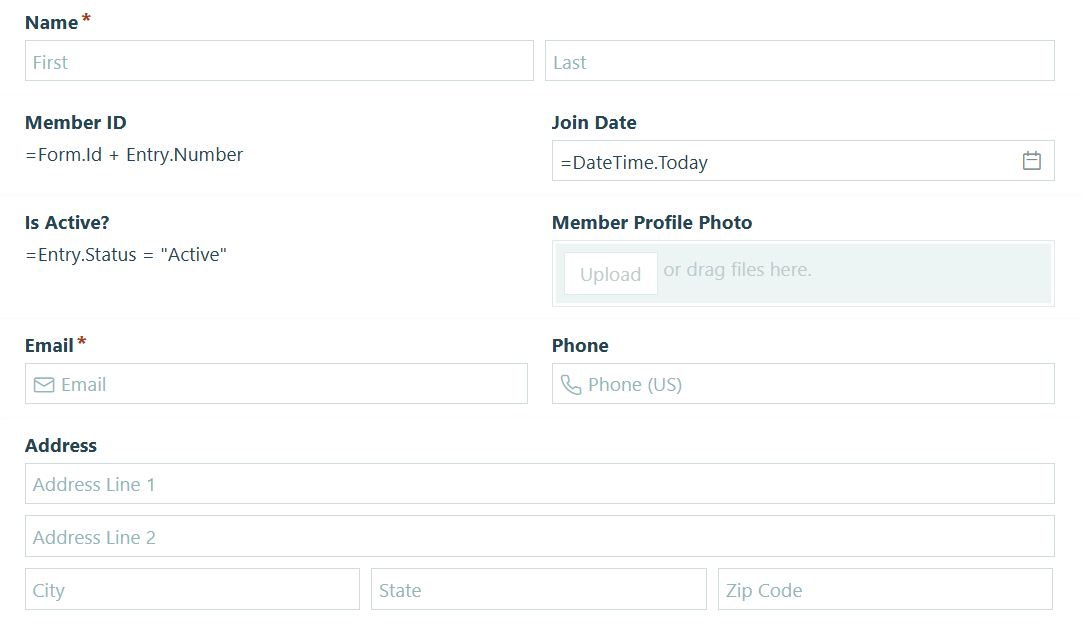
Add your fields
- Your new member list form should include Name, Email, and Yes/No fields by default.
- Add any additional member information you want to track, such as:
- Join Date: Add a Date field. To automatically prefill with the date the member signed up, set the Default Value to
=DateTime.Today - Member ID: Add a Calculation field and use the formula
=Form.Id + Entry.Numberto automatically generate a unique ID for every member.
- Join Date: Add a Date field. To automatically prefill with the date the member signed up, set the Default Value to
- When you have added the fields you want, go to your Form Settings and expand the Use with Person Field? setting to view the options.
- Because you created the form from the Guest Access settings page, all necessary settings will be enabled automatically. However, this is where you can adjust settings if needed.
Want to learn more about writing your own calculations?

Add a “Membership Type” Choice field
Membership types allow you to offer different pricing tiers, benefits, or access levels within your organization. To set this up:
- Add a Choice field to your form and name it “Membership Type,” or something similar.
- Set the Choice Options to your different membership tiers.
- Adjust the style and layout of your Choice field using the Style and Layout settings.
If you want to prevent changes to the membership tier field after submission:
- Scroll down and find the Read-Only setting.
- Select When and set it to
Entry.Status is not Incomplete
This step ensures that once a member has paid their initial dues they can still see their selection, they just can’t change it until they go through a renewal.
Step 3: Collect payment for member registrations
Initial membership dues are collected directly on the Member Profile form. Because the Membership Type field is already on your form, all you need to do is assign prices to each tier and connect your payment processor.

Assign prices to each membership type
- In the “Membership Type” field’s settings, find Collect Payment on this field and turn it on.
- Enter a price for each membership tier in the Price column that appears with each choice option. These prices will automatically calculate the payment total at the bottom of the form when a member selects their type.
Finish setting up payment
- Click Payment in the top toolbar on the Build page.
- Connect your payment processor: Stripe, PayPal, or Square. If you haven’t connected one yet, you’ll be prompted to do so.
- Under Process Payment, keep the default setting of Always so every registration collects payment.
Step 4: Automate renewal tracking & reminders
When a member registers, the system should automatically set up their renewal, whether that means sending them reminders to pay on their own or charging their card automatically. Choose the option that fits your organization’s billing preferences.
| Option A: Renewal Tasks & Reminders | Option B: Card on File Automatic Charge | |
|---|---|---|
| How it works | Members receive scheduled reminder emails and complete a renewal task in the portal to pay | Members authorize their card once at registration; you set up recurring billing in Stripe or Square |
| Best for | Organizations that want members to actively re-confirm their membership each year | Organizations that prioritize frictionless, automatic renewals |
| Setup steps | Go to Option A’s steps → | Go to Option B’s steps → |
Option A: Automatically prompt members to submit renewal payments
This option creates a dedicated renewal form, automatically generates a renewal entry for each member after registration, surfaces that entry as a task in the member’s portal when it’s time to renew, and completes the loop with scheduled email reminders.

Create the Dues Renewal form
Build a separate form to handle all renewal payments. Here’s how:
1. Create a new form and name it "Membership Renewal" or "Dues Renewal."
2. Add the following fields:
| Field | Field Type | Purpose | Settings |
|---|---|---|---|
| Member | Person field | This field will link to your Member Profile form. It will be prefilled automatically via Auto-Create Entries. | Set the Default To setting to None and Read-Only to Always |
| Membership Type | Choice field | This field has the same tiers as your Member Profile Form. The member’s current tier is selected for them (prefilling via the Person field), but they can adjust the tier as needed. | Set the field’s Default Value to =Member.MembershipType |
| Renewal Due Date | Calculation field (Date type) | Set the Calculation to =Entry.DateSubmitted.AddDays(365) |
Because you’ll use Auto-Create Entries to create this entry at the same time your member initially signed up, this calculation will set the due date one year from when the renewal entry is created. |
This field will link to your Member Profile form and will be prefilled automatically via Auto-Create Entries.
| Field Type | Settings |
|---|---|
| Person field | Set the Default To setting to None and Read-Only to Always |
This field has the same tiers as your Member Profile Form. The member’s current tier is selected for them (prefilling via the Person field), but they can adjust the tier as needed.
| Field Type | Settings |
|---|---|
| Choice field | Set the field’s Default Value to =Member.MembershipType |
Auto-Create Entries will automatically create the entry for you at the same time your member initially signs up. Then, this field will set the due date one year from when the renewal entry is created.
| Field Type | Settings |
|---|---|
| Calculation field (Date type) | Set the Calculation to =Entry.DateSubmitted.AddDays(365) |
3. Turn on Collect Payment for this field on your Membership Type field and assign each choice a price, just like you did on your "Member Profile" form.
4. Connect your payment processor under Payment settings. Use the same processor as your Member Profile form for consistency.
Adjust the Workflow
Here, you’ll add custom Workflow Actions and Statuses and ensure your Roles are set up appropriately. This is where you set up the foundation you need to automatically assign this form as a task and ensure the member has a smooth renewal experience. Set up the following Roles, Statuses, and Actions on this form:
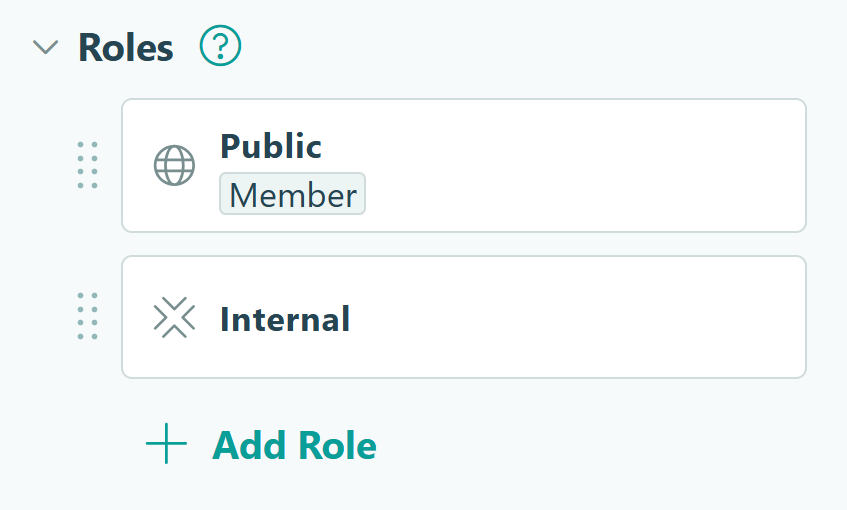
In this step, we'll adjust our settings to ensure the entry is automatically shared with the member:
1. Go to Workflow and click on Roles. The Roles listed here will stay as-is, unless you want to rename "Public" to "Member."
2. Open the Public Role and find the Share With setting.
3. Select the form's "Member" Person field you added in the last step. This ensures each entry is tied to the member selected or prefilled in this field.
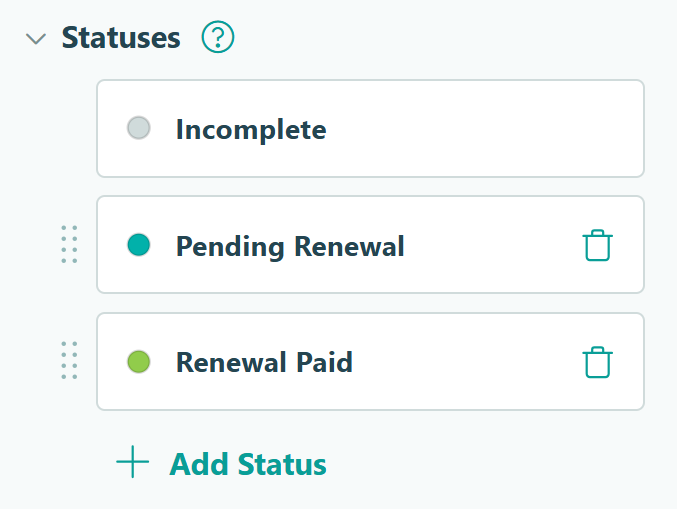
In this step, we'll adjust and create Workflow Statuses:
1. Go to Workflow and click on Statuses.
2. Change the Submitted Status to "Pending Renewal".
3. Create one new Status, named "Renewal Paid." This will be the Status entries move to after the member has renewed their membership.
In this step, we'll adjust and create Workflow Statuses:
1. Go to Workflow and click on Statuses.
2. Change the Submitted Status to "Pending Renewal".
3. Create one new Status, named "Renewal Paid." This will be the Status entries move to after the member has renewed their membership.
In this step, we'll adjust and create Workflow Statuses:
1. Go to Workflow and click on Statuses.
2. Change the Submitted Status to "Pending Renewal".
3. Create one new Status, named "Renewal Paid." This will be the Status entries move to after the member has renewed their membership.
In this step, we’ll adjust and create Workflow Actions. Go to Workflow and find the Actions setting. Then, click into an Action to adjust its settings, or click + Add Action to create a new one. Be sure you have these Actions setup on this form:
| Action | Purpose | Change Status To | Allow Action Logic |
|---|---|---|---|
| Create Entry | This Action will be used by your Auto-Create Entries setup to create the new entry and assign it as a task to be done in the future. | Pending Renewal | When Entry.Status is "Incomplete" AND Entry.Role is "Internal" |
| Submit | The member will click this to complete their renewal task after filling out the form and adding payment information. | Renewal Paid | When Entry.Status is "Pending Renewal" AND Entry.Role is "Public" |
Additionally, add a custom email notification to the “Submit” Action:
1. From the "Submit" Action settings, find Send Email and click Add New.
2. Select the "Member" Person Field in the To: space.
3. Write an email notification confirming their renewal payment. Use the Insert Field Option to dynamically include information from the form or the "Member Profile" Person field in the email's content.
4. Save your changes on the email dialog and on your form.
“Create Entry” Action
This Action will be used by your Auto-Create Entries setup to create the new entry and assign it as a task to be done in the future. Adjust these settings:
- Change Status To: Pending Renewal
- Allow Action: When
Entry.Status is "Incomplete"ANDEntry.Role is "Internal"
“Submit” Action
The member will click this to complete their renewal task after filling out the form and adding payment information. Adjust these settings:
- Change Status To: Renewal Paid
- Allow Action: When
Entry.Status is "Pending Renewal"ANDEntry.Role is "Public"
Additionally, add a custom email notification to the “Submit” Action:
1. From the "Submit" Action settings, find Send Email and click Add New.
2. Select the "Member" Person Field in the To: space.
3. Write an email notification confirming their renewal payment. Use the Insert Field Option to dynamically include information from the form or the "Member Profile" Person field in the email's content.
4. Save your changes on the email dialog and on your form.
Automate renewals with tasks and reminders
In this step, you’ll create a special Entry View for members to access. This is what makes renewal entries appear as tasks in their portal and trigger automated reminder emails.

Create the Task View
A Task View is basically a to-do list. Instead of just seeing a list, each entry becomes something someone needs to do, like review, approve, or complete. To set one up:
- Go to the Entries page on your Membership Renewal form.
- Click the plus sign (+) at the top and select New Task View.
- Provide a clear direction to your members, like “Pay annual dues” or “Sign document.”
- Verify your settings are set up correctly:
- The Role should be set to Public.
- Assign as Tasks should be turned on. This is what displays entries as actionable tasks on the member’s portal dashboard.
- Under Due Date, click into the field and select your Renewal Due Date calculation field you set up.
Set up reminder emails
Reminder emails are automatic emails sent to remind someone they still have a specific task to complete, like signing a document or sending a payment. Instead of having to remember or check manually, the system nudges them when something is due. This helps make sure nothing gets forgotten and reduces the need for you to follow up.
Here’s how to set them up:
- Check Send Reminders in the Task View settings.
- Customize the email notification for your reminders. This is the message members receive with the reminder.
- Under the Send field, select how many days/weeks/months before or after the due date you want the current reminder to send. You can add up to three reminders. Many membership organizations choose to remind their members at 30 days, 7 days, and 2 days before the due date.
- Click Save in both the reminder dialog and the Task View settings.
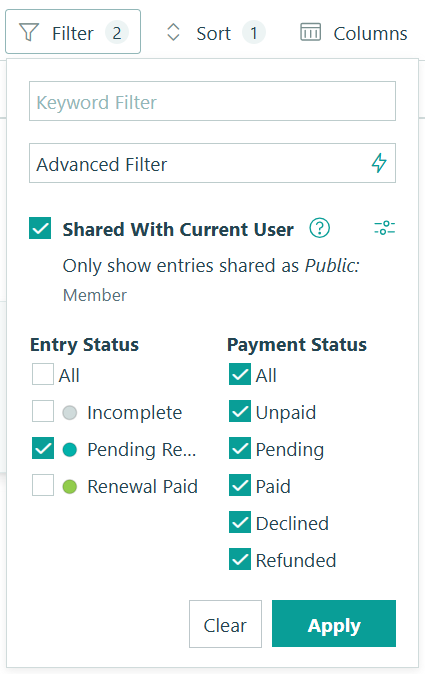
Filter the Task View:
Set your filters so that tasks appear in the view at the right time and disappear once completed.
- Add a filter for Shared With Current User. This ensures each member sees only their own renewal task.
- Filter the view by Status, only selecting the “Pending Renewal” Status.
- Without a Status Filter, members would see all of their entries in this View (Completed, Canceled, and In-Progress) which quickly turns the list into noise, and won’t correctly remove the entry from the View after the task’s Status changes to “Renewal Paid” or “Complete.” By filtering to only the “Pending Renewal” Status, you’re essentially saying: “Only show me what still needs to be done.”
- Add an Advanced Filter so the task only appears when the “Renewal Due Date” Calculation field is 31 days away or fewer (or whenever your first reminder email sends).
- Setting the filter one day earlier ensures the entry is in the view when the first reminder fires. For example, if your earliest reminder is 30 days before due, set the filter to show entries where the Renewal Due Date is within 31 days.
- Apply your filter settings.
- Hide any columns in the Task View that members shouldn’t see, such as internal notes or administrative fields.
- Don’t forget to Save the changes you made to this View!
Set up Auto-Create Entries
This is the step that makes the whole renewal flow automatic. When a member submits their registration, Cognito Forms immediately creates their renewal entry on the Dues Renewal form, pre-linked to them and dated one year out.

- Open your Member Profile form and go to Workflow → Actions.
- Open the Submit Action.
- Scroll to Create Entries and click + New Entry.
- Configure the following:
- Target Form: Select your Membership Renewal form
- Action: Select “Create Entry”. This places the renewal entry in “Pending Renewal” Status immediately
- Prefill Fields: On the left, select the Member Person field from the Renewal form. On the right, select
This Entry
- Save this Create Entry dialog box, and then Save your form.
From this point on, every new member registration automatically generates a corresponding renewal entry. The Renewal Due Date calculates itself, the task waits in the background, and reminder emails fire on schedule, all without any manual work from your team.
To automate the next year’s renewal task, you could set up the Workflow to create a new entry on the “Dues Renewal” form when the member clicks “Submit” to renew their membership.
Option B: Charge automatically by storing card details
This option has members authorize their card once during registration. You then set up recurring billing in Stripe or Square, and members are charged automatically when renewal comes around. No task, no reminder, no action required from them.

Enable Card on File on the Member Profile form
- On your Member Profile form, click Payment in the top toolbar.
- Find Keep Card on File and select your preference:
- Always: Use this option to collect card information from every member who registers
- When: Use this option to collect card information only when a specific condition is met. For example, you could add a Yes/No field asking “Automatically renew my membership each year?” and configure this setting to only store the card when the answer is Yes. This gives members the choice to be charged automatically or not.
- Map your billing fields when prompted. At minimum, you must map an Email field for this to work.
- Save your form.
Note: When members submit their registration, they’ll see a required checkbox: “I agree to save my card for future transactions.” They must check this before completing registration.
Set up the recurring charge in Stripe or Square
After a member’s card is saved, go to your payment processor dashboard to set up recurring billing:
| Payment Processor | How to set it up | Learn more |
|---|---|---|
| Stripe | Go to Customers, find the member, and select Add subscription or Create invoice to configure recurring billing on the saved card. | Read about setting up recurring payments in Stripe → |
| Square | Go to Customers → Directory, find the member, and create a recurring invoice linked to their card on file. | Read about setting up recurring payments in Square → |
Automate reminders of the upcoming charge
Even with automatic billing, members appreciate a heads-up before they’re charged. You have two options:
- Through your payment processor: Both Stripe and Square have built-in settings to send email notifications before a subscription renews or an invoice is due. Enable these in your processor’s notification settings, with no additional tools required.
- Through a third-party automation tool: For more customized reminder emails, use a tool like Zapier or Make to connect your Stripe or Square account to your email platform. Set up an automation that triggers a reminder email a set number of days before each recurring charge processes.
Step 5: Give members access to forms and entries
For any form you want members to interact with (whether to view their membership record, submit new requests, or complete assigned tasks), you need to configure it for Guest Access. This step explains how, and applies to your Member Profile form as well as any other form you add to your portal later, like an event RSVP or a service request form.

Add a Person field
Every form members access through the portal must have a Person field linked to your Member Profile form. This is what ties each submission to the right member automatically. Keep these two settings in mind:
- Default To: Set it to Current User if you want the form to automatically select the logged-in member.
- Read-Only: If you’re defaulting the field to the current user, you can use set this to Always be read-only. This would prevent members from changing who is listed here.
This ensures every entry the member submits is automatically associated with their record, with no manual linking required.
Set up a View
To make the form or entries visible in the portal, go to the Entries page and add a View for the Public Role. Here’s when to use each View type:
| View Type | When to use it | Example |
|---|---|---|
| Grid View | Let members see past submissions, with or without the ability to edit information | A “My Registrations” Grid View on an event RSVP form could allow members see all their past registrations in one place. |
| Form View | Allow members to submit a specific form multiple times or on a recurring basis | An event RSVP form could have a Form View so members can register for upcoming events directly from the portal. |
| Task View | To have one or more entries appear as actionable tasks on the member’s dashboard | The Dues Renewal form in this guide uses a Task View so the member’s renewal entry appears as an actionable task with a due date and reminder emails. |
Step 6: Customize your member portal
You have several options to tailor the portal experience for your members, from the moment they first register to every time they log back in. Use the options below based on what matters most to your organization.
| What to customize | What it is | How to set it up |
|---|---|---|
| Self-register for instant portal access | New members can sign up themselves through your portal link, giving them portal access as soon as they register and pay. | From your Guest Access settings, click the ellipsis (…) next to the “Member Profile” form and select Allow guests to register. |
| Profile editing | Allows guests to update their own profile information by clicking their profile image in the top right corner of the portal | From your Guest Access settings, click the ellipsis (…) next to the “Member Profile” form and select Allow guests to edit their profile. |
| A welcome message | Custom text that appears on every member’s homepage each time they log in. Use this to greet members, explain what they’ll find in the portal, or direct them to important links or resources. | From your Guest Access settings, find Guest Welcome Options and use the rich-text content editor to add your message. |
| Agreeing to terms & conditions | Members will be required to accept your company’s custom Terms or Service and/or Privacy Policy on their first login. If you update either document, members are prompted to re-accept the next time they log in. | In Guest Access settings, find Terms of Service and paste the URL of your documents or content in the provided fields. |
| Custom branding | Add your organization’s logo and brand colors to the portal so members see a fully branded experience that matches your website. | Go to Settings and find Appearance. Upload your logo, set your color scheme, and save your changes. This option is available on Enterprise plans only. |
| What to customize | What it is | How to set it up |
|---|---|---|
| Self-register for instant portal access | New members can sign up themselves through your portal link, giving them portal access as soon as they register and pay. | From your Guest Access settings, click the ellipsis (…) next to the “Member Profile” form and select Allow guests to register. |
| Profile editing | Allows guests to update their own profile information by clicking their profile image in the top right corner of the portal | From your Guest Access settings, click the ellipsis (…) next to the “Member Profile” form and select Allow guests to edit their profile. |
| A welcome message | Custom text that appears on every member’s homepage each time they log in. Use this to greet members, explain what they’ll find in the portal, or direct them to important links or resources. | From your Guest Access settings, find Guest Welcome Options and use the rich-text content editor to add your message. |
| Agreeing to Terms & conditions | Members will be required to accept your company’s custom Terms or Service and/or Privacy Policy on their first login. If you update either document, members are prompted to re-accept the next time they log in. | In Guest Access settings, find Terms of Service and paste the URL of your documents or content in the provided fields. |
| Custom branding | Add your organization’s logo and brand colors to the portal so members see a fully branded experience that matches your website. | Go to Settings and find Appearance. Upload your logo, set your color scheme, and save your changes. This option is available on Enterprise plans only. |
| What to customize | What it is | How to set it up |
|---|---|---|
| Self-register for instant portal access | New members can sign up themselves through your portal link, giving them portal access as soon as they register and pay. | From your Guest Access settings, click the ellipsis (…) next to the “Member Profile” form and select Allow guests to register. |
| Profile editing | Allows guests to update their own profile information by clicking their profile image in the top right corner of the portal | From your Guest Access settings, click the ellipsis (…) next to the “Member Profile” form and select Allow guests to edit their profile. |
| A welcome message | Custom text that appears on every member’s homepage each time they log in. Use this to greet members, explain what they’ll find in the portal, or direct them to important links or resources. | From your Guest Access settings, find Guest Welcome Options and use the rich-text content editor to add your message. |
| Agreeing to terms & conditions | Members will be required to accept your company’s custom Terms or Service and/or Privacy Policy on their first login. If you update either document, members are prompted to re-accept the next time they log in. | In Guest Access settings, find Terms of Service and paste the URL of your documents or content in the provided fields. |
| Custom branding | Add your organization’s logo and brand colors to the portal so members see a fully branded experience that matches your website. | Go to Settings and find Appearance. Upload your logo, set your color scheme, and save your changes. This option is available on Enterprise plans only. |
Step 7: Invite people to register
With everything configured, you need a way to direct prospective members to your registration form. There are two options; choose the one that fits how your organization communicates with potential members, or use both to reach people wherever they are.
Option A: Share your portal link
Your organization has a unique URL in Cognito Forms: https://www.cognitoforms.com/yourorganizationname
Replace yourorganizationname with your organization’s URL. You can find this in your browser’s address bar when logged in.
Put this link anywhere prospective members might find it, such as your organization’s website (as a button or linked text), outreach emails, social media posts or profiles, or printed materials.
You can also print your form’s QR code onto printed materials by simply downloading the QR code from the form’s Publish page. Learn more about QR codes here.
Option B: Embed the registration form on your website
If you’d rather keep prospective members on your website instead of sending them to the Cognito Forms portal, embed the registration form directly on any page.
- Go to the Publish page for the Member Profile form.
- Click on the Publish Code tab and find the Embed in your site section.
- Use one of the three embed code options by pasting it into your website’s HTML where you want the form to appear. Learn more about embedding forms on our support page.
The Full Member Experience
Once everything is configured, your members move through a single, connected system, from their first registration to every renewal that follows. Here’s what that experience looks like end to end.
Signing up & accessing the portal
When a prospective member finds your registration form, they fill it out, select their membership type, and pay their dues. The whole process takes a few minutes.
The moment they submit, three things happen automatically:
- Their member record is created in your membership database with Is Active? set to Yes, giving them have portal access immediately.
- They receive a confirmation email with their membership type, Member ID, and a link to log in.
- If you’ve set up the form for members to manually renew their membership via a task assignment, the entry is created in the background, dated one year out, ready to surface when the time comes.
In the portal, members see your welcome message and any forms you’ve given them access to. If you’ve enabled profile editing, they’ll be able to update their contact information as well. Everything they see is specific to them.

Renewing their membership
If you set up your renewal form with a task assignment and automatic reminders, as the renewal date approaches the member will receive a scheduled reminder email with a direct link to their task to complete payment. They click through, see the form prefilled with their membership type and information, pay their dues, and the task will disappear from their dashboard.

Enhance Your Member System with These Features
The seven-step system covers the core of what most membership organizations need. These additional Cognito Forms features pair naturally with what you’ve built, helping you automate more, communicate better, and create a more polished experience for both members and your team.
- Auto-generate membership cards or welcome letters. Set up a custom document template on your Member Profile form to automatically generate a PDF when a member registers. Attach it to the confirmation email so members receive their card the moment they join.
- Collect legally binding e-signatures for waivers and agreements. Use our Signature field to collect member signatures directly inside a form.
- Add extra security to members’ personal information. Enable data encryption to add an extra layer of protection on sensitive fields. This goes beyond Cognito Forms’ default data security with PCI-DSS Level 1 compliance.
Start Building Your Member Management System
Spreadsheets and manual renewal reminders slow your team down and create gaps that frustrate members. With Cognito Forms, you can replace that scattered process with one connected system that handles registration, dues, renewals, and member communication automatically.
Start with a template
Rather start from a pre-built foundation? Check out our Member Portal Template bundle. It keeps member data consistent across all connected forms, automates your dues collections, and is fully customizable to fit your existing workflow.
View the template →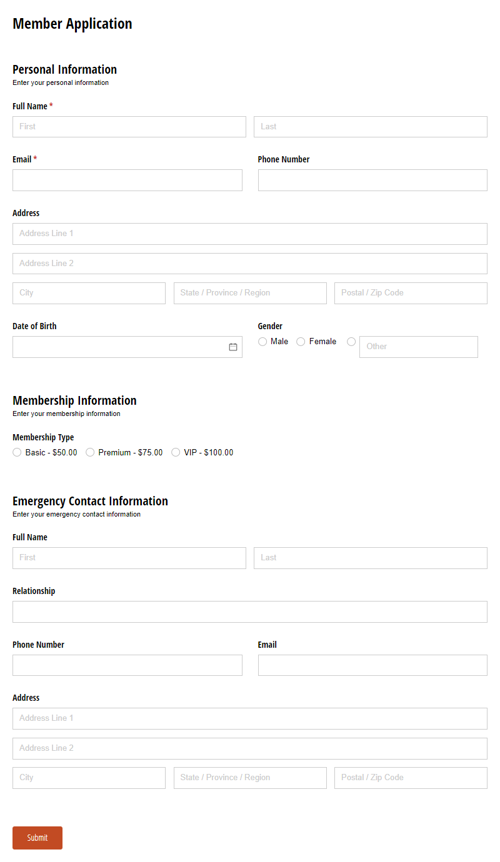
FAQ
Yes. Go to your organization’s settings, select the Guest Access tab, and find your Member Profile form. Click the three dots when hovering over the form and then enable the Allow guests to edit their profile? option. When logged into the portal, members can click their profile image in the top right corner and select Edit Profile to update any fields on your Person Form visible to the Public Role. Fields set to be Read-Only for the Public Role will remain protected and cannot be changed by members.
Learn more about managing guest types and customizing the portal experience.
No. Members log in by entering their email address and verifying it with a one-time code sent to their inbox, or by logging in using a trusted email provider, like Microsoft or Google. This makes it easy for members to access the portal without managing another set of credentials.
Learn more about what your members will experience with your portal.
Yes, you can monitor member activity through entry audit logs. These logs show when forms were submitted or updated, highlights the specific changes made to entries, when emails were sent or delivered, and more. You can also track the number of logins and the last login date of each guest from the Guest Access page in your Organization’s settings.
Simply add a Textbox field to your form and name it “Notes.” Be sure to set the field’s Show This Field setting to For Roles > Internal to ensure only your internal team can see the notes field.