Organization Owners or Administrators can customize the login authentication settings for all users in their organization.
Remain Logged in with Single Sign-On (SSO)
Allow users who sign in with SSO via Google, Facebook, or Microsoft to stay logged into Cognito Forms without being automatically signed out due to session limits.
This option is enabled by default. If disabled, users will be automatically logged out after 8 hours of inactivity (no interaction with the browser). For HIPAA-compliant organizations, user timeouts will change from 8 hours to 1 hour to increase the security for sensitive personal health information (PHI).
To allow user accounts with SSO to remain logged in:
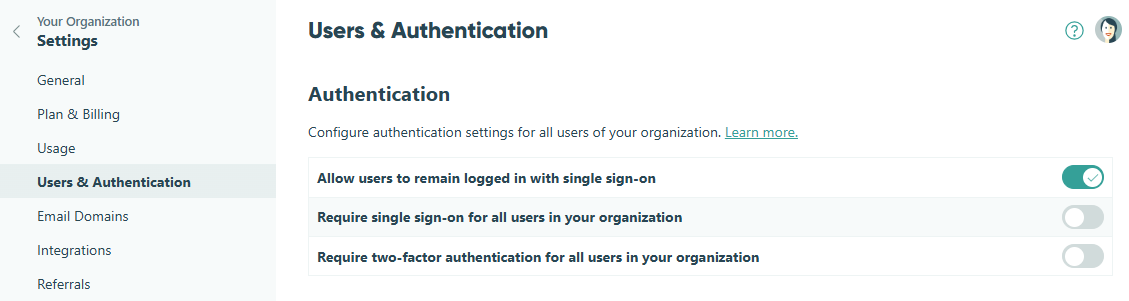
- Click your organization’s name in the top left corner and select Settings.
- Click Users & Authentication in the left-hand navigation.
- Toggle on Allow users to remain logged in with single sign-on.
Require Single Sign-On (SSO)
Once you require SSO, all organization members must sign up or log in with your selected SSO provider. We recommend checking your Users list to ensure everyone has the right credentials first!
Require all users to join or sign in to your organization with their existing Google, Facebook, or Microsoft account.
To require single sign-on for all user accounts:
- Find your organization’s name in the top left corner of the sidebar and select Settings.
- Click Users & Authentication in the left-hand navigation.
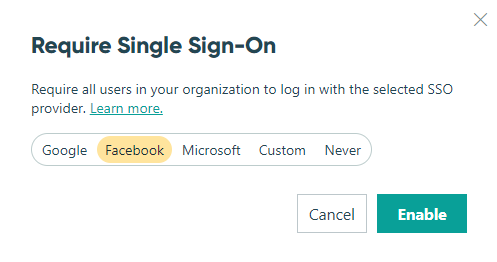
- Toggle on Require single sign-on for all users in your organization.
- Select an SSO provider (Google, Microsoft, or Facebook). You must be logged in with your selected provider before you can enable SSO.
- Select Save. If you want to change your SSO provider, you must turn off Require Single Sign-On and then repeat steps 3 and 4.
Managing users
- Once you restrict users to your selected SSO provider, all organization members must sign up or log in with an email address associated with your provider.
- If your existing users have the right credentials, they can continue to log in as usual. If you enable SSO and a user does not have the right credentials, you can turn it off and allow them to log in and update their email address.
- If any existing users are members of multiple Cognito Forms organizations, they must navigate to an organization-specific Url to login with SSO. You can find your organization’s Url when logged in to your organization dashboard (ex:
https://www.cognitoforms.com/yourorganization). - Please note that enabling SSO does not affect user permissions for new or existing users.
Google SSO
While Google sign-in supports standard Google and Gmail accounts, restricting users to your Google domain requires a Google Workspace account.
![]()
Google Workspace includes productivity apps such as Gmail, Drive, Docs, Meet, and many more.
You can control who has access to your Cognito Forms organization based on your Google Workspace domain. Once enabled, your users will be automatically signed in to Cognito Forms with their Google accounts.
To integrate Cognito Forms with your Google Workspace domain:
- Find your organization’s name in the top left corner of the sidebar and select Settings.
- Click Users & Authentication in the left-hand navigation.
- Toggle on Require single sign-on for all users in your organization.
- Select Google as your SSO provider and then select Restrict users to my Google Workspace domain.
- Select Enable. You will be prompted to sign in with your credentials before the settings are enabled.
Microsoft Entra SSO

Microsoft Entra ID (formerly Azure AD) is a cloud-based identity and access management solution. A Microsoft Entra tenant provides identity and access management (IAM) capabilities to applications and resources used by your organization.
You can control who has access to your Cognito Forms organization based on your Microsoft tenant. Once enabled, your users will be automatically signed in to Cognito Forms with their Microsoft Entra accounts.
To integrate Cognito Forms with Microsoft Entra ID:
- Find your organization’s name in the top left corner of the sidebar and select Settings.
- Click Users & Authentication in the left-hand navigation.
- Toggle on Require single sign-on for all users in your organization.
- Select Microsoft as your SSO provider and then select Restrict users to my Microsoft tenant.
- Sign in to the Microsoft Entra admin center as at least a Cloud Application Administrator.
- In the Overview section, select + Add > App registration. Enter a name and choose the account type that applies to your organization.
- Set the Redirect URI to Web and enter:
https://www.cognitoforms.com/svc/auth/oidc - Select Register.
- Go to Certificates & secrets and select + New client secret. Enter a name and a secret expiration period that fits your organization’s security policy.
- Copy your new client secret value. This value will not be visible again after you leave this page.
- Go back to the application overview page and copy the Application (client) ID and Directory (tenant) ID.
- In Cognito Forms, enter the Tenant ID, Client ID, and Client Secret values.
- Select Enable. You will be prompted to sign in with your credentials before the settings are enabled.
Custom SSO

Cognito Forms uses OpenID Connect to pair with popular identity providers, including Auth0, Okta, OneLogin, PingIdentity, Salesforce and more.
To integrate Cognito Forms with your SSO provider via OpenID Connect:
- Create a new client for Cognito Forms in your SSO provider. Set the Redirect URI to Web and enter:
https://www.cognitoforms.com/svc/auth/oidc. Ensure the following scopes are enabled for the client:openid,profile,email, andoffline_access. - In Cognito Forms, find your organization’s name in the top left corner of the sidebar and select Settings.
- Click Users & Authentication in the left-hand navigation.
- Toggle on Require single sign-on for all users in your organization.
- Select Custom.
- Discovery URL: This setting is the discovery URL for your SSO provider. For example, your Okta discovery URL will look something like this:
https://yourOktaDomain.oktapreview.com/.well-known/oauth-authorization-serverSee instructions on finding the discovery URL for your SSO provider: - Client ID: This setting is the client ID for the client in your SSO provider.
- Client Secret: This setting is the client secret value for the client in your SSO provider.
- Discovery URL: This setting is the discovery URL for your SSO provider. For example, your Okta discovery URL will look something like this:
- Select Enable. You’ll be prompted to log in with your connected SSO provider.
Require Two-Factor Authentication (2FA)
Once you require two-factor authentication, all organization members will be prompted to set up 2FA as soon as they log in to your organization. We recommend giving your organization members a heads-up first!
To require two-factor authentication for all user accounts:
- Find your organization’s name in the top left corner of the sidebar and select Settings.
- Click Users & Authentication in the left-hand navigation.
- Toggle on Require two-factor authentication for all users in your organization.
Once enabled, any users who have not already set up 2FA for their account will be prompted to do so the next time they log in to your organization. In the Users section, you can view which users currently have 2FA enabled on their accounts.