Build a branded donation form that accepts one-time or recurring payments and creates a personalized giving experience for your donors.
Build Time & Skill
20-30 min
Beginner
What you'll learn
How to build a donation form that collects payments via Stripe, PayPal, or Square, personalizes the giving experience with conditional logic and dynamic impact statements, and automatically sends donors a confirmation receipt
Donors decide whether to give to your cause in seconds. A polished, easy-to-use donation form signals that your organization is credible and that their payment is in good hands. A clunky one sends them somewhere else.
Cognito Forms makes it easy to build a donation form that works the way your supporters expect: clean, mobile-friendly, and connected to a trusted payment processor. Whether you run a nonprofit, school fundraiser, church, or community organization, you can set up a complete giving experience with ease.
A well-built donation form helps you:
- Securely accept payments. Connect to Stripe, PayPal, or Square directly from your form. No code or third-party plugins.
- Give donors a personalized experience. Let supporters choose one-time or recurring giving, designate a fund, see a real-time impact statement, or dedicate a gift in someone’s honor.
- Automate receipts and follow-up. Send a branded confirmation email with a PDF receipt attached the moment someone gives.
- Track and manage donations in one place. Use Entry Views to view new donations, filter for high-value donors, and track contribution levels without manually re-entering data in spreadsheets.
Step-by-Step: Building Your Donation Form
To build a donation form in Cognito Forms, set up a multi-page form that walks donors through their gift selection, personal details, and billing. Then, connect a payment processor and configure automatic receipts. These eight steps cover the full setup from planning to publishing.
Step 1: Plan your giving experience
Before you open the form builder, spend a few minutes mapping out what your form needs to do. The clearest donation forms are built with intention.
Work through these questions:
| Decision | What to think about |
|---|---|
| One-time vs. recurring | Will you offer one-time gifts only, or also give donors the option to give monthly, quarterly, or annually? |
| Donation tiers | What preset amounts do you want to suggest? ($25, $50, $100, $250, Other) |
| Impact statements | Do you want to add a short sentence for each tier that shows donors exactly what their gift does? |
| Fund designation | Can donors choose where their gift goes (e.g., general fund, food pantry, youth program)? |
| Dedications | Do you want to let donors to give in honor or memory of someone? |
| Personal vs. corporate gifts | Will you accept corporate donations? If so, you’ll need to collect a company name. |
| Anonymous donations | Will you allow donors to give without sharing their name publicly? |
| Newsletter opt-in | Do you want to give donors the option to sign up for updates from your organization? |
Step 2: Set up gift selections
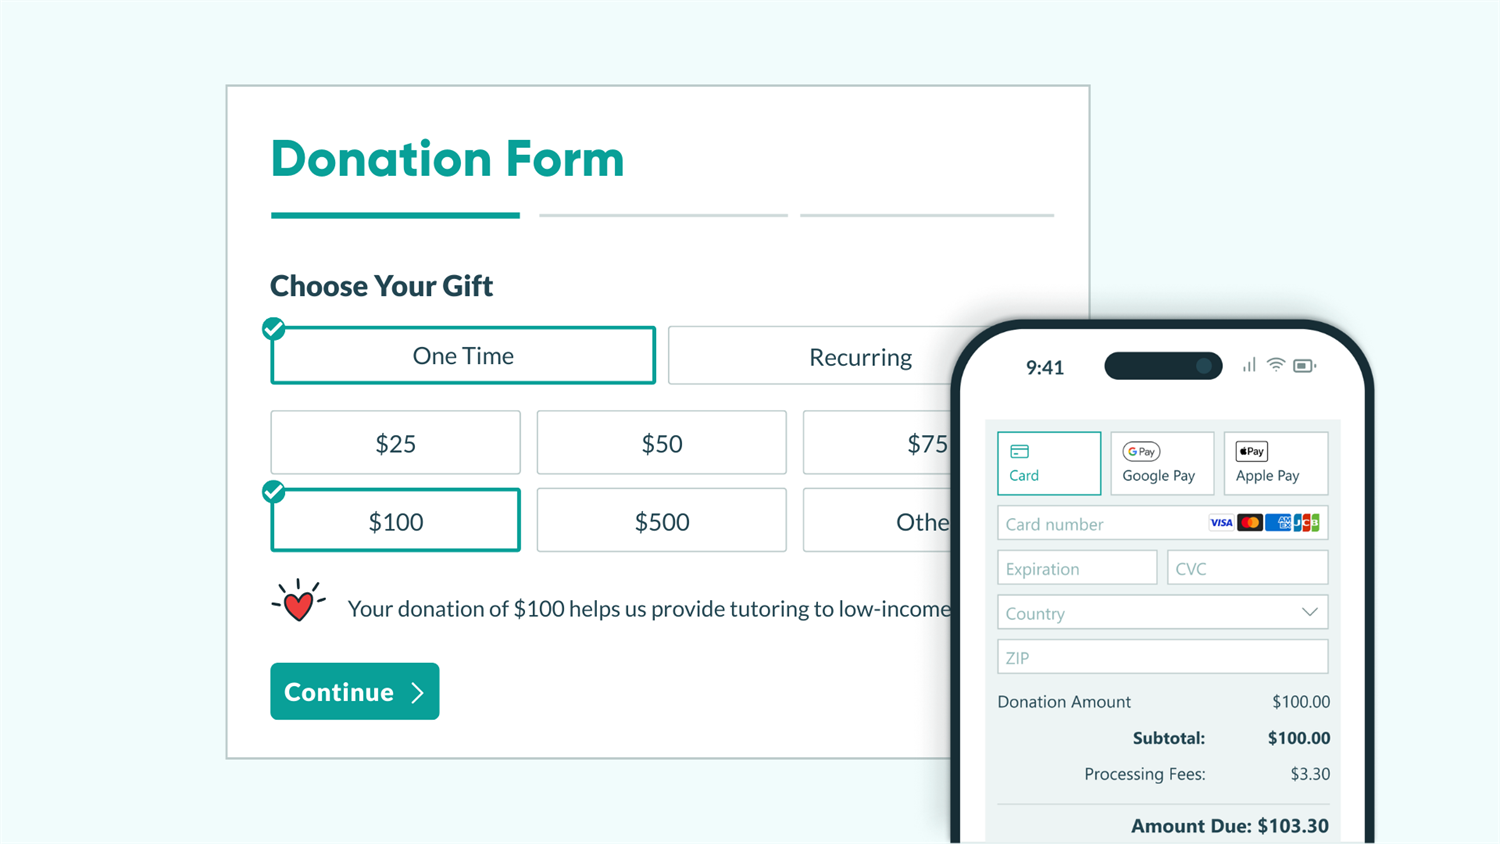
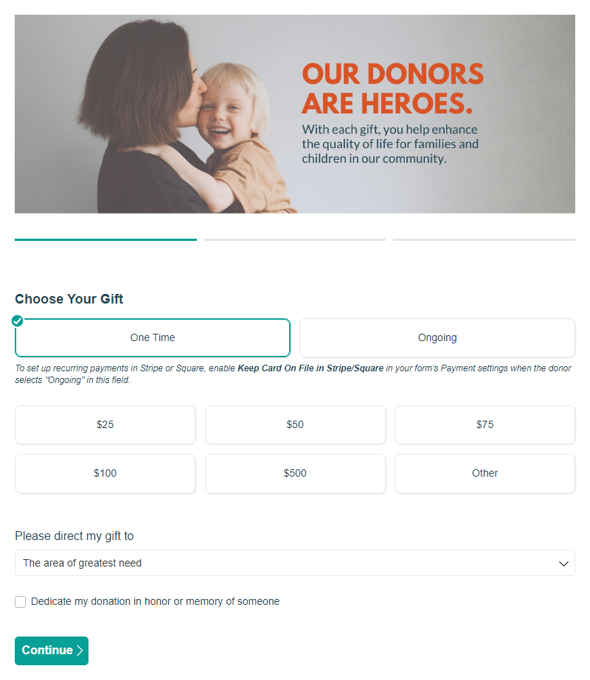
With your plan in hand, open Cognito Forms and create a new form. The donation form we’ll use in our example has three pages that guide donors through the experience without overwhelming them: gift selection, personal details, and billing. The first page (selecting a gift) is the most important page. It’s where donors decide what to give and why.
Gift type
Let donors toggle between giving options at a glance and select their desired gift frequency, if they choose a recurring gift.

To do this:
- Add a Choice field to your form with options to choose a one-time gift of recurring gift. Name it something clear, like “Gift Type.”
- Add a second Choice field with options for the frequency of giving. Name it something clear like “Gift Frequency.”
- Under the “Frequency” field’s Show This Field setting, set it to show only When >
Gift Type = "Ongoing". This hides the field for one-time donors and appears the moment someone switches to recurring giving.
Donation amount
Set up a clickable amount selector donors will interact with most, and give donors the option to donate a custom amount (or variable amount) different from the preset tiers (or fixed amounts).

To add preset tiers (fixed amounts):
- Add a Choice field with your desired giving tiers as options. Name the field something clear, like “Donation Amount.”
- Under Choice Options check the box next to Assign Prices.
- In the Price column that appears, set each option’s price to the correct amount. Uncheck the Show Prices in Choice Field box to avoid the amount showing twice on the options.
To enable custom (variable) amounts:
- Add an “Other” choice option to your “Donation Amount” Choice field options.
- Add a Currency field below the “Donation Amount” field. Name it “Custom Amount.”
- Set the “Custom Amount” field’s Show This Field setting to When
Donation Amount = "Other". This field only appears when a donor wants to give a different amount than the preset tiers.
Impact statements
Impact statements are one of the most effective tools for increasing average donation size. Donors give more when they understand exactly what their money does, and a personalized message for each tier makes that tangible.

To add unique impact statements:
- Add a Calculation field to your form, keep the Type set to Text, and give it a clear name.
- In the Calculation, write a conditional expression that returns a different sentence for each giving tier. For example:
= if ChooseYourGift.DonationAmount = "$25" then "Your donation of $25 helps us provide parents in need with basic infant care." else if ChooseYourGift.DonationAmount = "$50" then "Your donation of $50 helps us provide shelter and food to one person for a night." else if ChooseYourGift.DonationAmount = "$75" then "Your donation of $75 helps us provide utility relief to families in hardship." else if ChooseYourGift.DonationAmount = "$100" then "Your donation of $100 helps us provide tutoring to low-income students." else if ChooseYourGift.DonationAmount = "$500" then "Your donation of $500 helps pay for rehabilitation services when health insurance is unavailable." else if ChooseYourGift.DonationAmount = "Other" then "Your donation helps us continue to serve the people in our community." else null
- Now, add a Content field under your “Donation Amount” field. Use the Insert field option to dynamically populate the impact statement that matches the donation tier selected.
- In the Content field’s Show This Field setting, choose When. Set it to show only when the
"Donation Amount" field is filled out. This ensures the statement only appears after a donor makes a selection.
Fund designation and dedications
Some donors want to direct their gift to a specific area or donate in honor or memory of someone. Add these customization options to your donation form to make the giving experience more personal.

- Add a Choice field to your form with options for different funds your organization has (e.g. “Student Education Fund,” “Food Pantry Fund,” etc.).
- When adding your choice options, begin with “The area of greatest need” and ensure this is the default choice by checking the box next to it. This means the option will already be selected when someone opens the form, but donors can change it if they prefer to direct their donation to a different area.
- Add a Yes/No field displayed as a Checkbox. Set the field label to: "Dedicate my donation in honor or memory of someone.
- Set the Default of the Yes/No field to “No.” Donors who want to donate in honor of someone can adjust it as needed.
- Add a Choice field named “This gift is” and add two options: “in honor of” and “in memory of.”
- Add a Name field titled “Honoree’s Name”.
- For both the “This gift is” field and the “Honoree’s Name” field, set the Show This Field setting to When >
Dedicate my donation in honor or memory of someone = "Yes"This means the two fields will appear only after a donor checks the dedication box.
Step 3: Collect donor & billing info
This page collects the information your organization needs to process the gift and stay in touch with the donor.
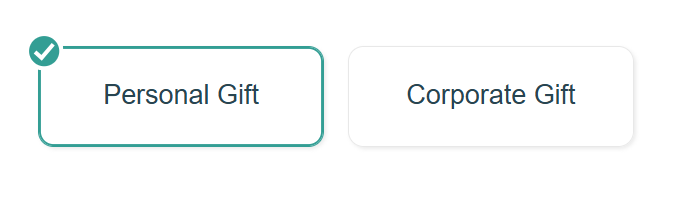
Type of donation
Add a Choice field with two options: “Personal Gift” and “Corporate Gift.” Choose “Personal Gift” as the Default option.
Section: What’s your name?
Group the following fields inside a section labeled “What’s your name?”:
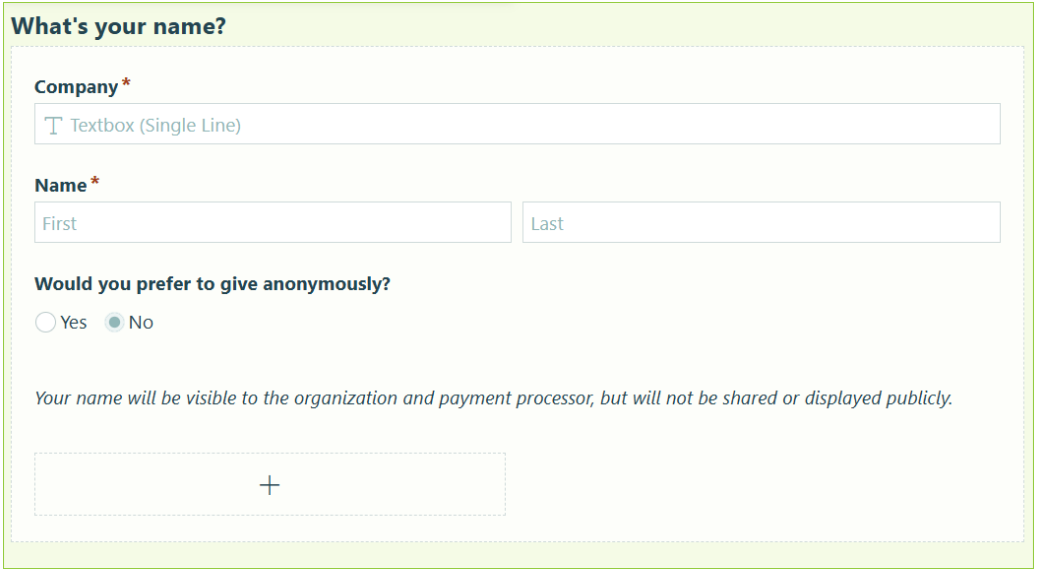
- Company: Add a Textbox field. Under Show This Field, set it to show When
Type of donation = "Corporate Gift". This field only appears for donors giving on behalf of a business. - Name: Add a Name field. Mark it as required.
- Would you prefer to give anonymously?: Add a Yes/No field displayed as a Checkbox. Set the default to “No.”
- Anonymous Donation Disclosure: Below the Yes/No field you created, add a Content Field that shows When this checkbox is selected, with the message: “Your name will be visible to the organization and payment processor, but will not be shared or displayed publicly.” This gives anonymous donors confidence that their privacy is respected.
Section: Let’s get your details.
Group the following fields inside a section labeled “Let’s get your details”:
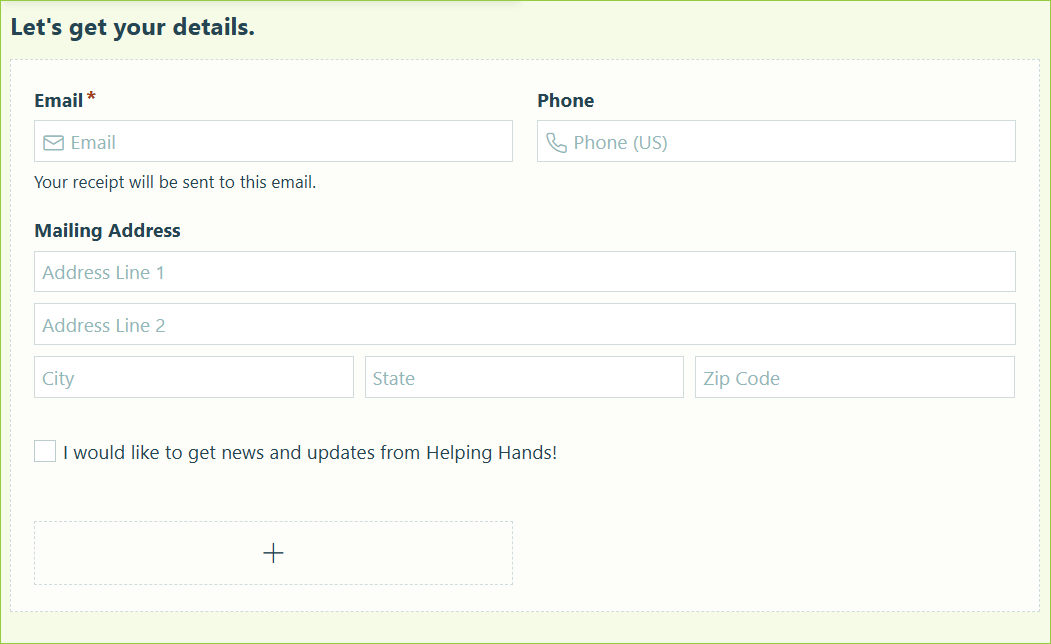
- Email: Add an Email field. Set the Require This Field setting to “Always.”
- Phone: Add a Phone field. Set the Require This Field setting to “Never.”
- Mailing Address: Add an Address field. Set the Require This Field setting to “Always.” This address is used for acknowledgment letters and tax receipt mailings.
- Newsletter subscription: Add a Yes/No field displayed as a Checkbox. Default to “No.” A straightforward opt-in that stays out of the way for donors who don’t want to subscribe.
Section: Billing address

Group the following inside a section labeled “Billing Address”:
- Same as Mailing Address: Add a Yes/No field displayed as a Checkbox. Default to “No.”
- Billing Address: Add an Address field and set the field’s Require This Field setting to “Always.”
- Adjust the Billing Address field’s settings to that when a donor checks the “Same as Mailing Address” box, the billing address fills in automatically with no retyping required. Adjust these settings:
- Set the Default Values to reference the Mailing Address fields from page 2 (Line 1, Line 2, City, State, Postal Code).
- Set the Default When condition to
=(SameAsMailingAddress). - Set Read-Only to When
Same as Mailing Address = Yes.
Step 4: Set up payment collection
Cognito Forms handles a donor’s entire transaction securely inside your form. No redirect to another site or separate checkout page.

Add a Price field
- At the bottom of your form, add a Price field.
- Set the Payment Amount to reference your “Donation Amount” field. Use a calculation to handle both preset tiers and custom amounts:
= if ChooseYourGift.DonationAmount = "Other" then ChooseYourGift.CustomAmount else ChooseYourGift.DonationAmount_Price
Connect a payment processor
- Go to the Payment settings in the top left of the Build page.
- Click Add Payment Account to connect to your desired payment processor.
- Follow the prompts to sign in to your payment provider.
Some organizations like to pass along processing fees to the donor. To do this, adjust the Include Processing Fees option in your Payment settings.
Enable recurring donations
When a donor selects “Ongoing” at the beginning of your donation form, the “Frequency” Choice field appears. In order to set up recurring payments in Stripe or Square, enable our Card on File feature:

- In the Payment Settings menu, find the Keep Card on File in Stripe/Square? option.
- Never is selected by default. Change this setting to When and use the Conditional Logic Builder to only save credit card information when
ChooseYourGift.GiftType = "Ongoing" - In the Map Billing Fields setting, choose the donor’s email field in the Email dropdown. You must map an email field in order to save a card on file.
- At this point, you can set up subscriptions in Stripe/Square, according to the donor’s selected giving frequency.
Now, customers must select the I agree to save my card for future transactions option before submitting your form. This checkbox is required so that customers can give explicit consent to having their card information stored in Stripe/Square.
Stripe supports Apple Pay and Google Pay automatically at no extra setup. Donors on mobile can complete their gift with a single tap, which removes a significant barrier for younger or mobile-first donors.
Step 5: Personalize the experience with conditional logic
Conditional Logic lets your form respond intelligently to what each donor selects, showing relevant fields at the right moment and hiding everything else. This keeps the form clean and focused for every donor, regardless of how they’re giving.
Most of the Conditional Logic in this form has already built in steps above. Here’s a full reference of every conditional field to double-check your setup before testing.
| Field | Show When |
|---|---|
| Gift Frequency | Gift Type = “Ongoing” |
| Custom Amount | Donation Amount = “Other” |
| Impact Statement | Donation Amount is filled out (or ≠ null) |
| This gift is | Dedicate my donation in honor or memory of someone = Yes |
| Honoree’s Name | Dedicate my donation in honor or memory of someone = Yes |
| Company | Type of donation = “Corporate Gift” |
| Anonymous donor disclosure (Content field) | Don’t share my name publicly = Yes |
The Impact Statement is the most visible piece of conditional logic on this form. Write each tier’s message in the voice of your organization (specific, warm, and outcome-focused). Vague statements like “helps our mission” are far less effective than concrete ones like “provides shelter and food to one person for a night.”
Step 6: Customize style & layout
A polished donation form builds donor confidence before they enter a single piece of information. These quick adjustments make your form look intentional and professional without any design experience.
Separate into pages
Breaking your form into pages reduces visual overwhelm and keeps donors focused on one task at a time. This form uses three pages: gift selection, personal details, and billing.

To set up pages:
- On the Build page, drag a Page Break to the point where you want a new page to begin.
- Adjust the Next Button Text to something like “Continue”, if desired.
- From the Form Settings page, find Progress Bar.
- Adjust the form’s Progress Bar style, change each page’s title, show or hide page titles, and show or hide Page Numbers.
Add a photo to appeal to emotions
A single well-chosen image at the top of your form can do more to motivate giving than any amount of copy. Donors respond to faces, real situations, and images that connect them to the people their gift will help.

Three ways you can add images to your form include:
- At the top of your form: Go to the form’s Publish page and add a banner as the form’s Logo. You can also choose to show only the logo/image, or include the form name as well.
- In a Content field: Use the rich text editor in a Content field to insert image(s) throughout your form.
- With each option in a Choice field: Add images to your giving tiers or fund designation categories for more context.
Step 7: Set up confirmations and donor receipts
A great giving experience doesn’t end at the payment screen. A confirmation message and receipt email can be automatically triggered, shaping how donors feel about your organization after they give.
Customize the confirmation message
After a donor submits, Cognito Forms displays an on-screen confirmation message. Make yours specific and personalized to foster a positive donor experience.

To adjust the confirmation message:
- From the Build page, go to your form’s Workflow settings.
- Find Confirmation, and replace the default Message content with something meaningful.
- Reference the donor’s name and donation amount using the Insert Field option (e.g., “Thank you {Name.First} for your generous gift of {DonationAmount}. Your support makes a real difference.”).
- You can also Redirect donors to a thank-you page on your website for a fully branded experience.
Set up the receipt email
Create an automated confirmation email that arrives to the donor within seconds of their donation. Instant, professional confirmations help build donors’ trust, and improve the odds of them giving again.

To set up an instant confirmation email:
- Go to your form’s Workflow settings and find Actions.
- Select the Submit Action. (We renamed ours to “Donate Now,” but this is optional.)
- Under Send Emails, click + Add Email.
- Set the To field to the form’s Email field so the receipt goes directly to the donor.
- Write a subject line like “Thank you for your donation!”
- In the message body, use the Insert Field option to dynamically include the donor’s name, donation amount, and donation date.
- In the Include options, select Receipt for our standard receipt document. Alternatively, you can attach a Custom Document for branded PDF receipts (see the Additional Features section for more on this).
Step 8: Test and publish
Before you share your form with anyone, run through the full donor experience yourself.
Test the form
- Use Preview Mode to fill out your form as a customer would. Verify:
- Conditional fields show and hide correctly based on your selections
- The Payment field calculates the correct amount for both tier selections and custom amounts
- The confirmation message appears after submission
- While in Preview Mode, use a test card number to submit a sample donation without processing a real charge. Learn more about testing payments.
- Submit a test entry from the form’s Public Link to check emails and PDF attachments.
- To do this without collecting payment, temporarily toggle payment off. Change the Process Payment setting in your form’s Payment Settings to Never. Just don’t forget to change it back when you’re done!
Please Note: Anything submitted in Preview mode will not be recorded, as it’s only intended to test how the form looks and functions before publishing it live. When you use a test card number, the transaction will show up in Stripe under your Test payments, but they do not process any real funds.
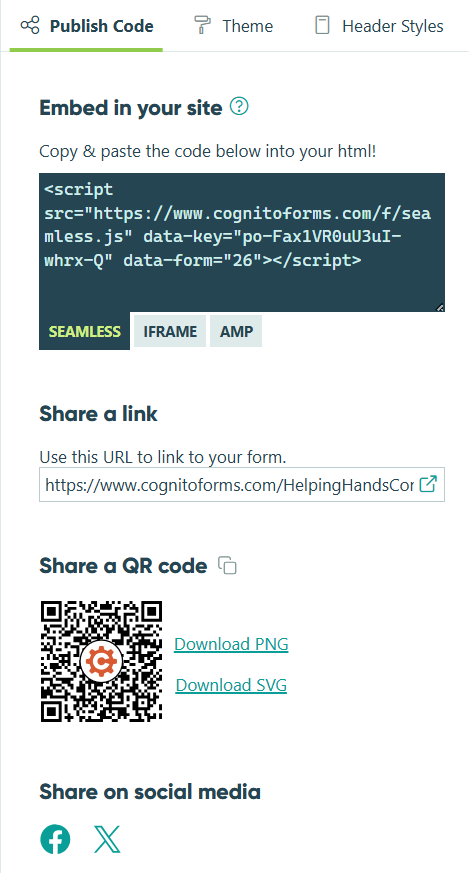
Publish your form
Once everything checks out, click Publish, go to the Publish Code tab, and share your form via:
- Direct link: Share in email campaigns, social media posts, or text messages
- Embed: Drop the embed code directly on your website’s donation page
- QR code: Include on printed materials, event programs, or signage
The Full Donor Experience
Once your form is live, donors move through a fast, intuitive giving process, from choosing an amount to receiving their receipt.

Here’s what they see at each step:
- Donors land on a clean form with a clear choice: give once or set up recurring support. They select a preset tier and a personalized impact statement appears immediately below, showing exactly what their gift does. If they want to give a different amount, a custom field appears the moment they select “Other.”
- Optional fields appear only when relevant. Donors who want to direct their gift to a specific fund or honor someone simply interact with those fields. The right inputs appear instantly, without cluttering the experience for donors who don’t need them.
- Personal details are filled in quickly from any device, and the payment step feels familiar. Corporate donors see a company name field as soon as they select “Corporate Gift.” Donors who want to give anonymously check the box and a brief explanation appears confirming their name stays private from the public.
- The final page is fast. One checkbox fills in the billing address automatically. Donors complete payment and click Donate Now. A confirmation message appears immediately, and a receipt email lands in their inbox within seconds.
Donation Forms in Action: Real-World Examples
Online donation forms work for nearly any cause or organization, from nonprofit annual fundraisers and school fundraisers to regular giving at churches or religious organizations. The setup is the same, while the fields and use case details change. Here are three examples of how organizations use Cognito Forms to create professional, donor-friendly giving experiences.
Nonprofit organizations
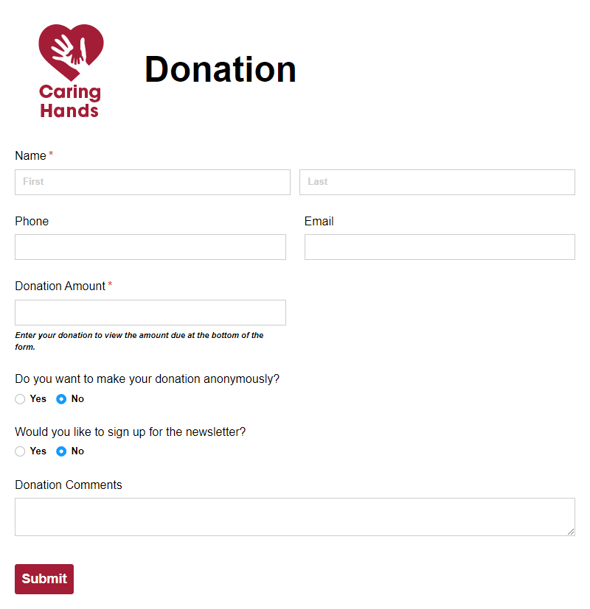
A small community-focused nonprofit runs its annual fundraising campaign through a single Cognito Forms donation form. Donors choose from four giving tiers (each paired with an impact statement) or enter a custom amount. A Recurring Donation field lets supporters opt into monthly giving with one click. After submitting, donors receive a branded PDF receipt they can use for tax purposes, automatically generated and attached to the confirmation email.
Schools & youth programs
A school PTA uses a donation form for their spring fundraiser tied to a specific goal: new furniture and supplies for the art department. Each giving tier is labeled with a tangible outcome ("$100 covers one student’s materials for the entire year"). A Fund Designation field isn’t included since all gifts go to one place, keeping the form simple. The PTA uses a filtered Entry View to track progress toward their $10,000 goal in real time.
Churches & religious organizations
A church uses a donation form for ongoing giving, with a Choice field for offering categories (Tithes, General Offering, Building Fund, Kids Ministry, Missions). A dedication field appears conditionally when a member selects “Give in memory or honor of someone.” The confirmation email thanks the donor by name and includes the specific category they gave to, adding a small touch that makes the experience feel personal rather than transactional.
Additional Features to Elevate The Donor Experience
Once your form is live and collecting gifts, these Cognito Forms features can help you do even more with what you’ve built:
- Design a Custom Document Template that automatically generates a branded donor receipt on every submission. Include your logo, tax ID, donation details, and a personal thank-you message. Donors get a receipt they can actually use at tax time.
- Turn high-value donations into actionable tasks for your team. With Workflow Tasks, you can assign a team member to personally thank every donor who gives above a certain threshold, and mark the task complete once follow-up is done.
- Give recurring donors a secure donor portal. With Guest Access, donors can login to view their full giving history, download past receipts, or update their payment method, all in one place.
- Connect your donation form to other tools, like an email marketing platform or CRM, with one of many Integrations we offer. Add every new donor to your mailing list automatically, trigger a welcome sequence, or log gifts directly to your donor database.
Start Collecting Donations Online Today
The only thing standing between your supporters and giving to your cause is a form that makes the process easy. With Cognito Forms, you can build a polished, secure donation experience in under 30 minutes. One that works on any device, sends automatic receipts, and keeps your team organized from day one. Build your donation form today to foster positive donor experiences and put your fundraising on autopilot.
Start with a template
Rather start from a pre-built foundation? Browse our donation form templates to find one that fits your needs. You can customize any template to match your organization's brand and mission.
-
Donation Form
Free donation form template built for nonprofits. Features giving tiers, recurring gifts, real-time impact statements, and automatic PDF receipts.
Preview -
Donation
Use our free online donation form template to collect contributions for a worthy cause.
Preview -
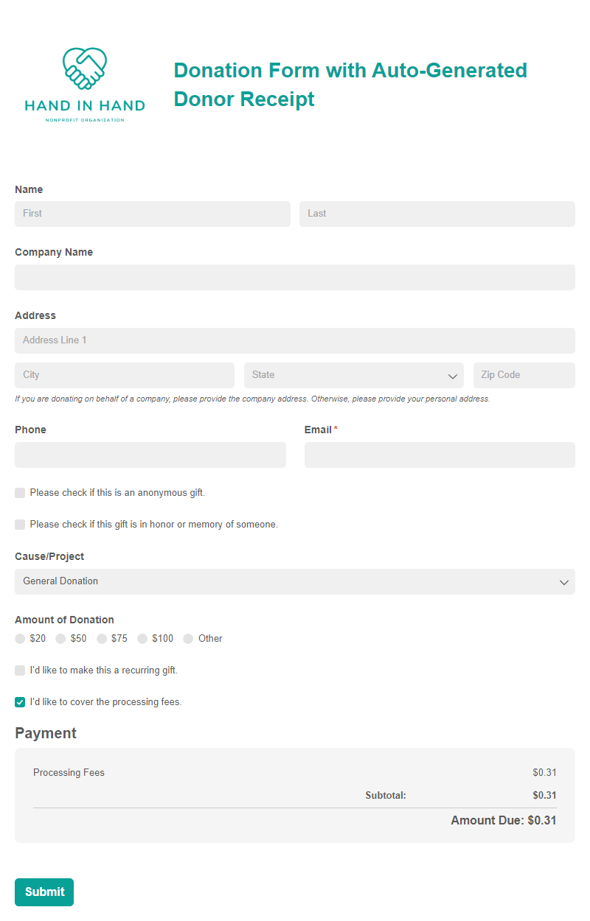
Donation Form Template with Auto-Generated Donor Receipt
This Nonprofit Donation Template provides you with an easy-to-use form that can quickly be tailored to fit your needs. After donating, donors will receive a charitable donation receipt using a custom document template created with nonprofits in mind!
Preview
FAQ
After you’re finished building your form, go to the Publish tab and copy the embed code. Paste it into any page on your website (no developer or coding knowledge needed). The form is fully responsive and adjusts automatically to any screen size, so donors on mobile have the same smooth experience as those on a desktop.
Learn more about embedding forms.
Yes, if you use Stripe as your payment processor. Donation forms connected to a Stripe account work on the free plan. If you prefer PayPal or Square, you’ll need a paid Cognito Forms plan.
Learn more about connecting to a payment processor.
No. Unlike other platforms, Cognito Forms doesn’t limit the number of payments you can collect on any plan level.
However, please keep in mind that each plan level allows a certain number of entries (or submissions) each month. If you exceed your entry limit for the month, your form will still continue to function as always and payments will continue to be collected, but access to the entries will be locked on your end. Additionally, excess entries will not trigger any email notifications or integrations.
Learn more about managing storage limits.