You can add any number of tracking pixels to your form - give each one a unique name for easy identification!
A tracking pixel is an HTML code snippet that is loaded when a user visits a website or opens an email. You can use tracking pixels on your forms to track form submission performance and send this data back to Facebook or another third-party ad service.
Please note: The tracking pixel only records and sends data when a user submits your form. It does not support custom JavaScript or place any scripts directly on the form. Additionally, ad blockers may detect and block tracking requests from pixels, potentially preventing actions or conversions from being recorded.
To add a tracking pixel to your form:
-
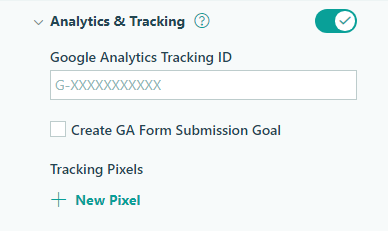
Open the form builder and enable Analytics and Tracking in the Form Settings menu.
-
Select New Pixel in the Tracking Pixels section.
-
Enter your tracking code or URL in the dialog.

-
Hit Save to create your new tracking pixel. This pixel tracks your form when submitted from the public link or submitted from the embedded form on your website. In the Tracking Pixels section, you can add, delete, and edit all your pixels as needed.
To test that your Facebook pixel is firing:
- Go to the Facebook Events Manager and select Data Sources.
- Select your pixel from the list of Data Sources and click the Test events tab.
- Under Confirm your website’s events are set up correctly, enter your form’s public url in the area labeled Enter website URL and click Open website. If you do not see that block, you may need to Clear Activity.
- You should see your form in the new browser tab. Fill it out and submit it.
- Go back to the Facebook Events Manager. If the event successfully fired, you should see that the pageview was processed. Test events appear in real-time, but it may take up to 30 minutes after you set up your event to see it in your analytics.