To access Form Settings, open the Build page and click Settings in the top toolbar.
Click the icon next to Form Settings to convert a Standard Form to a Person Form, or a Person Form back to a Standard Form. A Name field and an Email field are required to convert to a Person Form.
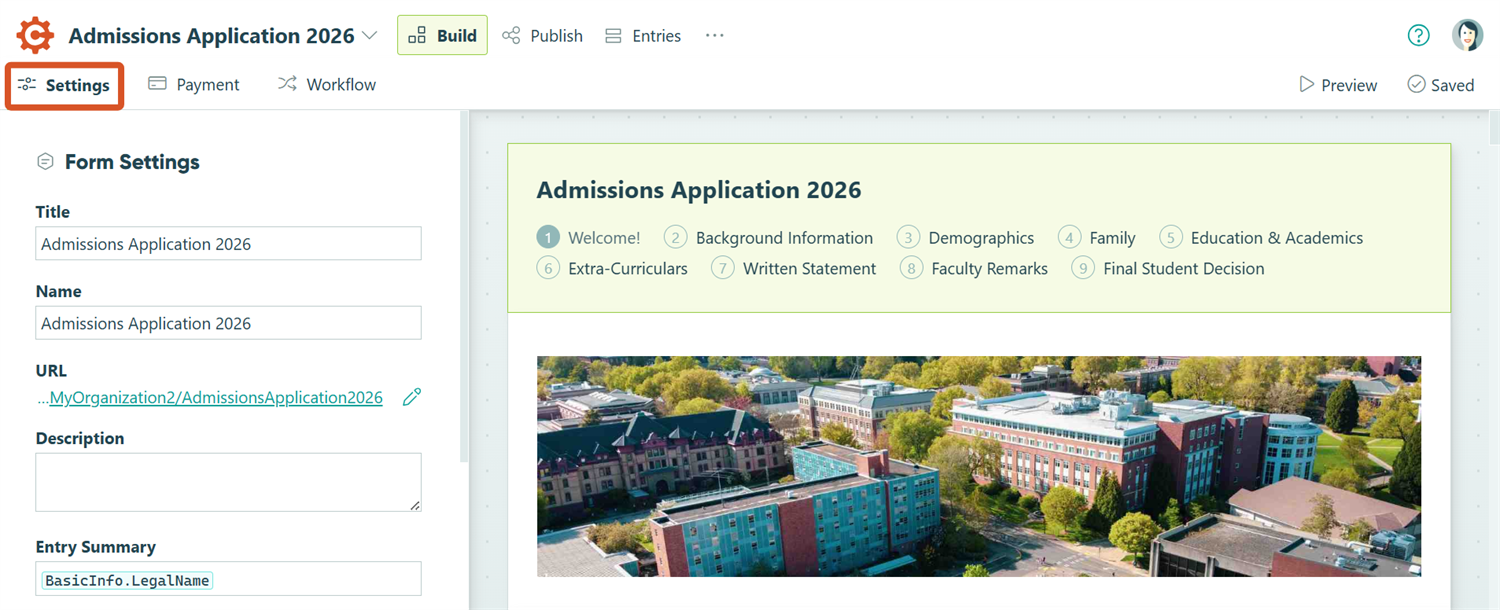
Title
The form title is the primary name displayed when people view your form. It appears at the top of the public form, on shared template pages, and elsewhere where the form is publicly shared. Changing the title will also automatically update the form’s name, unless you’ve set a custom name.
Name
The form name is used internally within your Cognito Forms organization to help you identify your form. It can be up to 100 characters long and is only visible to members of your organization.
By default, changing the form name automatically updates the form’s URL and QR code. To change the form name without affecting your existing links, set a custom URL first. Once a custom URL is set, you can change the form name without affecting the URL or existing links.
URL
If you change the form URL, be sure to update any direct links you’ve already shared, such as in emails, social media posts, or other communications.
The form URL is the unique web address used to access your form. You can click the pencil icon to customize the portion of your form’s public URL that appears after https://www.cognitoforms.com/YourOrganization/.
Description
The Description appears at the top of your form underneath the Title, and gives form users a brief description of what the form is about.
Entry Summary
The Entry Summary appears as a sub-heading under the form name in the Submissions and Orders tabs in the individual entry view, as well as in the entry preview when you open a submission from the Submissions tab. Enter free text, insert field values, or combine both to create a meaningful summary for each entry.
Data encryption
Encrypting your entry data keeps it safe and prevents it from being transmitted out of your Cognito Forms account. You must encrypt any form and protect any field that contains sensitive information, such as: Social Security numbers, Driver’s license numbers, and other personally identifiable information.
Use with Lookup Field
Select this option to make the form’s entry data accessible to other forms via the Lookup field. Disabling this setting will prevent your form from being used as a lookup source for new Lookup fields, but will not impact any existing fields. This option is off by default.
Restrict guest lookup options – When this option is selected, any Lookup fields connected to this form will only display dropdown choices for entries that have been shared with the guest. Entries that the guest doesn’t have access to won’t appear in the dropdown. Learn more about Guest Access.
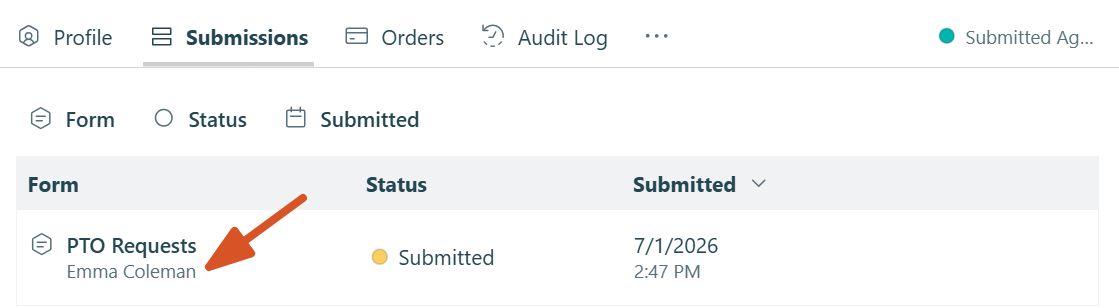
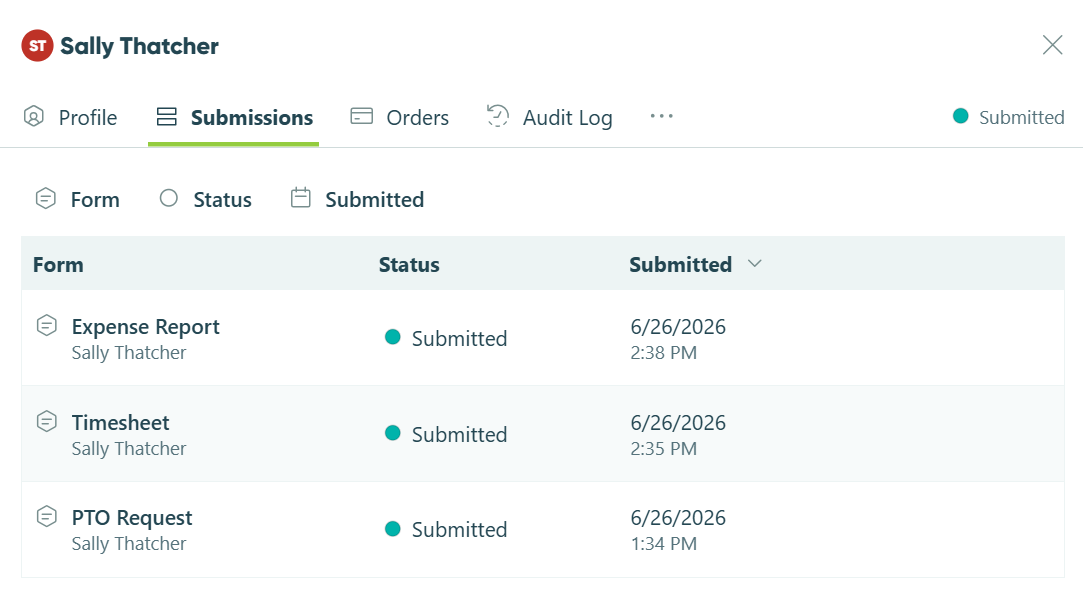
Track Submissions By Person
This setting is enabled automatically when your form contains a Name and Email field or a Person field.
See the full submission history of the people filling out your forms. Here’s how it works:
- Add a Name and Email field or a Person field to your form. Track Submissions By Person will be enabled automatically, and you can select a Person Form to link submissions to. If your organization doesn’t have a Person Form yet, we’ll create one for you called Contacts.
- As submissions come in, they are automatically matched to a person based on the Email field or Person field.
- View a person’s full submission history across forms under the Submissions tab in their Person Form profile. You can also see the linked person in the top right of each matched submission – clicking their name opens a summary of their history.
When enabled and your form has no existing Public role entry view, a My Submissions view is automatically created.
Type of Person
Select the Person Form you want to match submissions to.
Identify People Using
Select how the form identifies the submitter:
- Contact Fields – Match submissions to a person using an Email field. A Name field is also required.
- Person Field – Match submissions using a Person field on the form.
When identifying by Contact Fields, you can configure the following settings:
Field Mappings
Map your form fields to the corresponding person attributes used to identify and match submitters.
- Name – requires a Name field.
- Email – requires an Email field.
- Phone – optionally requires a Phone field.
- Address – optionally requires an Address field.
Create New People Automatically
If a submitter can’t be matched, automatically create a new entry on the target Person form. If this setting is disabled, unmatched submissions will not be added to the Person form.
- Action – Select the workflow action on the target Person Form to use when creating a new person entry.
Person Type
Configure your Person Form’s person type (Guest, Contact, or User) and field mappings. This setting only appears on Person Forms. Learn more about Person Forms.
Share as template
The “Share form as template?” option enables you to share a copy of your form. The provided link in this field can be shared with someone in another organization to allow them to use a copy of this form as a template.
Developer mode
Developer Mode allows you to easily view and customize the internal names of the fields on your form. For example, if you have a Choice field labelled “Please tell us where you found us”, you can use Developer Mode to set the internal name of the field to simply “Choice1”. That way, the field will appear as “Choice1” in calculations instead of the default name (“PleaseTellUsWhereYouFoundUs”).
Analytics & Tracking
Enable Analytics & Tracking to connect your form to your Google Analytics account. You can also use tracking pixels to connect your form to Facebook or another third-party ad service.
Location settings
Country, language, currency, and time zone settings cannot be changed once an entry has been received.
By default, your form’s location settings will be set to your Organization’s location settings. To change these settings, please refer to our help topic.
To change the country, language, currency or time zone for a specific form, go to your form’s Build tab and select your form’s title or click the Settings button in the top bar. These settings will appear in the left-hand Form Settings panel.
Country
As part of our location settings, you can use your form’s Country setting to determine the format of dates and numbers. Setting your Country will also default your Currency and Language settings.
Language
The Language setting will default to your country’s native language. If your country’s language is not one of our supported languages, it will default to English. You can change this when setting up your form.
Currency
The Currency setting will default to your country’s most commonly used currency. You can change this when setting up your form.
Time Zone
The Time Zone is determined by your organization’s time zone and will be used to show correct times for your form entries. You can change this when setting up your form.