Connect your Google Analytics account to optimize your forms, gain insights into your form users, and measure your advertising success. In addition to Google Analytics, you can also use tracking pixels to connect your form to Facebook or another third-party ad service.
Connecting your form to Google Analytics 4
We now support Google Analytics 4 (GA4), the successor to Universal Analytics (UA). GA4 combines web and app reporting into one seamless measurement experience. If you don’t already have a GA4 property, you can use the GA4 Setup Assistant to set one up alongside your existing UA property.
To connect your form to your Google Analytics account:
-
Log in to your Cognito Forms account.
-
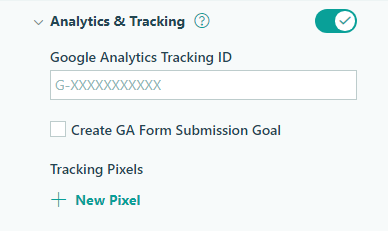
Open the form builder and enable Analytics and Tracking in the Form Settings menu.
-
Paste your Google tag ID into Google Analytics Tracking ID. The Google tag ID is under Admin > Property settings > Data collection and modification > Data streams. Select the data stream you want to track and copy the Measurement ID under Stream details.

-
Save your form.
If you turn off Analytics & Tracking, the tracking ID is saved so that you can easily turn it back on as needed.
Reporting and tracking
Explore the tutorials below to learn more about tracking your forms with Google Analytics 4.
Once you’ve enabled Analytics & Tracking, you can monitor page views in your Google Analytics account. Each page of the form (including the confirmation page) generates a unique page view.
You can use the Pages and screens report to view page view events related to your form. A page view event consists of the following:
- page_title
- page_location
- page_path
- page_referrer
From the Pages and screens report, you can change the default Page title and screen class option to Page path and screen class to see the the first part of the page Url:
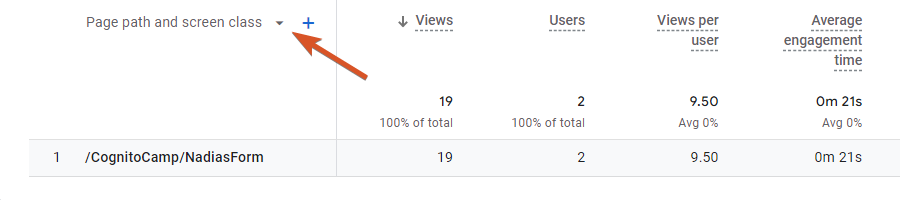
To see the full url with query string parameters (such as #pagename for multi-page forms and #confirmation for the confirmation page), you’ll need to create a custom report using the Page Location dimension as the Event parameter.
To create a custom Form Submission event in Google Analytics:
-
Log in to your Cognito Forms account.
-
Open the form builder and enable Analytics and Tracking as outlined in the section above.
-
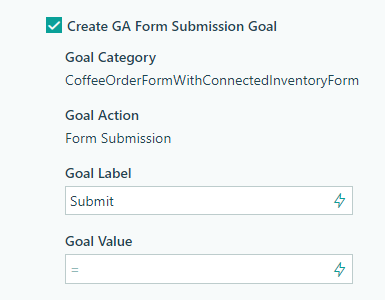
Select Create GA Form Submission Goal.
-
By default, the Goal Category is the form name, and the Goal Action is Form Submission.
-
Specify a static value or calculation for the Goal Label and Goal Value. The Goal Value must be an integer.
-
Save your form.
Your form will send a custom event (named “Form Submission”) to Google Analytics upon submission. After an event is triggered, you will need to wait up to 24 hours to view the data in the Events report. You can also mark events as key events and view data about these events in the Conversions report.
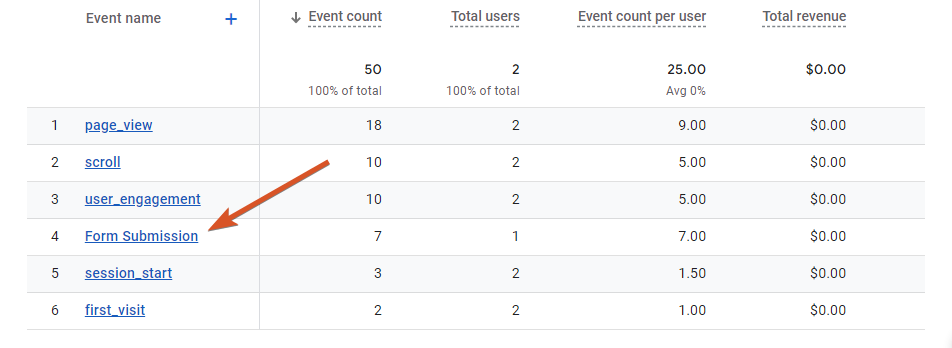
Event parameters are additional pieces of data that add context to your event. Each form submission event in GA4 includes the following parameters:
- event_category
- event_label
- value
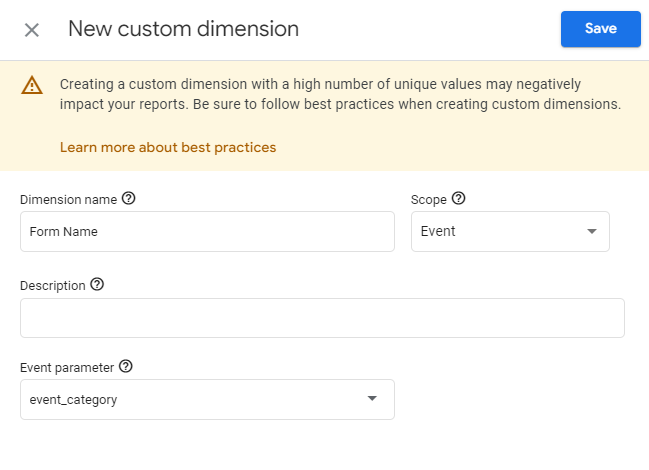
To see the event parameter values, you must create a custom dimension or metric for each event parameter.
Custom dimensions and metrics allow you to analyze data that is specific to your business needs.
For example, if you’re tracking multiple forms on your website, you can use a custom dimension to create a unique label for each form:
-
Give the dimension a name (ex: Form Name), scope it to an Event, and choose event_category as the parameter. Optionally, include a description of your new custom dimension.
-
Save the new custom dimension and go to Reports.
-
Select Form Submission to see a custom parameter showing the name of the form. Please note that this custom dimension only works moving forward and does not apply to historical data.
Once you’ve created a custom dimension, you can use that dimension in your reports. To create a new report:
-
Click Reports > Library in the left navigation.
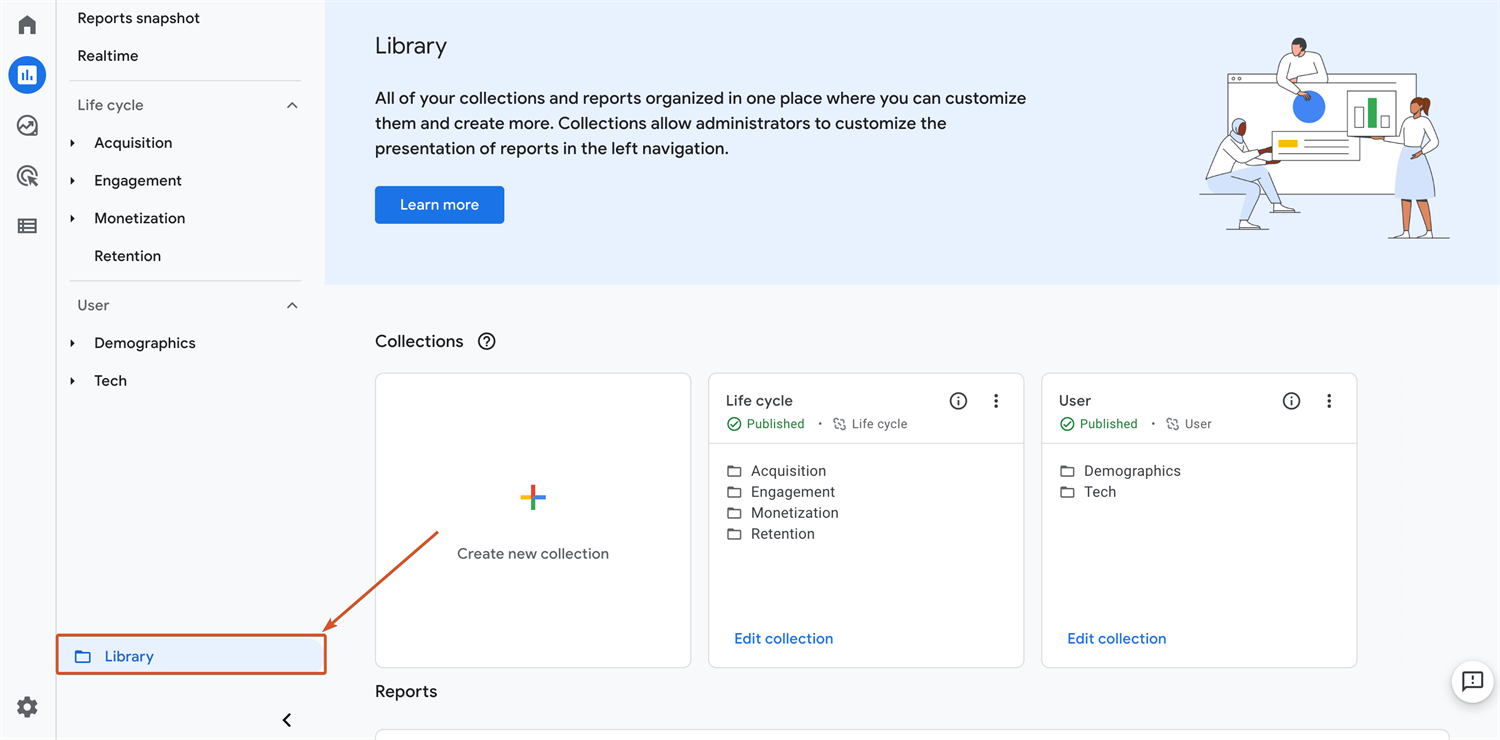
-
Select Create new report > Create detail report.
-
Select Blank (or one of the provided report templates).
-
Under Customize Report on the right hand side, select Dimensions and find your new custom dimension. Then, choose your Metrics & graph types.
-
Hit Apply and then add this report to a new or existing collection.
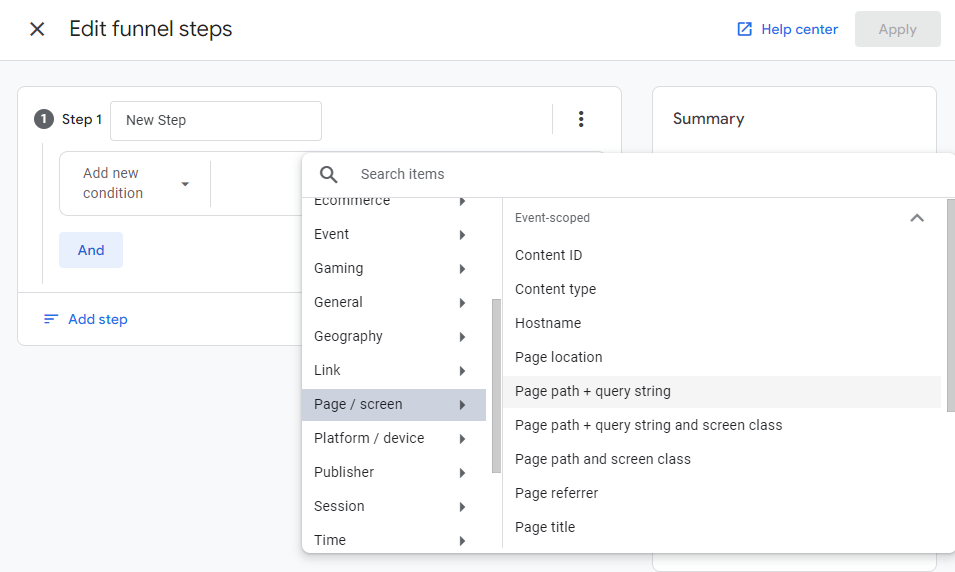
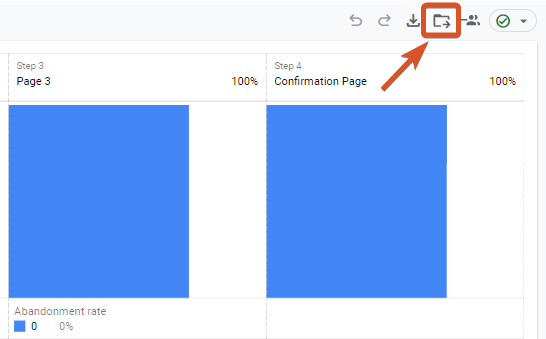
GA4 offers Funnel exploration to help visualize your customer journeys and analyze task completion at each step. For example, you may want to measure the completion rate for each page of your form, starting from the first page and ending on the confirmation page.
To set up a form funnel:
- Click Explore in the left navigation.
- Select Funnel exploration from the template gallery.
- Remove the existing Steps and create your own:
- Give the step a name (ex: “Page 1”).
- From the Add new condition dropdown, choose Page / screen < Page path + query string.
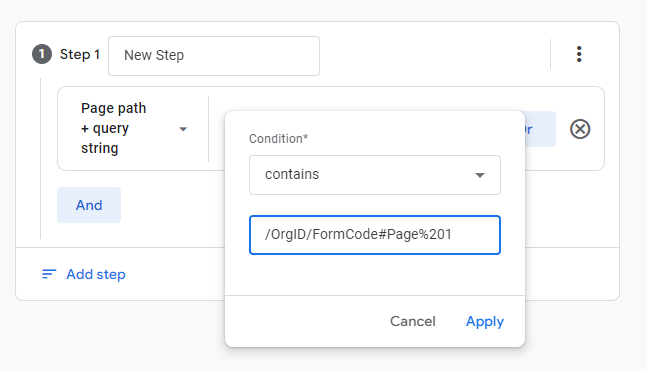
-
Select Add filter, choose the contains operator and type in or select the first page of your form. If your page title has spaces, you must replace each space with
%20.For example, if your page is named ‘Page 1’, use#Page%201.
-
Choose is indirectly followed by and add a step for every page on your form. The last step is the confirmation page that appears after the form is submitted (
#confirmation).
- Select Apply in the top right corner to create your funnel.
Funnel tips
-
Optionally select the Library icon in the top right to add your new funnel to the Report library.
-
If your form has custom page titles, make sure to use the custom names instead of Page 1, Page 2, etc. For example, if the first page is named Start, try using
/orgcode/formcode/#Start. -
If your form is embedded, do not include ‘orgcode’ in the page path. Instead, try using just
/#formcode#Page%201or/your-page-name/#formcode#Page%201Make sure to replace ‘formcode’ with your form’s name and ‘your-page-name’ with your webpage name (using hyphens between each word). If you are embedding your form on multiple pages you must include the page name (ex:/your-page-name-/#FormName#Page%201).
Testing and troubleshooting tips
Use the entry audit log to keep track of Google Analytics events, including the event delivery status and the data sent over with each event. The audit log does not include Universal Analytics events.
- Once you’ve connected your form to Google Analytics, you can use the Realtime and DebugView reports to confirm that you’re collecting data successfully.
- Google Analytics Tracking is only supported on public links and seamlessly embedded forms. It will not work with Iframe or AMP embedded forms.
- If you copy your form within the same organization, the Analytics & Tracking settings will be copied over. However, the settings will not be copied if you copy your form between different organizations.
- If your form has Save & Resume enabled, individual save links will not be sent to Google Analytics. When someone returns to your form via the Save link, it will simply appear as another page view for the page where the form is embedded.