Control capacity and prevent overbooking automatically by setting quantity limits that track availability in real-time across signups, products, appointments, and event registrations.
Build Time & Skill
10-15 min
Beginner
What you'll learn
Four quick methods to control form submission quantities and prevent overbooking
Managing capacity manually creates headaches. You’re constantly checking spreadsheets to see if you’ve oversold tickets, double-booked appointments, or promised inventory you don’t have. By the time you notice you’ve hit your limit, you’re already dealing with frustrated customers and scrambling to recover.
With Cognito Forms’ quantity limits, you automate the entire process. The system tracks availability in real-time, prevents submissions when limits are reached, and displays clear error messages, so customers know exactly what’s available. Quantity limits work well for:
- Events with limited seating or capacity, where each performance, date, or session has its own attendance cap.
- Product inventory management, tracking how many units remain for each item in your catalog.
- Appointment scheduling with capacity constraints, limiting how many people can book each timeslot.
- Limited-time offers or exclusive access, controlling how many people can claim special promotions or discount codes.
Four Ways to Use Quantity Limits
Quantity limits adapt to countless business scenarios. Here are four common examples showing how to apply them to events, tickets, appointments, and promotions.
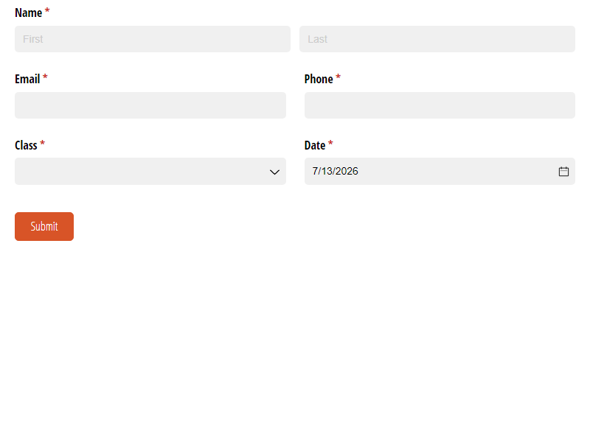
Method 1: Limit Event Signups
Control attendance for events, workshops, or activities with fixed capacity. This straightforward approach works when you need a simple yes/no signup with a specific attendee cap.
When to use this: Single events with one capacity limit, like pre-event dinners, exclusive workshops, or VIP experiences where everyone who says “yes” counts toward the same total.
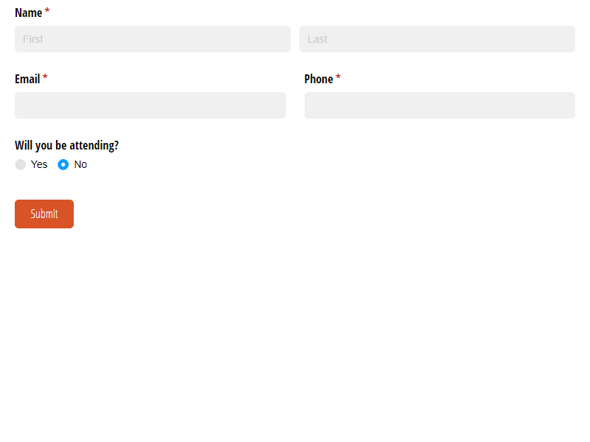
Create your form and add basic fields
- Create a new form and name it “Event Registration”, or use our free Signup Limits template. Consider adding fields like:
- Name field to capture attendee information
- Email field for confirmation notifications
- Phone field for event updates
- Add a Yes/No field for attendees to sign up.
Specify and track quantities
- Configure quantity limits on the Yes/No field:
- Set Limit Quantity to Specific Quantity
- Set Quantity to your attendee limit (like 50 or 100)
- Write a custom error message (ex: “The pre-event dinner has reached capacity!”)
- Optionally, add a Calculation field set to
=SignupField_QuantityRemainingto display the remaining capacity in real-time. Make sure to replaceSignupFieldwith the name of your Yes/No field.

Once your limit is reached, anyone trying to sign up sees your error message and cannot submit. If someone cancels their registration (and you delete their entry), a spot automatically opens up.
Method 2: Manage Limited Ticket Sales
Sell tickets for performances, events, or experiences with different seating types and varying availability across multiple showtimes. This method tracks quantities for each unique combination of performance time and seat type.
When to use this: Events with multiple performances and ticket tiers, like theater shows, concerts, or conferences where Friday night premium seats have different availability than Saturday matinee standard seats.
Create your form and add basic fields
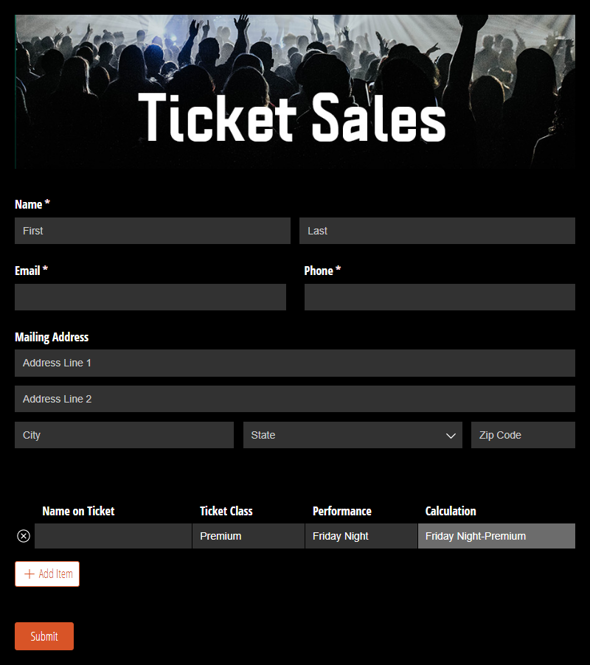
- Create a new form and name it “Ticket Sales”, or use our free Ticket Sales template. Consider adding fields like:
- Name field to capture ticket holder information
- Email field for ticket confirmation
- Phone field for order updates
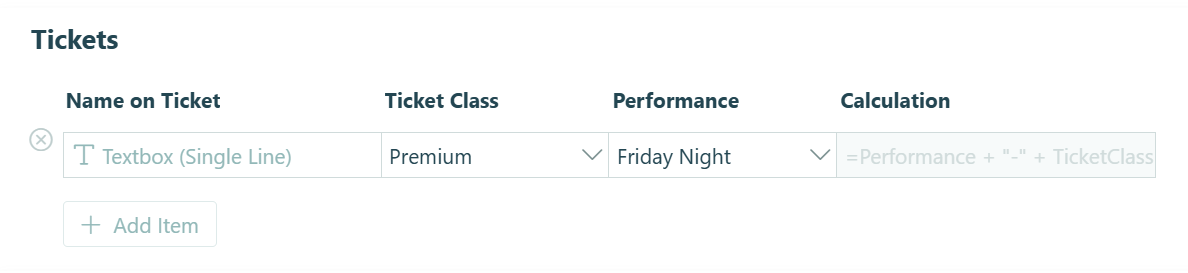
- Add a Repeating Section labeled “Tickets” to allow multiple ticket purchases.
- Inside the Repeating Section, add the following fields:
- Textbox field (set to Single Line) labeled “Name on Ticket”
- Choice field labeled “Ticket Class” to select the ticket class (Premium, Standard, Basic)
- Choice field labeled “Performance” to select a performance (Friday night, Saturday matinee, Saturday night)
- Calculation field (set to Text type) to track unique performance-seat combinations
Specify and track quantities
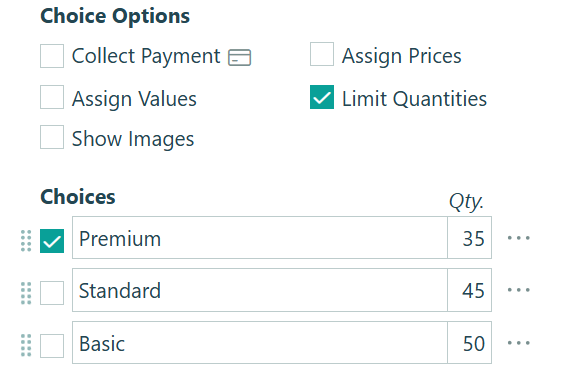
- Select the “Ticket Class” Choice field and check Limit Quantities under Choice Options, then specify quantities for each seat type.
- In the Calculation field settings:
- Set Calculation to
=Performance + "-" + TicketClass - Set Show This Field to For Roles > Internal (this hides the tracking calculation from customers)
- Set Calculation to
- Configure quantity limits on the Calculation field:
- Set Limit Quantity to Specific Quantity
- Set Quantity to
=TicketClass_Quantity - Write a custom error message (ex: “Sorry, there are no more seats available for the selected ticket class.”)
This setup creates separate quantity tracking for each performance-seat combination. When someone selects “Friday night” and “Premium,” the system checks availability specifically for Friday night premium seats – not just total premium seats across all performances.

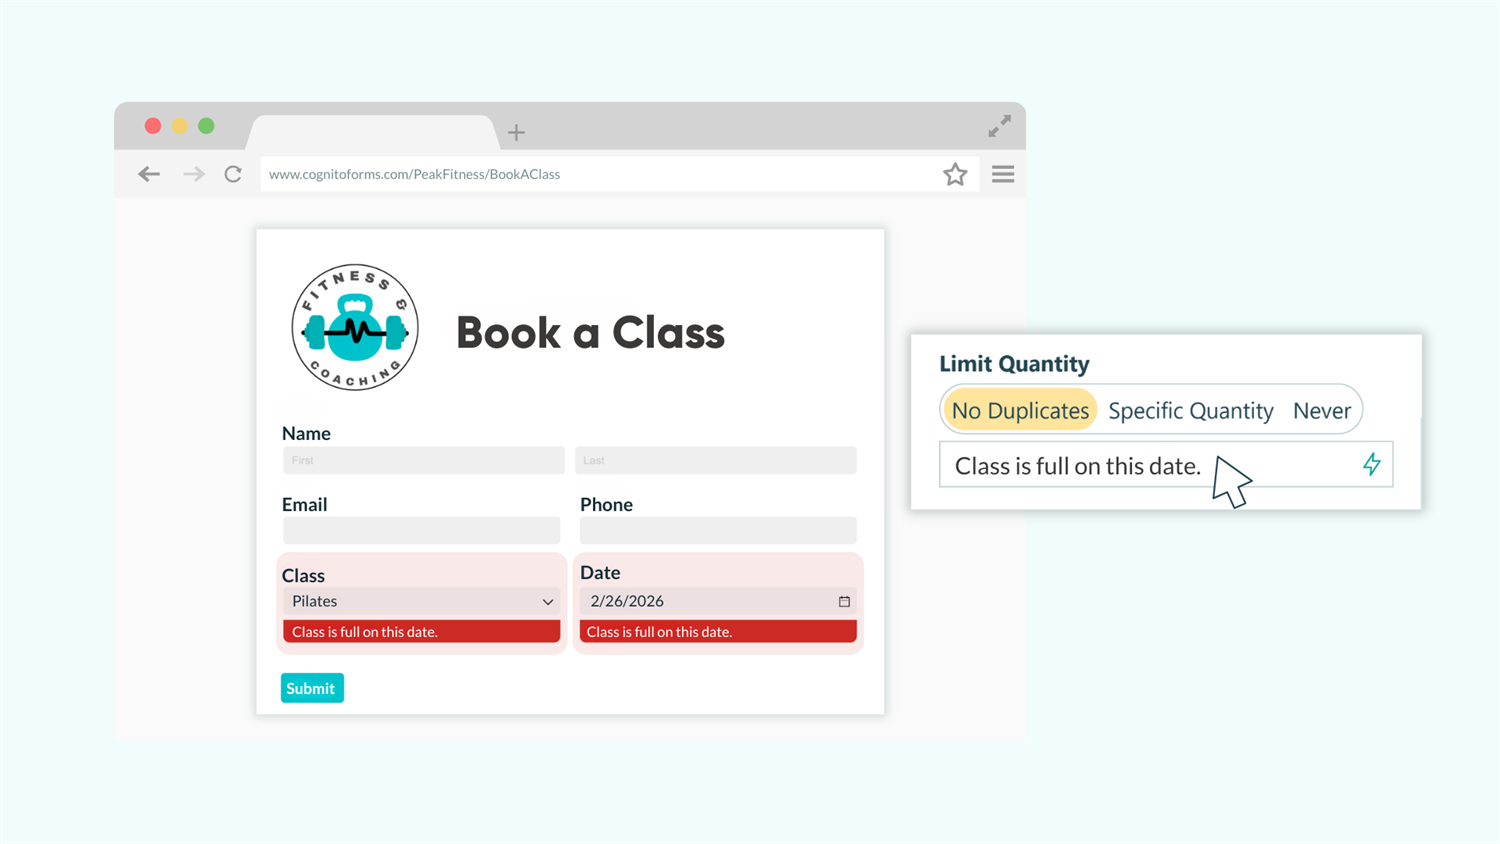
Method 3: Control Appointment or Class Timeslots
Manage bookings for classes, appointments, or services where the same offering is available on multiple dates with limited spots per session. This method prevents double-booking by tracking capacity for each unique date-class combination.
When to use this: Recurring classes, appointment scheduling, or services offered multiple times per week where each session has its own capacity limit—like yoga classes, tutoring sessions, or equipment rentals.
Create your form and add basic fields
- Create a new form and name it “Class Registration”, or use our free Appointment Booking template. Consider adding fields like:
- Name field to capture participant information
- Email field for class reminders
- Phone field for last-minute updates
- Add a Choice field containing a list of classes or services (Yoga, Zumba, Pilates).
- Add a Date field for participants to select when to attend.
- Optionally, add a Custom Error to the Date field, limiting selections to available days (like Tuesdays and Thursdays only):
=(Date.DayOfWeek != "Tuesday" and Date.DayOfWeek != "Thursday")
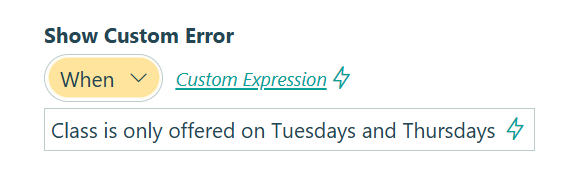
- Optionally, add a Custom Error to the Date field, limiting selections to available days (like Tuesdays and Thursdays only):
Specify and track quantities
- Add a Calculation field to create unique date-class combinations:
- Set Calculation to
=Class + Date - Set Show This Field to For Roles > Internal
- Set Calculation to
- Configure quantity limits on the Calculation field:
- Set Limit Quantity to Specific Quantity
- Set Quantity to your capacity per session (like 20 attendees)
- Write a custom error message (ex: “Class is full on this date.”)
The Calculation field combines the selected class with the chosen date, creating entries like “Yoga 2025-03-15” or “Pilates 2025-03-17.” Each unique combination gets its own quantity tracker, so Yoga on March 15 can fill up while Yoga on March 17 still has openings.

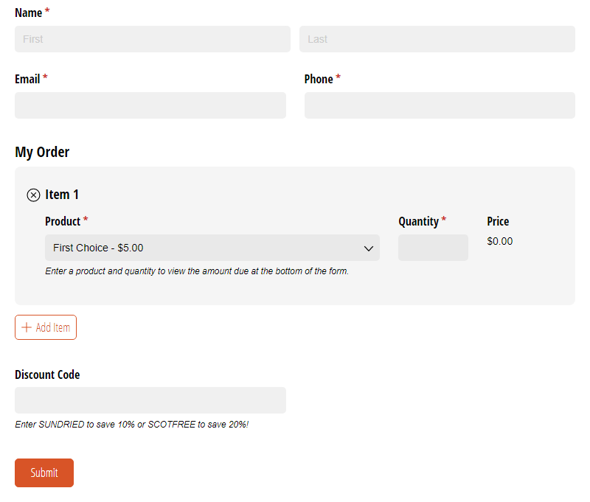
Method 4: Track Limited-Use Discount Codes
Control how many times promotional codes can be redeemed across all form submissions. This method validates discount codes and prevents overuse while applying the appropriate discount to payment totals.
When to use this: Limited promotions, early-bird specials, or exclusive offers where you want to cap total redemptions—like “first 20 customers get 20% off” or partner codes with usage limits.
Create your form and add basic fields
- Create a new form and name it “Order Form”, or use our free Order Form template. Consider adding fields like:
- Name field to capture customer information
- Email field for order confirmation
- Choice field or Repeating Section for product selection
- Add a Textbox field (Single Line) to capture the discount code.
Specify and track quantities
-
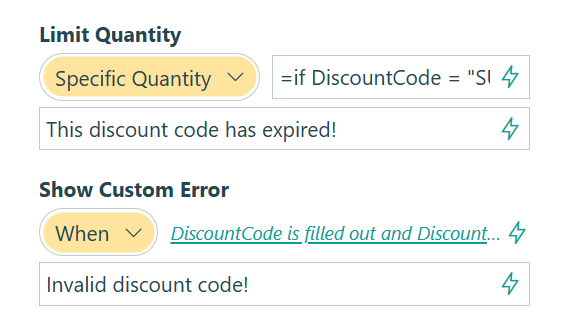
In the Textbox field settings, set up the quantity limit for the discount code:
- Set Limit Quantity to Specific Quantity
- Set Quantity to
=if DiscountCode = "SUNDRIED" then 20 else if DiscountCode = "SCOTFREE" then 10 else null - Write a custom error message (ex: “This discount code has expired!”)
-
Next, set up the custom error for the discount code:
- Set Show Custom Error to When
- Show the custom error when
DiscountCodeis filled out andDiscountCode_QuantityLimitis not filled out - Write a custom error message for invalid codes (ex: “Invalid discount code!”)
-
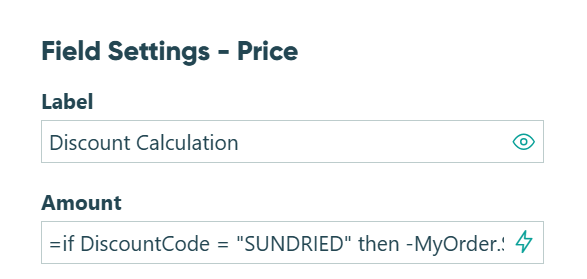
Add a Price field to calculate and apply the discount.
- For percentage discounts, multiply the payment total by the percentage:
=if DiscountCode = "SUNDRIED" then -ItemTotal * 0.20 else if DiscountCode = "SCOTFREE" then -ItemTotal * 0.10 else 0
- For percentage discounts, multiply the payment total by the percentage:
When calculating discounts, reference actual payment fields on your form (like PaymentField1 + PaymentField2) rather than Order.SubTotal. The order subtotal automatically changes once a discount is applied, which would make your discount calculation inaccurate.
This setup tracks how many times each code has been used across all submissions. When “SUNDRIED” reaches 20 redemptions, anyone trying to use it sees your error message. The system validates codes in real-time and automatically applies the correct discount percentage to the payment total.

Start Enforcing Quantity Limits Today
Manual capacity tracking creates bottlenecks, disappointed customers, and constant administrative work. With Cognito Forms’ quantity limits, you automate the entire process—setting clear boundaries that the system enforces automatically while giving customers transparent information about availability.
Whether you’re managing event registrations, product inventory, appointment bookings, or promotional campaigns, quantity limits transform how you handle capacity. Set your limits once, and let the system handle the rest.
Start with a customizable template
Get a head start with our pre-built quantity limit templates. Our Signup Limits, Ticket Sales, Timeslot Limits, and Limited Use Discount Codes templates already include quantity tracking, ready to customize for your specific capacity needs.
-
Signup Limits
Our free sign up limits form template allows you to limit the number of attendees to an event based on your own specified quantity.
Preview -
Ticket Sales
Use our free ticket sales template to limit the number of tickets based on both event date and ticket class availability.
Preview -
Timeslot Limits
Use our free timeslot limits template to limit the number of attendees to a class on each unique date the class is offered.
Preview -
Limited Use Discount Codes
Use this free form template to limit the number of times a discount code can be used.
Preview
FAQ
When someone tries to select an option that’s at capacity, they see your custom error message and cannot submit the form until they change their selection. The form remains accessible for other options that still have availability. If someone deletes their entry later, that quantity automatically becomes available again.
No, quantity limits track continuously based on submitted entries. They only decrease when entries are deleted. If you need to reset or increase a limit, you can adjust the quantity setting at any time. Changes apply immediately—new submissions see the updated limit.
Yes, you can update quantity limits anytime in your field settings. Existing submitted entries are not affected—they keep the quantity values from when they were submitted. New submissions see and are held to the updated limits. This lets you adjust capacity as circumstances change without disrupting historical data.