Give customers a chance to review all their answers on one page before submission, reducing errors and building confidence in the submission process.
Build Time & Skill
10-15 min
Beginner
What you'll learn
How to add a review page to multi-page forms that displays all customer answers in one place with a confirmation step before final submission.
When customers fill out long forms, they often miss typos, forget to answer questions, or want to double-check their information before submitting. This is especially true for important forms involving payments, applications, or registrations.
Adding a review page to your forms helps you:
- Reduce submission errors by giving customers one final chance to catch mistakes before clicking Submit.
- Build trust and confidence by showing transparency, since customers see exactly what they’re submitting.
- Create a more professional experience that makes customers feel in control of their information.
Step-by-Step: Adding a Review Page to Your Form
Follow these four steps to add a summary page where customers can review their answers before final submission:
Step 1: Add a Page Break to your form
Multi-page forms work best for review pages because they create a clear, dedicated space for customers to pause and verify their information. The review page would (most often) come at the very end of your form, right before the final submit button. However, depending on your needs, it could come before a signature, consent, or acknowledgment page.

How to do this:
- Navigate to the Build page of your form.
- Scroll to the bottom of your form (or wherever you want your summary page to show up) and add a Page Break.
When you create a Page Break, you can adjust a number of different settings, including:
- The text shown for the “Next” and “Back” buttons
- Conditional Logic that determines when to show the next page
- Page titles, and whether or not to show them
- The style of your Progress Bar (Bar, Steps, or None)
- Whether to show page numbers in the form’s footer or not
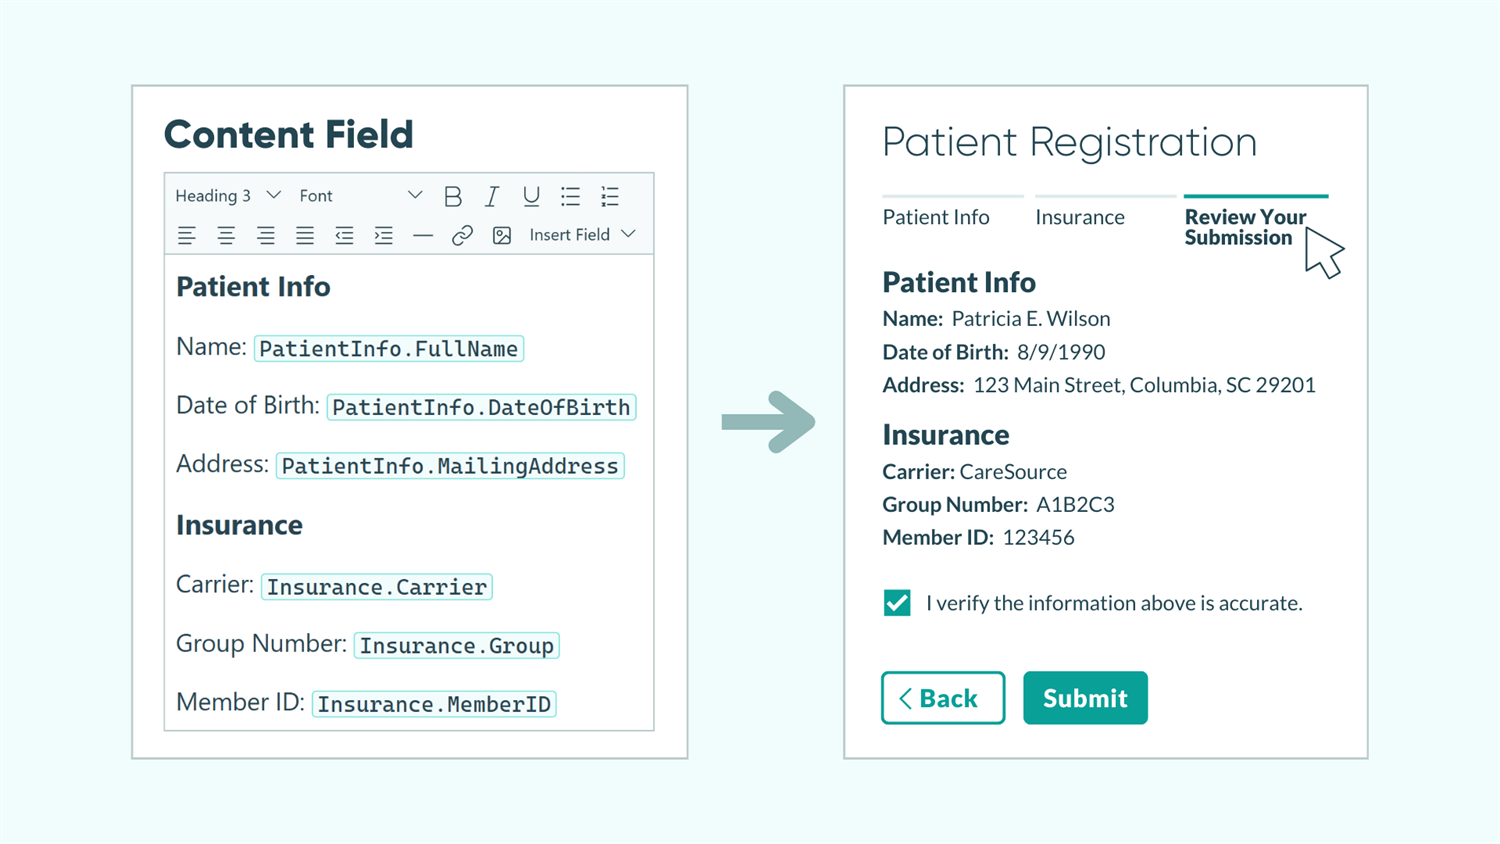
Step 2: Add a Content field to display answers
Content fields let you pull in and display all the answers customers have provided on previous pages. You’ll use the field picker to select fields throughout your form and insert them into your content.

How to do this:
- Add a Content field above the Page Break you added in the previous step.
- Click inside the Content field’s text editor to begin adding your summary.
- When you want to insert a field’s data, use the Insert Field option in the toolbar.
- Select the field you want to display from the dropdown menu.
- Repeat for each field you want to show in the summary.
Inserted field values will appear as a placeholder like FullName.First in the editor. When someone fills out your form, these placeholders will be replaced with their actual answers.
Please Note: Because Repeating Sections and Tables can collect a potentially unlimited amount of data, you cannot directly target this data in your Content field. If you need to do this, you must first target the repeating data in a separate Calculation field. Learn more about referencing repeating data.
Tips for formatting your summary
How you organize the summary matters. A well-formatted review page is easy to scan and helps customers quickly verify their information. Here are formatting tips to create a professional, readable summary:
- Order fields in the same order as your form pages, using headers to separate them into distinct sections.
- Add descriptive labels before each field. Don’t just show what was entered in a field. Include context by labeling each item. For example, instead of displaying “Alex Pearson” alone, show “Name: Alex Pearson.” This prevents confusion about what each piece of information represents.
- Use dividers and strategic spacing to add white space between sections. This makes the summary scannable rather than overwhelming.
- Show only what matters. You don’t need to display every single field. Focus on the most important information for customers to verify before submitting.
Step 3: Add a Yes/No field for confirmation
Add a simple checkpoint with a Yes/No field. This will require customers to acknowledge they have reviewed their answers, rather than clicking through without reading.

How to do this:
- Add a Yes/No field below the Content field you added in the previous step.
- Select the Checkbox type.
- Label it with clear, affirmative language such as, “I verify the information above is accurate.”
- Toggle Require Yes Response to Always.
- This means customers must check the box before the form allows submission, creating an intentional pause in the submission process.
Step 4: Test your summary page
Always preview your form before sharing it with customers. This helps you catch formatting issues, missing field values, and other problems that could cause confusion or frustration.

How to do this:
- Click Preview in the top right corner of the Build page.
- Fill out your entire form as a customer would, testing different answer combinations.
- When you reach the review page, verify:
- All field values display correctly
- Labels are clear and descriptive
- Spacing and formatting look professional
- The confirmation checkbox is required
If you spot any issues during testing, return to the Build page to make adjustments, then test again.
Real-World Examples: When to Use Review Pages
Review pages work especially well in scenarios where accuracy matters before submission, such as:
- Event registration forms: When collecting attendee details, meal preferences, and payment information for events, a review page ensures customers catch registration mistakes before their payment is processed. This reduces refund requests and last-minute changes that disrupt your planning.
- Job applications: Multi-step job applications often collect detailed work history, qualifications, and require uploading multiple documents. Give applicants confidence that they’ve presented themselves accurately and help reduce their anxiety before submitting their application.
- Quizzes or assessments: Review pages are valuable for educational assessments, certification tests, and training exams where answers are immediately scored and cannot be edited afterward. They give participants an intentional moment to double-check the answers they selected.
Additional Features to Go Beyond Review Pages
Once you’ve mastered this basic review page setup, these related features can make your forms even more powerful:
- Send summaries in automatic email confirmations. Automatically send customers a copy of their submitted answers using Email Notifications, giving them a record of their responses.
- Allow customers to save their progress and return later to review before submitting. This is especially useful for lengthy applications where customers might need time to gather information.
- Let customers edit after submission. Use Workflow Links to allow customers to update their submission if they spot an error after reviewing.
Start Adding Review Pages Today
A summary page transforms a standard multi-page form into a professional, intentional experience. By giving customers one final checkpoint before submission, you reduce errors, build trust, and create a smoother process for everyone involved. Add a review page to your next multi-page form and see how this simple feature improves submission quality.
FAQ
Yes. You control exactly which fields appear in your summary by choosing which fields to insert into the Content field. You can display all form fields, only the most important ones, or organize fields into topical sections with headers. Focus on information customers need to verify before submitting rather than showing every single field.
No, customers cannot edit their answers directly from the review page. They need to use the “Back” button or Progress Bar to go back to previous pages and make changes. After making edits, they can return to the review page to see their updated answers reflected in the summary before submitting.
No, you could place a Content field with a summary in a section at the bottom of a single-page form. However, using a dedicated review page on a multi-page form creates a cleaner, less overwhelming experience. The separate page gives customers a clear moment to pause and verify their information without distraction from other form fields.