Build approval workflows that automatically route requests to the right people, track progress, and maintain accountability—all without code.
Build Time & Skill
20-30 min
Intermediate
What you'll learn
How to create a fully automated multi-level approval system with automatic notifications and task assignments
Multi-level approvals drive critical business decisions across your organization. Purchase orders need budget approval. Contract proposals require legal review. Project requests need manager sign-off before moving forward. These processes can look different: reviewers signing in sequence, simultaneously, only when rules require it, or a mix of these at different steps.
With Cognito Forms, you can build sophisticated approval workflows on a single form using Roles, Statuses, Actions, and conditional logic. This guide walks you through the complete process, from planning to launch, covering the three most common approval patterns: serial, parallel, and conditional approvals. By following these steps, you’ll create approval systems that:
- Deliver the right information to the right person at the right time. Role-based conditions control what each participant can view, edit, or approve (essential when coordinating multiple reviewers).
- Reduce manual coordination and speed up decisions. Automated status changes and email notifications keep requests moving forward, minimizing bottlenecks.
- Maintain accountability and ensure compliance. Clear audit trails show who approved what and when, making progress visible while meeting regulatory requirements.
What Is A Multi-Level Approval?
A multi-level approval requires requests and submissions to pass through multiple reviewers (either in sequence, simultaneously, or based on specific criteria) before reaching final approval. Unlike single-step approvals where one person makes the decision, multi-level approvals give different roles the proper authority to make decisions, ensuring proper oversight and compliance.
Well-structured approval workflows benefit organizations by:
- Creating clear accountability at every decision point.
- Ensuring requests receive the right level of scrutiny based on their complexity or value.
- Automatically routing requests to the right people without manual intervention.
- Providing audit trails for compliance and dispute resolution.
Types of Multi-Level Approvals
Multi-level approvals follow three main patterns, each suited to different organizational needs. Understanding which pattern fits your process helps you configure the right workflow logic from the start.
- Serial approvals: Each approver must sign off before the request moves to the next level. Authority is layered, and every step depends on the previous sign-off. This traditional hierarchy works well when decisions build on each other or when authority flows top-down.
- Parallel approvals: Multiple approvers review simultaneously instead of sequentially. While parallel approvals don’t follow a strict order, they typically require sign-off from multiple distinct groups before moving forward (like getting both legal and finance approval at the same time).
- Conditional approvals: Different approval paths trigger request details like amount, project type, or client status. This creates adaptive workflows that scale approval requirements to match each request’s complexity or risk level.
Most real-world workflows combine these patterns. For example, a purchase order might use conditional logic to determine the approval path, then route through serial approvers in that path.
Workflow Components: Roles, Statuses, and Actions
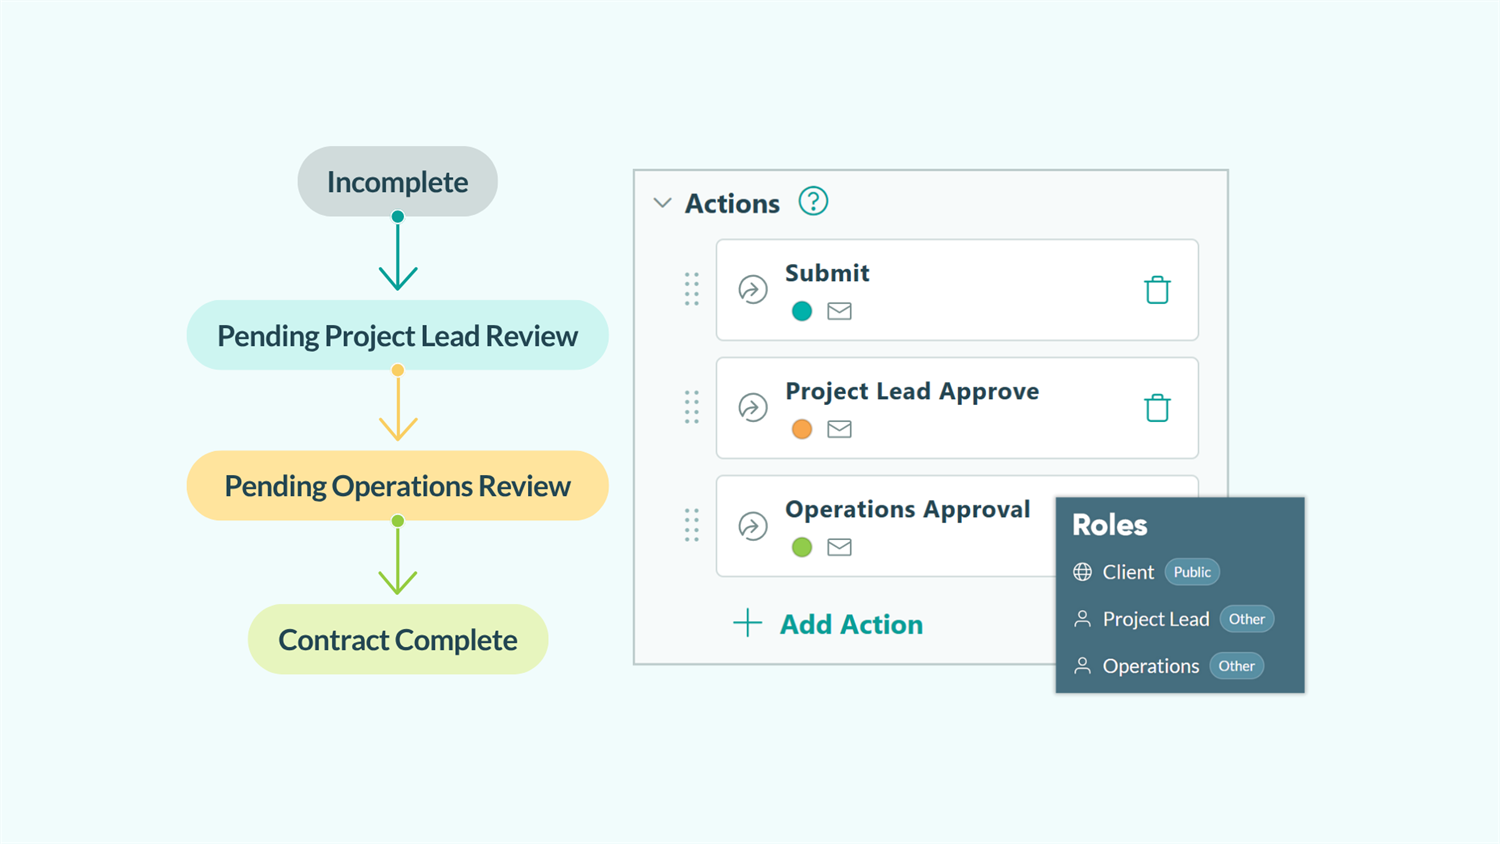
Cognito Forms uses three interconnected components to create approval workflows. Roles define who participates, Statuses show where entries are in the process, and Actions let people make decisions. Together, they create the logic that routes requests intelligently through your approval chain.
| Roles | Statuses | Actions |
|---|---|---|
| Roles define who participates in the Workflow. | Statuses act as a label to show where an entry is in the process. | Actions are the decisions people make. |
| They control what participants can see, edit, or approve, ensuring participants only see and interact with fields and actions relevant to their responsibilities. | They create a logical path for submissions to follow, making it clear what stage each request is in. | They are clickable buttons on your form that trigger what happens next, such as a status change or sending a notification. |
Roles
Roles define who participates in the Workflow. They control what participants can see, edit, or approve, ensuring participants only see and interact with fields and actions relevant to their responsibilities.
Statuses
Statuses act as a label to show where an entry is in the process. They create a logical path for submissions to follow, making it clear what stage each request is in.
Actions
Actions are the decisions people make. They are clickable buttons on your form that trigger what happens next, such as a status change or sending a notification.
Here’s how these components work together in a typical approval:
- An employee submits an expense report, which enters the “Pending Manager Review” Status.
- Their assigned manager clicks the “Approve” Action, changing the submission’s Status to “Pending Finance Review.”
- Finance sees the entry in their queue, reviews it, and clicks the “Process Payment” Action.
- The entry moves to the “Complete” Status and sends a confirmation email to the employee.
How to Set Up Multi-Level Approvals: Step-by-Step
Building approval workflows becomes manageable when broken into clear steps. Follow this process from planning through launch to ensure every role, action, and notification is properly configured before your first request goes live.
Step 1: Map out your approval process
Start by documenting your current (or desired) approval flow on paper or in a document. This planning step saves hours of rework later.
- Identify everyone involved in the process. Include people who initiate requests, those who approve them, and anyone else who needs to review or track progress.
- Define your approval pattern. Is your process sequential (steps in order), parallel (reviews happening simultaneously), or conditional (different paths triggered by criteria like amount or project type)?
- List every step in order. Capture what happens at each point (sending notifications, documenting information, making decisions) and note who is responsible.
- Document conditions for each step. Write down any “if/then” logic: sending emails only when fields meet criteria, hiding sections for specific roles, or showing new fields only in certain statuses.
Want to see a more detailed example and walk through how to outline a Workflow?
Step 2: Build and structure your form
Once you’ve mapped your workflow, build the form that captures information and presents it logically. A well-structured form helps reviewers see only relevant information while keeping the entire process connected.
When building your form, consider:
- What information needs to be collected? Choose the right field type for each piece of data, such as Date fields for deadlines, Number fields for amounts, File Upload fields for supporting documents.
- How should fields be grouped?
- Create sections for each reviewer if roles have distinct responsibilities.
- Group related details (like all financial information) so multiple reviewers can see them together.
- Combine both approaches. Most workflows benefit from sections tailored to reviewers and shared fields visible across roles.
Enforce compliance automatically with validation rules. Use Custom Errors to prevent approvals from moving forward if required attachments are missing or if fields don’t meet your organization’s policies.
Step 3: Configure Workflow Roles
Roles define who participates in your approval workflow and control what they can access. Set these up before configuring statuses or actions, as you’ll reference roles throughout the workflow.

- Navigate to Workflow > Roles.
- Review the default roles:
- Public Role: The external person initiating the request (clients, customers, applicants)
- Internal Role: The administrator managing entries and the overall Workflow. (We recommend keeping this Role as-is for internal purposes.)
- Click + Add Role to create roles for each distinct participant type in your approval chain.
- Any additional Roles you add here will be considered “Other” Roles.
- Give each Role a clear, descriptive name that reflects the person’s responsibility in the approval process.
Name roles based on responsibilities, not job titles. “Budget Approver” is clearer than “Director” when multiple directors have different approval responsibilities. This makes your workflow easier to understand and maintain as your organization changes.
Step 4: Set up your Statuses
Statuses create the path your approval requests follow. Each status represents a stage in your approval process, making it clear where entries are and what happens next.

- In Workflow settings, click Statuses.
- Review the default statuses (Incomplete, Submitted). You’ll need to add statuses for each approval stage.
- Click + Add Status to create new statuses for each step in your approval chain.
Use descriptive status names that explain both the current state and what’s next. “Pending Manager Review” is clearer than “Step 1.” Anyone looking at the entry immediately understands where it is in the process and who needs to act.
Step 5: Create Actions to move requests forward
Without a way to move requests from one Status to the next, your process won’t move forward. Actions are buttons on your form that drive the workflow forward. They move requests along and determine the next step of the process. Common Actions include Submit, Approve, Reject, Request Changes, and Update.

- In Workflow settings, click Actions.
- Click + Add Action to create new Actions for each decision point in your workflow.
- The default “Submit” and “Update” Actions are already configured.
Configure each action:
- Give the Action a clear name (like “Approve Request” or “Send to Finance”)
- Set Change Status To to specify where entries move when this Action is clicked
- Under Allow Action, choose who can perform this action:
- For Roles: Select specific role(s) who can take this action
- When: Add conditions if the Action should only be available in certain situations (like specific Statuses or field values)
Common scenarios for Allow Action logic
| Use this logic | Allow Action > For Roles >
[Select Role(s)]
|
|---|---|
| Example | You only want the initial requester to be able to make updates to the entry, so no information gets accidentally changed by internal roles or approvers. To do this, the “Update” Action is allowed only for the “Public” Role. |
| Use this logic | Allow Action > When >
Entry.Status is [Select Status]
|
|---|---|
| Example | You want anyone to be able to update new requests, because additional details often come up early in the approval process. To do this, the “Update” Action is allowed for all Roles, but only when in a “New Request” Status. |
| Use this logic | Allow Action > When >
Entry.Role is [Select Role]
+ AND
Entry.Status is [Select Status]
|
|---|---|
| Example | You only want the Manager to be able to Approve or Deny the request before the request is sent to accounting. To do this, the “Approve” and “Deny” Actions are only allowed for the Manager Role and when in a “Pending Approval” Status. |
Step 6: Control field visibility and permissions
Decide and configure what each approver can see and edit at each stage. Use conditional logic on fields, sections, and pages to give participants different experiences throughout the process based on their Role, the Workflow status, and more.

Configure conditional logic:
- Use Show This Field to determine who can see the field and when.
- Use Read-Only to determine who can edit a field and when.
You can combine the Show This Field with Read-Only settings to create unique form experiences for different Roles throughout your Workflow. Combine any of the examples below, use just one, or define your own conditions.
Common scenarios
Show This Field logic controls whether a field is visible to specific Roles or in certain Statuses.
Common uses:
- Hide internal notes and scores from the requester
- Show approval fields only to approvers, not to the person who submitted
- Display financial details only to a “Finance” Role
Example configurations:
| Example | Use this logic |
|---|---|
| You want to hide a section from customers that only employees see. To do this, you show the section only for “Internal” and “Staff” Roles. | Show This Field > For Roles >
[Select Role(s)]
|
| You want to show a content field with pre-submission instructions, but after the form is submitted, this content is hidden from everyone. To do this, you show the Content field only when the Status is “Incomplete.” | Show This Field > When >
Entry.Status is [Select Status(es)]
|
Read-Only logic makes fields visible but not editable. People can see the information but can’t change it.
Common uses:
- Lock original request details after submission
- Let approvers see the previous reviewer’s notes without editing them
- Display requester information to all reviewers as reference only
Example configurations:
| Example | Use this logic |
|---|---|
| You want the requestor to see their submitted information but not change it. Set the request fields to Read-Only for the "Requestor" or "Public" role. | Read-Only > For Roles >
[Select Role(s)]
|
| You want fields editable only during initial submission. Set them to Read-Only when "Status is not Incomplete" so they lock after submission. | Read-Only > When
Entry.Status is not Incomplete
|
The most powerful field logic combines both role-based and status-based conditions using AND logic. This gives you precise control over who can edit what and when.
Example configuration:
| Example | You want a client to provide their event address when submitting, but after submission, they cannot change it, but staff can still edit if needed. Make the Address field Read-Only when "Role is Customer" AND "Status is not Incomplete." This locks it for clients after submission but not for staff. |
|---|---|
| Use this logic | Show This Field > When >
Entry.Role is [Select Role]
+ AND
Entry.Status is [Select Status]
|
Add Require This Field conditions to prevent participants from moving requests forward with missing critical information. You can make fields required only for specific roles or in certain statuses.
Step 7: Automate Email Notifications
Email notifications keep everyone informed as approvals progress. Automated emails eliminate manual follow-up and ensure nothing falls through the cracks.

For each Action in your Workflow:
- Go to Workflow > Actions and select the Action you want to trigger the email.
- Scroll to Send Emails and click + Add Email.
- Configure the email’s To, Subject, and Message.
- Add a Workflow Link so recipients can access the entry directly:
- Click Share Workflow Link (next to the To field)
- Select the Role that should access the entry
- Customize the button text (like “Review Request” or “View Details”)
Common notification patterns:
- After initial submission: Email the first approver (Manager) with a link to review
- After each approval: Email the next approver in line with a link to their review form
- After final approval: Email the requestor to confirm their request was approved
- After rejection: Email the requestor to explain the decision and next steps
Step 8: Set up Entry Views and Tasks
Entry Views organize how you and your team see and manage approval requests. Different view types serve different purposes. Choose the right combination for your workflow.
Task Views
Task Views transform entries into action items that appear on approvers’ Task Dashboards. Approvers see exactly what needs their attention without searching through entries or emails.

To create a Task View:
- At the top of the form’s Entries page, click the plus sign (+) and select New Task View.
- Set the Role to the appropriate approver role.
- Keep Assign as Tasks turned on.
- Filter the view by Status so entries appear as tasks only in relevant Statuses (such as “Pending Initial Review,” “Awaiting Final Approval,” or “Completed”).
- Add the Shared With Current User filter if multiple people share the same role but should only see entries assigned to them.
- Configure Due Dates and Reminder Emails to automatically notify approvers before deadlines.
To learn about this more in-depth, read our support content about Workflow Tasks.
Grid Views
Grid Views display entries in a spreadsheet-like format, perfect for tracking and managing multiple requests simultaneously. Create different Grid Views for different purposes:
- Status-based views: Filter by specific statuses to see all requests at a particular stage
- Date-based views: Sort by submission date or deadline to prioritize urgent requests
- Assigned views: Use Shared With Current User filter so people see only their assigned requests
- Overview views: Show all entries with custom columns for quick status checks

Example: Create a Grid View for the “Project Lead” Role, filtered to entries in the “Completed” Status and only entries Shared With the Current User. This means Project Leads can only see their assigned clients’ completed entries.
Form Views
If the person initially submitting a form is an organization user or guest user, they can submit forms from inside Cognito Forms with Form Views. These views display the form for a specific Role, only showing fields and Actions available to that specific Role.

Example: Create a Form View for the “Client” Role. Clients can log into your organization’s portal and access the “Service Agreement” Form View, which shows only submission fields and no approval sections or internal notes.
Step 9: Test your complete Workflow
Testing catches configuration issues before real requests enter your system. Walk through every approval path to ensure logic, notifications, and permissions work correctly.
- Use Preview and switch Roles to confirm the right fields are visible or editable, the right Actions appear, and Statuses change correctly.
- Use View As User to view and interact with forms and entries as a different user, without any changes being made.
- Walk through the full Workflow using the form’s live Public Link. Temporarily set each email to send to your email address to confirm that notifications arrive at the right time, include the correct Workflow Links, and display the right content. Check that entries also appear in Task Views when expected.
Refer to our Workflow Pre-Launch Checklist as you test each step to ensure you don't miss critical configuration items.
Real-World Examples: Common Multi-Level Approvals
Every organization has different approval processes. These examples highlight how serial, parallel, and conditional approvals play out in everyday scenarios.
- Project proposals are a good example of a serial approval with a strict order of reviews. A project lead submits proposal details, which first go to the supervisor for review. Only after the supervisor’s approval does the proposal move on to the client for final review.
- Contract reviews typically involve multiple reviewers with no set order of approvals, making them a clear example of a parallel approval. Once contract details are submitted, multiple approvers can be notified at the same time. The Workflow then ensures that all required approvals are collected before moving to the final step of the review process.
- Purchase orders often include different approval levels based on the PO amount, making them a good example of a conditional approval. Requests can be routed to the right approvers depending on criteria such as amount or budget category. This ensures the approval scales appropriately with the size and type of purchase.
More Features to Enhance Your Approvals
Once your approval workflow runs smoothly, these additional features transform it into an even more sophisticated system.
- Integrate with your tech stack via Zapier, Make, Power Automate, or our API. Send notifications in Slack or Teams, automatically add signed docs to SharePoint or Google Drive, or post approval details to your CRM when requests are finalized.
- Auto-Generate documents when approvals are complete. Create professional contracts, purchase orders, or approval letters with all details and signatures embedded. Automatically attach the PDF or Word document to confirmation emails or send to document management systems through integrations.
- Create a self-service portal using Guest Access. Requesters submit multiple approval types, track their requests’ status in real-time, and complete assigned tasks. All from one branded portal, instead of scattered email chains.
- Layer calculations into approval logic. Automatically calculate budget impact, ROI, or risk scores that inform approval decisions. Show approvers real-time totals, remaining budgets, or year-to-date comparisons.
Start Building Smarter Approvals
Multi-level approvals don’t have to be complex to build. By combining Roles, Statuses, and Actions with field-level logic and automated routing, you create approval workflows that adapt to your business needs.
The workflows you build in Cognito Forms automatically route requests intelligently, engage the right people at the right time, and maintain visibility throughout the entire process. Whether you need serial approvals with strict authority chains, parallel reviews from multiple departments, or conditional routing based on request details, the same core components create any approval pattern you need.
Structured, automated workflows make approvals more efficient, more compliant, and easier to manage—all without writing a single line of code.
FAQ
Look for no-code setup so non-technical staff can build and modify workflows without developers or coding. Prioritize role-based permissions that control who sees and edits what. Ensure the tool offers flexible routing (serial, parallel, and conditional paths) in one system. Automated notifications and audit trails are essential for compliance. Integration capabilities matter if you need to connect with existing tools.
Yes. When you create Task Views for your approvers, you can configure due dates that appear alongside each task. Set reminder emails to automatically notify approvers before deadlines or when they’re past due.
You can also set Workflow Links to expire after a certain amount of time (e.g., 7 days). In this case, go to Workflow > Allow Links > When and use the following expression: =(Entry.DateSubmitted > DateTime.Today.AddDays(-7))
Alternatively, you could calculate a dynamic due date in a hidden Calculation field on the form and reference that field instead.
Use the Automatically Assign Status setting on each Workflow Status with “When” conditions.
For example, if you wanted to automatically approve entries with a lower amount specified, but require approval for higher amounts, you might set up the conditions like this:
- On the “Approved” Status, the auto-assign rule is
if Amount < $500ANDEntry.Status is Incomplete - On the “Pending Finance Review” Status, the auto-assign rule is
if Amount > $500 AND Entry.Status is Incomplete
Because we specified the “Incomplete” Status in both conditions, the Workflow only automatically routes new entries and will always be based on the “Amount” field.