Control how many times customers can use discount codes by setting usage limits that automatically validate codes, expire when the limit is reached, and prevent overuse on your payment forms.
Build Time & Skill
15-20 min
Intermediate
What you'll learn
How to create discount codes with usage limits that automatically validate, display clear error messages, and apply discounts to order totals
Discount codes drive sales and reward loyal customers, but unlimited codes create problems. Customers share codes beyond their intended audience, promotional budgets get exceeded, and you lose control over your campaigns. With Cognito Forms, you can set a specific limit per code, and the form handles everything else — validating codes on entry, tracking redemptions in real time, and automatically rejecting codes that have hit their cap.
Setting usage limits on your discount codes helps you:
- Prevent discount abuse while rewarding legitimate customers. Set exact limits so codes can’t be shared endlessly or shared outside of your intended promotion scope.
- Create urgency with limited-time promotional codes. When customers know only 50 people can use a code, they act faster to claim their discount before it runs out.
- Track exactly how many times each code has been used. See real-time usage data for every code without manual counting or spreadsheet tracking.
- Automatically validate codes and show helpful error messages. Customers get instant feedback when they enter invalid codes or codes that have reached their limit.
Step-by-Step: Setting Up Limited-Use Discount Codes
Create a discount code field with quantity limits that validate codes and display error messages, then add a Price field that calculates and applies the discount to your order total. These five steps establish a complete discount code system that prevents overuse while rewarding customers.
Step 1: Add a discount code field
Start by adding a field where customers enter their discount code. A Textbox field works best because it allows customers to type any text, giving you the flexibility to create memorable codes.
- Add a Textbox field to your payment form
- Label it clearly, like “Discount Code” or “Promo Code”
- Leave the field optional so customers without codes can still complete their purchase

Step 2: Set quantity limits for each code
Configure how many times each discount code can be used by setting a quantity limit with a calculation that defines each code and its limit.
- Select your Discount Code field and find Limit Quantity in the field settings.
- Choose Specific Quantity.
- In the Quantity field, enter a calculation that defines each code and its usage limit:
- For a single code:
=if DiscountCode = "SAVE20" then 20 else null - For multiple codes:
=if DiscountCode = "SAVE20" then 20 else if DiscountCode = "SAVE50" then 50 else if DiscountCode = "VIP10" then 10 else null
This calculation checks the entered code against your valid codes. When someone enters “SAVE20,” the form allows 20 total uses. When the code doesn’t match any valid option, the calculation returnsnull, which means no limit exists. This triggers your “invalid code” error message in the next step.
- For a single code:
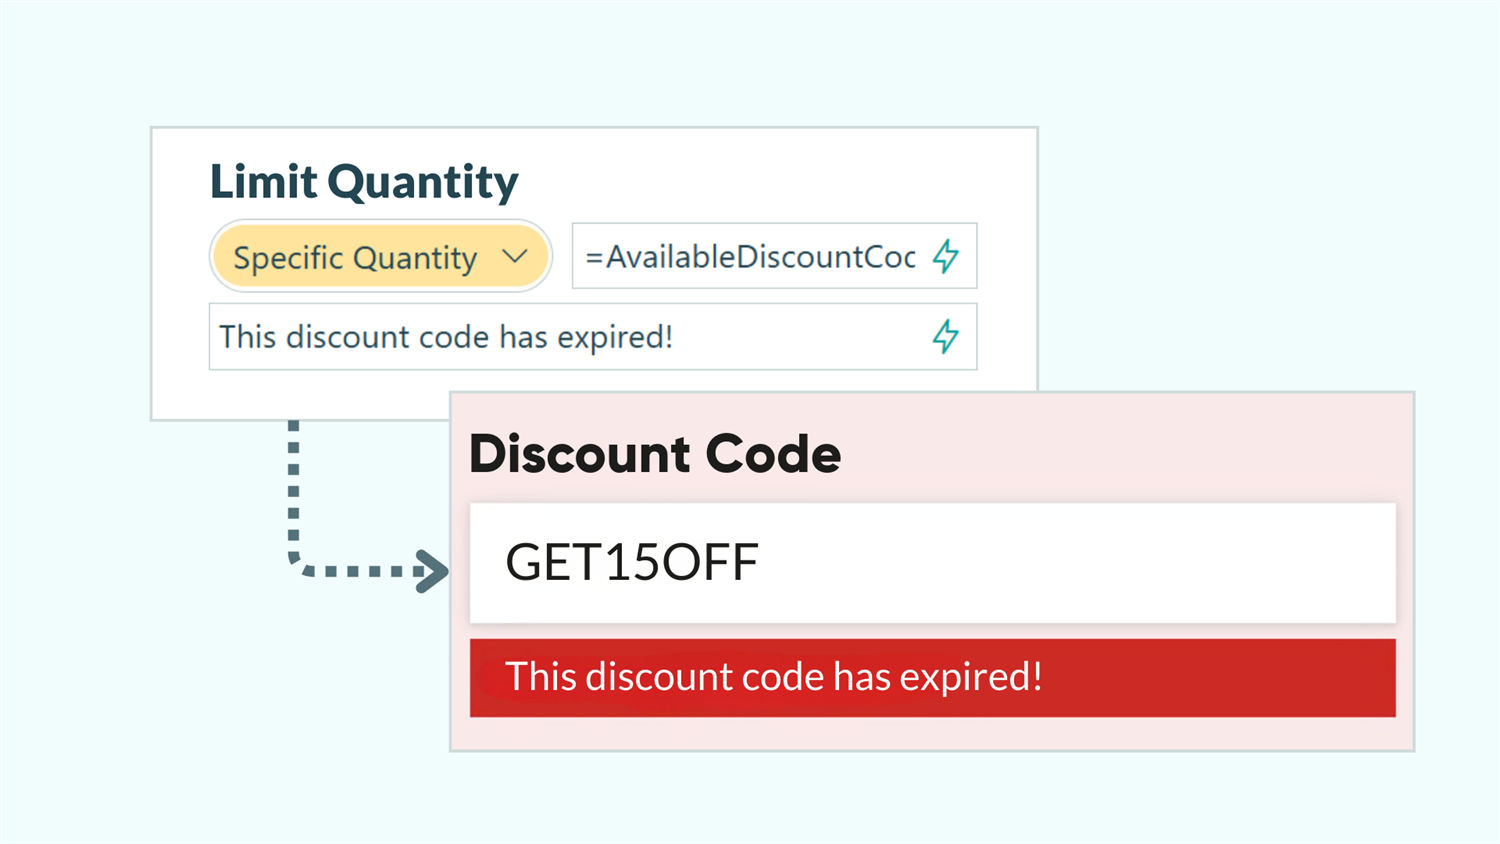
- Include a Quantity Exceeded Error Message (ex: “This discount code has expired!”)

Create meaningful, memorable codes. Use codes like “LAUNCH50” or “WELCOME10” instead of random characters. Customers remember these codes more easily and are more likely to use them.
Step 3: Add an invalid code error message
Configure an error message that appears when customers enter a code that doesn’t match any valid option.
- In your Discount Code field settings, select Show Custom Error - When
- Set the condition to:
=(DiscountCode != null and DiscountCode_QuantityLimit = null) - Enter a custom error message: “Invalid discount code. Please check your code and try again.”
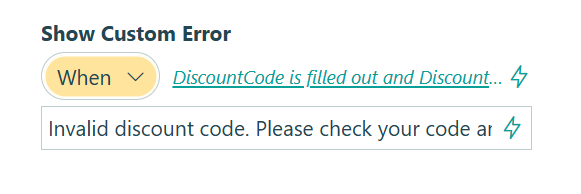
This expression works by checking two things at once: whether someone entered any code (DiscountCode != null) and whether that entry matched a code with a defined limit (DiscountCode_QuantityLimit = null). If a code was typed but no matching limit exists, it’s not a valid code.
Step 4: Calculate and apply the discount
Add a Price field that calculates the discount amount and subtracts it from your order total.
-
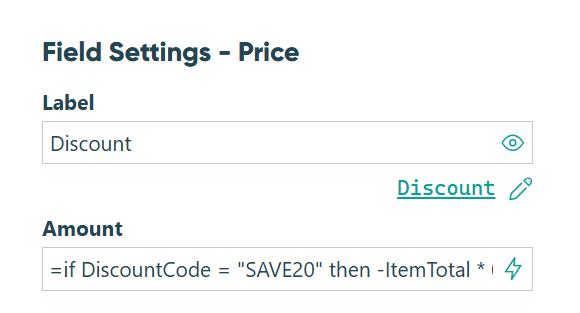
Add a Price field to your form and label it “Discount”
-
In the Price field settings, find Amount and enter your discount calculation:
- For percentage discounts:
=if DiscountCode = "SAVE20" then -ItemTotal * 0.20 else if DiscountCode = "SAVE50" then -ItemTotal * 0.50 else 0 - For fixed amount discounts:
=if DiscountCode = "SAVE10" then -10 else if DiscountCode = "SAVE25" then -25 else 0
Replace “ItemTotal” with the actual name of your payment field. If you have multiple payment fields, add them together:(PaymentField1 + PaymentField2 + PaymentField3).
The negative values (-ItemTotal * 0.20or-10) subtract from the total, creating the discount. When no valid code is entered, the calculation returns0, applying no discount.
- For percentage discounts:
-
Optionally, select Show This Field - When and set the Discount Price field to only appear when a discount applies:
=(Discount > 0)

Important: When creating a discount calculation, always reference the actual payment fields on your form, not calculation properties like Order.SubTotal. The order subtotal property automatically recalculates after the discount is applied, creating a circular reference that yields incorrect discount amounts.
Step 5: Test your code usage limits
Before publishing, run through each scenario a customer might encounter. Verify everything works correctly before customers see your form.
- Click Preview in the form builder
- Try entering an invalid code (like “TEST123”) and verify the “Invalid discount code” error appears
- Enter a valid code and confirm the discount calculates correctly
- Submit several test entries with the same code to approach the usage limit
- Try using the code after reaching its limit and verify the “code has reached its usage limit” error appears

Managing Multiple Discount Codes (Advanced Method)
When you have many discount codes or frequently add and remove promotional codes, managing them through calculations becomes tedious. Every code change requires editing the calculation and remembering the exact syntax. This advanced method uses a hidden Choice field to manage all your codes in one organized place, making updates faster and reducing errors.
Setup steps
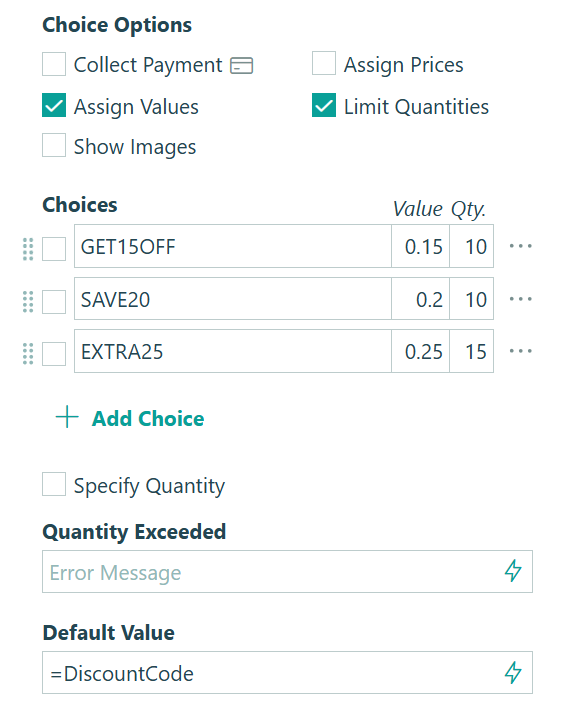
- Add a Choice field and label it “Available Discount Codes”
- Set the field Type to Dropdown
- Add a choice for each discount code you want to offer
- Select Limit Quantities and specify the usage limit for each code
- Select Assign Values and enter the discount percentage or amount for each code (0.20 for 20%, 0.50 for 50%)
- Set Default Value to
=DiscountCode(this connects it to the Textbox field that customers see) - Set Show This Field to Never
Now update your Discount Code Textbox field and Price field discount calculation:
- In your Discount Code field settings, change the Quantity calculation to:
=AvailableDiscountCodes_Quantity - Update the Show Custom Error condition to:
=(DiscountCode != null and DiscountCode != AvailableDiscountCodes) - In your Price field settings, change the Amount calculation to:
=if DiscountCode = AvailableDiscountCodes then -ItemTotal * AvailableDiscountCodes_Value else 0

This approach references the hidden Choice field for all quantity limits and discount calculations. When you need to add a new code, just add it to the Choice field along with its quantity and value – no calculation editing required.
More Ways to Extend Your Discount Code System
Once your usage limits are in place, these features add more depth to what your discount code system can do:
- Apply discounts to repeating section totals for bulk order scenarios. Use the
.Sumfunction to calculate discounts on the total of all items in a repeating section:=if DiscountCode = "BULK10" then -MyOrder.Sum(ItemTotal) * 0.10 else 0 - Track code usage in Entry Views to monitor promotion performance in real-time. Create custom views filtered by discount code to see which promotions drive the most conversions.
- Display remaining uses to create urgency. Add a Calculation field showing
=DiscountCode_QuantityRemainingand conditionally display it when the code is valid. Customers see “Only 12 uses remaining!” and feel motivated to complete their purchase before the code runs out.
Start Creating Limited-Use Discount Codes Today
Limited-use discount codes transform uncontrolled promotions into strategic campaigns with measurable impact. By setting precise usage limits, you protect your profit margins while still rewarding customers with valuable discounts. Whether you’re running flash sales, building referral programs, or creating tiered promotions, quantity limits give you complete control over who uses your codes and how many times they’re redeemed.
FAQ
When a code reaches its usage limit, the custom error message you configured is displayed immediately after customers enter the code. The error prevents form submission until they remove the invalid code or leave the field blank. The discount doesn’t apply, ensuring you never accidentally honor a code that exceeded its intended use.
You can display this information by adding a Calculation field set to =DiscountCode_QuantityRemaining and using Show This Field conditions to display it only when a valid code is entered. This creates urgency messaging like “Only 12 uses remaining!” that motivates customers to complete their purchase.
Every submitted entry records the discount code used in the Discount Code field. View this data in your Entries page, where you can filter by specific codes to see all customers who used each one. Export entries to a spreadsheet for deeper analysis, tracking total revenue per code, most popular codes, or identifying which promotions drove the most conversions.