Create event registration forms with integrated payment that sells tickets, enforces capacity limits, and processes payments in one seamless flow—no coding required.
Build Time & Skill
15-20 min
Beginner
What you'll learn
How to create a shareable event registration form with ticket tiers, quantity limits, integrated payment, confirmations, and exportable attendee data
Event registration with payment removes friction from sign-ups by combining attendee data collection and payment processing in one seamless flow. With Cognito Forms, you can set up tiers (General, VIP, Student), prevent overselling, process payments, and automatically send confirmations and receipts. All so you spend less time chasing invoices and more time running your event.
Here are four key benefits:
- Remove payment friction. Attendees can register and pay in one step without chasing invoices or handling cash payments.
- Prevent overselling. Ticket tiers and quantity limits keep capacity under control, providing a positive attendee experience.
- Deliver instant confirmations. Registrants receive receipts and event details right away, boosting their confidence.
- Scale effortlessly. Whether your event has 20 tickets or 200, the form automatically manages payments, limits, and notifications.
How Your Event Registration Form Works
A successful event registration form combines multiple components that work together to create one seamless experience. Rather than managing separate systems for registration, payment, and confirmations, everything happens in a single form that handles ticket sales, capacity management, payment processing, and attendee communications automatically.
The key building blocks
A successful event registration form isn’t six separate steps. It’s a single, seamless flow made up of a few key building blocks that work together:
| Feature | What It Helps You Do |
|---|---|
| Quantity Limits | Enforce limits for each ticket type to prevent overselling |
| Online Payment | Total costs and process secure payments directly on your form |
| Confirmations & Email Notifications | Provide receipts with instant confirmation messages or automated email notifications |
| Entry Views | Store data in one place to easily track capacity or filter by ticket type |
Step-by-Step Setup: Build Your Event Registration Form with Payment
In the steps below, we’ll walk you through how to build an event registration form with payment that is ready to use. Let’s get started!
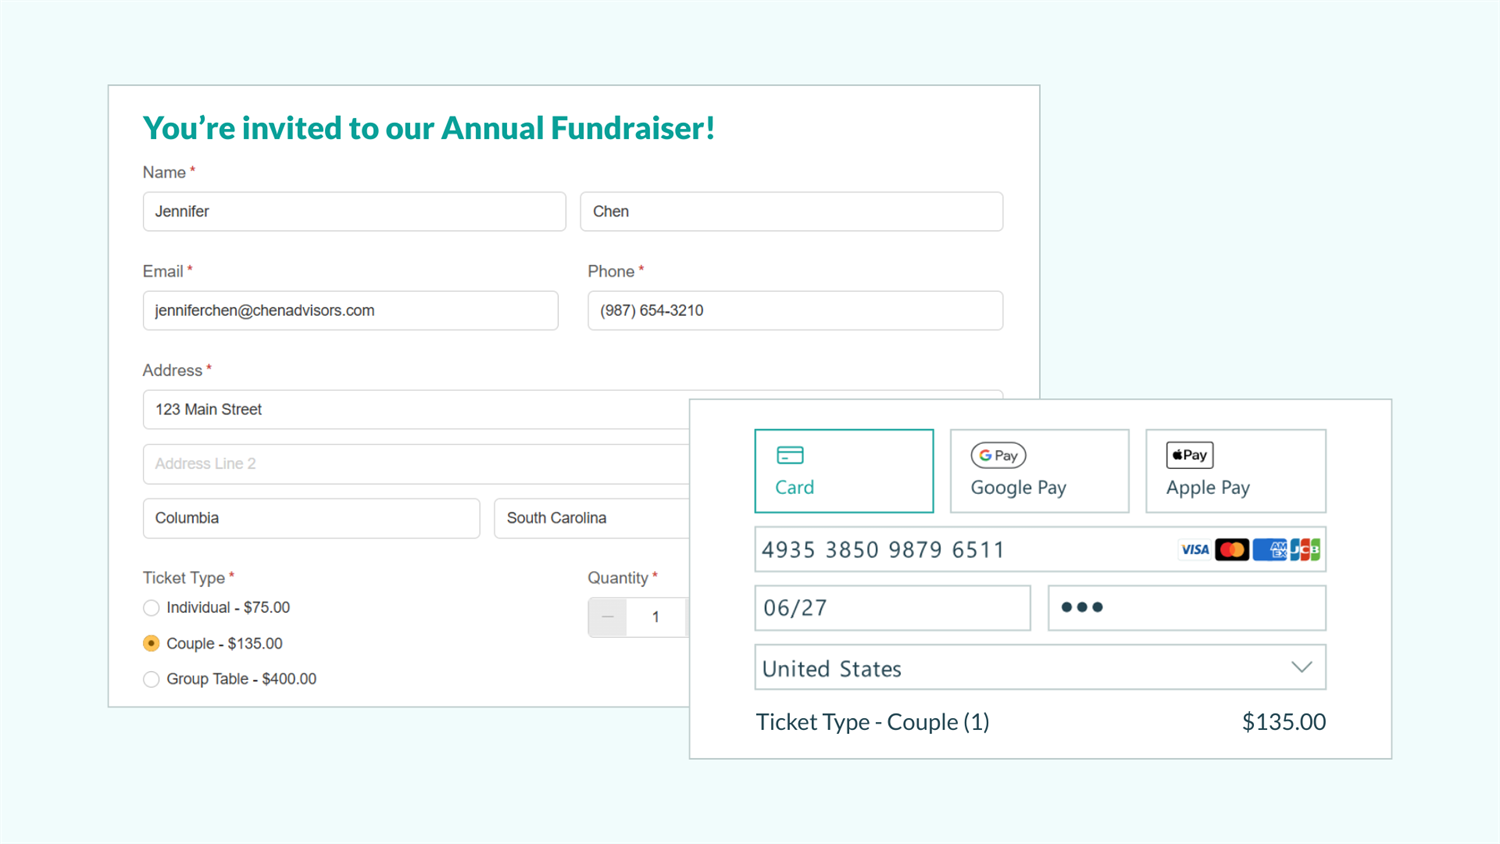
Step 1: Set up a section for attendee information

- Create a Section titled “Attendee Information” to collect the details you’ll need for check-in and communication.
- Include Name, Email, Address, and Phone fields.
- Add optional fields like T-shirt size or dietary needs based on your event’s requirements.
Keep attendee forms short. Only ask for information you actually need. The fewer fields registrants complete, the faster they finish (and the higher your completion rate).
Step 2: Add ticket types and pricing
Add a field for the registrant to select the ticket type and price they are interested in.

- Add a Choice field (Drop Down or Radio Button) and name this field “Ticket Type.”
- Under Choices, enter the different types of ticket options (e.g. General, Premium, VIP).
- Select the Collect Payment checkbox to enable payment processing. You can connect your payment account now or complete that step later in Step 5.
- When you enable payment collection, the Assign Prices option becomes available. Use this to set a price for each ticket type. The Show Prices in Choice Field option displays prices directly in the dropdown, making it easy for attendees to compare options before selecting.
Step 3: Specify ticket quantity
Specify the number of tickets available for each type with Quantity Limits. When a ticket type is selected, your form with automatically track the quantity left and enforce the limit you set.

- Add a Number field (Integer type) and choose a style (e.g., Spinner). Name this field “Quantity.”
- Set the Minimum Value to
1and the Default Value to1. Setting the default to1pre-fills the field, but registrants can adjust it if they want more than one ticket. - Under Show This Field, select When and set the condition to
TicketType is filled out. This ensures the Quantity field only appears after someone selects a ticket type. - Back in your “Ticket Type” field settings, select Limit Quantities and specify the maximum number of tickets available for each option (e.g., 100 General tickets, 50 Premium tickets, etc.). This prevents overselling by tracking available capacity in real-time.
When Limit Quantities is selected for a Choice field, the quantity for each option is available in calculations as FieldName_Quantity. For example, in this guide, it would be TicketType_Quantity.
Step 4: Enforce registration limits
Connect the Quantity field to your ticket purchases to ensure quantity limits apply correctly, even when someone purchases multiple tickets.

- In the “Ticket Type” field’s sidebar, map Specify Quantity to your Quantity field. This ensures that the quantity limits are applied correctly, even when multiple tickets are purchased.
- Add a custom error message under Quantity Exceeded, such as: “Sorry, these tickets are sold out.” This message appears when someone tries to select a sold-out ticket type.
- Optional: Close the form’s public link automatically once all tickets sell out.
- Navigate to Workflow > Public Links
- Set Allow Links to When, and then select
TicketType_QuantityRemaining is greater than 0. - Update the Not Available Message to display when the form closes. For example: “We are sold out!”.
Step 5: Connect Payment
When you enabled Collect Payment on your “Ticket Type” field, Cognito Forms automatically added a Payment field to your form. This field calculates totals based on ticket prices, quantities, and any add-ons you configure.

Connect your payment account
- Click the Payment block at the bottom of your form.
- Under Account, select Add Payment Account.
- Choose from supported payment processors (PayPal, Stripe, or Square).
- Complete the connection in the pop-up window, where you can create a new account or link an existing one.
- Be sure to provide accurate information. You must verify your identity (and your organization’s, if applicable) to confirm you are collecting payment for legitimate purposes.
Customize your payment setup
Once your account is connected, customize your payment setup by setting conditions for when to process payment, mapping billing fields, including processing fees, or displaying subtotals and line items.
Step 6: Set up confirmations and receipts
Set up confirmation messages and email notifications to reassure registrants that their registration was successful.
Confirmation message

- From the Workflow menu, select the “Submit” Action (or any relevant Action you’ve created).
- Under Confirmation enter your message.
- Include event details such as time, date, location, or a contact email for questions.
- You can also attach a Document (such as a receipt) that will automatically generate and be included with the confirmation message after submission.
Email Notifications

- In the same “Submit” Action, navigate to Send Emails.
- Send it to the registrant’s email by inserting your form’s Email field using Insert Field.
- Customize the message to include relevant event details and consider attaching an automatically generated receipt document.
- Optional: Set up an additional email for your internal team that includes the registrant’s details and a link to view the entry.
Step 7: Test and monitor payments
Before launching, test in Preview mode to verify your setup processes payments correctly. After launch, monitor payment status and view detailed payment information directly on the Entries page. Use the entry audit log to review order changes, including when orders were paid or refunded.
Enhanced Event Registration Features
Once you’ve mastered the basics, these advanced features give you more control over pricing, workflows, and multi-session events. They extend your registration capabilities when you need to handle complex scenarios like promotional discounts, team approvals, or conferences with multiple breakout sessions.
These options extend your registration form when you need more control:
- Promo codes and discounts: Registrants enter a code and Quantity Limits control how many times it can be redeemed. Perfect for early bird specials, sponsor giveaways, or limited-time promotions.
- Workflow Automation: Control your team’s internal workflows and automate notifications to the right people at the right times. Perfect for events needing approval or when teams handle different registration types.
- Multi-session registrations: Let registrants select add-on sessions and narrow choices by type or time with Cascade Filters. Perfect for exclusive workshops during an event or session-specific capacity limits.
Create a Seamless Event Registration Experience
You’ve built a comprehensive event registration form that seamlessly integrates ticket sales, attendee details, and payments into a single, smooth flow. This setup in Cognito Forms ensures every ticket is sold correctly, every registrant gets an instant confirmation, and every payment is tracked automatically. Whether you’re managing a small workshop or a large conference, this foundation scales to meet your needs while reducing administrative work and delivering a professional experience for your attendees.
FAQ
Payments can be fully refunded through Cognito Forms or through your payment account. To refund through Cognito Forms, select the entry and click Refund in the green box under Payment Summary. Partial refunds must be performed in your connected payment account.
Yes, you can enable group registration by using Repeating Sections. Create a Repeating Section for attendee information that allows registrants to add multiple attendees in a single submission. Each attendee’s information is captured separately while processing payment for the entire group at once. Set minimum and maximum limits on the Repeating Section to control group sizes.
For detailed instructions on how to set up Repeating Sections, check out our guide on How to Let Customers Add Multiple Line Items.
The Entries page displays payment status for each registration. Create filtered views to segment paid, pending, and failed payments. The entry audit log tracks all payment activity, including when payments were processed or refunded.
Cognito Forms integrates with three trusted payment providers: Stripe, PayPal, and Square. Individual and Pro plans include Stripe integration, while Team and Enterprise plans support all three processors. While a single form only allows one payment provider connection, you can set up all three for your Cognito Forms organization and use different payment providers between multiple forms.