Turn form submissions into polished documents instantly, for accurate quotes, invoices, and contracts delivered without manual work.
Build Time & Skill
20-30 min
Intermediate
What you'll learn
How to create PDFs and custom documents that automatically generate and deliver with every form submission
Manually creating documents from form data wastes time. You copy information into templates, check calculations, fix formatting, and keep customers waiting for quotes or contracts. Cognito Forms transforms every submission into a professional PDF or Word document that is branded, accurate, and ready to send. The system eliminates manual copying, reduces errors, and speeds up delivery. This approach solves four major challenges:
- Respond instantly to customers. Send quotes, confirmations, or certificates within seconds, building trust and improving response rates.
- Ensure consistent branding. Every document matches your brand’s exact fonts, colors, and layout.
- Reduce errors from manual data entry. Documents pull data directly from form submissions, preventing copy-paste mistakes and ensuring accuracy.
- Scale effortlessly. Handle hundreds of submissions without adding staff, freeing your team to focus on higher-value tasks.
Understanding Document Generation in Cognito Forms
Cognito Forms offers two template types for different needs. Standard templates instantly convert submissions into formatted documents with one click, perfect for basic receipts and confirmations. Custom templates provide complete design control using Word documents with merge syntax, ideal for branded quotes, contracts, and invoices.
Both template types turn form submissions into polished, professional documents. The difference is how much control you need over the final appearance and layout.
| Standard Templates | Custom Templates | |
|---|---|---|
| What They Are | Built-in option that pulls all form submission details into a formatted document | Customizable templates with full control over layout, branding, and dynamic content using merge syntax |
| Best For | Receipts, confirmations, summaries, internal documents | Branded quotes, invoices, contracts, certificates |
| How They Work | Select what to include (fields, logo, title). System auto-formats the document | Download standard template, design in Word/Docs, insert merge syntax like {CustomerName} to pull form data |
| Setup | One-click setup, no design work needed | Full control: fonts, colors, tables, headers/footers, conditional logic |
| Key Pointer | Instant results with minimal setup | Complete design control, tailored to your brand and process |
How to Build Your First Automated Document: Step-by-Step
Building professional, automated documents is easier than it looks. Follow the steps below to go from blank form to custom documents, without the guesswork.
Step 1: Build your form
Your form is the foundation, and every field you add can become content in your documents. Customer names become greetings, selections become line items, and calculations become totals. Think about what information your final document should include, and make sure your form captures it.
- Navigate to your form’s Build page.
- Add fields for:
- Customer information: Name, email, phone, address
- Selections: Products, services, registrations, etc.
- Parameters: Quote expiration, payment terms, etc.
- Calculation fields: Automatic totals, taxes, discounts
For easier setup, add fields to your form before building your document template.
Step 2: Choose a document template
Every form supports multiple document templates, letting you generate different documents from the same submission.

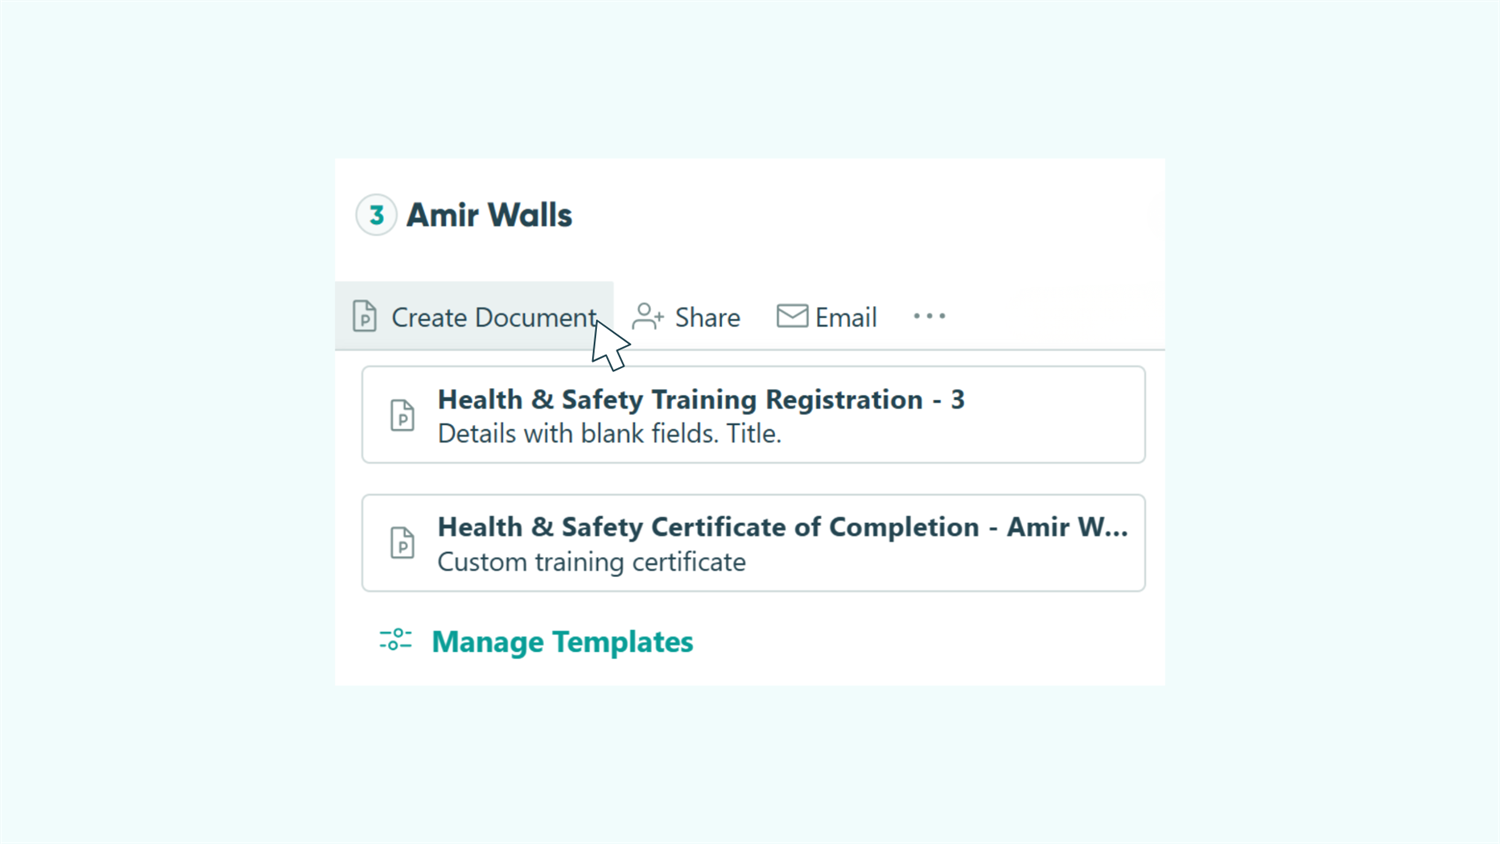
1. Access the Manage Document Templates dialog from one of three locations:
2. Select an existing template or choose + New Template .
3. Enter the File Name , Description , and Role .
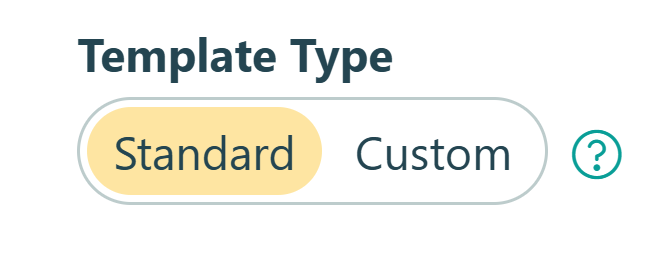
4. Choose your template type:
- Standard Templates are pre-formatted and include all form fields, making them ready to send instantly.
- Custom Templates start with a standard template that you download, customize in Word (or another word processor), then upload back to Cognito Forms. This template type gives you complete control over the design, formatting, and layout, making it a bit more hands-on.
Step 3: Configuring standard templates
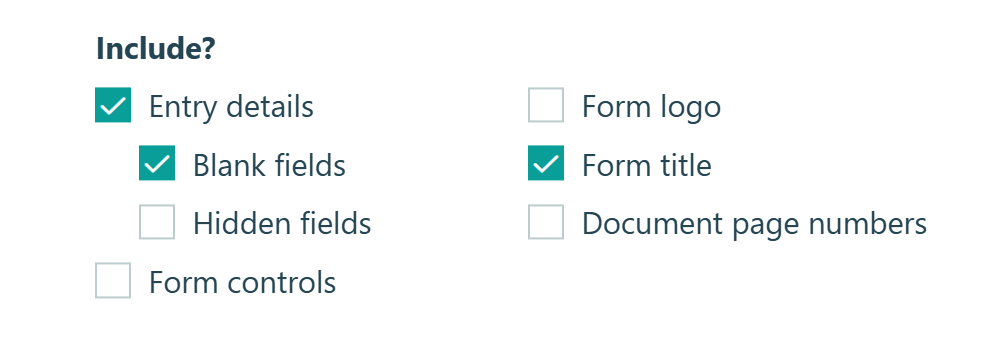
Standard templates require minimal setup. Choose what to include, and the system handles formatting. (You can skip this step if you are only setting up custom documents.)
- Under Include?, select the items you’d like on your document, and then select Save.
- Your standard document template is now ready to go. It’s that easy!
Step 4: Create your custom template
Custom templates provide complete design control. Follow this workflow to build professional, branded documents.

Download the standard template
- With Custom selected under Template Type, download the standard template.
- Open the Word document in Microsoft Word, Google Docs, or your preferred word processor.
- Any word processor will work, as long as you can open a .DOCX file and export your custom template as a .DOCX file.
Understand merge syntax and customize your template
When you open the file, you’ll see your form’s field names inside curly brackets (e.g. {CustomerName} or {DateOfBirth}). These are “field tokens” that tell Cognito Forms to pull in the submission’s data from that field.
By inserting these field tokens throughout your document, you control exactly what appears and where:
- Insert form data:
{FieldName}places field content anywhere - Loop through Repeating Sections:
{each SectionName}displays lists of items, attendees, or services - Add conditional content:
{if FieldName}shows information only when specific selections are made - Display uploaded images:
{image FieldName, width=5in, height=3in}controls image size - Display e-signatures:
{Signature}shows signatures as images with adjustable dimensions
Pull in data and format your document
As you add field tokens to your template, use Word or Google Doc’s text formatting options to keep your document polished and on-brand. You can:
- Create tables, columns, and custom page layouts
- Add headers, footers, and page numbers (including dynamic form details)
- Apply exact fonts, colors, and spacing to match your brand
- Optimize layout for readability on any device
Upload your custom template
- When you’re done customizing your template, save it as a
.DOCXfile. - Return to your template settings in Cognito Forms.
- Click Upload Template and select your customized .docx file.
- If errors are detected, you can download an annotated version showing what needs to be fixed.
- Choose your Output Format (PDF or Word document)
- Choose PDF if you want the generated document to be static and non-editable.
- Choose Word document if you want to be able to make edits to the generated document.
- Click Save.
Step 5: Share your documents
Once your template is ready, decide how you want to deliver documents to customers. You can share documents in one or all of these three ways:
- Confirmation message: Display a download link(s) for documents directly on a form’s confirmation page. No email notification required.
- Email notifications: Attach documents to an automated email notification.
- Entries page: Download generated documents directly from one or more entries.
- Manually share documents via email for individual recipients as needed.
- Download an individual entry’s document to save internally or attach to an external email.
- You can also download documents in bulk for multiple entries at once.
Step 6: Test & Refine
Always test your documents before going live to catch formatting issues and verify data accuracy.

- Navigate to your form’s Entries page and open any entry.
- Click Generate Documents and select your template.
- Review the generated document for:
- Accurate data placement
- Proper formatting
- Brand consistency
- Make adjustments to your template if needed and re-upload.
- When your template is ready, switch the template from Test to Live mode.
Please Note: Custom templates include a watermark in Test mode. Because of this watermark, headers and footers you add to your template will not generate until the document is in Live mode. This lets you test freely without using your plan’s document generation allowance.
Real-World Examples: How Teams Use Automated Documents
Here are three common scenarios where automated document generation transforms manual processes into streamlined workflows:
- Sales Quotes & Proposals: Generate branded quotes with itemized pricing, terms, and expiration dates instantly after prospect submissions. Product selections and calculations flow directly into templates.
- Invoices & Payment Confirmations: Eliminate manual entry errors by generating professional invoices from order forms. Pricing and tax fields auto-calculate totals in branded templates.
- Completion Certificates: Generate branded certificates immediately after clients finish certifications or training. Names, titles, and dates populate certificate templates automatically.
Ideas to Take Your Documents Further
With additional Cognito Forms features, you can build a powerful system that creates, delivers, and manages documents exactly the way you need.
- Automate delivery with Workflows. Trigger specific documents when Actions are clicked or statuses change. Send contracts when entries are marked ‘Approved’ or receipts when marked ‘Paid’.
- Send documents to cloud storage automatically. Use our integrations to save documents to Google Drive, Dropbox, or other platforms.
- Create role-based documents. Generate different documents for different audiences using Workflow Roles. Staff see costs and internal notes, while customers receive clean invoices with only relevant information.
Start Automating Your Documents
Manual document creation wastes time, introduces errors, and keeps customers waiting. With Cognito Forms, every submission becomes a professional, accurate document instantly. Set up your first template today and eliminate tedious copy-and-pasting. Your quotes, contracts, and certificates will generate automatically with consistent formatting and accurate data every time.
FAQ
Yes, you can create multiple document templates for any form, each generating as a PDF or Word document. For example, generate a PDF quote for customers while creating an editable Word contract for internal review. If you want to generate a PDF and Word document with the exact same data and formatting, simply use the same document on two different templates - one outputting as a PDF and one outputting as a Word document.
Keep in mind: Even if you use the same document template, each output will count as one template. In this scenario, you would be charged for two templates.
You can create unlimited document templates per form. Many organizations create multiple templates for different purposes: customer-facing quotes, internal cost breakdowns, executive summaries, and detailed technical specifications, all from one form. Each template can be configured to generate and send to different recipients automatically.
No, you do not need to use Microsoft Word to create custom document templates. You can use any word processor that opens and exports .docx files (such as Google Docs or Apple Pages). Simply download the standard template as a .docx file, edit it in your preferred word processor, then save or export it back as a .docx file to upload to Cognito Forms.