Transform how you collaborate with clients by building a secure, self-service portal where they can submit forms, track progress, and access their information anytime.
Build Time & Skill
30-40 min
Intermediate
What you'll learn
How to create a secure client portal where customers can submit forms, track progress, and manage their own information
Client portals simplify how you work with customers by reducing back-and-forth communication and putting clients in control of their own data. They deliver the most value when you need to:
- Share sensitive documents or information securely without countless email attachments.
- Keep clients informed by letting them check their project status anytime.
- Collect recurring forms and documents from returning clients.
- Build trust with a professional, branded experience that works 24/7.
Understanding Client Portals
Before diving into setup, it helps to understand what clients experience in their portal and when a portal makes the most sense for your organization.
What clients experience in their portal
Your clients get a full self-service experience with their own secure login to:
- Submit forms from any device, whenever it’s convenient for them.
- View past submissions and track progress on active requests.
- Update their own data when information changes, without contacting you.
- Complete assigned tasks within your Workflows at their own pace.
When a client portal makes the most sense
Organizations managing ongoing client relationships see the biggest impact with portals. This approach works especially well for:
- Tax professionals collecting documents from clients during tax season.
- Agencies juggling multiple client projects with different timelines.
- Organizations regularly collecting information from their members.
- Any business with returning clients who submit forms multiple times.
Client portals don’t just save time. They create a smoother, more professional experience for everyone involved. When clients can handle routine tasks themselves, you can focus on delivering exceptional service instead of managing administrative details.
Steps to Set Up Your Client Portal
Creating a client portal in Cognito Forms doesn’t require any coding or technical expertise. It just takes thoughtful planning and configuration. Follow these six steps to build a secure, branded portal that clients will use confidently. Each step builds on the last, creating a complete self-service experience.
Step 1: Planning your client portal experience
Planning before building ensures your portal fits naturally into your workflow and serves your clients’ actual needs. Take time to map out which forms clients will use, how they’ll access information, and what parts of your process should happen automatically. A clear plan saves time during setup and creates a portal that works seamlessly from day one.
Identify your clients
- Start by defining who will use your portal. Consider whether different types of users, such as clients, vendors, or internal team members, will be using the portal.
- You can create separate guest lists for each audience type (clients vs. vendors, or different service tiers) to maintain clear boundaries and appropriate access levels.
Identify the forms your clients will use
- Which forms do clients regularly submit?
- Examples: Change requests, support ticket, or project updates
- Which forms should clients view their past submissions for?
- Examples: Previous project requests, submitted contracts, or historical invoices
- Which multi-step workflows will clients participate in?
- Examples: Document approval processes, multi-step applications, or onboarding sequences
- Which forms will include tasks for clients to complete?
- Examples: Completing an onboarding questionnaire, signing an agreement, or uploading required documents
Step 2: Adding clients to your portal
Once you’ve planned your client experience, create your guest list and connect it to the forms clients will use. This foundation ensures each client sees only their own information and can access everything they need in one secure location.
Your guest list (also called a Person Form) serves as your organization’s client database. When you add someone here, they become eligible to log into your portal and access the forms you share with them.
Creating your client list

- Enable Guest Access.
- Navigate to your organization’s Settings > Guest Access and enable the feature using the toggle button.
- Create a Person Form.
- Click + New Person Form to select a Person Type and create your client list.
- The form will already include fields for Name, Email, and IsActive status.
- If you are creating your Person Form from a previously created form, be sure you have these fields.
- Go to Form Settings and enable Use With Person Field?
- Map your form’s fields to each Person Field setting:
- Name identifies the client.
- Email must match the address clients will use to log in.
- IsActive controls whether a client currently has access to the portal.
If you want clients to update their own personal information, check this box: Allow guests to edit their profile?

3. Add your clients by creating a separate entry for each client.
- You can create entries manually, import them from a CSV or Excel file, or use an integration (like Zapier or Power Automate) to sync from your CRM or another system.
For more detailed instructions, check out our user guide on creating guest lists.
Connecting forms using Person fields
Once your guest list is ready, you’ll need to link each form to it using a Person field. This connection automatically populates client details and ensures entries are shared with the right people.

- Open a form your clients will use.
- Add a Person field. In the sidebar settings, under Look Up People From, select the name of the Person Form you previously created.
- Set Default To – Current User to automatically fill in the Person field with the logged-in client’s name.
- We recommend setting the Person field to Read-Only > Always when you’re defaulting the field to the Current User. This prevents anyone from accidentally selecting another client and seeing other users’ data.
Linking entries to the right clients
Configure the “Public” Role to automatically connect submitted entries to the client selected on the Person field. This ensures each client sees only their own submissions when they log into the portal.

- Open the form’s Workflow Role settings.
- Under Roles, select the “Public” Role. (Guests must always be in the Public role.)
- In the Share With section, choose the “Client” Person field you added earlier. This will automatically share each submission with the “Client” associated with this Person field.
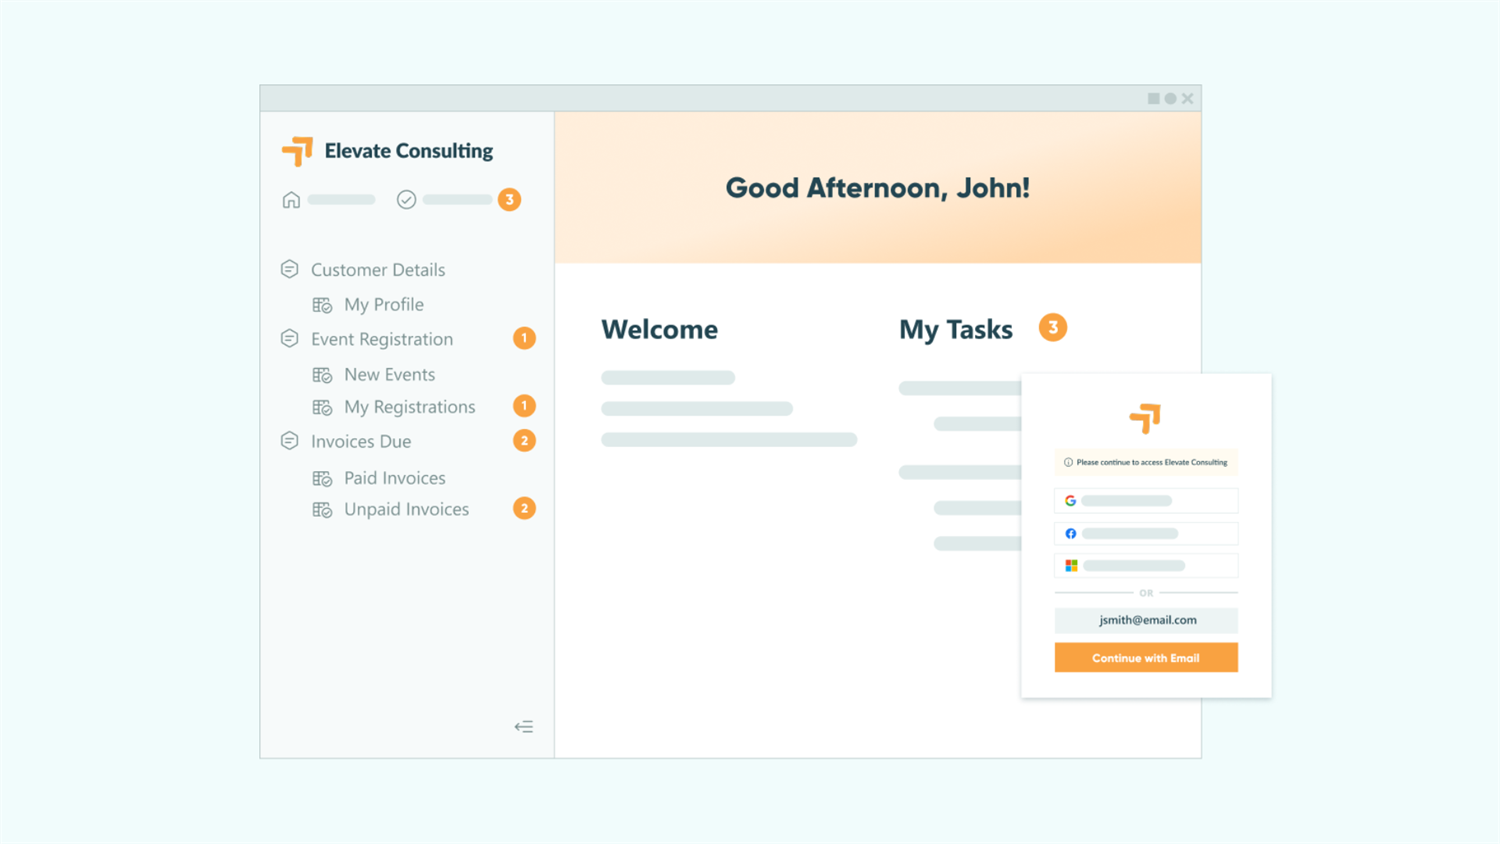
Enabling authentication for secure access
Authentication protects sensitive information by requiring clients to verify their email address before accessing entries. When someone clicks a portal link, they receive a one-time code to confirm their identity, ensuring only verified guests can view or update their information. Without it, anyone with a link could potentially access client data. Authentication adds a critical security layer while remaining simple for clients to use.

Choose one or more authentication methods based on how your clients will interact with your portal:
- Go to your form’s Workflow settings
- Follow the setup process for the type of link(s) you want to authenticate using the table below
| Type of Link | When to use it | How to enable it |
|---|---|---|
| Workflow Links | Use when clients need to view or update specific entries you share via email notifications | Find Workflow Link Sharing and turn on Require Authentication. Set it to Always or For Roles > Public. |
| Save & Resume Links | Use when clients need to save partially completed forms and return later | Find Save & Resume and turn on Require Authentication. Set it to Guests & Users. |
| Public Links | Use when clients submit new forms directly through the portal, or you simply want to verify the client’s email address during submission | Find Public Links and turn on Require Authentication. Set it to Guests & Users. |
Please Note: Public Link authentication only requires email verification before accessing the form. The Guests & Users option doesn’t restrict access to specific people. Anyone can open the form after verifying their email. Read our FAQ on how to restrict access to only clients on your guest list.
Step 3: Creating Entry Views for clients
Entry Views determine what clients see when they log into their portal: which forms they can submit, which tasks they need to complete, and which past submissions they can access. Think of Views as different windows into your data, each configured to show clients exactly what’s relevant to them at any given time.
Clients need Views to access forms and track their submissions within the portal. Without Views, even though you’ve set up authentication and Person fields, clients would have nowhere to actually interact with your forms when they log in.

To add a view:
- Open your form and go to the Entries page.
- Click the + button to create a new View.
- Choose the appropriate Entry View type based on what you want clients to do in the portal.
- Assign the View to the “Public” role.
If you named the Public role on your guest list “Client,” you’ll see the Role in the View Settings as Client instead of Public.
Types of Views
There are three types of Entry Views you can use, each one working best for a different scenario. Keep in mind, you could have more than one View type for clients on a single form. It just depends on your needs and the process.
- Form Views allow clients to submit new forms directly from the portal. These could be used for things like clients submitting new project requests.
- Task Views allow you to assign tasks to clients within a Workflow. These could be used to assign clients a form for document uploads or approvals.
- Grid Views give clients access to past submissions. These could be used to let clients view past invoices, submitted applications, or project history.
Step 4: Controlling what clients can see
Visibility controls ensure clients see only what’s relevant to them while protecting internal information. You’ll customize what appears in their portal at three levels: in their entry lists (columns and filters), in the actions they can take (workflow actions), and in the individual form fields they see (field-level visibility).
Without proper controls, clients could accidentally see internal notes or pricing details meant for your team. These settings protect sensitive data while keeping the client experience clean and professional.
Columns and filters
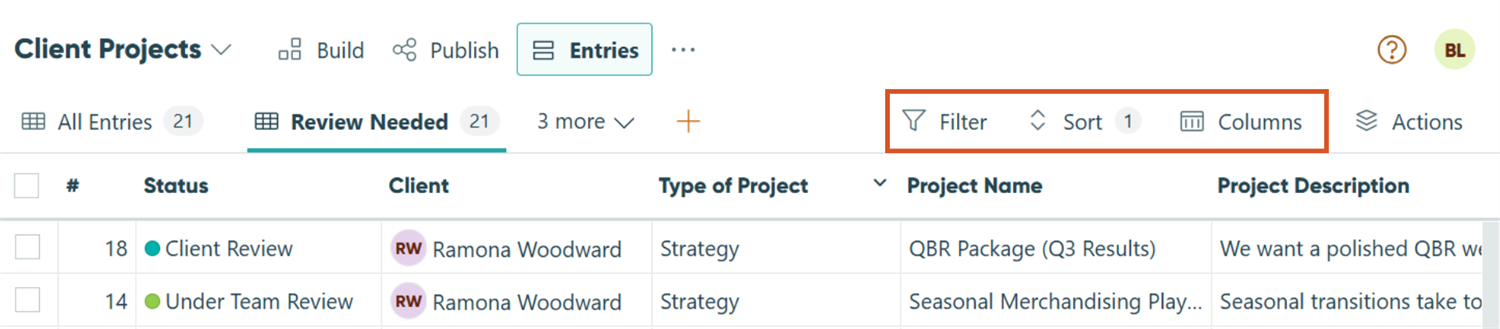
Use each Entry View’s Columns, Filter, & Sort settings to organize what clients see in their portal.
- Hide internal notes, staff-only fields, or sensitive data.
- Display only client-facing information, such as project name, status, or due date.
- Use the Shared With Current User filter to show each client their own submissions.
A “Column” in an Entry View is essentially a field on your form. No matter what conditional logic might be set up on the field, the column will still display in the grid view, if selected. Use the Columns setting on the View to hide specific columns in this View.
Workflow Actions
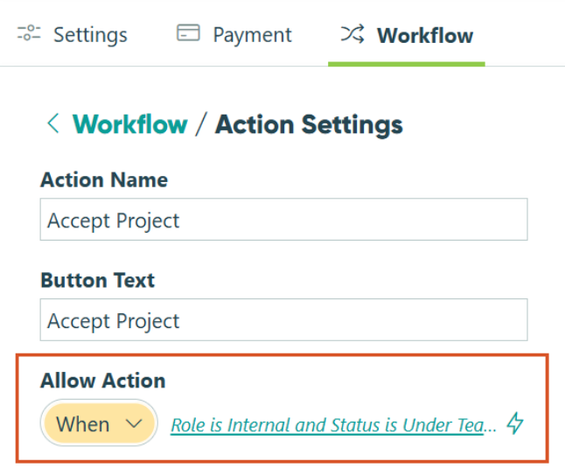
Control when clients can see and initiate Workflow Actions on your forms.
- Add conditional logic to determine when Actions (like submit, approve, or update) appear.
- Hide Actions that are meant only for internal staff.
- Display Actions dynamically based on Workflow Status or field visibility.
Field-level visibility
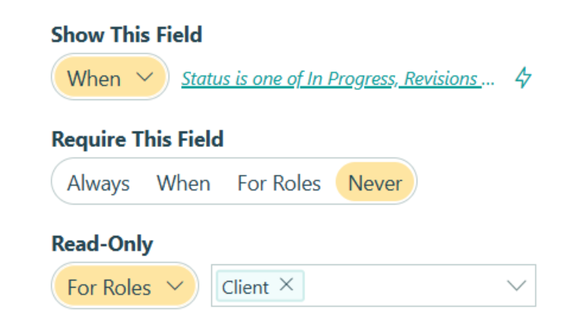
- Use the Show This Field setting to hide internal fields from the "Public" (or "Client") Role.
- Change field visibility based on Workflow status or other conditions.
- Make certain fields read-only at specific stages when clients shouldn’t modify them after submission.
Workflow Actions
Control when clients can see and initiate Workflow Actions on your forms.
- Add conditional logic to determine when Actions (like submit, approve, or update) appear.
- Hide Actions that are meant only for internal staff.
- Display Actions dynamically based on Workflow Status or field visibility.
Field-level visibility
- Use the Show This Field setting to hide internal fields from the "Public" (or "Client") Role.
- Change field visibility based on Workflow status or other conditions.
- Make certain fields read-only at specific stages when clients shouldn’t modify them after submission.
Please Note: Apply field-level visibility rules whenever your forms collect both internal and client data. This helps prevent accidental edits and keeps your workflow secure and consistent.
Step 5: Testing your portal before launch
Testing your portal from your client’s perspective catches issues before they impact real users. You’ll verify that everything looks professional, works as expected, and provides a seamless experience once clients log in. Thorough testing prevents confusion and support requests later.
What looks perfect in your admin view might confuse clients in theirs. Testing reveals visibility issues, broken workflows, and unclear instructions before clients see them.
Impersonate your client
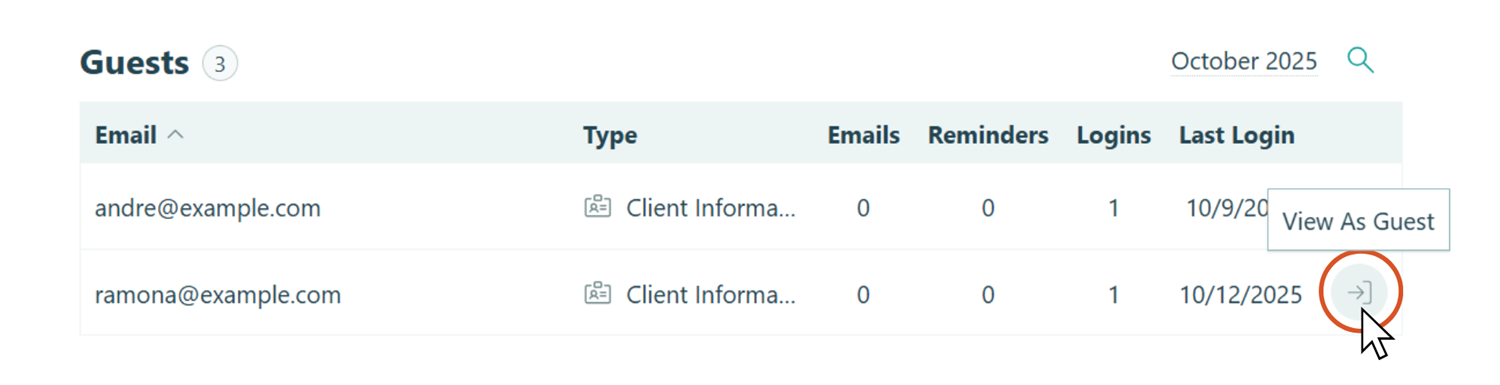
Use View As Guest and preview your portal exactly as your clients will see it. Check the sidebar navigation, make a test submission, and confirm entries or tasks appear when expected. Changes made in View As Guest mode aren’t saved, perfect for testing without affecting real data.
Test each form’s Workflow
If your forms have multi-step Workflows (for example, review and approval stages or automated notifications) test each step thoroughly. Complete every action yourself, review and send email notifications to ensure they display correctly, and double-check the information that is visible for the Public role (client) to see.
Use our Workflow Pre-Launch Checklist when testing the form’s Workflow.
Step 6: Sharing your portal with clients
Once your portal is tested and ready, share it with clients using the method that best fits your workflow. You can link it on your website for easy ongoing access, send it via email for specific onboarding scenarios, or share individual entries when clients need to complete one-time actions.
Link your portal on your website
Add your portal link to a button on your website, or another external location that clients visit often. This option is best for ongoing client relationships where clients need regular access.
Here’s how to do this:
- Add your organization’s unique portal URL on your website or another dashboard clients currently access:
https://www.cognitoforms.com/yourorganizationname - Replace “yourorganizationname” with your Cognito Forms organization name (visible in your browser’s address bar when logged in).
Note: Specific setup directions depend on your website host.
Send your portal link via email notifications
Send your portal link directly in an email or include it in an automated email notification when you add new clients to your guest list. This option is great for client onboarding or newly established clients.
Here’s how to do this:
- Set up an email notification on the “Add Client” Action of your “Client List” form.
- Add your portal link to the email message:
https://www.cognitoforms.com/yourorganizationname- Replace “yourorganizationname” with your Cognito Forms organization name (visible in your browser’s address bar when logged in).
- Provide login instructions and a quick overview of what they can expect to see and do in the portal.
Share individual entries via email notifications
Use authenticated Workflow or Save & Resume links to share individual entries securely. This option is best for one-time actions and requests, or ad-hoc client interactions.
Here’s how to do this:
- Under Workflow settings, enable Require Authentication > Guests & Users for Workflow Link Sharing and/or Save & Resume.
- Create an automatic email notification tied to a specific Action (e.g., “Send for Review”).
- Insert the Workflow Link for the “Client” Role into your email message. The Workflow Link will require them to authenticate prior to accessing the entry.
Enhance Your Portal Even More
Now that you’ve set up your very own client portal, enhance it with powerful automation and integration features that save even more time while delivering an exceptional client experience. These additions transform your portal from a simple access point into a complete client management system.
- Automate client task assignments. Use Auto-Create Entries to automatically assign clients a set of forms to complete with a single click (perfect for onboarding packets, recurring check-ins, or renewal processes).
- Generate professional documents automatically. With Document Generation, instantly create polished contracts, invoices, reports, or summaries using your form submission data.
- Connect with your favorite tools. Integrate your portal with systems you already use (like your CRM, email marketing platform, or project management software) to keep everything in sync and reduce manual data entry.
- Build sophisticated Workflows. With Workflow Automation, you can automate multi-step processes and involve the right people at every stage, whether they’re internal team members or clients.
Start Building Your Client Portal Today
You’ve successfully learned how to create a secure client portal that empowers your customers with self-service access while keeping you in control. Your clients can now submit forms, track progress, and manage their information independently, all from one professional, branded location. Meanwhile, you save hours on administrative tasks, reduce email clutter, and eliminate the frustration of chasing down information.
The portal you build today becomes the foundation for stronger client relationships tomorrow. When clients can handle routine tasks themselves, you have more time to focus on delivering exceptional service and growing your business. Start with the basics outlined in this guide, then enhance your portal with automated workflows and integrations as your needs grow.
Ready to transform how you work with clients? Begin building your portal today and experience the difference a self-service approach makes for both you and your customers.
FAQ
Yes, you can allow clients to update their own profile information directly from the portal. In your guest list settings, check Allow guests to edit their profile? This lets clients update basic information like their email address, phone number, or company name without contacting you. You control which fields they can edit.
Yes, you can create separate guest lists for different audiences (such as one for clients, another for vendors, and another for partners). Each guest list can have its own forms, views, and access permissions. This keeps different groups separated while giving you control over what each audience sees and can do within the portal.
No, clients don’t need to create or remember a password. They log in using email verification. When they enter their email address, they receive a one-time code to verify their identity. This password-free authentication is more secure than traditional passwords and easier for clients to use.
Yes, you can monitor client activity through entry audit logs. These logs show when forms were submitted or updated, highlights the specific changes made to entries, when emails were sent or delivered, and more. You can also track the number of logins and the last login date of each guest from the Guest Access page in your Organization’s settings.