Create legally binding contracts with electronic signatures, automated delivery, and complete audit trails—without per-document fees or separate e-signature platforms.
Build Time & Skill
15-20 min
Beginner
What you'll learn
How to build digital contracts with legally binding signatures and automated document generation
Most professional e-signature platforms charge $15-40 per document. If you process contracts regularly, those fees add up fast. With Cognito Forms, you eliminate these recurring costs while keeping all the professional features your business needs.
This guide shows you how to create contracts where clients sign from any device. You’ll maintain legal compliance, generate professional PDFs automatically, and keep detailed records of every signature. No separate software required.
Before paying for standalone e-signature tools, consider whether you need them. If you’re collecting signatures as part of a larger workflow (like gathering client details before the signature) Cognito Forms can replace costly e-signature platforms entirely.
- Stop paying per document. Sign 10 contracts or 10,000 without additional charges. Traditional platforms bill you for every envelope sent.
- Collect everything in one step. Capture client details and signatures together. No copying information between systems. No duplicate data entry.
- Get professional features without the complexity. Automatically generate PDF contracts, deliver documents to all parties securely, and maintain detailed audit trails. All through a simple form builder.
What Are Electronic Signatures?

An electronic signature is a typed or handwritten signature captured digitally. When you meet basic legal requirements, these signatures are just as binding as ink on paper. Cognito Forms’ Signature field lets people type or draw their signature. The signature saves with their form submission and appears in any documents you generate.
Try it out
Step-By-Step Setup: Collecting Signed Contracts Without E-Signature Software
Build a professional contract workflow in six straightforward steps. You’ll create a form that collects information, captures signatures, generates documents, and maintains records automatically.
Step 1: Build your contract form
Create the foundation by adding the right fields in the right order. Your form will collect information and display contract terms before capturing signatures.

Add your contract terms
- Go to the Build page and add a Content field
- Write your agreement text: terms and conditions, service details, or contract language
- Click Insert Field to pull in information automatically
- Examples: Insert the client’s name so it appears throughout the contract text or insert today’s date so the contract is always current.
Add fields for client information
Include the details your contract needs:
- Name field for the signing party
- Email field for contact and document delivery
- Address field if location matters
- Phone field for follow-up contact
- Any contract-specific information (project descriptions, service options, payment amounts)
Use Currency fields for money amounts and Choice fields for service options. Not sure which field type to use? Check our field reference guide.
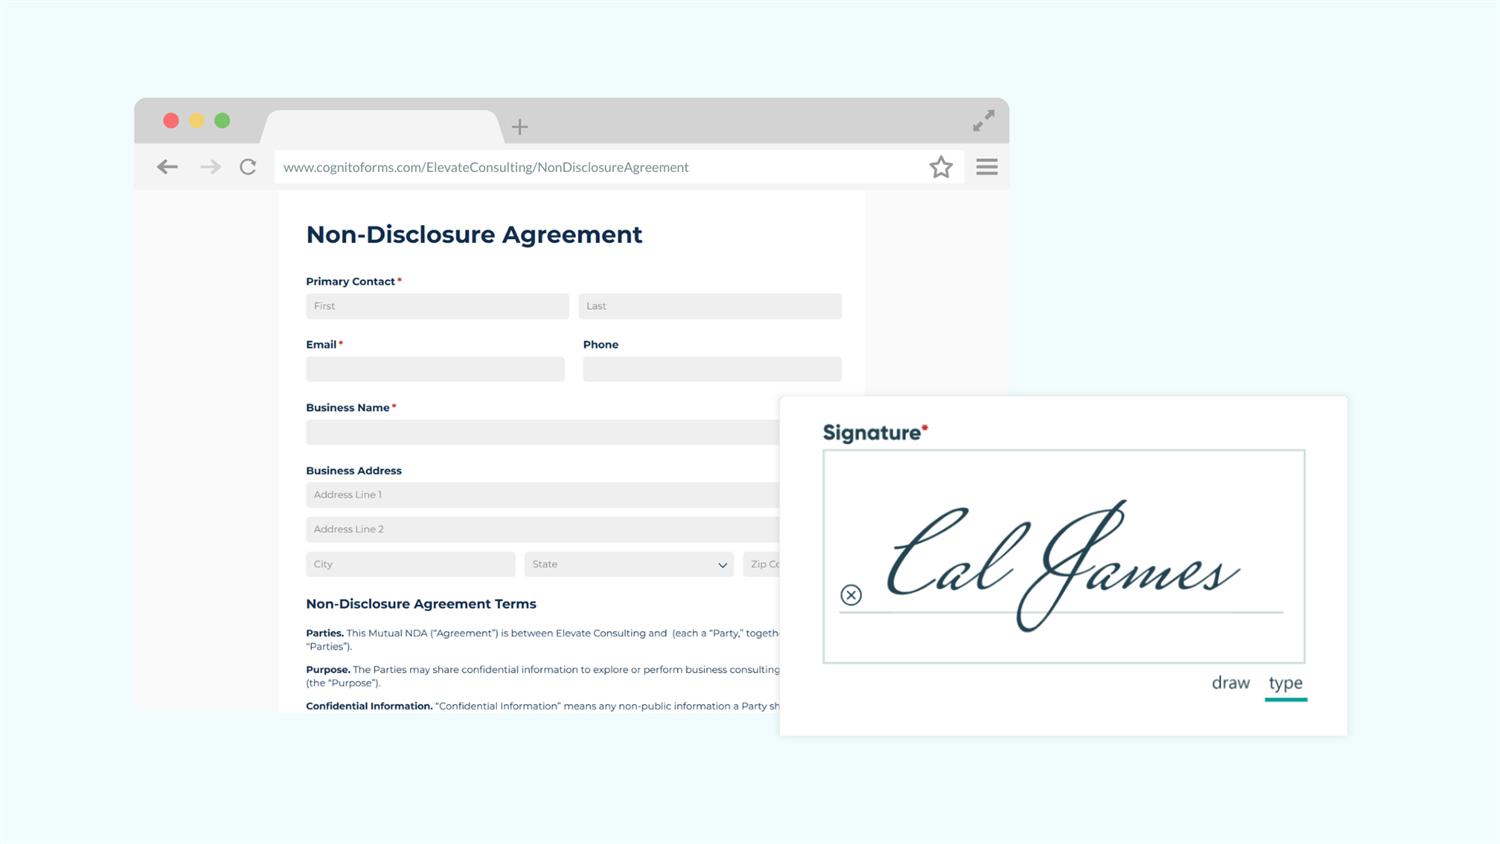
Add the Signature field

- Add a Signature field at the end of your contract.
- Choose whether clients can draw their signature, type their name, or both.
- Desktop users often prefer typing
- Mobile users usually prefer drawing
- Offering both options lets everyone sign naturally
- Set Require to
Alwaysso the form can’t be submitted without a signature. - Optional: Set Read-Only to For Roles > Internal to prevent your team from accidentally changing signatures
Step 2: Follow e-signature best practices
Electronic signatures are legally binding when you meet three requirements. These steps ensure your contracts hold up legally.
Add consent language
Include clear consent language above your Signature field. This proves the signer understood they were entering a legally binding agreement.

- Place a Yes/No field (Checkbox type) above your Signature field
- Add consent language to the Field Label:
- “By checking this box, I acknowledge that I have read and agree to the terms above. I understand this electronic signature is legally binding.”
- Set Require Yes Response to Always
Without consent language, someone could claim they didn’t understand what they were signing. This simple checkbox prevents that argument.
Record the signature date automatically
Add a Date field that captures exactly when someone signed.

- Add a Date field near your signature
- Click the Date field and find the Default setting
- Add this formula:
=if Signature.Svg != null then DateTime.Today else null - Set Read-Only to Always
This calculation checks if someone signed. If they have, it records today’s date. If not, the date stays blank. Making it read-only prevents anyone from changing the signature date.
Auto-filling dates ensures accuracy. Manual date entry leads to errors—people forget, backdate, or mistype. Automatic dates give you reliable records that can’t be disputed.
Keep copies for everyone
Email signed contracts to the signer and your team. Steps 3 and 4 below show you how to automate this completely.
- Why this matters: Both parties need access to what they signed. If a dispute arises later, having these records proves what was agreed to and when.
Step 3: Set up an automated PDF confirmation of your records
Automatically generate a PDF when someone signs, complete with all their form details and signature.

Create your document template
- Find the Manage Templates option in one of these locations:
- From the confirmation message (what clients see after submitting)
- From an email notification (emails you send automatically)
- Choose which type of document template works best for your needs:
- Standard Templates are a quick, built-in option for generating PDF or Word documents that directly pull in all details of a form submission.
- Use this template type when you want to get set up with the click of a button, requiring no additional design work on your end.
- Custom Templates are customizable versions of standard templates where you have complete control over formatting, branding, and dynamic content.
- Use this template type when you want to create extremely professional contracts with full control over fonts, colors, tables, headers/footers, page breaks, and conditional logic (for content that changes based on responses).
- Standard Templates are a quick, built-in option for generating PDF or Word documents that directly pull in all details of a form submission.
- Add data from form fields into each document’s File Name using the Insert Field option. This names each file automatically with specific information, like the client’s name, business name, or signing date.
- Why this matters: Instead of “contract.pdf” filling your downloads folder, make files easier to find and organize later by automatically naming them something like “ABC_Company_Service_Agreement_Oct_2025.pdf.”
- Select any other settings your document needs, such as including your logo from the form’s header or showing blank fields.
Step 4: Automate document delivery
Send contracts automatically when someone signs. Both the signer and your team receive copies immediately, with no manual work required.
Choose where to attach the generated document (or use both):
Option 1: Attach to the confirmation message
Add the generated document to your form’s confirmation message so clients see their signed contract instantly after submitting. They can download it right from the confirmation screen without waiting for an email.

To do this:
- Go to Workflow > Actions
- Click the “Submit” Action
- Find Confirmation and select the Documents dropdown
- Attach your document template
Option 2: Set up automatic emails
Set up automated emails that land in inboxes where clients expect to find important documents. You can also send one email to the client and a separate email to your team, both with the contract attached.

To do this:
- Go to Workflow > Actions
- Click the “Submit” Action
- Find Send Emails and select Add Email
- Attach your document template
- Configure the email:
- To: Select the Email field from your form
- Subject: “Your Signed Contract - [Company Name]”
- Message: Write a professional note explaining what they’re receiving
Now both parties have copies immediately. No forwarding. No manual filing. Everyone gets what they need automatically.
Set up verified email domains so contracts come from your company address (like contracts@yourcompany.com) instead of Cognito Forms. Clients trust emails from your domain and are less likely to mark them as spam.
Step 5: Test everything before going live
Test the entire process as a client would experience it. It’s always best to fix issues now rather than discovering them when a real client tries to sign.
How to test your contract workflow
- Use Preview mode to check how the form flows while you’re still editing.
- What to look for: Do all the fields make sense? If using conditional logic, does it function as intended? Does the contract text read correctly? Are the instructions clear?
- After saving any edits you make, fill out the form using the Public Link exactly as a client would.
- What to check: Do emails arrive at the right time? Does the confirmation message display correctly? Is there a PDF copy of the contract attached to the confirmation email?
- Then, open the generated PDF and verify everything looks right.
- What to check: Is all relevant information included? Does formatting look professional?
Step 6: Track and manage contracts
Instead of digging through email inboxes, monitor all contracts from one organized location. See which contracts need follow-up and which are complete.
View all contracts in one place

- Go to Workflow > Statuses and set up Workflow Statuses like “Awaiting Signature,” “Signed,” “Completed,” or “Expired”
- Click on your form’s Entries page to see every contract submission
- Create Saved Entry Views to filter contracts:
- See only unsigned contracts
- View contracts from the last 30 days
- Filter by contract type or amount
- Optional: Schedule automated reminders for contracts that haven’t been signed
Verify signatures with audit trails
If a client claims they never received a contract or disputes the signature date, the audit log provides proof.

- Open any entry
- Check the Entry Audit Log for a complete timeline
- When they submitted the form
- When emails were sent and delivered
- When changes were made
- Exact timestamps in your time zone
This documentation is valuable if you face a legal dispute. The system tracks everything automatically.
Your audit log’s history length depends on your paid plan level. Learn more.
Optional: Require authentication for identity verification
Want extra proof of who signed? Require people to verify their email before they can view or sign.

- Go to Workflow > Public Link
- Set Require Authentication to Guests & Users
- If your form has an Email field, set its Default Value to
=Entry.User.Email
After someone verifies their email to access the form, their address automatically fills in. No typing required.
The tradeoff: This adds one verification step for signers. For contracts where identity proof matters (like employment contracts, financial agreements, legal documents) this extra step is worth it. For low-risk agreements where speed matters more, you might skip it.
Please Note: Requiring Authentication enables Guest Access and includes a monthly fee based on the number of guests. Learn more about Guest Access pricing.
Advanced Features for Complex Contract Scenarios
Handle sophisticated contract requirements with these advanced capabilities. Multi-party agreements, prefilled information, and conditional workflows extend your basic contract form into a complete contract management system.
- Multi-Signer Workflows: Use Conditional Logic to show different sections to different people. Route contracts automatically based on amounts, service types, or approval status.
- Prefilled information: Use Person fields to fill in returning customer details automatically. Use Lookup fields to pull in existing data like pricing or project specifications.
- Internal contract initiation: Start contracts internally by entering recipient information yourself. Send them a secure, personalized link to their partially completed form. This works well for high-value contracts or internal approvals.
Real Contract Examples
These contract types are commonly collected digitally with electronic signatures in Cognito Forms.
- Service Agreements: Professional service providers collect client signatures on project scopes, payment terms, and deliverables during onboarding. The form captures project details, calculates fees automatically, and sends signed agreements to both parties, all in one workflow. Clients review everything once and sign immediately, instead of back-and-forth emails about scope or pricing.
- Waivers and release forms: Event organizers collect liability waivers before activities. Participants sign on-site using tablets or in advance from their own devices. All signed waivers save to cloud storage automatically. No paper forms to lose or file. Digital records are easier to produce if insurance companies request them.
- Sales contracts: Sales teams generate custom contracts with pricing, terms, and instant signature capture. Customers review everything and sign immediately from a single form. The final contract is professionally formatted to match your brand. Sales cycles shorten because clients don’t wait for someone to manually generate contracts. Less time between “yes” and a signed contract means fewer deals fall through.
Take Your Contract Forms Further
Once your basic contract workflow runs smoothly, extend it with these powerful features:
- Build a self-service client portal. Give clients secure, ongoing access to their contracts. They can reference agreement terms, track status updates of relevant documents, and manage everything in one centralized location.
- Automate multi-step workflows. Route contracts between multiple people automatically. A client signs first, then the system sends the contract to your team for countersignature, with automated notifications at each step.
- Connect to your existing tools. Integrate with file storage to automatically file completed contracts, your CRM to create or update records when contracts are signed, or project management tools to kick off onboarding automatically.
Start Collecting Signed Contracts Today
Professional e-signature functionality doesn’t require expensive per-document fees or complex software. With Cognito Forms, you build complete contract workflows that capture legally binding signatures, generate professional documents, and maintain detailed audit trails—all in one platform.
Your clients get a fast, professional signing experience from any device. You eliminate ongoing signature costs while keeping professional features your business needs. The system handles document generation, delivery, and record-keeping automatically, freeing you to focus on your actual work instead of contract administration.
FAQ
The entry’s audit log provides a complete record of when the form was submitted and all changes. If you enable authentication, you have verified proof of the signer’s email address. Additionally, the signed PDF itself contains the signature, date, and consent language as part of the permanent record.
Yes, you can collect signatures from multiple parties. Add separate Signature fields for each signer with clear labels (like “Client Signature” and “Service Provider Signature”). Use Show This Field logic to show or hide Signature fields based on the Role accessing the form.
You control whether fields on your contract form can be edited after signature. Use Read-Only settings on fields to prevent changes after submission. If you need to allow corrections, you can configure Workflow Links that let specific people update certain fields while keeping signatures locked. For significant changes, consider voiding the original contract and having parties sign a new version.