Fill forms automatically with data you already have and eliminate duplicate typing, creating workflows where information flows seamlessly.
Build Time & Skill
15-20 min
Intermediate
What you'll learn
Three ways to automatically prefill customer information and eliminate repetitive data entry across multiple forms
When you require customers to type their email address multiple times, you’re creating friction that slows everything down. With Cognito Forms, you can avoid that friction by automatically prefilling customer information across all your forms.
When you auto-populate customer data, you:
- Save everyone’s time. People complete forms faster when there’s less to fill out, and you spend less time chasing incomplete submissions.
- Eliminate errors and inconsistencies. When data is pulled automatically from a central source, you avoid typos and ensure you have accurate information.
- Create professional, personalized experiences. Forms that recognize people show attention to detail, and users appreciate being remembered.
- Streamline complex workflows. Multi-step processes become more manageable when they’re automated.
What makes prefilling possible?
Two core features make prefilling customer information possible in Cognito Forms. You’ll use one or both depending on what you’re trying to accomplish.
| Person Fields | Auto-Create Entries |
|---|---|
| A field on your form similar to a Choice field that references a list of people and their information. You can reference all the data connected to a selected person. | A Workflow feature that takes data from one form (Form A) and automatically creates a new entry on a different form (Form B) with fields prefilled. |
| Learn more about Person Fields . | Learn more about Auto-Create Entries . |
Three Ways to Prefill Customer Information
In Cognito Forms, you can automatically populate fields with customer data in three different ways:
| If you’re trying to… | Use this method: |
|---|---|
| Automatically fill form fields with the logged in user’s information | Method 1: Recognize Logged-In Users or Guests |
| Prefill fields on a second form with data entered on the first form | Method 2: Use Data From A Customer’s Submission |
| Fill in form fields based on the person selected in a dropdown | Method 3: Let Users Select Someone |
Before You Begin: Set Up Your Source Form
All three methods start with a source form containing people’s information. Think of this as your central database that other forms will reference. You’ll create this once, then use it across multiple forms and workflows.

Build your source form
-
Create a new form and give it a clear name like “Customer Database” or “Client List.”
-
Add fields for information you’ll reference:
- Name (use a Name field)
- Email (use an Email field)
- Phone Number
- Company Name
- Job Title or Role
- Any other relevant details specific to your organization
-
Optional but recommended: Add a Yes/No field called “Is Active?” to filter inactive customers, without deleting their historical data.
-
Optional: Add a File Upload field if you want to display a profile photo for each person.
Enable for Person Fields

- Open your form settings and turn on Use with Person Field?
- Map each field type from the dropdown:
- Name: Select Name field
- Email: Select Email field
- Photo/Avatar: Select File Upload field (if added)
- Is Active?: Select Yes/No field (if added)
If you have multiple Name or Email fields, select the ones that represent the main person, not their manager or emergency contact.
Populate your source form

- Go to Entries page.
- Click + New to add each person who should be on the list.
- Or import from a spreadsheet to bulk add multiple people at once.
Method 1: Recognize Logged-In Users or Guests
Automatically populate form fields with information about whoever is currently logged in. Their name, email, company, and any other details from your central database.
For example, when Andre opens the form, it pulls his information. When Aila opens the same form, it pulls her information instead. The form recognizes who’s using it and responds accordingly.

Common use cases
- Eliminate manual entry while maintaining accuracy. Since information comes from your central database and users can’t edit it, you ensure consistency across all submissions.
- Create self-service portals. Customers or members log in and see their information already filled in on service requests, orders, or support tickets.
- Employee self-service forms. PTO requests, expense reports, time tracking, and benefits enrollment automatically show the logged-in employee’s details.
Setup steps

- Create your form (like “Service Request" or “Intake Form”).
- Add a Person field and label it appropriately (like “Name” or “Customer”).
- In Person field settings:
- Look Up People From → Select your source form
- Default To → Current User. This automatically selects whoever is logged in.
- Read-Only → Always. This makes sure the user can’t change the person (themselves) in this field.
- For any other fields you want to prefill (like Company Name, Email, or Phone), set Default Value to reference your Person field.
- Example:
=Customer.CompanyName - Make these Read-Only if users shouldn’t change them.
- Example:
- Enable authentication by going to Workflow → Public Links → Require Authentication → Guests & Users (or Users Only)
- Without authentication, the form won’t know who the “Current User” is.
Test with View As User before going live. This lets you see exactly what each user or guest will see when they log in.
Method 2: Use Data From Another Form
Automatically create a new entry on a second form when someone submits the first form, carrying customer information forward through multi-step workflows. During this automated creation, you can prefill fields on the second form with data from the first form’s submission.

Common use cases
- Sequential workflow stages: Add a client to your Customer Database and automatically create their Intake Questionnaire with details prefilled.
- Department handoffs: When Sales adds a new customer, the system automatically creates an entry in the “Project Kickoff” form for the delivery team with customer details prefilled.
- Parent-child relationships: After a client is added, automatically generate related forms (like service agreements or monthly reports) with information already filled in.
- Sequential workflow stages: Each department or approval stage has its own form, but customer data flows forward automatically without manual copying.
Setup steps
Part 1: Connect your target form to the source form

- Create your target form (Form B) where entries will be automatically created. (Like "Project Kickoff” or "Client Intake Form”)
- Add a Person field to Form B.
- Select your source form in the Look Up People From setting
- For fields you want to prefill based on the Person field:
- Set Default Value with calculations that reference the Person field (e.g.
=Customer.Email) - Without Default Values, fields remain empty even when Person is filled.
- Set Default Value with calculations that reference the Person field (e.g.
Part 2: Set up automatic creation

- Go back to your source form (Form A - your Client List or Customer Database).
- Navigate to Workflow → Actions.
- Click the “Submit" Action (or whichever triggers the creation).
- Find Create Entries and click + New Entry.
- Choose Form B as the Target Form.
- Select Submit as the Action to assign the newly created entry to the “Submitted” status on Form B. (You can use any Action/Status combination.)
- Under Prefill Fields:
- Left side Choose the Person field from Form B
- Right side: Choose “This Entry”
Now when someone submits Form A, an entry automatically appears on Form B with prefilled information.
Please Note: If you only have one Person field on each form, you’ll see one option. If you have multiple Person Fields on either form, be sure you’re selecting the correct field(s) to prefill.
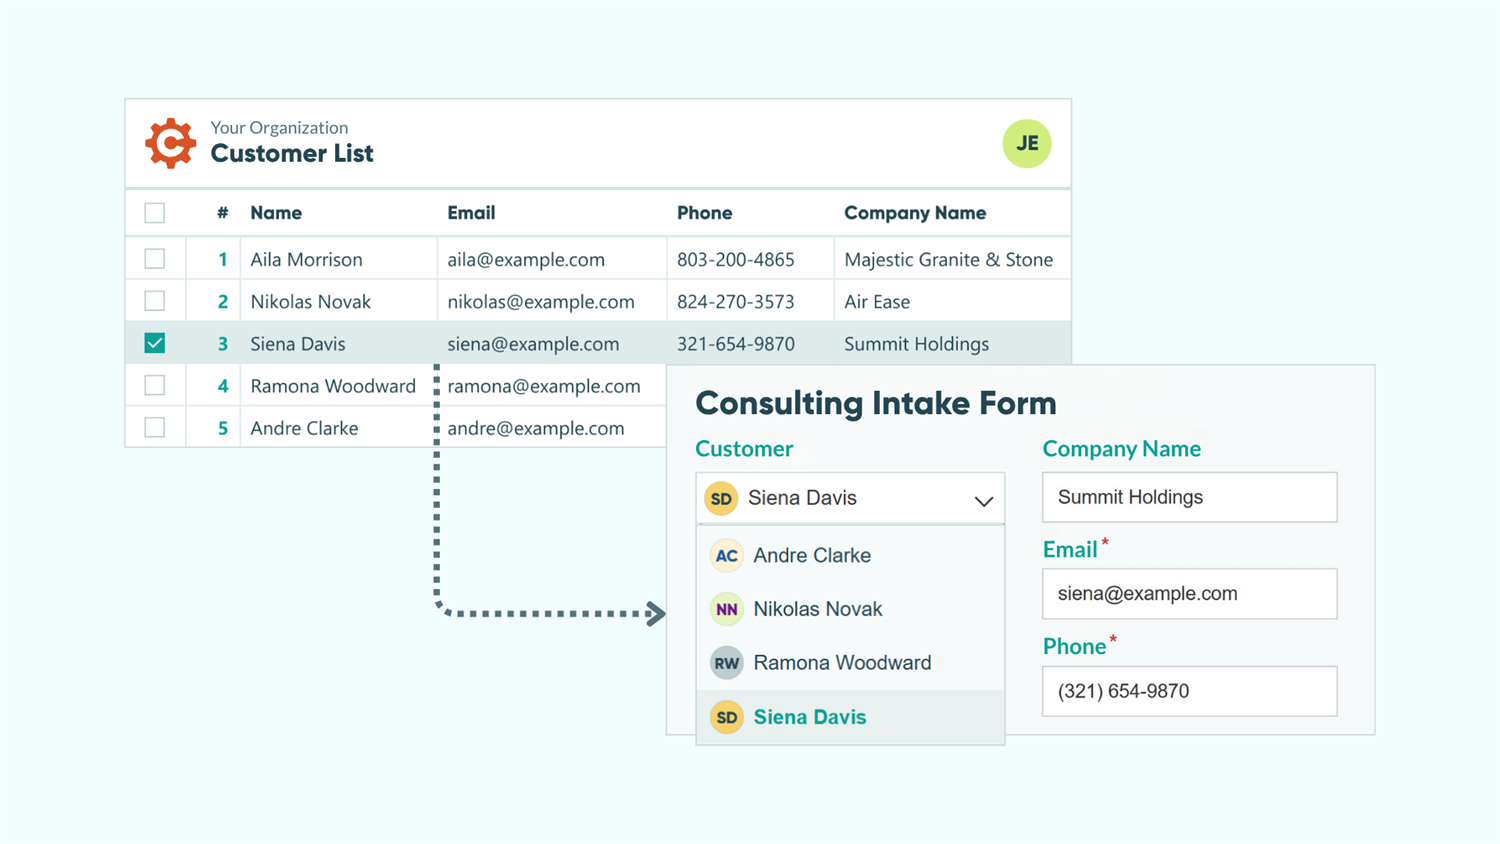
Method 3: Let Users Select Someone
Display a list of people from your source form, then automatically fill other fields based on who the user selects. Unlike defaulting to the current user, this method lets someone choose which person’s information to use.

Common use cases
- Customer service selections: Support staff select a customer from the dropdown and instantly see their account details, service tier, or purchase history without searching through separate systems.
- Manager workflows about team members: Managers initiate performance reviews, assign tasks, or approve requests by selecting an employee and their information fills automatically.
- Scheduling, booking, or assignment forms: When booking appointments or assigning work orders, select the person and instantly see their schedule, hourly rate, qualifications, or availability.
- Any form about someone other than the submitter: When the form subject is different from the person filling it out, manual selection lets them choose the right person.
Setup steps

- Create the form (like “Project Assignment” or “Support Ticket”).
- Add a Person field
- Set Look Up People From to your source form
- For fields you want to prefill:
- Set Default Value to reference the Person field.
- Example:
=Client.Email
- Optionally, make prefilled fields Read-Only → Always to prevent accidental changes. (Leave it editable where flexibility makes sense.)
Use the Include filter to keep dropdowns manageable. If you have 300 clients, filter by industry, account manager, or active status to show only relevant people.
Additional Features to Enhance Your Workflow
Once you’re comfortable with basic prefilling methods, layer on advanced features to create even more powerful automations:
- Combine with Workflow for complete automation. Automatically route forms to the right people, set conditional logic based on department or role, and trigger specific email notifications.
- Create cascade filters for hierarchical data. When you have managers, departments, and teams, use cascade filters to narrow down Person field selections, making it easier to find the right person in large groups.
- Connect multiple forms in a sequence. Build complex workflows where Form A auto-creates Form B, which then auto-creates Form C, carrying forward and building upon customer information at each stage.
- Create a client portal for external workflows. Enable Guest Access to create client portals where external users can log in and see forms prefilled with their specific information.
Start Prefilling Today
Prefilling customer information transforms disconnected forms into intelligent, connected workflows. You eliminate the frustration of repetitive data entry while ensuring accuracy across your entire system.
FAQ
No, you can use a single source form for all people and use filters to segment them. Add fields like “Department” or “Customer Type” to your source form, then use Include filters on your Person fields to show only relevant people based on context. This approach is simpler to maintain than multiple forms.
Example: One “People Database” form with a Department field lets you filter for “Sales” on sales forms and “Support” on support forms.
You can prefill information for both internal users and external customers. For external customers, enable Guest Access and use Method 1 (Recognize Logged-In Users). Guests log in with their email, and the system automatically recognizes them and prefills their information, creating a personalized customer experience.
You control whether prefilled fields are editable or locked. Set any field to Read-Only > Always to prevent changes, ensuring data accuracy for critical information like email addresses or account numbers. Leave fields editable when users might need to update outdated information, like phone numbers or addresses.
There’s no hard limit on the number of entries in your source form. However, for better usability, use the Include filter to show only relevant people in dropdowns. Filter by department, status, or other criteria to keep selection lists manageable when you have hundreds of people.
Best practice: For lists over 100 people, always use filters to narrow down options based on context (active customers, specific department, assigned territory).