Make every confirmation count with emails that feel personal, on-brand, and automated to save time.
Build Time & Skill
5-7 min
Beginner
What you'll learn
How to automatically personalize confirmation emails with form data, send different messages for different scenarios, and include relevant details without writing code
Generic confirmation emails waste an opportunity to build trust with your customers and reduce follow-up questions. With Cognito Forms, you can send confirmation emails that automatically include submission details, adapt to different situations, and route to the right people (all without any coding or custom development).
Personalized confirmation emails can help you:
- Deliver relevant information instantly. Automatically include appointment details, assigned account managers, or service-specific next steps in every confirmation, without manual copying and pasting.
- Reduce support inquiries. Answer common questions right in the confirmation email by including order numbers, timelines, or what happens next.
- Route workflows efficiently. Send the right details to the right team members automatically based on form selections or workflow status.
- Maintain brand professionalism. Every email reflects your attention to detail when confirmations address people by name and reference their specific needs.
Understanding Email Notifications
Email notifications in Cognito Forms are triggered by Workflow Actions like “Submit” or “Update.” Actions appear as buttons on your form, and can send one or more emails to different recipients with customized content. When someone submits your form or clicks an Action button, the system automatically sends your emails with the relevant details included.
Think of Actions as the “when” (when someone submits, when status changes, when someone approves) and emails as the “what” (what message gets sent, to whom, with which details). You configure both from your form’s Workflow settings, creating a complete notification system that runs automatically.
How to set up Email Notifications
To create or customize confirmation emails, access your form’s Workflow settings and choose which Action should trigger the email. From there, you’ll configure who receives it, what content appears, and when it sends. This is where all email notifications are built and managed.
To create an email notification:
- Open your form and go to the Build page.
- Select Workflow, then choose the Action that should trigger the email (like “Submit” or “Update”).
- Under Send Emails, choose an existing email or select + Add Email to create a new one.
- Configure the email by setting recipients, crafting the subject line, adding field data, and customizing the message.
Send from your verified domain for trust and replies. Verify your email domain in your organization settings so emails arrive from your actual email address rather than a generic notification address. This builds trust with recipients, ensures replies reach your team instead of bouncing, and prevents confirmations from landing in spam folders.
Three Ways to Personalize Confirmation Emails
Cognito Forms provides three core approaches for customizing your email notifications:
- Directly inserting submission data into the email content
- Pulling information from connected Lookup or Person fields
- Using conditional logic to send different messages based on specific criteria
These methods work individually, or you can combine them for sophisticated email automation that is still simple to set up.
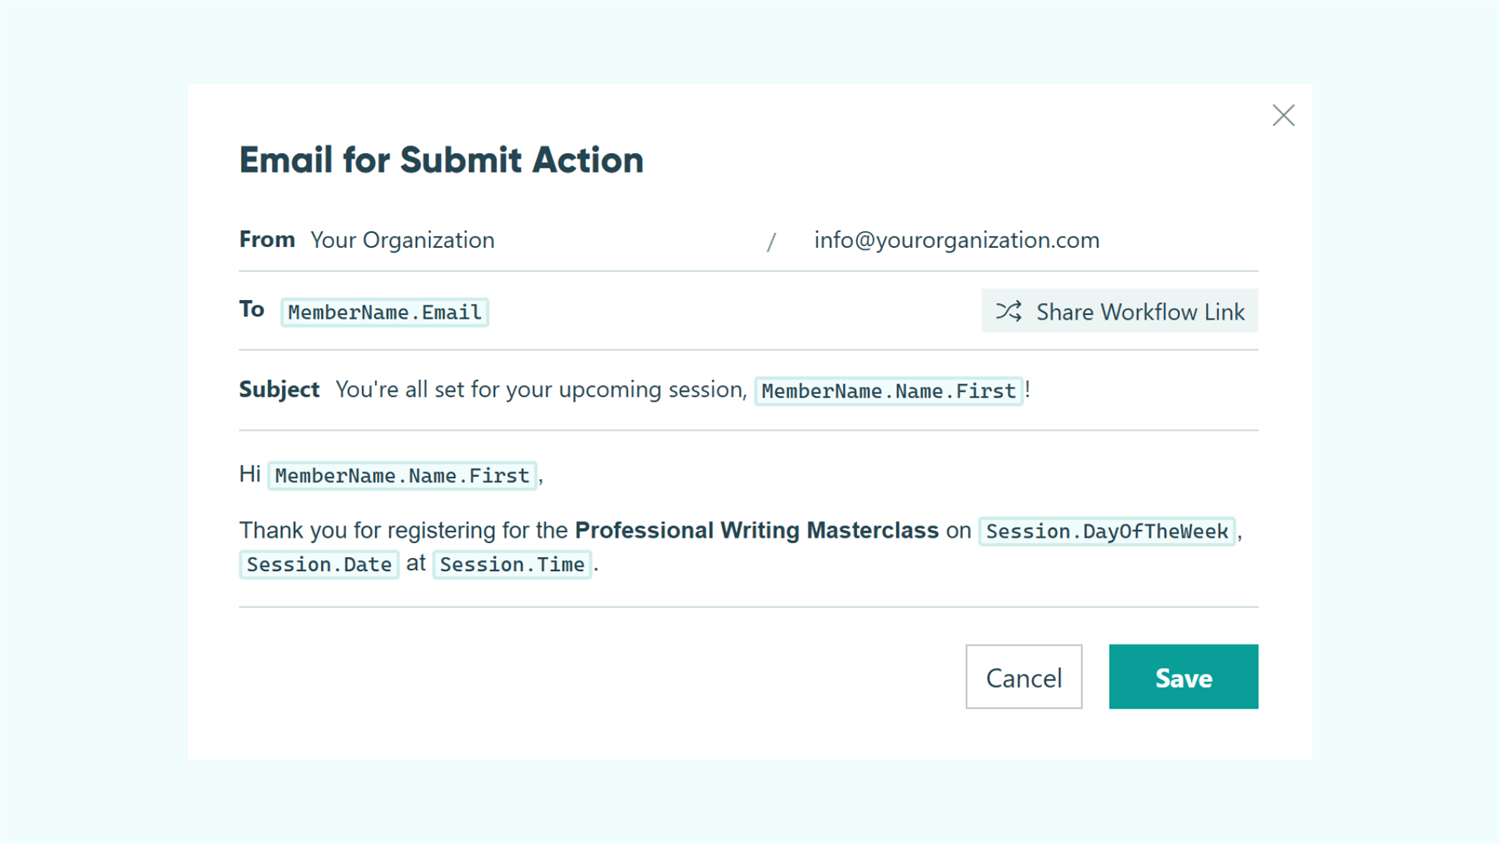
Method 1: Insert form data into your emails
The Insert Field option pulls information directly from your form’s fields into any part of your email (recipient addresses, subject lines, or message content). This creates personalized emails without requiring you to manually customize each one.

To set this up:
- In the email dialog, click into the To, Subject, or Message field where you want to add personalized data.
- Select Insert Field, choose the field you want to reference, and add any additional text around it.
Please Note: Fields marked as Protected are intentionally excluded from emails. We recommend protecting sensitive fields so they never appear in notifications.
Common uses
- Personalize greetings by addressing clients by name, using the form’s Name field: “Hi
Name.First, your service request has been received.” - Confirm appointment specifics by referencing a Date or Time field: “Your consultation is scheduled for
AppointmentDateatAppointmentTime.” - Acknowledge and confirm service selections made on a Choice field: “We’ve received your request for
ServiceType. Here’s what happens next…” - Pre-fill recipient addresses by inserting the Email field in the To section, so confirmations automatically go to the person who submitted.
Long field names can make Insert Field tokens in the email editing dialog look cluttered and hard to follow. Enable Developer mode to assign shorter internal names for cleaner token selection. For example, reference a Choice field as “Service” instead of “WhatTypeOfServiceDoYouNeed,” without changing the field label that customers see on the form.
Method 2: Pull information from connected forms
When your form includes a Lookup field or Person field that connects to another form, you can pull in any data from the entry selected in this field. This lets you include contextual information in emails without adding extra fields to your current form, keeping forms simple while providing more details in the email.

To set this up:
- In the email dialog, click into To, Subject, or Message.
- Select Insert Field and choose your Lookup field or Person field.
- Choose a subfield connected to the Lookup or Person field (e.g.,
Service.EstimatedDurationorClient.AccountManager.Email).
The period . between two field names helps you target individual fields from the entry selected on the Lookup or Person field. For example, if you type Member.Email, you’re basically saying, “Insert the Email address of the Member I selected in this Person field.”
Common uses
- Route to assigned team members: A client selects a service type on an intake form, and the confirmation email automatically goes to the team lead assigned to that service. The specific team lead is prefilled from your “Services” database form, without showing team assignments on the customer-facing form.
- Include location-specific details: A patient selects their preferred clinic from a Lookup field. The confirmation email includes that location’s address, phone number, and parking instructions, all stored in your “Locations” form but displayed contextually in the email.
- Display client account information: When a staff member selects a client from a Person field on a project form, the email to that client includes their account manager’s name and contact details automatically.
- Reference service details: An order form includes a “Product” Lookup field. The confirmation email displays warranty information and usage instructions associated with the specific product. These details are stored in your “Product Catalog” and not shown on the form itself, but are relevant to include in the purchase confirmation.
Method 3: Send different emails based on conditions
Conditional logic allows you to send different emails based on form selections, Workflow Status, or any criteria you define. This ensures each recipient gets exactly the information relevant to their situation, without requiring multiple forms.

To set this up:
- In the email dialog, set Send to When.
- Build your condition using form fields or Workflow Status (e.g.,
RegistrationType = "VIP"orStatus = "Approved"). - Configure the email content that should send when that condition is true.
The checkbox Only send when conditions become true? ensures emails only send the first time conditions are met, not every time an entry is updated. For example, an email for “VIP Registration” selections would only send when the “Ticket Type” field was first filled out. If the same Action was clicked again, it would not send the email again, even though the “Ticket Type” is still the same.
Common uses
- Differentiate service tiers: Send detailed onboarding instructions to premium clients while standard clients receive basic next steps, all triggered by the service package they selected during registration.
- Route by department: Service requests for IT issues go to the IT team with technical questions, while facilities requests go to maintenance with location and access details. This all happens from the same form, based on the issue category selected.
- Adjust by urgency: Standard requests include next-business-day expectations in the email content, while urgent requests trigger an email with emergency contact information and acknowledge the customer’s need for a faster response time.
- Customize by approval stage: When Status changes to “Approved,” send clients a congratulatory message with contract next steps. When Status is “Needs Revision,” send feedback and instructions for resubmission, all from the same Action.
Enhance Your Email Notifications
Once you’re comfortable personalizing basic confirmations, these three advanced features transform email notifications from simple messages into complete workflow solutions that drive collaboration and self-service:
- Include actionable buttons in emails. Use Workflow Links to include buttons that take recipients directly to their entry with appropriate permissions. Send clients “Review Your Proposal” links or “Upload Required Documents” links that open their exact entry to act on, streamlining multi-step processes without back-and-forth communication.
- Transform notifications into organized task assignments. Email notifications can announce when someone has a new Workflow Task waiting for them. Users access their Task Dashboard, where all pending assignments appear with due dates and priorities, automatically disappearing as work completes.
- Create a complete self-service client portal with Guest Access. Enable Guest Access to give clients, patients, or members a secure portal they can return to anytime. Confirmation emails direct people to log in and view all their submissions, complete pending tasks, and track workflow progress, all from one central dashboard.
Start Personalizing Your Confirmation Emails Today
Generic confirmation emails represent missed opportunities to build trust, reduce support questions, and streamline your workflows. The personalization techniques in this guide transform those basic “We got it” messages into professional communications that deliver real value.
You don’t need to implement everything at once. Start by adding name personalization to one confirmation email using Insert Field. Once you see how that simple change improves the experience, layer on conditional logic to send different content based on selections. Then, explore pulling in data from related forms to provide even more context in your emails. Each enhancement takes minutes to configure, but delivers lasting improvements to your customer communications and internal workflows.
FAQ
Submit a test entry with sample data and verify the email arrives with correct personalization. Be sure to check that conditional logic behaves as expected. You can also send test emails to yourself by temporarily changing the recipient address, then switching it back to the proper field reference before going live.
Empty fields appear as blank spaces in your emails without generating errors. To avoid blank spaces, use Require This Field validation to ensure data is present before submission.
Yes, each Action can send multiple emails to different recipients with different content. Under Send Emails for any Action, click + Add Email multiple times to create separate notifications. This lets you send a confirmation to the customer, a task notification to your team, and an alert to a manager, all triggered by the same Submit button.