Create a product catalog that connects to your order forms, so pricing, availability, and product details update automatically across all forms.
Build Time & Skill
15–30 min
Intermediate
What you'll learn
How to connect a product catalog to your order form so prices and availability update automatically.

Managing product inventory across multiple forms becomes tedious when prices change or items go out of stock. With Cognito Forms’ Lookup fields, your business can manage its entire product inventory in one form that links to your order form. When customers place an order, the order form will automatically look up product names, prices, and availability from the inventory form, keeping your listings, prices, and availability up to date without manual updates.
This approach helps you:
- Eliminate duplicate data entry by maintaining product details in one place that all forms reference automatically.
- Prevent errors by ensuring customers always see current prices and accurate stock levels.
- Save hours of manual updates when products, prices, or availability change.
- Scale efficiently by adding new products once and seeing them appear across all connected forms.

Steps to Connect Your Product Catalog
First, you’ll create a Product Inventory form to store your catalog data, then connect it to your Order form using a Lookup field.
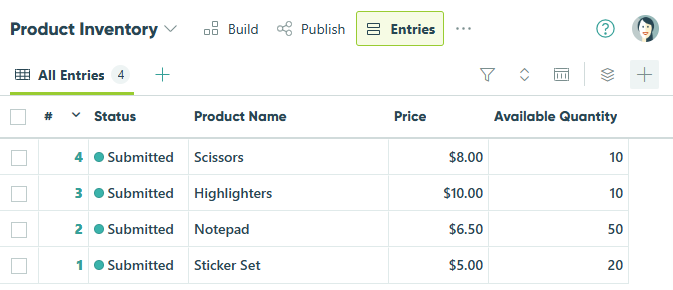
Step 1: Build the Product Inventory form
-
Create a new form named Product Inventory.
-
On the Build page, add fields for your catalog details:
- Product Name (Textbox field)
- Price (Currency field)
- Available Quantity (Number field)
-
Under Form Settings, enable Use with Lookup Field? so this form’s entries can be referenced by other forms.

-
Click Save.
-
On the Entries page, create a new entry for each product.
Step 2: Build the Order form
- Create a new form named Order Form.
- Add fields to collect customer information:
- Name (Name field)
- Email (Email field)
- Shipping Address (Address field)
- A Repeating Section – Repeating sections are groups of fields that can be duplicated as necessary.
- Within the repeating section, add a Lookup field named Product and a Number field named Quantity.
Configure the Lookup field
-
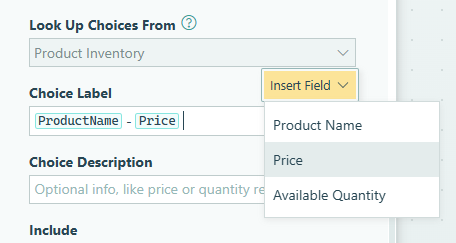
In the Lookup field settings:
- Select the Product Inventory form under Look Up Choices From.
- Insert the Product Name and Price into the Choice Label.
-
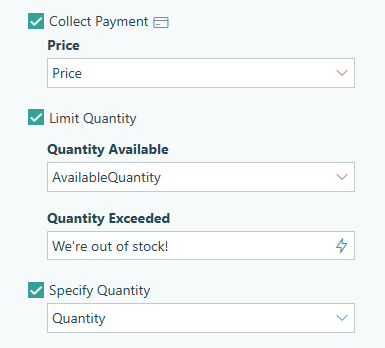
Enable Collect Payment and select the Price field. If you haven’t already, you’ll be prompted to connect your payment account.
-
Enable Limit Quantity. Set the Quantity Available field to the Available Quantity field on the Product Inventory form. Make sure to include an error message (“We’re out of stock!”).
-
Enable Specify Quantity and select the Quantity field in the repeating section.
-
Save your changes.
Step 3: Test Your Setup
Before going live, verify that your new Order form works correctly:
-
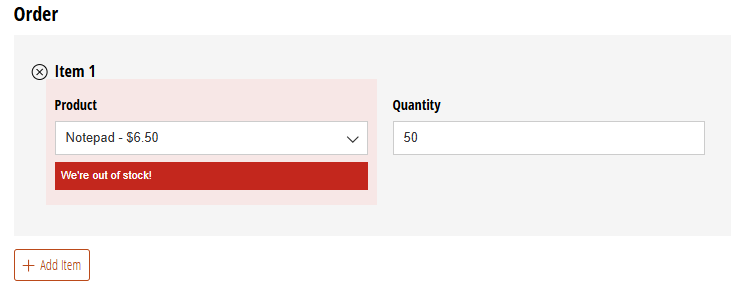
Test the customer experience. Preview your Order form by clicking the Preview button in the top right. Add multiple products and enter quantities to confirm that your product selection works as intended.
-
Test payment processing. Test the payment calculation by submitting a test order. If you’re using Stripe to collect payment, you can use a test credit card number.
-
Verify automatic updates. Update a product in your Product Inventory form to make a change to a product name, price, or quantity. Select that same product on the Order form and confirm the updated information displays correctly.
Advanced Customizations
Once your inventory and order forms are working, these advanced techniques help you make them even more powerful:
Hide products with the Include option
To hide out-of-stock items from your Product field, use the Include option in the Lookup field settings to show only items where Available Quantity is greater than 0 (Available Quantity > 0).

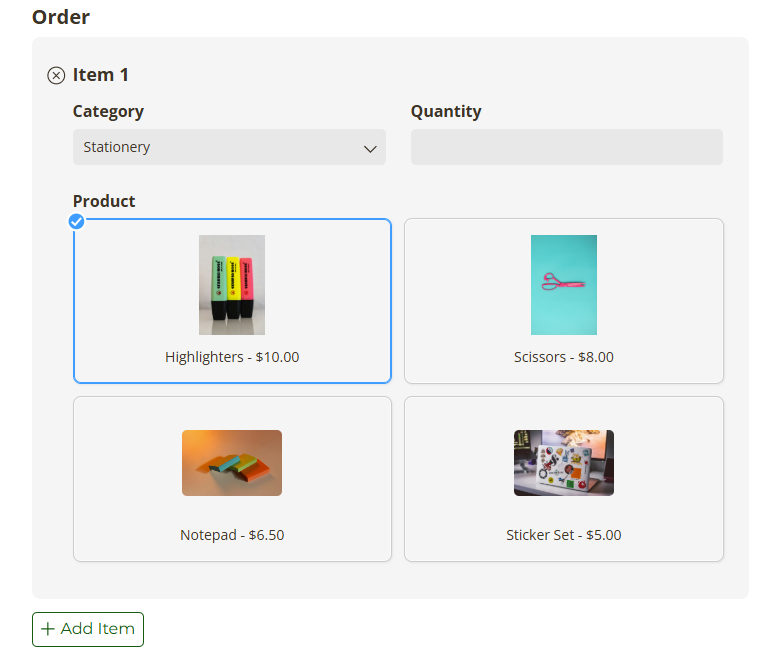
Add images to your product selection
To display product images in your lookup field, add a File Upload field to your Product Inventory form and upload an image file to each entry.

On your Order form, select the File Upload field under Choice Image in the Lookup field settings. Use the options under Style and Image Size to control how the images appear alongside the product names.
Organize products with Cascade Filters
To allow customers to narrow down their selection before choosing a specific product, add a Choice - Dropdown field for Product Category in your Product Inventory form (e.g., “Stationery,” “Electronics,” “Apparel”). Then, click + Add Cascade Filter under the Include option in the Lookup field settings to filter products by category. Learn more about Cascade Filters.
You can also set the Product field to only display after a category is selected. In the Product field settings, update Show this Field - When to Category is filled out.

Start Building Your Product Inventory Today
With Lookup fields, you create one product catalog that powers all your order forms automatically. When inventory changes, update it once and watch the changes flow everywhere instantly.
Whether you’re managing a small product line or hundreds of items, this approach saves time, prevents errors, and ensures customers always see accurate information. Start with your first product catalog today and experience how Lookup fields can transform your ordering process.