Automatically send notifications to the correct manager, department head, or team member based on what someone selects on your form.
Build Time & Skill
15-30 min
Intermediate
What you'll learn
How to route emails to the right person using a Lookup field
With Cognito Forms, you can automatically route notifications based on form selections. When someone chooses a field value (like a store location), a Lookup field pulls matching data (like the store manager’s email) from a connected form. This keeps contact information centralized, connects forms across your organization for better automation, and ensures notifications reach the right person every time.
Scenario: A customer completes the Cognito Coffee Customer Survey. Based on their selected store location, a notification is sent to that store’s manager.
Steps to Auto-Route Notifications
We’ll build a customer feedback system that automatically routes survey responses to the correct store manager. The same approach works for any scenario where notifications should go to different people based on what the customer selects.
Step 1: Build the Locations form
Your Locations form serves as the central database that stores contact information for everyone who might receive notifications. Build this form once, and you can reference it across multiple forms.
- Create a new form (ex: “Cognito Coffee Locations”).
- On the Build page, add fields for the store details:
- Store Location (Textbox field)
- Manager Name (Textbox field)
- Manager Email (Email field)
- In the Form Settings, enable Use with Lookup Field? to allow the form’s entry data to be accessible to other forms.
- Click Save.
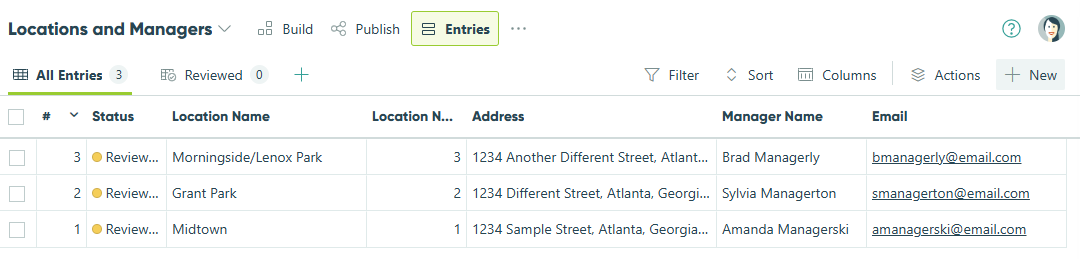
- Open the Entries page and add one entry per location, along with manager details.
Step 2: Build the Survey form
-
Create a new form named (ex: “Customer Survey”).
-
On the Build page, add your survey fields (e.g., Rating, Comments).
-
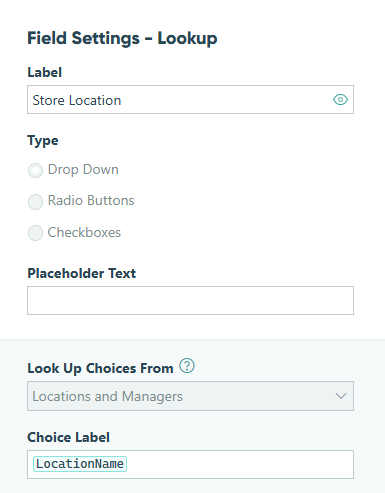
Click into an empty placeholder and add a Lookup field named “Store Location”.
-
In the Lookup field settings:
- Lookup Choices From: Select the “Cognito Coffee Locations” form.
- Choice Label: Select the Store Location field.
-
Save your changes.
Step 3: Set up the notification
-
Go to Workflow (or open Action Settings for the Submit action).
-
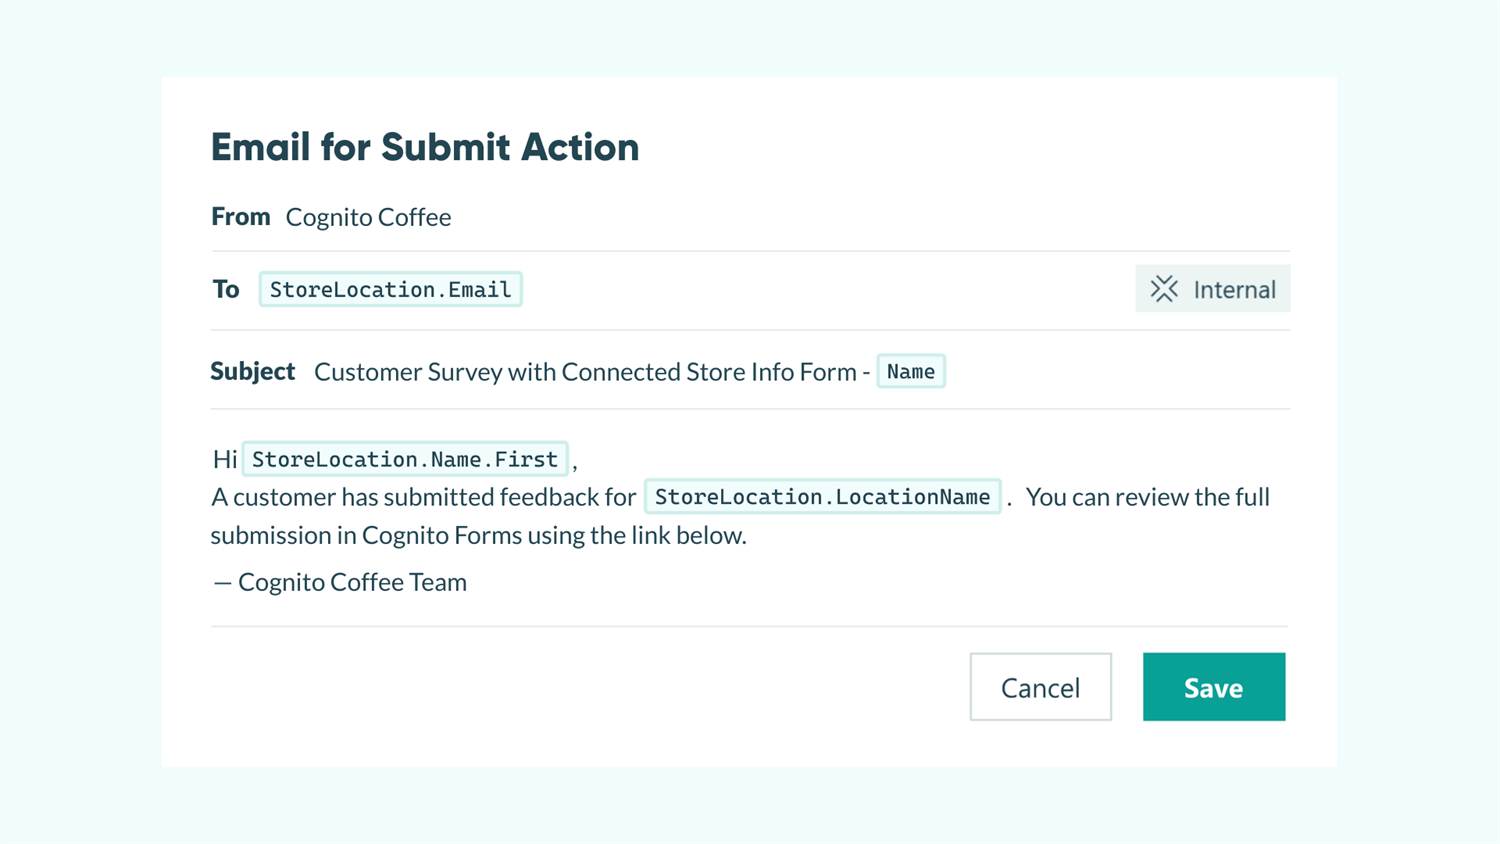
In the Submit action settings, find Send Emails and click + Add Email (or edit an existing email).
-
For the To value, click Insert Field and select the manager’s email from the Store Location lookup. Optionally, include a workflow link so the manager can directly access the submitted survey.

-
Make sure to save your changes to both the email notification and the form.
Now, when someone submits the survey, Cognito Forms retrieves the appropriate manager’s email from the Locations form and automatically routes the notification to that manager.
To test your setup, publish and open the form, select a known store location, and submit a test entry. Then, confirm that the manager for that location received the email.
Expert Tips From Our Team
- Review your Locations form regularly to keep store details and manager information up to date. The changes you make here instantly update across all connected forms.
- Personalize email notifications by adding dynamic field values to the message, like:
“Thanks for visiting the {{ Store Location }} location! Your feedback has been sent to {{ Manager Name }}.” - Verify your email domain so notifications are sent on behalf of your own domain, creating a professional and branded experience. Learn more about verified email domains.
Start Routing Notifications Automatically Today
With Lookup fields, you create one central directory that powers notification routing across all your forms automatically. When contact information changes, update it once and watch the changes flow everywhere instantly.
Whether you’re routing survey responses to store managers, support tickets to departments, or event registrations to coordinators, this approach saves time, prevents errors, and ensures notifications always reach the right person.
FAQ
Absolutely. This method works for any scenario where you need to route notifications based on a form selection. Just replace “Store Location” with your selection field (Department, Product Type, Event, etc.) and customize your Locations form accordingly.
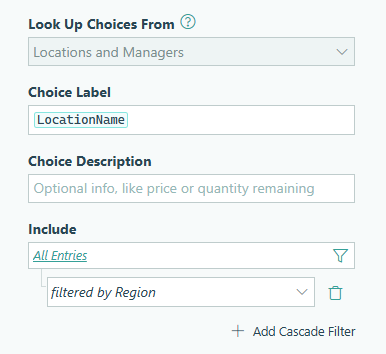
Yes. You can use a cascade filter to display only relevant locations based on another field, like region. First, add a Textbox field named “Region” to your Locations form and assign each location’s region on the Entries page.
Then, in the Lookup field settings on your Survey form, add a Cascade Filter and select the Region field. This automatically adds a Region dropdown to your Survey form and filters the Store Location options to match the customer’s selected region.