Automatically apply the correct sales tax rate to every order based on where your customer lives, eliminating manual calculations and ensuring tax compliance across all locations.
Build Time & Skill
15-20 min
Intermediate
What you'll learn
How to set up a tax rate database that automatically applies the correct sales tax percentage to orders based on the customer's state, keeping your forms accurate and compliant
When you collect payments through order forms, manually calculating sales tax for each location wastes time and creates opportunities for errors. With Cognito Forms’ Lookup field, you create one master tax rate database that automatically applies the correct percentage to every order based on the customer’s address.
Update a tax rate once, and it changes everywhere instantly. Your order forms stay accurate, your customers see the right charges, and you maintain tax compliance without manually updating multiple forms.
This automated approach helps you:
- Eliminate manual tax calculations. The system automatically applies the correct rate based on customer location, removing human error from the equation.
- Maintain compliance across all locations. Always use current, accurate tax rates without tracking changes across multiple forms or spreadsheets.
- Save time updating rates. Change once in your database, update everywhere automatically – no need to hunt down every order form.
- Create professional checkout experiences. Customers see accurate totals immediately, building trust and reducing cart abandonment.
Step-by-Step: Setting Up Automatic Sales Tax Calculation
These five steps create a system that automatically applies the correct sales tax to every order based on customer location.
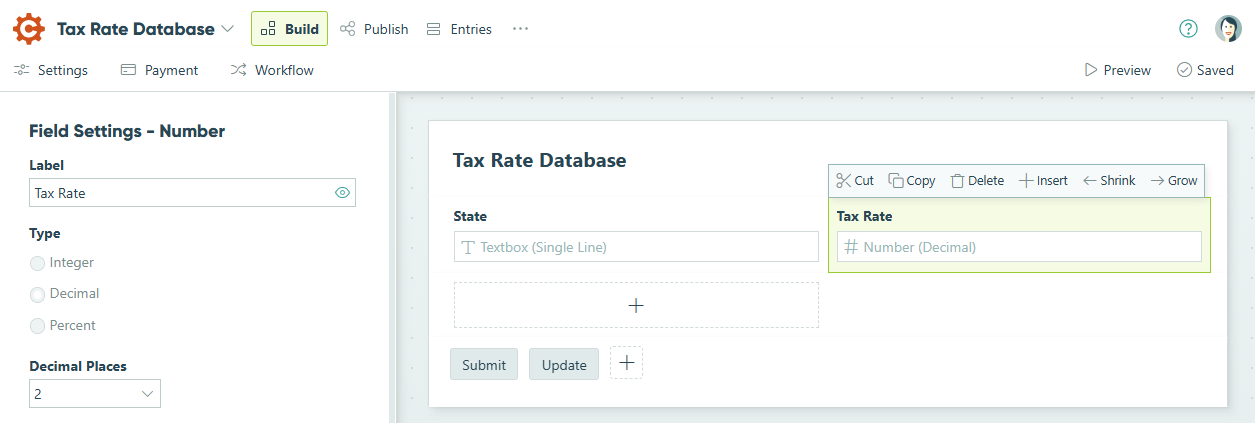
Step 1: Build your tax rate database
Your tax rate database serves as the central hub for all sales tax percentages. You’ll create this once and reference it across all your order forms.
-
Create a new form and name it “Tax Rate Database” or “State Tax Rates.”
-
Add two fields:
- Textbox field labeled “State”
- Number field set to Decimal Type labeled “Tax Rate”
-
Save your form.
-
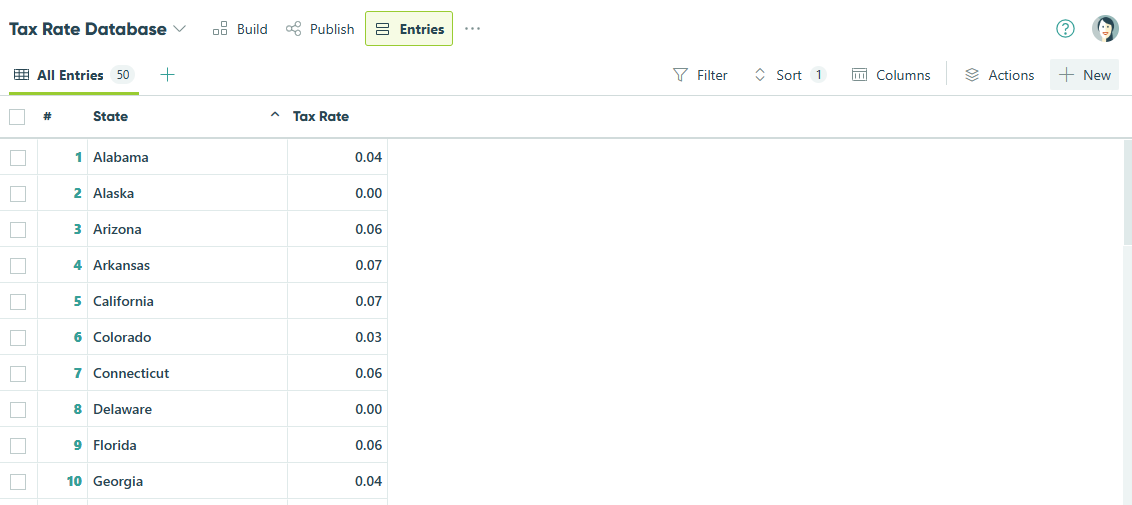
Go to the Entries page for your Tax Rate Database.
-
Click + New in the top right.
-
Fill in the state name and tax rate for each location to populate your tax rate database. Click Submit to save each entry.
If you already have tax rates in a spreadsheet, use Cognito Forms’ import feature to upload them all at once. Go to the Entries page, click the three-dot menu, and select Import Entries. Learn more about importing entries.
Step 2: Add a Lookup field to your order form
Now connect your order form to your tax rate database. This Lookup field automatically matches the customer’s state to the correct tax rate behind the scenes.
-
Open your order form (or create a new form for collecting orders).
-
Add an Address field for customer shipping or billing information.
-
Add a Lookup field and label it “Tax Rate Lookup.”
-
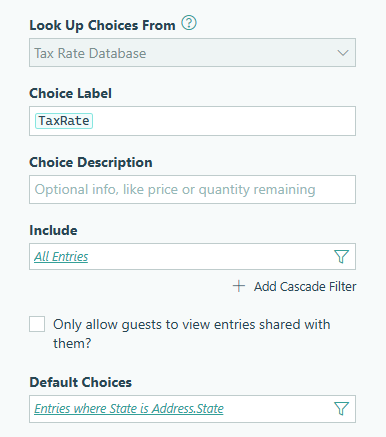
In the Lookup field settings:
- Lookup Choices From: Select your “Tax Rate Database” form
- Choice Label: Select “Tax Rate”
- Default Choices: Click the dropdown and select the State subfield from your Address field (e.g.,
Address.State)

-
Under Show This Field, select For Roles and choose Internal to hide the Lookup field from customers.
The Lookup field now automatically selects the tax rate entry that matches the customer’s state. Customers never see this field – it works silently in the background.

Improve address accuracy with Google Maps
![]()
Enable Address Autocomplete on your Address field to help customers enter accurate addresses with suggested options as they type. This ensures the state field is filled correctly for tax matching.
Step 3: Calculate the order subtotal
Before applying tax, you need to know the subtotal of the customer’s order. The calculation method depends on your form structure.
For simple order forms with individual payment fields
Add a Calculation field set to the Currency type and create a formula that adds all payment fields:
=PaymentField1 + PaymentField2 + PaymentField3

For order forms with repeating sections
This approach works best for product catalogs where customers can order multiple items:
- Inside your repeating section, add a Calculation field set to the Number type labeled “Line Total” that multiplies price by quantity. For example, if you display products in a Choice field labelled “Product” with a connected Quantity field:
=Product_Price * Quantity - Outside the repeating section, add another Calculation field set to Currency type. Label this calculation field “Subtotal” and use the
.Sum()function to add all line totals. Make sure to replace “Order Information” with the name of your repeating section:
=OrderInformation.Sum(LineTotal)
Step 4: Calculate and display sales tax
Create a Price field that multiplies your subtotal by the tax rate from the Lookup field, then automatically adds it to the final payment total.
- Add a Price field to your form labelled Sales Tax.
- For the Amount setting, enter this formula:
=Subtotal * Decimal.Parse(TaxRateLookup.TaxRate)
Replace “Subtotal” with your calculation field’s name and “TaxRateLookup” with your Lookup field’s name. TheDecimal.Parse()function converts the tax rate text into a number the calculation can use. - In the Item Name setting, enter “Sales Tax” (this is what appears on payment receipts).
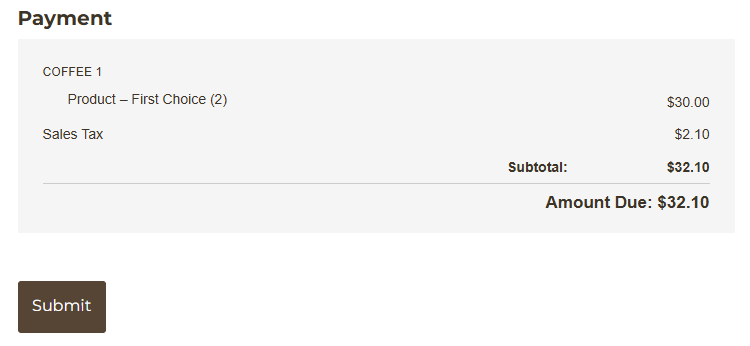
The Price field now automatically calculates the sales tax based on the customer’s state and adds it to their order total. Customers see the sales tax as a separate line item, and it’s included in the final payment amount.
Step 5: Test your tax calculation
Before sharing your form with customers, verify the tax calculation works correctly for different states.
- Click Preview in the form builder.
- Fill out the form with a test address from a state in your database.
- Check that:
- The correct tax rate is applied
- The sales tax calculation is accurate
- The final total includes both the subtotal and tax
- Test with addresses from 2-3 different states to confirm the lookup works correctly. If something’s not calculating correctly, double-check:
- Your Lookup field’s Default Choices setting references the
Address.Statesubfield - Your tax rates in the database are entered as decimals and not percentages (0.07, not 7%)
- The field names in your calculation formulas match your actual field names exactly
- Your Lookup field’s Default Choices setting references the
Additional Features to Enhance Your Tax Calculation
Once your basic tax system works smoothly, consider these enhancements to create even more sophisticated order forms:
- Track tax collected by location. Create Entry Views filtered by state to see how much sales tax you’ve collected from each location. This simplifies tax reporting and helps you identify your highest-revenue states.
- Add tax exemption handling. Include a Yes/No field asking if the customer is tax-exempt. Use conditional logic to hide the sales tax Price field when they select “Yes,” and add a File Upload field for their exemption certificate.
- Calculate county or city taxes. Expand your Tax Rate Database to include County and City fields alongside State. Use cascade filters in your Lookup field to match more granular location data when needed for complex tax jurisdictions.
- Set up automated tax reports. Use the Cognito Forms API or integrations with tools like Zapier to automatically send tax collection summaries to your accounting software or generate monthly tax reports.
Start Automating Your Sales Tax Today
Manual tax calculations create errors, waste time, and risk compliance issues. With Cognito Forms’ Lookup field, you build one central tax rate database that automatically applies correct percentages to every order based on customer location.
This approach transforms your order forms from manual calculation headaches into streamlined, accurate checkout experiences. Customers see the right charges immediately, you maintain compliance effortlessly, and tax rate updates happen in one place instead of across dozens of forms.
Start building your tax rate database today and experience how automation simplifies one of the most tedious parts of running an order form.
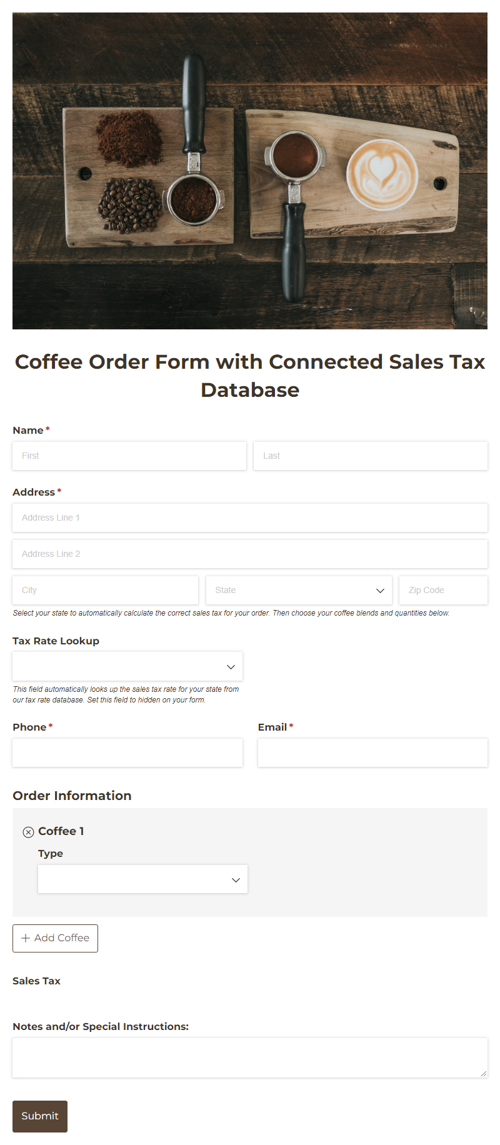
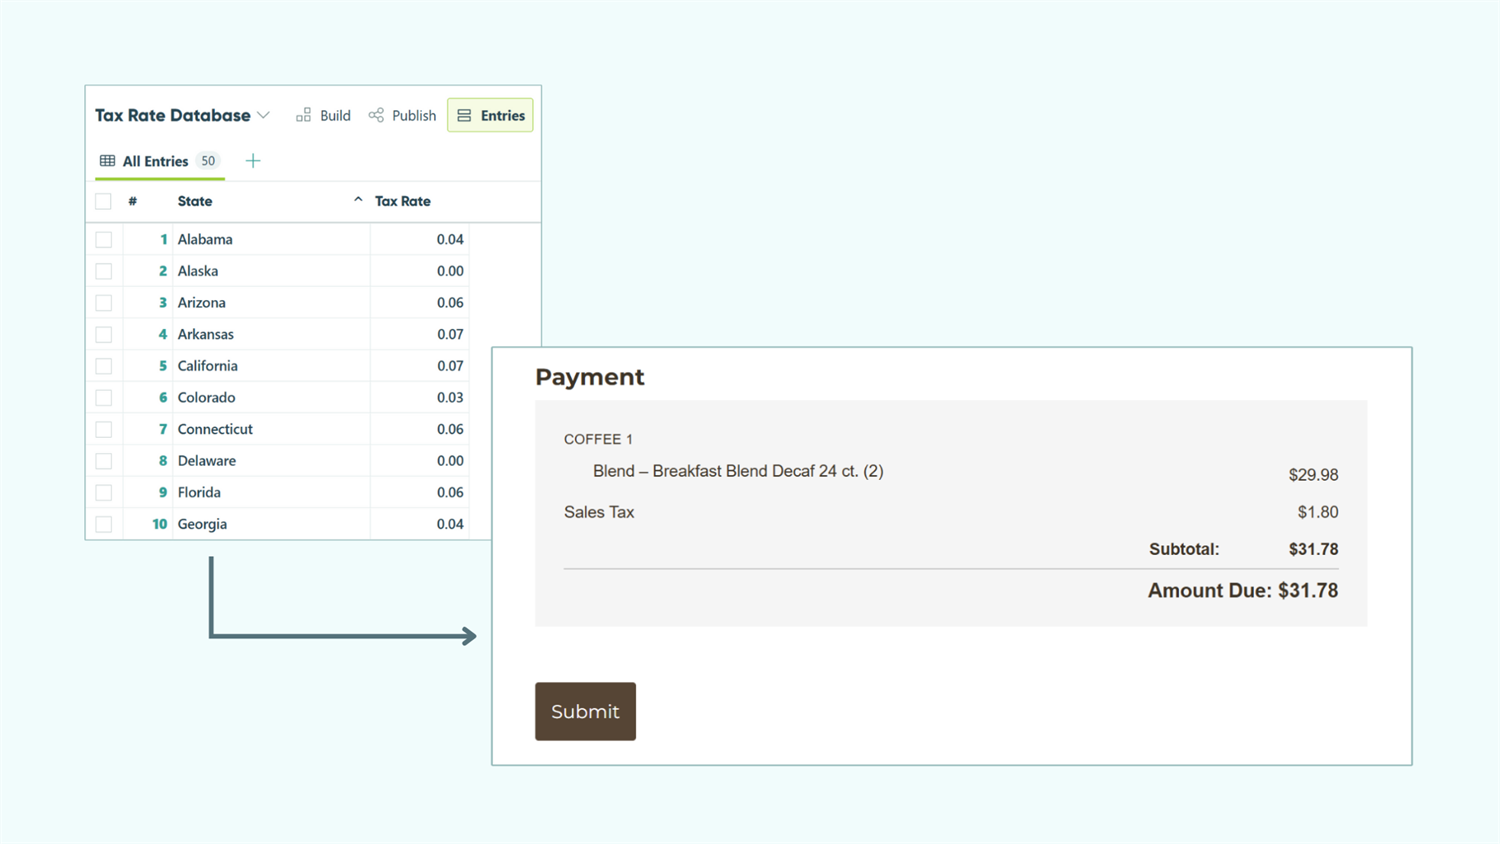
Coffee Order Form with Connected Sales Tax Database
- Collect bulk orders with automatic sales tax calculation
- Auto-fill products and prices from inventory
- Manage state tax rates from connected database
FAQ
Yes. Instead of using State as your lookup reference, add a Country field to your Tax Rate Database and reference the Country subfield from the Address field in your Lookup field’s Default Choices setting. This applies the tax rate based on which country the customer selects.
Go to your Tax Rate Database form’s Entries page, find the state with the changed rate, click to edit that entry, update the tax rate, and save. The new rate applies immediately to all forms using your database – no need to update individual forms.
Yes, but this requires a more advanced setup. Add a “Product Type” field to your Tax Rate Database (like “Clothing” or “Electronics”) and use cascade filters in your Lookup field to match both the state and product type. This lets you apply different rates for different product categories within the same state.