Let customers add unlimited line items to a single form, duplicate submissions or managing complex conditional fields.
Build Time & Skill
10-15 min
Beginner
What you'll learn
How to choose between repeating sections and tables, set up either option to collect unlimited line items, and use them for common business workflows
When you need to collect multiple items from customers, you face a common challenge: most form builders force you to create separate forms for every scenario or manage endless conditional fields. Cognito Forms gives you two better options: Repeating Sections and Tables. Both collect multiple items, leaving the number of items added up to the person completing the form.
These features help you:
- Collect unlimited items on a single form. Stop limiting customers to arbitrary maximums or creating duplicate forms for different scenarios.
- Keep forms clean and manageable. Customers see only the fields they need, adding more as required instead of scrolling through empty spaces.
- Let customers control their submissions. They decide how many items to add based on their specific situation, not your form’s constraints.
Understand Repeating Sections and Tables
Repeating Sections and Tables both collect multiple items, but they work and look differently.
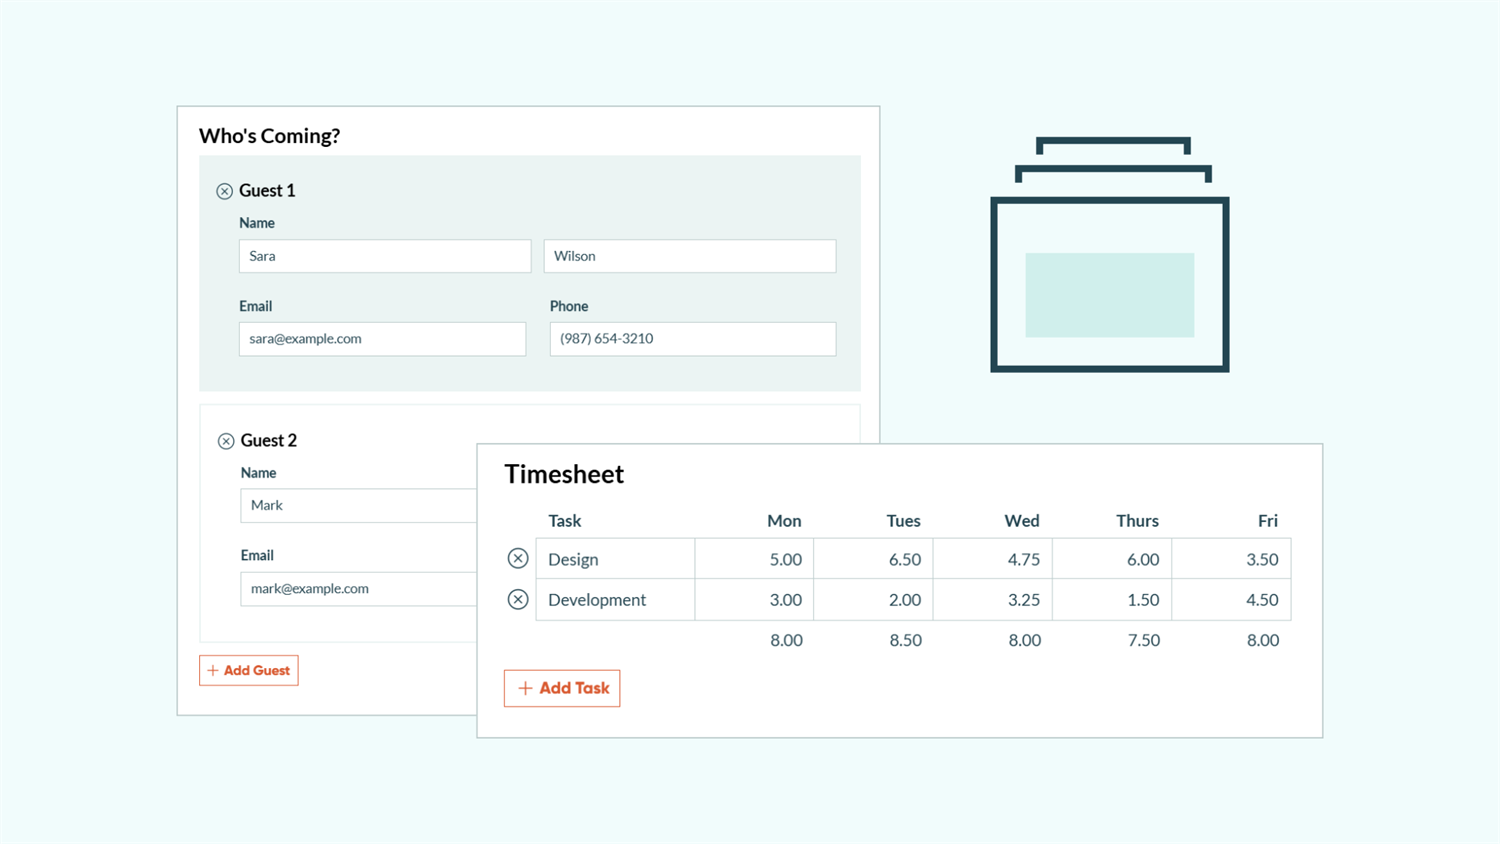
- Repeating Sections let customers add as many sections as needed, each containing multiple fields with different field types. They display each item vertically with fully customizable layouts, making them ideal for complex data collection.
- Tables organize data in a grid format with columns and rows for quick, spreadsheet-style entry. They display items horizontally in a grid format, perfect for simple structured data that follows the same pattern for every row.
Both approaches keep your forms clean and manageable while giving customers complete control over how much information they submit.
Method 1: Use Repeating Sections for Complex Data
Repeating Sections let customers add multiple instances of a group of fields, each with complete visibility and control. They work best when each item needs diverse field types, conditional logic, or detailed information collection.
Setting up a Repeating Section

- Add a Repeating Section field to your form. Give it a clear Label that describes what’s being collected (like “Event Attendees” or “Service Requests”).
- Set the Item Label to describe individual items (like “Attendee” or “Request”). This appears with a number for each item added.
- Customize the Add Button Text to match your form’s context (like “Add Attendee” or “Add Another Service”.
- Drag the fields you need into the repeating section. Any field type works.
- Optional: Set Number of Items minimum and maximum to control how many items customers can add. Leave these blank for unlimited items.
Set minimum and maximum strategically. If you require at least two items for every entry, set the minimum to 2 so the form loads with that many sections ready and cannot go lower. Set a maximum only when you have capacity constraints, like limited event seating or team bandwidth.
Real-world example: Event registration form
A professional association hosts quarterly events and needs to collect attendee information for multiple people per registration. Previously, their event coordinator manually added that several sets of the same fields with conditional logic showing or hiding them as needed. Managing updates became tedious and adding a new field meant updating it across multiple sets of fields.
Their solution with a Repeating Section:
- A Repeating Section for “Event Attendees”
- Fields included for: Name, Email, Phone, Dietary Restrictions, T-Shirt Size, and Special Accommodations
- Minimum of 1 and maximum of 8 (venue capacity per registration)
- Conditional logic shows the “Special Accommodations” field only when “Dietary Restrictions” is “Other”
Why this works: Each attendee gets their own section with all necessary fields. When the organization needs to collect emergency contacts, they add it once to the Repeating Section, not eight separate times. Customers see exactly what they need without scrolling through empty fields.
Try it out
Advanced techniques with Repeating Sections
Once you’re comfortable with basic Repeating Sections, these calculations unlock powerful automation:
- Calculating totals from repeating data: Use the
.Count()function to count items or.Sum()to total numeric values across all items. For an event registration charging $150 per adult and $75 per child, create a Calculation field:=Attendees.Count(AgeCategory = "Adult") * 150 + Attendees.Count(AgeCategory = "Child") * 75 - Referencing specific items: Target data from the first item with
.First()or last item with.Last(). To copy the first attendee’s address as the billing address:=Attendees.First().Address - Creating quantity-based discounts: Combine
.Count()with conditional logic for group discounts. To discount registration when 5 or more attendees register:=if Attendees.Count() >= 5 then TotalRegistration * 0.85 else TotalRegistration - Using conditional logic within items: Show different fields based on selections within each repeating item. Display an “Allergy Details” field only when “Has Dietary Restrictions” is “Yes” for that specific attendee.
Method 2: Use Tables for Streamlined Data Entry
Tables organize repeating data in a grid with columns and rows, similar to a spreadsheet. They work best for simple, structured information where every row follows the same pattern and quick data entry matters more than seeing extensive details.
Setting up a Table

- Add a Table field to your form. Give it a clear Label describing the data being collected (like “Monthly Budget” or “Equipment Checkout”).
- Set the Item Label for what each row represents (like “Budget Item” or “Equipment”).
- Customize the Add Button Text or leave blank for just the + button.
- Add fields as columns, dragging them into the Table area. Tables support up to 12 columns, but fewer columns create cleaner forms.
- Optional: Configure Column Summary for number fields to automatically show totals, averages, minimums, or maximums at the bottom.
- Optional: Set Number of Items minimum and maximum to control rows.
Customers can now quickly add rows of data, filling across columns with minimal scrolling. The compact grid format makes reviewing and editing easier than vertical sections.
Keep tables simple. Tables work best with 3-7 columns of straightforward fields. If you need complex conditional logic, file uploads, or addresses, use repeating sections instead.
Real-world example: Department budget planning form
A non-profit organization creates annual budgets across multiple departments. Previously, each department submitted a separate form, creating dozens of entries their finance team had to consolidate manually. Department heads also couldn’t easily see their total requested amount while completing the form.
Their solution with a Table:
- A Table field for “Budget Line Items”
- Columns created for: Category (with options like “Staffing,” “Supplies,” “Events”), Description, Estimated Cost, and Priority (High, Medium, Low)
- Column Summary is enabled on the “Estimated Cost” field and set to “Sum” with the label “Total Budget Request”
Why this works: Department heads can see their entire budget request at a glance in a familiar grid format. They can quickly compare line items, adjust amounts, and watch their total update automatically. The finance team receives one comprehensive form per department instead of dozens of scattered entries. When the organization needs to add a “Justification” column, they add it once to the table, not to multiple separate sections.
Try it out
Advanced techniques with Tables
Once your basic Table is working, these features add sophisticated capabilities:
- Column summaries for automatic totals: Tables calculate summaries automatically for Number fields. Set a Currency column to show “Sum” and watch the total update as customers add rows. You can also display “Average,” “Count,” “Min,” or “Max” depending on what matters for your workflow.
- Referencing Table data in calculations: Pull Table data into calculations outside the Table using the same syntax as Repeating Sections. To reference the total from a Budget column:
=BudgetItems.Sum(EstimatedCost) - Creating conditional pricing within rows: Use calculations within Table rows to apply discounts or fees. For a quantity-based price calculator:
=if Quantity >= 10 then UnitPrice * Quantity * 0.90 else UnitPrice * Quantity - Using ItemNumber for row-specific logic: The
ItemNumberproperty lets you reference which row you’re in. Set a default value that changes by row:=if ItemNumber = 1 then "Primary" else if ItemNumber = 2 then "Secondary" else "Additional"
Quick Reference: Repeating Sections vs. Tables
Still deciding which option fits your needs? This comparison highlights the key differences:
| Feature | Repeating Sections | Tables |
|---|---|---|
| Visual Format | Flexible form-like layouts with vertically stacked items that provide a guided experience to the user | Streamlined spreadsheet-style horizontal grid with compact rows |
| Field types supported | All field types (including File Upload, Signatures, Name, Address, Rating Scales, Lookup, and Person fields). Additional Sections inside the Repeating Section are also supported (use sparingly). | Basic field types only (including Text, Number, Choice, Date, Phone, Email, Website, Price, Currency and Calculation). Lookup and Person fields are supported in a Dropdown style. |
| Field Limit | Unlimited | Up to 12 columns per row |
| Calculations | Manual Calculation fields required. (We recommend doing this outside of the section for easiest use.) | Built-in column summaries (Sum, Average, Count, Min, Max) |
| Conditional logic | Full flexibility to show/hide by individual fields; Each item can have different fields | Limited to show/hide by column; each row will have the same fields |
| Best for | Complex data with varied requirements between items and guided experiences for users | Simple, structured fields for quick data entry on items that require the same type of information |
| Example use cases | Event registrations, patient intake, and service requests | Budget tracking, equipment lists, and order line items |
Additional Features to Enhance Your Workflow
Combine Repeating Sections or Tables with other Cognito Forms capabilities to create even more powerful workflows:
- Automatically calculate totals from repeating items and collect payment in one step using a Price field.
- Use conditional logic to show or hide entire Repeating Sections or Tables based on earlier form selections.
- Combine with Workflow Automation to route entries containing repeating data through approval processes or assign tasks to specific team members.
- Add calculations to create sophisticated totals, discounts, and validations based on repeating data.
Start Simplifying Your Forms Today
Stop managing dozens of conditional fields or creating separate forms for every scenario. Repeating Sections and Tables transform rigid forms into flexible data collection tools that adapt to your customers’ needs. Whether you’re collecting complex event registrations or simple budget line items, these features give customers control while keeping your forms manageable.
Choose the right tool for your data, set it up once, and watch it handle unlimited variations without any additional work on your part.
FAQ
- Repeating Sections support unlimited fields of any type; add as many as you need to collect complete information for each item.
- Tables support up to 12 columns, which keeps the grid manageable and prevents horizontal scrolling.
If you need more than 12 data points per item or require complex field types like file uploads or addresses, use a Repeating Section instead.
Yes, customers can remove any item by clicking the x button that appears on each Repeating Section or Table row. They can also edit any item by simply clicking into the fields and making changes.
However, if you set a minimum number of items, the remove buttons will disappear when that minimum is reached, preventing customers from removing required items. This gives you complete control over data collection requirements.
In the Entries page, repeating data displays when you expand an individual entry. You’ll see all repeating items organized together, making it easy to review complete submissions.
When you export entries to Excel, Repeating Section and Table data appears on a separate sheet within the same workbook, with each repeating item as its own row. This structure makes analyzing and reporting on repeating data straightforward.
Both Repeating Sections and Tables let you set minimum and maximum item counts. Set these limits using static numbers (like 1 to 10) or calculations based on other form fields. When you enable Automatically Hide Add and Remove Buttons, the controls disappear when limits are reached, preventing customers from exceeding your capacity.
You can even dynamically adjust limits. If someone enters “3 guests” in a number field, set that field as both the minimum and maximum to show exactly three repeating items.