Build a complete scholarship system from student application to committee review and award decision, without paper, email chains, or manual coordination.
Build Time & Skill
45–60 min
Intermediate
What you'll learn
How to build your own scholarship application form with custom review workflows, tracking views, and automated emails
Managing dozens of scholarship applications can be very cumbersome for already stretched admissions staff and faculty. At the same time, today’s students expect clear, transparent communication and a straightforward scholarship experience. Meanwhile, a single missed document or miscommunication can delay the entire process for a student who is counting on that award.
With Cognito Forms, you can bring the entire scholarship process into one place, from the moment a student submits an application to your committee sending them a decision. If you need a structured, repeatable process without relying on an IT department or costly cumbersome software, this guide is for you.
A scholarship management system in Cognito Forms helps you:
- Collect everything at once. Students submit essays, transcripts, and supporting documents directly through a single form, from any device at any time.
- Easily manage your list of available scholarships. Add or close scholarships in one place and the application stays updated without losing any important data.
- Give your committee a clear, consistent review process. Workflow moves each application through defined stages, so reviewers always know what needs their attention.
- Keep students informed at every step. Automated emails notify students when their application is received, when a decision is made, and when they need to take action.
The Components of a Scholarship Management System in Cognito Forms
This guide covers three connected pieces that work together as one application system:
| The Component | What It Does |
|---|---|
| Lookup field | Powers the scholarship choices on your application, making it easy to manage the application’s list of available scholarships. Adding or closing a scholarship instantly updates the available choices on your application form. |
| Workflow | Moves each application through defined stages, from submission to committee review to award decision. Controls who can see what, what actions each role can take, and when automated emails go out. |
| Entry Views | Clear, organized dashboards to track and manage applications. Set up filtered Views for whatever you need, such as applications pending committee review or all applications for a specific scholarship. |
Step-by-Step: Building Your Scholarship Application
Step 1: Plan what information to collect
Before building anything, decide what your committee actually needs to evaluate applications fairly. A focused form protects the student’s time and makes your review process faster.
Most fields included on scholarship applications fall into six categories of information:
| Common information collected | Field type to use |
|---|---|
| Student's full name | Name field |
| Enrollment status | Choice field |
| Mailing address | Address field |
| Contact information | Email field and Phone field |
| Student ID | Text field |
| Common information collected | Field type to use |
|---|---|
| Grade Point Average (GPA) | Number field |
| Credit Hours Completed | Number field |
| Program or Major | Choice field or Lookup field |
| Common information collected | Field type to use |
|---|---|
| Which scholarship(s) they want to apply for | Lookup field, connected to the source form you'll create in Step 2 |
| Previous or current scholarships received | Repeating Section with fields for scholarship name and award amount |
| Common information collected | Field type to use |
|---|---|
| Personal Essay | File Upload field and a Content field with your essay prompt |
| Current Transcript | File Upload field |
| Financial Statements | File Upload field |
| Letter(s) of Recommendation | File Upload field |
| Common information collected | Field type to use |
|---|---|
| Your university's text for attestation of accuracy | Content field |
| Student signature | Signature field |
| Checkbox to approve their review of the acknowledgment statement | Yes/No field |
| Common information collected | Field type to use |
|---|---|
| Which scholarship to award to the student | Lookup field or Choice field |
| Scoring rubric selection(s) | Choice field(s) or a Rating Scale |
| Additional or Significant Notes | Textbox field; Multiple lines |
Think through your specific requirements before you start building. Knowing which fields are required versus optional, and which sections apply only to certain scholarships, will make building faster and save you from reworking the form later.
Step 2: Create a scholarship lookup form
Before building the main application, create a simple “source form” (AKA: your list of scholarships and what program they’re connected with). This will power the choice options on the application form by using Cognito Forms’ Lookup field.
A Lookup field pulls its choices from the entries on another form. Instead of typing scholarship names directly into a dropdown (which you’d have to update manually every time something changes) your application automatically reflects whatever entries exist in the source form. Add a new scholarship, and it appears on the form immediately. Close one, and it disappears without any changes to the application itself.

Create the lookup source form
- Create a new form and name it something clear, like “Scholarship Listings.”
- Add fields for the details your committee uses, such as:
- Scholarship Name (Text field, Single line)
- Major or Program (Choice field, with each program type as a choice)
- Award Amount (Number field or Currency field)
- Eligibility Requirements (Text field, Multiple lines)
- Deadline (Date field)
- Is Active? (Yes/No field)
Please Note: The Yes/No field is completely optional, but highly recommended. This field allows you to hide closed or paused scholarships from the available options without deleting them. Historical entries stay intact for reporting, but students only see what’s currently available.
Add entries to the source form

- Go to the Entries page.
- Add an entry for each scholarship you offer.
- Alternatively, import a long list of options all at once. Visit our import guide for more guidance.
Step 3: Build the student application form
With your source form ready, now it’s time to build the main application. Use the six-section structure from Step 1 as your guide. The goal is a form that feels straightforward for students while collecting exactly what your committee needs.
Connect your list of scholarships with a Lookup field

- Add a Lookup field and label it “Scholarship” or “Select a Scholarship.”
- If students can apply for more than one scholarship at a time, change the Lookup field’s Selection Type setting to Multiple. This will let them select multiple scholarships within a single submission.
- In the field settings, set Lookup Choices From to your “Scholarships” source form.
- Set the Choice Label to the Scholarship Name field. This will show the “Scholarship Name” as the choices in the Lookup field.
- Open the Include option and add a filter: Is Active? = Yes. This hides closed scholarships automatically.
- Use the Sort option if you want to put the scholarship list in alphabetical order.
If your Lookup field dropdown becomes too long or overwhelming, add a Cascade Filter. This will create a second dropdown that filters based on the first selection. For example, students can select their program or major and only see a list of scholarships that apply to their program or major.
Add fields
Use any of the 20 or more field types to let applicants fill out and provide the information you need.

Here are a few fields that most scholarship applications include:
- File Upload fields: Add one File Upload field for each type of document your committee requires.
- Signature field: Place a Signature field at the end of the form with a short statement above it confirming the student attests that all information is accurate.
- Calculation fields: Generate scores for each application automatically. Create a Calculation formula that awards points based on GPA, credit hours, enrollment status, or specific answers to multiple-choice questions.
- Content field: Show essay prompt(s) to applicants directly on the form. Use conditional logic to show a specific essay question only when a particular scholarship is selected. Students applying for a need-based award can see income-related questions, while merit-based applicants see achievement-focused prompts. Learn more about showing different questions based on previous answers.
Organize the form with sections and pages
Break the application into clearly labeled sections, with one for each category of information. For longer applications, use Page Breaks to divide the form into manageable steps. A multi-page form with a progress indicator is less overwhelming than a single long scroll, especially for students filling it out on a phone.

Step 4: Set up your review workflow
Workflow is what transforms your application form from a basic data collection tool into a full review process. It controls who sees what, what Actions each person can take, and how applications move from submission to decision.
A scholarship application workflow involves three roles: the student, the scholarship committee, and the administrator managing the setup. Field visibility and the availability of Actions are controlled based on who is working with the entry at each stage.

Set up Roles
- In Workflow, click Roles.
- You’ll see two default Roles:
- Public: Represents the student applying for scholarship(s). Rename this to “Student,” if desired.
- Internal: Represents your staff who manage all incoming applications, form building, and Workflow setup.
- Add a new Other Role to represent your scholarship committee, and name it “Scholarship Committee.”
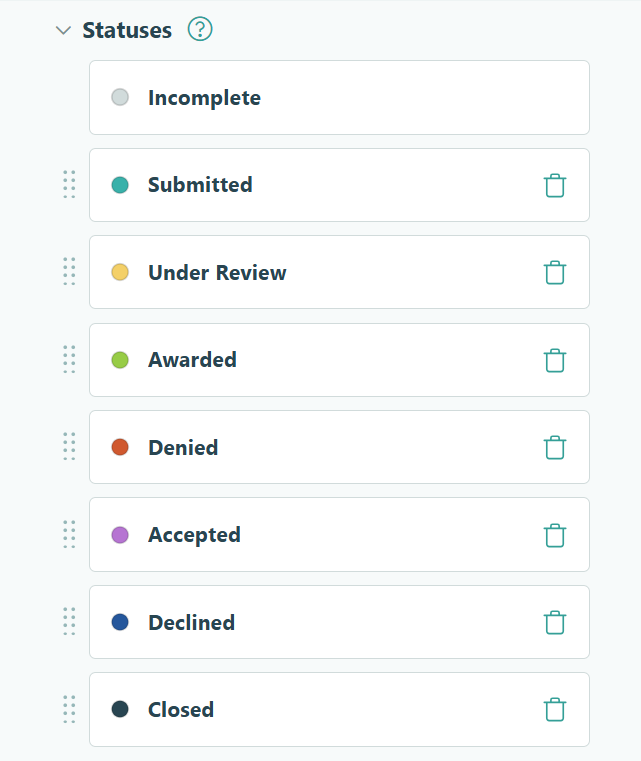
Define Workflow Statuses
Statuses show where each application is in the review process. A clear set of Statuses makes it easy for your team to filter and prioritize their work at a glance.
To add or rename statuses:
- Go to Workflow and click Statuses.
- Your form starts with “Incomplete” and “Submitted” Statuses. Keep these.
- Add additional statuses you need. A few common Statuses for scholarship application workflows include:
- Under Review: For when the committee has opened and is reviewing the application
- Awarded: When the committee decided to award the student a scholarship
- Denied: When the committee decided not to award the student a scholarship
- Accepted: After the student accepted the award they were selected for
- Declined: After the student declined the award they were selected for
- Closed: When the process is complete and the entry has been “archived”
Configure Workflow Actions
Actions are the buttons that move applications through your Workflow. Your form includes “Submit” and “Update” by default.

To configure Actions:
- Find Actions under the Workflow menu.
- Click + Add Action and give it a clear name.
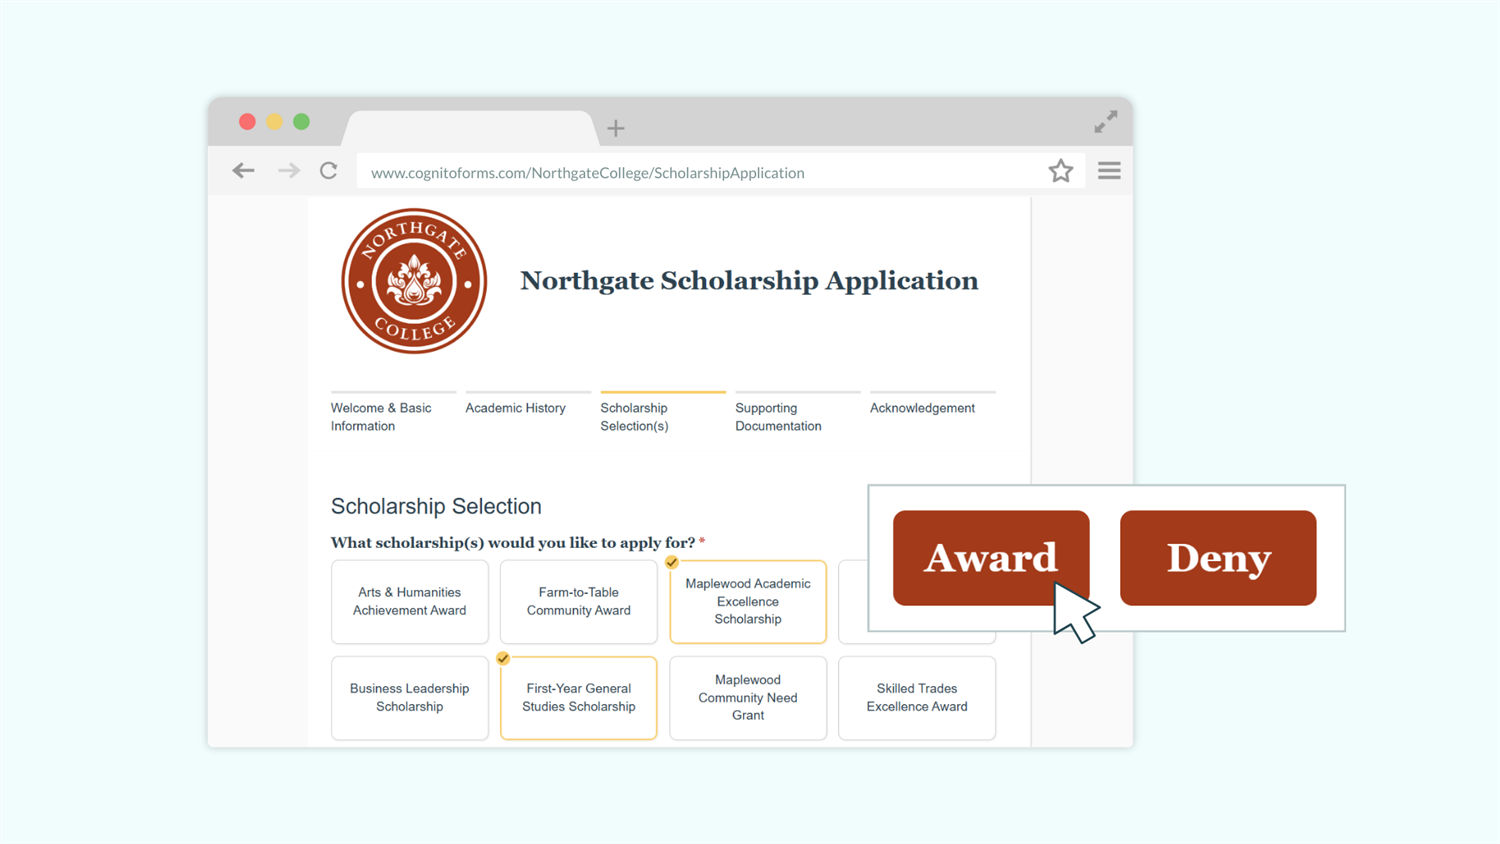
- Use the Allow Action > When option to restrict the Action to the correct Role, make Actions only available at the right Status, or layer both conditions. For example, the “Accept Award” and “Deny Award” Actions should only appear when the
Entry.Role = "Student"ANDEntry.Status = "Awarded"
Here are common Actions you might want to include:
| Action | Who uses it | What it does |
|---|---|---|
| Submit | Student | Submits the application; status changes to Submitted |
| Save | Student | Saves progress without submitting |
| Award | Scholarship Committee | Marks the application as Awarded |
| Deny | Scholarship Committee | Marks the application as Denied |
| Accept Award | Student | Student accepts the scholarship; status changes to Accepted |
| Decline Award | Student | Student declines; status changes to Declined |
Control what each Role can see and edit
Committee fields (like internal notes and scoring rubrics) will likely need to be hidden from students. However, other fields might be useful for the student to see, but not be editable. Use the Show This Field and Read-Only settings on each field or section to control visibility and editing permissions.

Here are a few things you might do with this:
- Committee fields: Set the Show This Field setting to For Roles >
"Scholarship Committee". Students see a clean application with no internal data visible. - Submitted application fields: Set these to Read-Only for the Student role. After submission, students should be able to see their answers but not edit them.
- Information for recipients: Add fields specifically for the recipients of awards to view details or provide a response. To do this, set the Show This Field setting to When >
Entry.Status is "Awarded"ANDEntry.Role is "Student"
Step 5: Set up Entry Views for tracking & review
Once applications start coming in, your committee needs a structured way to find, prioritize, and work through them. Entry Views let you create filtered, role-based views of the Entries page so each reviewer sees exactly what they need (and nothing they don’t).
- Manage any View type from the Entries page.
- Create new Views by clicking the + icon in the top toolbar and selecting the View type you want to create.
- Give each View a clear name, and be sure to select the correct Role for whoever will be accessing the View.
There are two view types that work well for scholarship review:
Grid Views
Grid Views show applications in a spreadsheet-style layout. Use these for an overview of all submissions, sortable and filterable by status, program, or scholarship.

Two common examples of how you might use Grid Views for scholarship management, include filtering by:
Status = Awardedto give your team a running list of students who have been offered a scholarship but haven’t yet responded. This makes follow-up easy.Scholarship Name = [Choice]to see only the students who applied to a specific scholarship you need to review.
Hide any columns you don’t want the Role to see. Even if a Role cannot see a field or entire section when the entry is expanded, you also need to hide its corresponding column from the View.
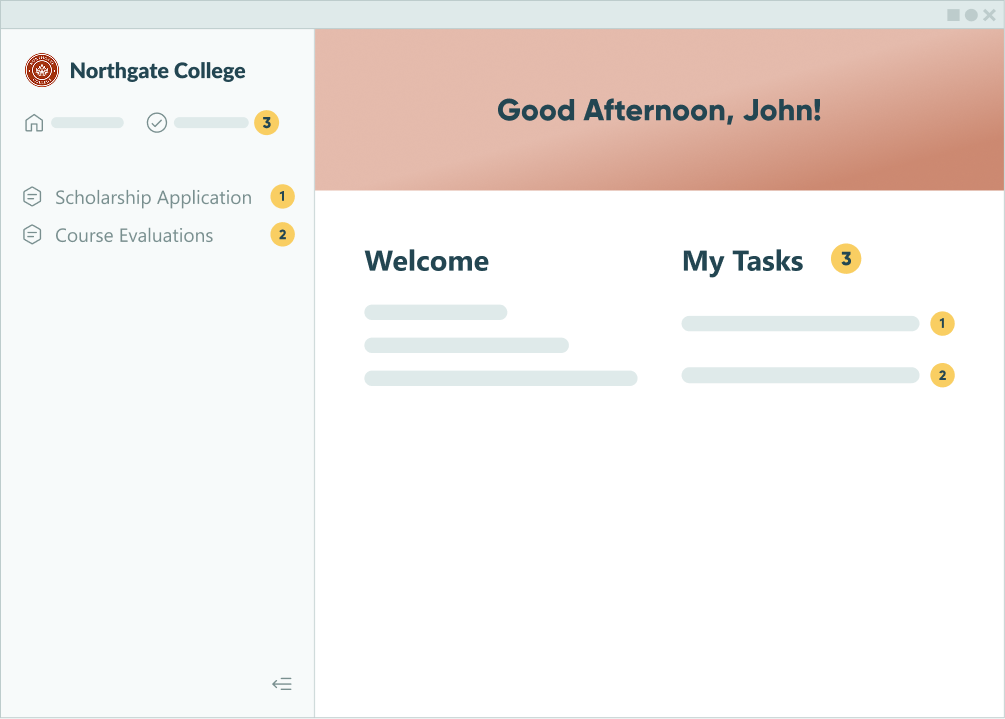
Task Views
Task Views convert entries into to-do lists and surface pending tasks on each reviewer’s dashboard automatically. Use this View type to assign applications to individual reviewers, so they know they have work waiting for them.

Here are a couple of best practices for Task Views:
- Set a Priority level if your committee should triage by urgency or deadline.
- Set a Due Date tied to a date field on the form (for example, the scholarship deadline). This lets you send automated email reminders to committee members as the deadline approaches.
- Always add a Filter to the view (such as
Status = Pending Review). When a committee member takes action and changes the status to “Review Complete” or “Short Listed”, the entry disappears from this view automatically, marking the task as complete. - Hide any Columns you don’t want the Role to see. Even if a Role cannot see a field or entire section when the entry is expanded, you also need to hide its corresponding column from the Task View.
- If you want individual reviewers to only see applications assigned to them (rather than the full applicant pool) add the Shared With Current User filter to the View. Learn more about this in our Shared With Current User support article.
Step 6: Automate your email notifications
Automated emails keep students informed and your committee moving without anyone sending manual messages. Every email in Cognito Forms is tied to a specific Workflow Action, so notifications only go out at the right moment.

To set up automated emails:
- Go to your form’s Workflow settings.
- Find the correct Action you want to trigger the email.
- Click + Add Email and finish setting up the notification in the pop-up.
- Use Insert Field option to dynamically insert answers on the student’s application into the email’s subject line, the main message, or to prefill the recipient’s email address.
- Add a Workflow Link to let the recipient view or edit the entry depending on what you allow by showing and hiding fields or making them read-only.
- Use the Send When settings to send different email content based on selections on the form.
Here are a few common email touchpoints that cover the full lifecycle of a scholarship application:
A confirmation email is sent to the student immediately after they click “Submit.” This email confirms the application was received, provides them with their application number or entry reference, and gives them an expected timeline for decision.
A notification email goes to the committee (or a specific committee member based on the selected scholarship). It is sent immediately after the student clicks “Submit.” This email lets the committee know that a new application needs their attention. It can also include a Workflow Link so they can open the entry directly and take action, without logging in separately.
A notification email is sent to the student immediately after a committee member clicks “Award.” This email lets the student know they have been selected as the recipient of a scholarship, what next steps or conditions to expect, and a Workflow Link for them to respond to accept or deny the award.
A notification email is sent to the student immediately after a committee member clicks “Deny.” This email lets the student know they have not been selected for a scholarship and provides any relevant information about reapplying in a future cycle.
A notification email goes to the committee (or a specific committee member based on the selected scholarship). It is sent immediately after the student clicks either “Accept Award” or “Decline Award.” This email lets the committee know the student’s response, so they can close the application or proceed with alternate recipients.
The Full Scholarship Experience
Now, your committee manages every application from a single dashboard while students move through the process entirely on their own — no manual updates or emails to chase.

Your committee’s experience
When a new application comes in, your committee logs into their Task View to see only the applications waiting for them. They open an entry, evaluate the student’s information and essay, and add ratings and internal notes (none of which the student can see). Then, they click Award or Deny directly from the entry and the status updates instantly, triggering the right email automatically.
The student’s experience
Students submit once and receive an immediate confirmation email with a link back to their submission. When a decision is made, they receive an automatic notification that takes them to their entry with an Accept or Decline button. Their response updates your team’s dashboard instantly.
Advanced Setup: Create a Scholarship Portal
Rather than sending students individual email links every time they need to take action, you can give them access to a central scholarship portal. If your institution runs multiple scholarship cycles per year, the portal becomes especially valuable for returning students.
How portals work in Cognito Forms
With Guest Access enabled, students can be added as guests (or external users). This lets them log in and see everything in one place (their application, its current status, and any updates waiting for them). All while you still stay in control of what they can see and do.
Because everything lives in one place online, students can check on the status of their applications from anywhere. No need to dig through emails for the Workflow Link. They can return to the portal at any time by visiting your organization’s Cognito Forms URL.
Additional Features to Enhance Your Scholarship Application System
Once your application is running, these features extend what it can do for your team:
- Auto-generate award letters with Document Templates: When a committee member clicks Award, you can automatically create a personalized PDF with the student’s name, the scholarship name, and the award amount. The document can include your institution’s letterhead and signature, and it can be attached directly to the award email (no manual document creation required).
- Route applications to the right reviewer: Use conditional email routing to notify a specific committee chair when a high-value scholarship is selected. Each scholarship can trigger its own targeted notification without any manual sorting. Add a condition to the email notification (such as Send When >
[Scholarship Field] = [Scholarship Name] - Automatically calculate financial need inside the application. For need-based scholarships, use a Calculation field to total income automatically. Add conditional logic to flag applications that fall within your eligibility threshold or to show and hide sections based on the result.
Advanced Scholarship Application
- Initial Application Review
- Automated Email Notifications
- Final Decision Communication to Recipient
Start Collecting Scholarship Applications Today
Replacing a paper-based or email-driven application process takes less than an hour in Cognito Forms, and the time you save compounds with every application cycle. Build your Lookup source form, set up your Workflow, and give your committee the structured review process they’ve been asking for. All without IT’s help or knowing how to code. Start with this Scholarship Application template and customize it to match your institution’s needs.
FAQ
Yes. Set the “Scholarships” Lookup field to a selection type of Multiple. Choices will appear as checkboxes or cards (whichever you choose) and applicants can select as many options as they want.
- Set a limit to the number of scholarships they can select in this field by adding a Calculation field that adds up the number of choices selected in the field and then add a Custom Error when that field goes above your limit. Visit our support articles to learn more about Calculations and Custom Errors.
- Use Conditional Logic to show or hide sections that contain questions required for a specific scholarship, but not required for other scholarships. Simply set a section’s Show This Section setting to > When >
[Scholarship Lookup field] contains [Scholarship Name]
Because the Scholarship dropdown is powered by a Lookup field connected to your Scholarships source form, you manage the list entirely from that source form, not the application itself. To add a scholarship, add a new entry on that source form. To remove one from the dropdown without deleting it, set its Is Active? field to No. The change appears on the application immediately, and historical application data stays intact.
In the form’s Workflow settings, find the Form Read-Only setting to lock the entire form for specific roles in specific statuses. Select When and add a condition like this: Entry.Status is not Incomplete. Once the student submits and the status changes to Submitted, all their fields become read-only. They can still view their application using a Workflow Link or through the student portal (if these are set up), but they cannot make changes.
Yes. Use a Choice field or a Yes/No field early in the form to ask whether the student is a new applicant or a current enrolled student. From there, use conditional logic to show or hide sections relevant to each group. For example, incoming students might need to provide high school GPA and SAT scores, while current students provide their college GPA and credit hours. Both groups complete one form, but each sees only the questions that apply to them.