Begin with your form’s Iframe embed code, located in the Publish Code section of the Publish page. Then, choose one of the following options:
- Option 1: Paste the code into your webpage’s HTML. Then, insert some additional script directly underneath the code to include your CSS:
<script>Cognito.setCss('body { background-color: #ff0000; }');</script> - Option 2: Pass-in a URL for a stylesheet by inserting the address of your CSS file:
<script>Cognito.setCss('https://mysite.com/site.css');</script>
Learn more about styling your forms in our Advanced CSS guide.
Yes! The Seamless embed code enables you to embed, prefill, and style multiple forms on the same webpage. Please refer to our Seamless embedding help guide to learn more.
Yes! You can completely customize the layout (including titles, logos, fields, etc.) of your generated PDF or Word documents.
To start creating a custom document:
- Go to your Entries page and open an individual entry.
- At the top of the entry view, select the Create Document option.
- Select a template to open the Manage Document Template dialog. From here, you have the ability to edit your document settings (such as logo alignment).
To further customize these templates, you can use our advanced document generation feature and directly edit the logo in Word.
While the direct link to a form is technically a public link, the form itself will not be public as long you do not share that link.
Additionally, we do offer a few options to help you secure your forms.
-
Require authentication on your form. Once enabled, this feature requires users to log in with their Cognito Forms account to access the form. Learn more about creating authenticated forms.
-
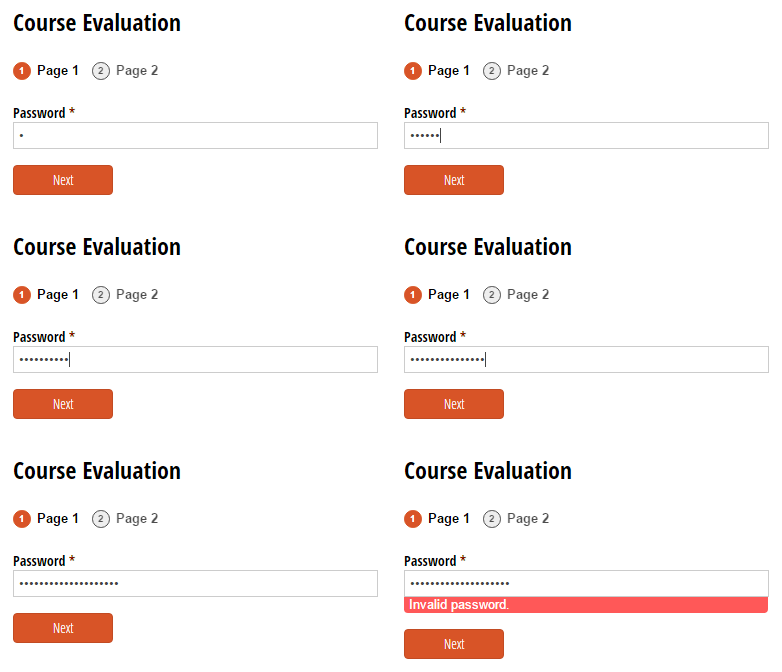
Set up an access code to ensure that only the right people fill out your form. To password-protect your form:
- Enable Data Encryption in your field settings.
- Add a Textbox field set to the Password type at the top of your form and set the field to required.
- Find the Custom Error option at the bottom of the Textbox field settings, and select When. In the conditional logic builder, set an error message to display when a user doesn’t type in the correct password (e.g. “Cognito”).
- In the second box, write a custom error message (“Invalid password.”).
- Add a Page Break below your password field to effectively hide the rest of the form. When a user doesn’t enter the correct password on the first page, they won’t be able to continue on through the rest of the form.

-
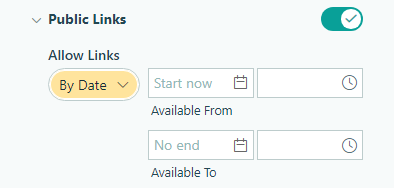
Disable Public Links in your form’s Workflow menu to keep the public link unavailable to all users. Don’t forget to adjust the ‘Not Available Message’ for users who try to open the form when it’s unavailable. Keep in mind that the authentication settings for public links also apply to both Save & Resume links and Form Views in the Public Role. Learn more about updating Public Links.

In your form settings, you can customize the portion of your form’s public URL that appears after https://www.cognitoforms.com/YourOrganization/. This means you can change the form name in the link to something shorter or more relevant.
If you want your form link to use your own domain instead of the Cognito Forms domain, we recommend embedding the form on your website. Check out our embedding guides for popular website building platforms like Wix, Weebly and Squarespace.
After you’ve finished building your form, click the Publish tab to access the form styles. Here, you can upload your company logo, change fonts, and modify the color of the text, buttons, and backgrounds.
You can also use your site’s CSS to determine the look of your form and provide a seamless integration with your website.
There are a few different reasons why your form might not be displaying properly:
-
Your form has availability dates set. In the form builder, you’ll find the form availability settings in the Workflow menu. Under Public Links, you can specify the dates during which your form will be available to view and complete. Learn more about form availability settings.

-
Your browser is not compatible. Check out our FAQ to see which browsers we support.
-
Your form violates our terms of service. If you receive a security alert message when you try to publish your form, then your form has been flagged for possible fraudulent activities. To resolve this issue, refer to our terms of service to determine where a violation may have occurred. If you cannot figure out the issue, submit a help request and our support team will be happy to assist you.
-
Your website is causing the form not to load. When embedding a form onto your website, some type of coding interaction or conflict between your form and your site may prevent the form from loading properly on the page. When you encounter a problem trying to embed your form, try using the Iframe option from the Publish Code section rather than the Seamless option. If you are still experiencing difficulties with the Iframe option, please submit a help request so our support team can pinpoint your individual issue.
-
Your form is hidden when the page loads. Cognito Forms measures form widths on page load to determine if a form is small, medium, or large. However, if your form doesn’t show when the page first loads (e.g. it’s in an inactive tab and is only shown if activated with JavaScript later), you may need to run this JavaScript immediately after the form is shown:
Cognito.resize();Otherwise, the form may be measured later and change sizes at an unexpected time. -
Your email address is not verified. When you sign up for Cognito Forms, you must verify your email address before you can publish forms, create entries, send emails, or create new organizations. Simply open the verification email in your inbox and select ‘Confirm Email’ to verify your account. If you are unable to find the verification email, click the ‘Resend Email’ link on your forms homepage or check your spam folder. If you are still having trouble completing the verification process, contact our support team.
In Cognito Forms, you can manually replace the text that appears in fields, error messages, and other areas of your form. Many text changes can be done very quickly using the visual builder. For example, you can set custom error messages, or write your own placeholder text for most field types.
Of course, you may still want to change individual words or use a language that’s not on our list. You can do that manually on your embedded form – learn how to override text on the Seamless and Iframe embed codes.
To see a full list of of possible field types and text that you can override, visit our Text Overrides guide.
Whether accessed via the public link or embedded on a website, Cognito Forms are fully responsive and scale to fit any device.
However, if your website is not responsive, your embedded form will not be responsive either. This may result in a webpage and form that is not optimized for viewing on mobile devices. In this case, we would recommend one of two options:
- Include your form’s public link on your webpage rather than embedding the form directly.
- Make your website responsive. Here are a couple of guides that will help you get started:
To align your logo on your form:
- Go to the Publish page and select Header Styles from the top menu.
- Upload your logo and change the logo alignment (Left, Center, or Right).
- Make sure to save your changes.
To center your embedded form on your webpage, start by copying either your form’s Iframe or Seamless embed code from the Publish page in your builder.
- Iframe: Underneath the embed code, add a short script block that allows you to pass through your own CSS. This CSS snippet will center your form on your webpage:
<script>
Cognito.setCss('.c-forms-form { margin: 0 auto; }');
</script>
- Seamless: Paste your embed code into your website’s HTML. Then, insert the following code into your style sheet, or within a style block on the page. This CSS snippet will center your form on your webpage:
.cognito .c-forms-form{margin:0 auto;}
Learn more about customizing form styles using Advanced CSS.
To hide your form’s title and logo when embedding it on your website:
- In the sidebar, hover over the form you want to update and select Publish Form.
- Select Header Styles in the top menu.
- Click the Hide header when embedded? option.
- Make sure to save your changes.
Yes! You can add images and logos to nearly any section of your forms.
- Choice fields: Select Show Images in the Choice field settings to upload an image for each choice option.
- Content fields: If you have images hosted on another server, you can use a Content field to insert that image into your form. Or, you can simply upload the file and host it directly on Cognito Forms.
- Form header: On the Publish page, you can upload your organization’s logo to the top of the form.
- Background: On the Publish page, you can upload an image as your form’s page background.
- Help text: Insert visual resources into Help Text to enhance your user experience.
- Notification emails: Add your company logo or other images directly into the content of your notification emails.
To remove the Cognito Forms branding from your forms, simply upgrade your organization to a Pro, Team or Enterprise plan. The “Powered by Cognito Forms” branding will immediately disappear from all forms associated with that organization.
Please note that if you’re on a free trial of a paid plan, the branding will remain until your trial period has ended.