In Cognito Forms, you can assign numeric values to Choice field options to build quizzes and tally totals.
Let’s say you have a form that screens prospective tenants for your rental property. Based on how applicants answer, you want to tally a final score that indicates whether they meet your quality standards or not. For example, an applicant may earn one point for answering “Yes” to owning a home but receive zero points for being a smoker. After they submit their application, you can use the final score to quickly evaluate how they fared on their reference check, as well as easily compare the prospective tenants.
To create your point system:
-
Add a Choice field for each question.
-
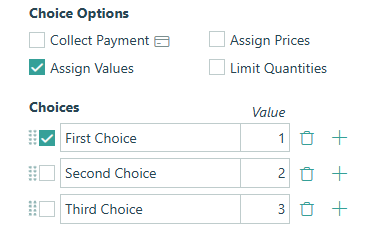
Select each Choice field and find the Assign Values option in the field settings.
-
Adjust the point values to any numeric value, assigning different values for different options.
-
Add a Calculation - Number field to your form labeled Score. Make sure to set the Score field to only appear internally. Use the following expression to add up all your choice field values:
=HowIsYourCredit_Value + HaveYouEverOwnedAHome_Value + DoYouSmoke_Value + HaveYouEverBeenConvictedOfOrPledGuiltyOrNoContestToAFelonyOrMisdemeanor_Value + HaveYouEverBrokenARentalAgreementOrLease_Value
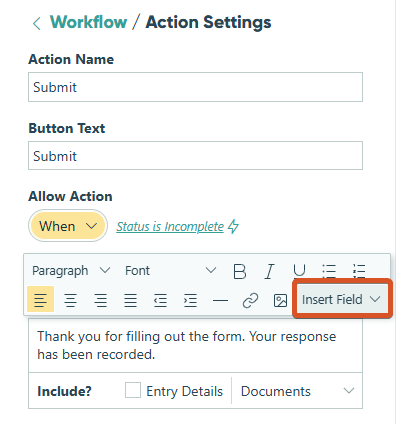
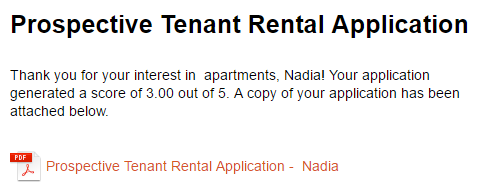
With the ability to insert fields into the form confirmation message, you can let users know their score as soon as they finish their application:
On the Entries page, easily view your submitted entries with their respective scores. Or, use the advanced search option to search and filter through entries depending on their score.
It’s important to let your customers know exactly when your business operates – but rather than just telling them, why not actually enforce your business hours through your form? Using some simple calculations and a bit of conditional logic, you can make your form available (or unavailable) at any time of day.
1. Hide your form on certain days and hours
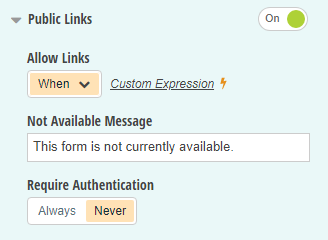
Under your form’s Workflow menu, find the Public Links option and set Allow Links to When. Now, using the calculation editor, you can set the rules that determine when the form should be available.
Let’s say that your business operates from Monday through Friday. Use the following expression to limit the form availability based on the day of the week:
=(DateTime.Today.DayOfWeek = "Monday") or
(DateTime.Today.DayOfWeek = "Tuesday") or
(DateTime.Today.DayOfWeek = "Wednesday") or
(DateTime.Today.DayOfWeek = "Thursday") or
(DateTime.Today.DayOfWeek = "Friday")
Next, let’s say that your hours of operation are from 8:00AM to 5:00PM. In this case, you can use the DateTime.Now property to ensure that users can only access the form within that time range (using UTC/GMT):
=(DateTime.Now < DateTime.Today.AddHours(17).AddMinutes(0)) and (DateTime.Now > DateTime.Today.AddHours(8).AddMinutes(0)) and
(DateTime.Today.DayOfWeek = "Monday") or
(DateTime.Today.DayOfWeek = "Tuesday") or
(DateTime.Today.DayOfWeek = "Wednesday") or
(DateTime.Today.DayOfWeek = "Thursday") or
(DateTime.Today.DayOfWeek = "Friday")
If your business hours are different depending on the day, you can combine the DateTime.Now and DateTime.Today properties to change the hours of operation based on the day of the week:
=(DateTime.Today.DayOfWeek = "Monday") and (DateTime.Now < DateTime.Today.AddHours(17).AddMinutes(0)) and (DateTime.Now > DateTime.Today.AddHours(8).AddMinutes(0)) or (DateTime.Today.DayOfWeek = "Tuesday") and (DateTime.Now < DateTime.Today.AddHours(17).AddMinutes(0)) and (DateTime.Now > DateTime.Today.AddHours(8).AddMinutes(0)) or (DateTime.Today.DayOfWeek = "Wednesday") and (DateTime.Now < DateTime.Today.AddHours(17).AddMinutes(0)) and (DateTime.Now > DateTime.Today.AddHours(8).AddMinutes(0)) or (DateTime.Today.DayOfWeek = "Thursday") and (DateTime.Now < DateTime.Today.AddHours(17).AddMinutes(0)) and (DateTime.Now > DateTime.Today.AddHours(8).AddMinutes(0)) or (DateTime.Today.DayOfWeek = "Friday") and (DateTime.Now < DateTime.Today.AddHours(17).AddMinutes(0)) and (DateTime.Now > DateTime.Today.AddHours(8).AddMinutes(0))
Finally, don’t forget to include a custom message to display when the form is not available (ex: “This form is not currently available.”).
2. Limit selection based on time and day of week
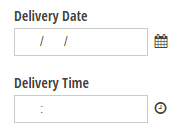
Rather than hiding your form, you may want to limit the dates/times that your users can select. Let’s say, for example, that your Pizzeria that only delivers between 9AM to 5PM during the week, 10PM to 3PM on Saturdays, and 12PM to 3PM on Sundays. In this case, you can take advantage of the Range function in your field settings to specify the days and hours that a user is allowed to select.
First, set the Range Minimum value for your Delivery Time field to the following:
=DeliveryDate.DayOfWeek = "Saturday" ? "10:00 AM" : DeliveryDate. DayOfWeek = "Sunday" ? "12:00 PM" : "9:00 AM"
This if/then statement is simply stating that if the date selected is a Saturday, then the earliest time available is 10:00AM, and if the date is a Sunday, then the earliest time available is 12:00PM. Otherwise, the earlier time available for every other day of the week is 9:00AM.
Then, set the Range Maximum value for your Delivery Time field to the following:
=DeliveryDate.DayOfWeek = "Saturday" ? "3:00 PM" : DeliveryDate.DayOfWeek = "Sunday" ? "3:00 PM" : "5:00 PM"
Now, when the user selects a time on Friday that’s outside of the available time frame, they’ll see an error message:

You can adjust these calculations to whatever your business’ operating times are, whether they’re different for every day of the week, or just for one day. There may also be certain days of the week when you don’t deliver at all; in this case, you can go to the Delivery Date field settings and find the Show Custom Error section. With the custom error option, you can specify which day(s) that you don’t deliver in the conditional logic builder, then write your own custom error message to display:
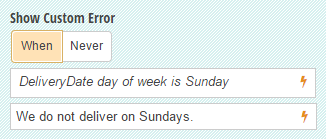
So, when the user selects a Sunday in the Delivery Date field, they won’t be able to continue until they change the date:

Learn more about the Custom Error option in our help topic.

To assign tasks to multiple users:
- Add a Person field to your form and choose Checkboxes as the type.
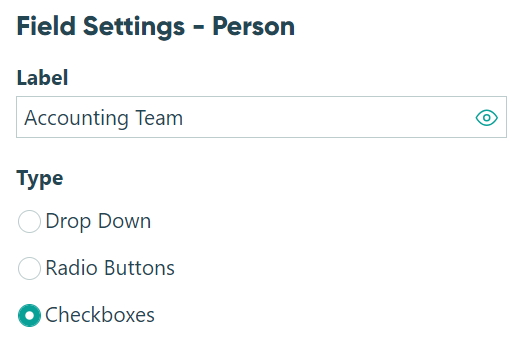
- Select the correct source form from the Look Up People From drop-down menu.

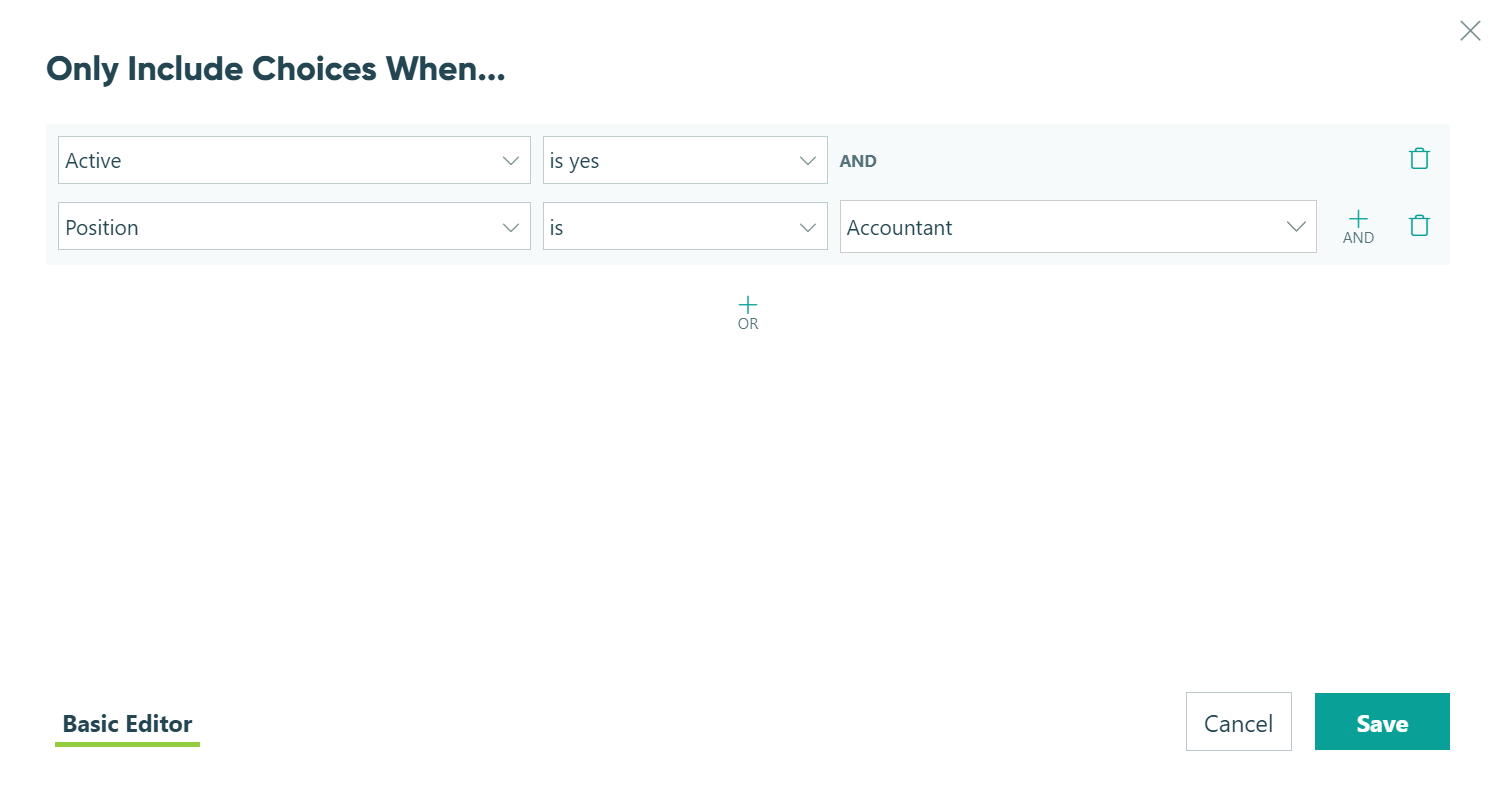
- Include the right people by setting appropriate conditions.
- Set the Person field to default to the right people.
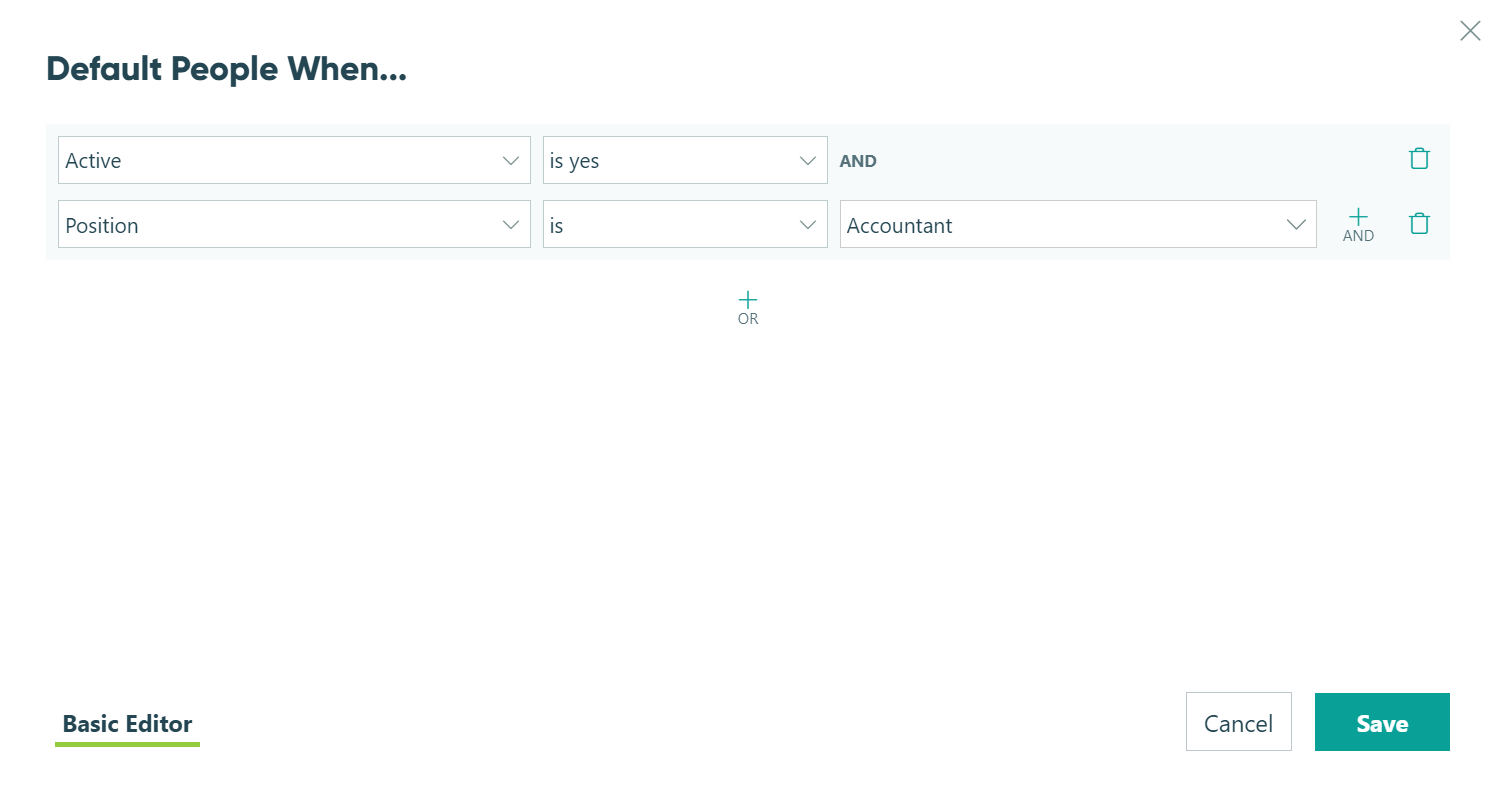
- Save your form.
- Go into the Workflow section and edit the role that you would like to assign multiple users to. In the drop-down menu under Share Specific Entries With, select the Person field you just created, then click Save.
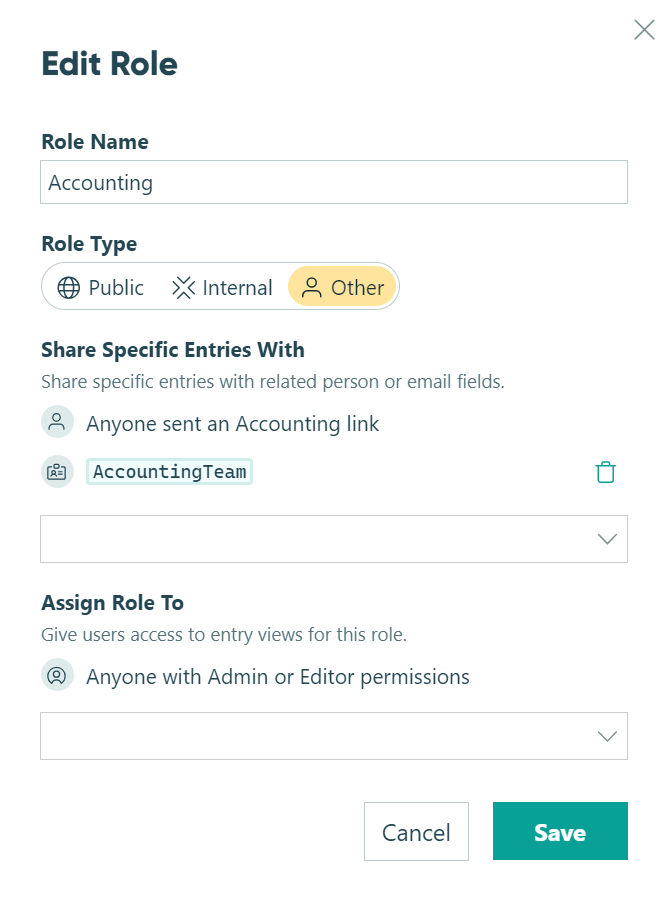
- Save your form, then go to your Entries.
- Create a new grid view, label it, turn ON Shared With Me, and turn ON Assign As Tasks.
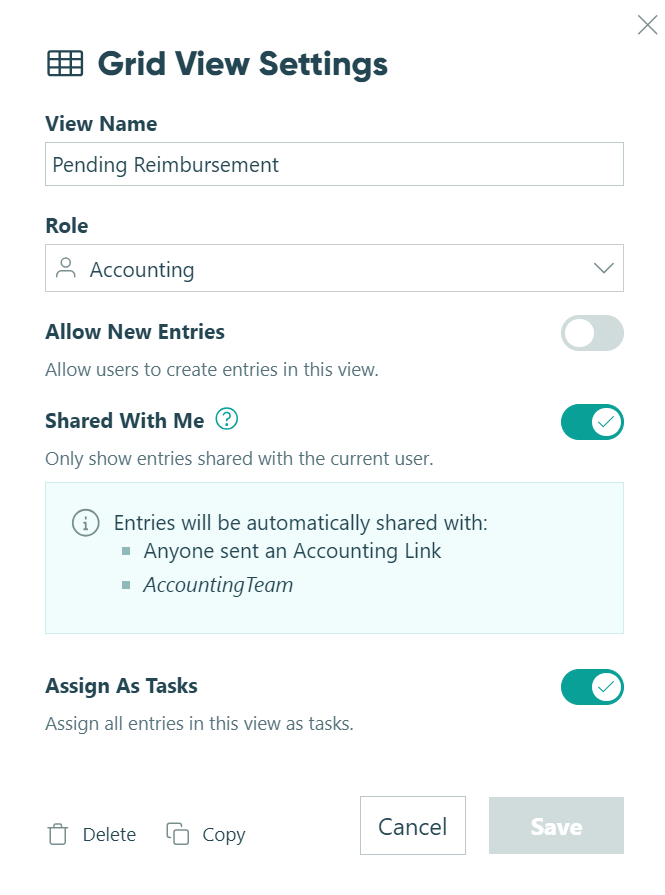
- Filter your grid view to include entries with the correct status, then hit Apply.
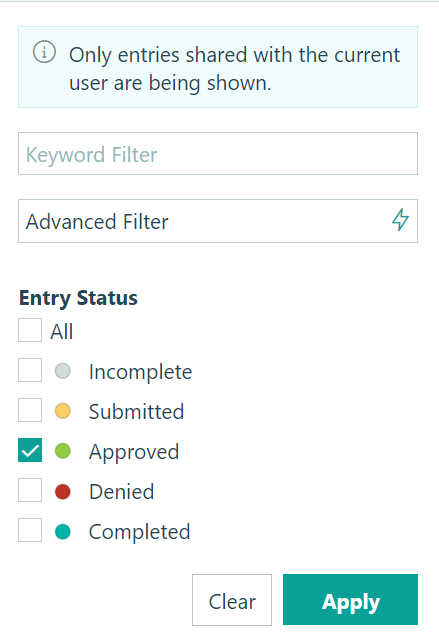
- Save your filter to this view.
Learn more about Workflow Tasks.
You can share workflow links with anyone via email; however, workflow participants must log in to your Cognito Forms organization to view and complete tasks. If you’ve enabled Guest Access, you can also assign tasks to guest users, who log in through your organization’s guest portal.
Learn more about Workflow Tasks.
Of course! Our Workflow features allow you to automate an endless variety of processes, including basic approval workflow, parallel approval workflow, parallel task workflow, serial task workflow, negotiation workflow, and more.
On your form’s Build page, open the Workflow menu to assemble your workflow using a combination of custom actions, statuses, and roles. Not sure where to start? Use one of our pre-built templates (like the Expense Report Form) and customize it to fit your needs.
Learn more about creating automated workflows or get in touch with our support team if you have any questions.
You can determine when your form is available using the Limit Form Availability settings in the Workflow menu.
To update your form’s availability dates:
-
In the sidebar, hover over the form name and select Build Form.
-
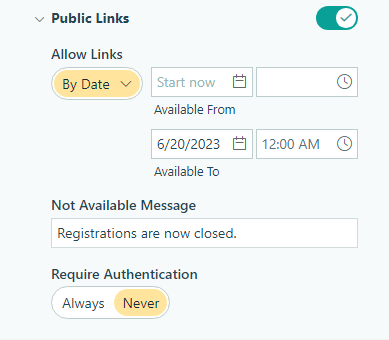
Open the Workflow menu and select Public Links.
-
Under Allow Links – By Date, update the Available From and/or Available To dates and times. Or, select Allow Links – Always to make public links available at all times.
-
Save your changes.
Learn more about managing public links in our help guide.
Yes – Cognito Forms supports automated reminder emails for Workflow Tasks. You can set up reminders in your Task view settings and schedule them to be sent before, on, or after a task’s due date. This helps keep workflows on track by automatically notifying assigned users when their task is due or overdue.
To create an automated reminder email:
- Go to your form’s Entries page and open the Task view settings.
- Set a Due Date for the tasks.
- Check the Send Reminders option, customize the reminder notification, and schedule when it should be sent.
- Click Save to apply your changes.
Note: Reminder emails are only available for Workflow Tasks. If you need to send a one-off notification for an entry outside of a task workflow, you can manually send an email notification from the Entries page.
To manually send an email notification:
- Go to your form’s Entries page.
- Open an individual entry and select Email at the top.
- Choose an existing email notification template and edit it if needed.
- Click Send.
For more details on setting up Workflow Tasks and reminders, visit our guide on automated reminder emails.
Yes! The easiest way to hide a Submit action button on your form is to never allow the action to be performed. To do this:
-
Go to your form’s Build page and open the Workflow menu.
-
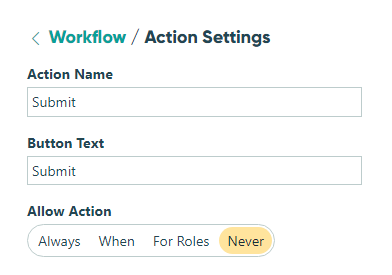
Open the Action Settings for your Submit action.
-
Under Allow Action, select Never.
-
Make sure to save your changes.
Now the Submit action will never appear on your form, however you can change this setting at any time.
You also have the option to allow a Submit action to be performed only by certain roles, or even allow it under certain conditions. Click “For Roles” beneath Allow Action to assign one or mole roles the ability to perform this action. Or, select “When” to apply conditional logic for when the Submit action should become available.
Yes! You can trigger an email that acts as a submission confirmation from an existing Submit action on your form:
- Click Workflow in the form builder and open the Action Settings for your Submit action.
- Under Send Emails, add and build your confirmation email. In the To field, use the Insert Field option to select the Email field that collects your form user’s email.
- Under Include, check the box next to Entry Details. This will include a copy of the form user’s entry details in the body of the email.
- Make sure to save your changes.
-
Click on the email notification from the Action Settings for the form action that triggers the email.
-
Specify who’s receiving the email, the subject of the email, and optionally include a custom message.
-
Under Send, select “When” to open the conditional logic builder.
-
Specify the criteria that should trigger the email to send.

-
Make sure to save your changes.
With the help of some conditional logic, you can redirect people to a different web page depending on the information they submit.
To use conditional confirmation pages:
- Add a Calculation field to your form and make sure to set the Show This Field settings to For Roles > Internal.
- Write an if/then statement as the expression for your Calculation field, e.g
= if ChoiceField = "Choice A" then "https://www.mywebsite.com/choice-a" else if ChoiceField = "Choice B" then "https://www.mywebsite.com/choice-b" else "" - In the Action Settings for your Submit action, select Redirect underneath Confirmation. Then click into the URL field to insert your Calculation field using the Insert Field option.
Yes! You can create fields that only appear to administrators when previewing the form, viewing the form from the Publish page, or viewing/editing entries. To do this:
- In the form builder, select the field you wish to display internally.
- Under the Show this Field section in the left-hand field settings, choose the For Roles option and select Internal.
- Make sure to save your changes.
To view the IP address of the person submitting your form:
- Add a Calculation field to your form.
- Set the calculation to:
=Entry.Origin.IpAddress - Set Show This Field to For Roles and select Internal.
Learn more about limiting the number of submissions per unique IP address.
Organizations on the Pro, Team, and Enterprise plans can add Table fields to their forms. Similar to repeating sections, a Table field is a grid that repeats and expands as needed.
To add a predefined (or preset/static) table to your form:
-
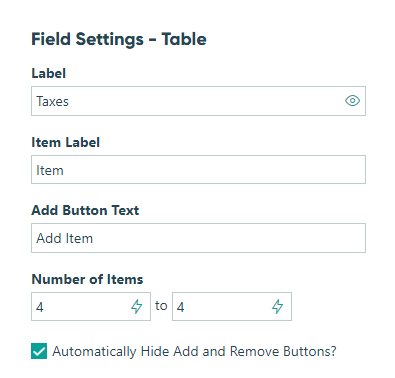
Add a Table field to your form. In the Table field settings, set the minimum and maximum range for the Number of Items to your desired number of rows (ex: 4).
-
Check the Automatically Hide Add and Remove Buttons? option.
-
Make sure to save your changes.
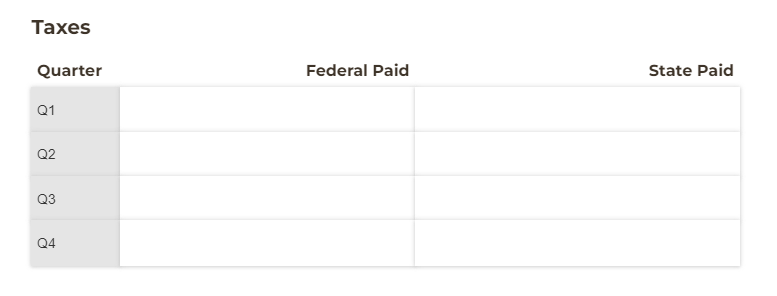
In some cases, you may want to set specific values for each row. For example, let’s say you have a field in your table labelled “Quarter” and you want each row to display a different value (Ex: Q1 in the first row, Q2 in the second row, etc.):
-
For the Default Value option in the field settings, use an if/then statement to display a value depending on the item number. Ex:
= if ItemNumber = 1 then "Q1" else if ItemNumber = 2 then "Q2" else if ItemNumber = 3 then "Q3" else if ItemNumber = 4 then "Q4" else null -
Make sure to set the Read-Only option to Never.

-
Save your changes.
Now, the first column of the table will display a static value based on the row number:
Yes! You can use the Lookup field to filter choice options based on quantity limits, dates or other custom criteria. In this case, you’ll need two forms: 1) a source form that contains your choice options and quantity limits, and 2) an order form with a Lookup field that filters the available choice options.
To hide unavailable choice options using the Lookup field:
-
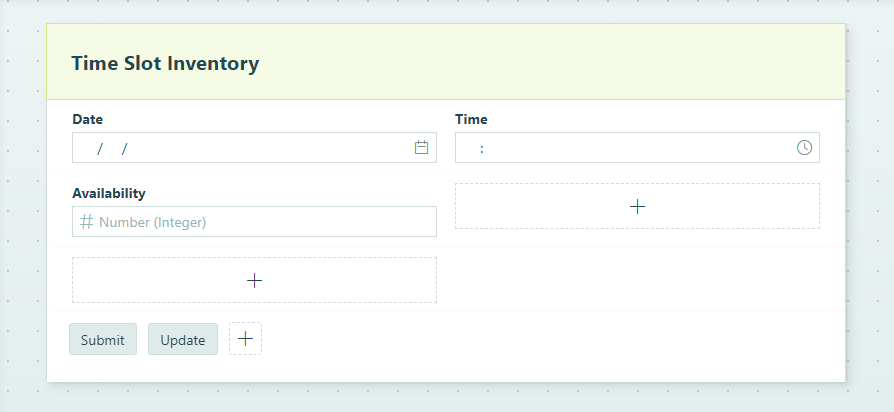
Create a source form and populate it with your choice options. In this example, we’re listing time slots available based on date and time. This form includes a Date field, a Time field, and a Number field for the quantity available of each time slot.
-
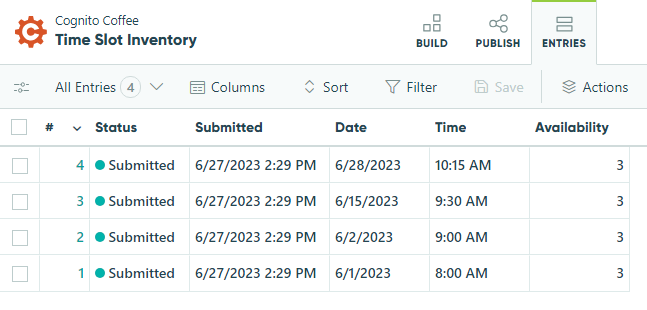
Populate the form entries with dates, times and available quantities. You can populate these values manually by creating new entries on the Entries page or directly from the form. You can also import entry data into the form via an Excel spreadsheet.
-
Create the form that allows people to sign up for time slots. Add a Lookup field and look up choices from the Time Slot Inventory form. Then, set the Include option to only include entries where the number of available slots is greater than zero. Optionally, include a Number field on the form (ex: ‘Number of People’) to allow more than one person to book a single time slot.

-
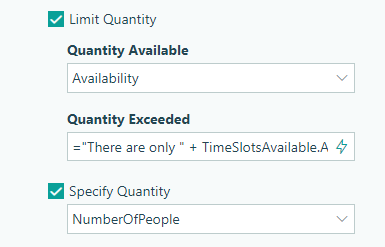
Select the Specify Quantity option and set the Quantity Available to the Availability field on the source form. Make sure to include an error message as well (ex:
="There are only " + TimeSlotsAvailable.Availability + " slots available."). This message will appear if someone attempts to sign up for more slots than are available. Optionally, if you’re allowing more than one person to sign up at a time, set the Specify Quantity option to the ‘Number of People’ field.
-
Make sure to save your changes.
Now, you can test out your workflow. For this example, we can submit an entry to claim all of the available time slots for 6/1/2023.

Once we submit our entry, the Lookup field will automatically filter out the unavailable time slot. If someone attempts to sign up a number of slots that exceeds the quantity available, your custom error message will appear.

Learn more about filtering choice options using the Lookup field.
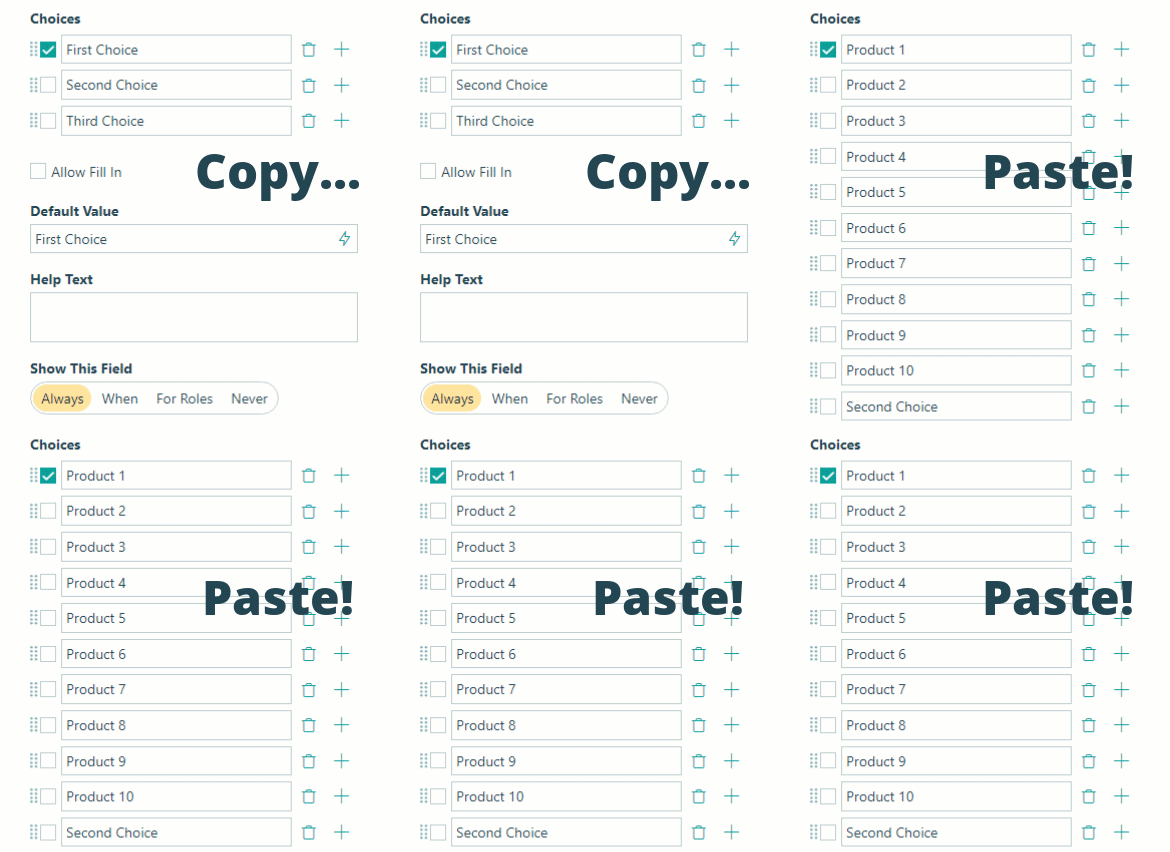
Yes! To import choice options, prices and values, simply select the first line of the choice label textbox and paste your list from Excel or another text editor. Choices, prices and values must be tab delimited (automatic when pasting from Excel) and separated by line breaks between choices.
Each line item will populate down the list, eliminating the need to manually copy every item from long lists.
Cognito Forms is a subscription-based service that hosts all forms and collected data securely on the Microsoft Azure cloud platform. It is PCI (DSS) Level 1 and HIPAA compliant.
While we do not offer the option to host forms on your own web server, you can embed your form directly into your website and send form data to other applications using various integrations.
Learn more about our hosting provider and our data security practices.
If your Choice field is set to the Radio Buttons type, you cannot deselect (or clear) the field once you’ve selected an option. However, you can deselect choice options if the field is set to the Dropdown or Checkboxes types.
To allow Choice field options to be deselected:
- Copy the existing Choice field and change the field type to the Dropdown or Checkboxes type.
- Set the original Choice field to Internal view only. You can also delete the field entirely, which will subsequently delete any data that you’ve already collected on this field.
- Make sure to save your changes.
Cognito Forms does not currently support the ability to copy sections (or groups of fields) between forms, or merge two forms together. Alternatively, we recommend making a copy of your form and then removing or adding fields as necessary.
While Cognito Forms does not currently offer the ability to automatically adjust or reset quantity limits, you can manually reset a quantity limit using one of the following options:
- Update the existing quantity limit to account for previous entries. For example, if your field has a quantity limit of 10 and 2 entries have been submitted, you must update the limit to 12 (not 10) to take the previous entries into account. You can use an expression such as
=FieldName_QuantityUsedin a calculation on your form to see the number of quantities used on a specific field. - Create a new field to reset the quantity limits. You can simply copy the existing field to create a new field with new quantity limits. Please note that if you delete the old field, the associated entry data will be deleted as well. To maintain the existing data, you can set the Show This Field option in the field settings to Never.
You can share your form as a QR code from the Publish page under the Share a QR code tab. This QR code links to your form’s public URL and can be copied to your clipboard or downloaded as a PNG or SVG file for easy sharing.
If your form is embedded on your website, you can use any third-party QR code generator to create a QR code that links directly to the embedded form.
Cognito Forms does not currently support generating a QR code to display directly on the form itself. However, if you want to display a QR code on the page around your embedded form, you can use an external JavaScript library (see example) to generate and place a QR code anywhere on your site.
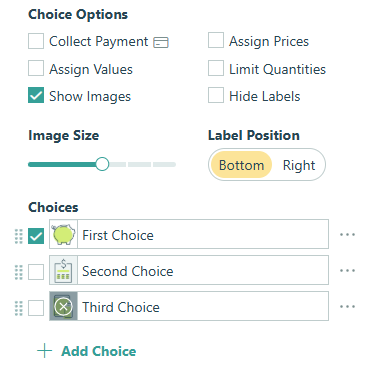
Yes! To add images to your choices:
- Select the Choice field on the Build page to open the field settings.
- Under Choice Options, select Show Images.
- Click the image icon next to each choice or drag and drop an image onto the choice option. You can also adjust the image size and optionally hide choice labels.
Learn more about using Choice fields.
Templates that use Lookup fields are a bit different from standard templates. They include additional, connected forms that supply entry data to populate dropdown menus on the template.
This extra level of connectivity enables you to work more efficiently. You can reference the same data from multiple forms, eliminating the need to update rapidly changing data in multiple places (such as when teachers change courses from one semester to the next, or store locations open and move.)
How to use these templates:
- Choose the template you want to use and select Use This Template. (The template will open in the Cognito Forms builder for you to customize.)
- Click Save Connected Forms in the pop-up dialog (You can choose to save the sample entries already entered in your connected forms or not. These entries are placeholders and only exist to demo the Lookup Fields.)
- Save your new form template and connected forms. (You can rename the forms at this time - before entering your source information.)
- Preview your new form to make sure the Lookup fields are working.
- Enter your data (or replace the sample entry data) in the connected forms by creating new entries.
- Return to the main form and preview it again. You should see your entry data appearing in the appropriate Lookup field dropdowns on the form.
- From here, you can continue customizing your template as you would any other. Add your own branding, create additional automation, and build out your form like you would any other.
Yes! You can easily copy forms and entries both within your organization and across different organizations.
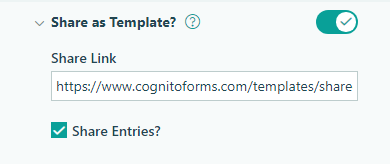
Yes! When two or more forms are connected via the Lookup field or the Person field, you can share those forms together as a bundle. On the Build page, go to Settings and select the Share As Template? option. Here, you can find the Share Link for your form. You can also check Share Entries? to include the associated entry data (such as a product inventory or list of store locations) along with your shared form.
Learn more about creating data lookups and sharing forms as templates.
We do not currently offer the ability to embed videos directly onto your forms.
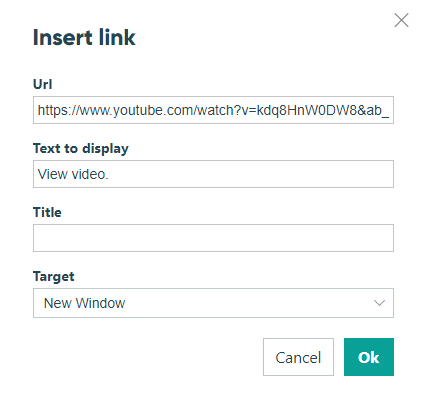
Alternatively, you can use a Content field on your form to add links to other websites (like YouTube). Simply add a Content field to your form, and select the Insert/edit link option from the formatting toolbar. In the dialog that appears, you can include your video link, display text, and choose whether the video will appear in the current window or a new window.
If you no longer need a form, you have two options: archive or delete. Archiving moves the form to the Archived folder, allowing you to restore it anytime. Deleting, however, permanently removes the form and all its associated entries.
-
To delete a single form, hover over the form name in the sidebar and then right-click or select the ellipsis (…) and select Delete Form.
-
To delete multiple forms, find your organization’s name in the top left corner of the sidebar and select Settings. Click Usage in the left-hand navigation and then select the forms you want to delete from the list. Upon selecting this option, you’ll be prompted to type DELETE and confirm the deletion of your forms and all associated entries.
Yes! Using our Lookup field and Quantity Limit features, you can create product inventory and limit quantities for specific items.
To create and manage a limited product inventory:
- Create an inventory form and populate the form entries with product details using fields like Product Name, Price, Size, Available Quantity, etc.
- Create a sales form and add a Lookup field. In the Lookup field settings, find the Lookup Choices From option and select the Inventory form.
- Next, find the Limit Quantity option. Set the Quantity Available value to the Starting Quantity field from your inventory. Make sure to include a message to display when the quantity is exceeded (ex: “Out of stock!”).
- After setting the quantity available, the Lookup field Choice Description will automatically display the total quantity remaining next to the product name:

If the quantity for a product has been exceeded, an error message will display to let the customer know the item is no longer available.
Learn more about managing limited inventories and setting up quantity limits on your forms.
While you cannot directly pull repeating section or table data through the Lookup field, you can use a simple calculation on your form to pull the data through instead.
To lookup repeating data:
- Add a Lookup field to your form and select the form that you want to pull the data from.
- Add a Calculation field. For your expression, use the names of your Lookup field and repeating section/table, followed by the .Select function and the name of the field inside the repeating section/table that you want to reference:
=Lookup.RepeatingSection.Select(Name) - Now, your Calculation field will display every name entered into the repeating section on the other form.
Learn more about referencing repeating data and creating data lookups.
When someone shares a template with you, the link should open a page showing all templates that user has shared with you.
If the link you were sent takes you to the general templates page, or you don’t see the template you were expecting among the shared templates, it could be that settings were changed, or the form wasn’t saved before it was sent to you.
Check with the sender to make sure:
- The Share as Template option is enabled in the form settings.
- The form has been saved.
- The title of the form has not changed, which would invalidate the previous share link.
- The form has not been archived.
This will usually fix the problem. Simply have the sender correct the settings and/or save the form and resend it. If that doesn’t work, contact our support team.
To turn off (or ‘unpublish’) a form, try one of the following options:
-
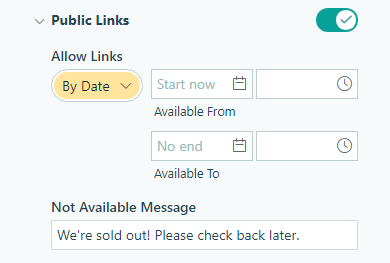
Disable public links. Turn off the Public Links option in your form’s Workflow menu and make sure to customize the ‘Not Available Message’ that users see if they visit your form once it is unavailable. Please note that public link availability settings do not affect Save and Resume links or Workflow links.

-
Change the form’s availability end date. Find the Public Links section in your form’s Workflow menu and set the ‘Available To’ date and time to any time in the past.
-
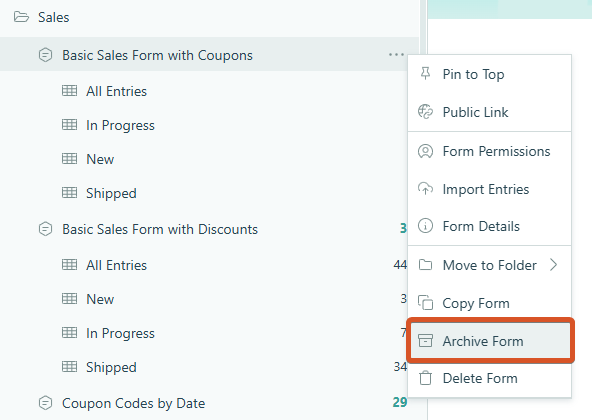
Archive the form. Hover over a form name and then right-click or select the ellipsis (…) to access the form menu. Select Archive Form to send the form to the Archived section. Archived forms can be restored at any time.
We do not currently offer the ability to sketch or draw over an image on your form. However, this is an option we are considering for a future release.
Alternatively, you can provide users a link from another application (Google Drive, Dropbox, etc.) to download the image. The user could draw over the image, and then upload the image back into the form using the File Upload field.
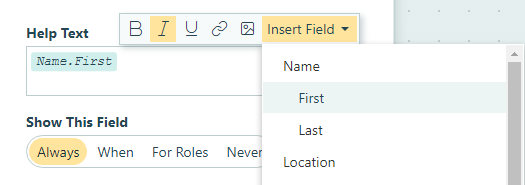
Yes! With Text piping (also referred to as “question piping”), you can take user input from one field and insert it elsewhere on the same form. For example, when a user enters their name, you can insert it directly into the help text of another field on the form to create a more personalized experience. To do this:
- Add a Name field to your form.
- Select the field that you want to personalize and find the Help Text section in the field settings.
- Use the Insert Field option to insert the Name field value into the message.
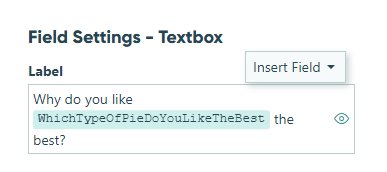
Yes! You can use our text piping feature to insert (or “pipe”) answers from a previous question into a later question on your form. For example, if you’re asking a customer about their favorite type of pie, you can insert their answer directly into the label of the next field on the form. To do this:
-
Add a Choice field to your form labelled ‘Which type of pie do you like the best?’
-
Add a follow-up Textbox field. In the field settings, use the Insert Field option to insert the answer from the previous Choice field into the field label, ex: ‘Why do you like [WhichTypeOfPieDoYouLikeTheBest] the best?’
-
Set the follow-up Textbox field to only appear after the previous Choice field is filled out, ex:
=(WhichTypeOfPieDoYouLikeTheBest != null) -
Now, when a customer selects their favorite pie, their answer will automatically populate the label of the next field:

To prevent users from selecting a date in the past:
-
Find the Range option in your Date field settings.
-
Set the minimum range to this expression:
=DateTime.Today

-
Make sure to save your changes.
When you collect integers via the Number field, the resulting value contains commas (or a different type of character depending on your form’s location settings). When you need to collect a number without commas (ex: a year), use a Textbox field instead:
- Add a Textbox field to your form.
- In the field settings, find the Format Validation option and select the Numeric option. This option requires users to enter only numbers.
- Optionally, select the Custom Mask option and enter your numeric value (ex: ####) as the Format Mask.
Our forms use what’s known as a “smart” captcha.
We have rules in place that automatically detect spam bots based on how the form is used. As long as your customers are humans, the captcha won’t appear and frustrate your users, and you’ll block any nasty spam entries.
We do not currently support the ability to create fillable PDFs from your forms. You can, however, create regular PDF files using our document generation feature and then manually convert the files to fillable PDFs once they’ve been created.
To create PDFs from your form entries:
- Open the Entries page.
- Find the entry that you want to export.
- Select the Create Document option to download the entry as a PDF.
Yes, this feature is available to organizations on our Pro, Team, and Enterprise plans.
To enable Save & Resume on your form:
- Open the Workflow menu on your form’s Build page.
- In the menu that appears on the left, click the Save & Resume option to enable the feature.
- Make sure to save your changes.
For more in-depth details, visit our tutorial on using Save & Resume.
It’s easy and intuitive, so feel free to jump right in.
Simply choose the types of fields you’d like to add to your form. Position them where you want them. Style them to make them match your brand. Then send them out into the world.
And if you want to add super powers to your form – things like calculations, automated behaviors, and conversational styling – you can do that too.
Check out our quick-start video to learn how to create your first form.
Browse our library of online tutorials.
Electronic signatures are considered legally binding for nearly every business or personal transaction in the United States and around the world.
The eSIGN act of 2000 established the legal basis for the use of electronic signatures in the United States as an alternative to paper signatures. In the United Kingdom, the equivalent legislation to the ESIGN Act was the Electronic Communications Act 2000.
When using Cognito Forms’ Signature fields to capture a signature, take the following additional steps to ensure full compliance with eSIGN:
- Inform the person filling out the form that the signature will be legally binding and provide a paper-based alternative if possible (the consent provision).
- Include a date next to the signature to show when the document was signed.
- Include a PDF copy of the signed form in the confirmation email sent to the customer/user (the retention provision).
- Additionally, send a PDF copy to yourself (or to a cloud service via Zapier) for your own records.
Following these simple steps ensures that you have notified your customers that the form submission will be legally binding, and have provided them with an electronic copy of the signed contract; thus fulfilling the basic requirements of the eSIGN act.
In Cognito Forms, you have the ability to upload images in multiple places on your forms. However, Google Drive currently prohibits the remote hosting of uploaded images. We would recommend using an alternative service to host the images that you want to display on your forms.
When you copy a form, the settings that get copied over will differ based on the location the form is copied to:
- When a form is copied within the same organization, all form settings will be copied verbatim.
- When a form is copied into a different organization (this includes forms that are shared as templates), most form settings will be copied over with some exceptions.
For a detailed explanation, visit our Copying Forms tutorial.
Cognito Forms performs very well in the latest version of most major browsers, enabling you to build and manage your own online forms and consistently display forms to users.
These browsers, however, are the ones we specifically support:
- Edge
- Firefox
- Chrome
- Safari
- Safari iOS
If you’re unable to see your form, first check your browser to make sure you are running the latest version. If you still can’t see your form after updating your browser, please contact our support team.
Yes! If your form has multiple pages and you want people to be able to review their answers before submitting, you can use a Content field to effectively create a summary page at the end of your form.
To create a review-answers page on a multi-page form:
-
Add a final page to your form called Review (or something similar).
-
On this page, insert a Content field. Content fields allow you to insert field data, so you can easily list out all of the user’s answers in a concise format.
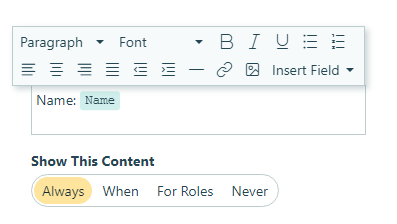
-
Underneath your Content field, add a Yes/No field set to required. This way, the person filling out the form must confirm that they’ve reviewed their answers before submitting their form.
You can split any form into multiple pages using a Page Break.
To add pages to your form:
-
Open the form builder.
-
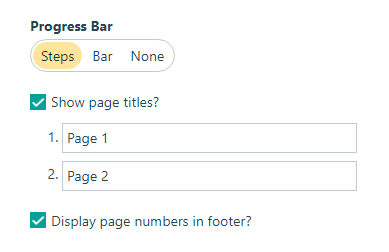
Insert a Page Break where you want to add a new page. From the Form settings section, you can edit page titles, display a progress bar, and display page numbers at the bottom of each page. Additionally, within the field settings, use the Show Next Page option to conditionally display the page based on conditions on the form.
-
Save your changes.
At the moment, we do not support offline usage of Cognito Forms. However, this is an option we are considering for a future release.