Show customers real-time availability and eliminate scheduling back-and-forth with a booking form that updates as spots fill.
Build Time & Skill
15-20 min
Beginner
What you'll learn
How to create a booking form that shows only available timeslots, prevents double-booking, and displays how many spots are left
Manual scheduling becomes a hassle when you’re constantly going back and forth with clients to find an available time, only to discover you’ve accidentally double-booked yourself. Customers get frustrated waiting for responses, and you spend time managing a process that should run itself.
With Cognito Forms, you can create a booking form that solves these problems automatically. Customers see only your truly available timeslots, the system prevents double-booking without any manual intervention, and you both get instant confirmation when an appointment is made.
This automated approach helps you:
- Eliminate double-booking. Once the last spot for a session is taken, it instantly becomes unavailable to everyone else.
- Create a professional booking experience. Customers see real-time availability, book instantly, and receive instant automated confirmation.
- Scale effortlessly. Whether you’re scheduling five appointments or 500 sessions, your form manages capacity itself.
Before You Start
Two features in Cognito Forms work together to create smart booking. Lookup Fields pull your available timeslots into the booking form, while Quantity Limits ensure each slot can only be booked up to its capacity. This combination creates a self-managing system where availability updates automatically as appointments fill.
| Lookup Fields | Quantity Limits |
|---|---|
| Lookup Fields pull data from another form's entries into a field on a different form. | Quantity Limits control how many times a specific value can be selected in a field. |
| This lets you manage all your timeslots in one place, then reference that data wherever you need it. | This prevents overbooking by setting a maximum number of times each timeslot can be selected. |
| Learn more about Lookup Fields → | Learn more about Quantity Limits → |
How to Set Up Your Booking Form & Timeslots
In the steps outlined below, we’ll show you how to build these two forms that work together:
- Availability Inventory Form: A behind-the-scenes form that stores all your available timeslots, including dates, times, and attendee limits.
- Booking Form: A customer-facing form that uses a Lookup field to pull available timeslots from your inventory, filters by selected date, hides full times, and enforces capacity limits. When customers book, availability is automatically updated on the form.
Step 1: Build your availability inventory
Your inventory form stores every timeslot you offer. This becomes like a mini database that automatically feeds your booking form with up-to-date availability.

- Create a new form and add:
- A Date field, and name it “Date.”
- A Date field of the Time type, and name it “Time.”
- A Number field named “Capacity.” This specifies how many people can book each individual timeslot.
Add any additional fields that would help customers filter through timeslots. A few ideas include:
- A Choice field for location, letting customers select sessions at their preferred office.
- A Person field for provider, letting patients book with their preferred therapist or consultant.
- A Choice field for service type, letting customers book different appointment types.

2. Add entries for each date’s timeslot you offer.
- Add entries individually using the Public Link of your form or from an entry view. You can also import an Excel or CSV file to add multiple timeslots at once, or use an integration to automate populating timeslots from your calendar.
- Update the “Capacity” Number field to match your needs. For example, if you’re scheduling a class with ten people, set “Capacity” to 10. If you’re a consultant who only sees one client at a time, set “Capacity” to 1. For a physical therapy clinic with three treatment rooms, each room’s timeslot would have a capacity of 1.
Step 2: Build the booking form
Now, you’ll create a booking form that pulls timeslots from the inventory form. Each timeslot will display as selectable options that automatically update as appointments fill.

- Create a new form and add fields for your customer’s details, such as Name, Email, Phone Numbers, etc.
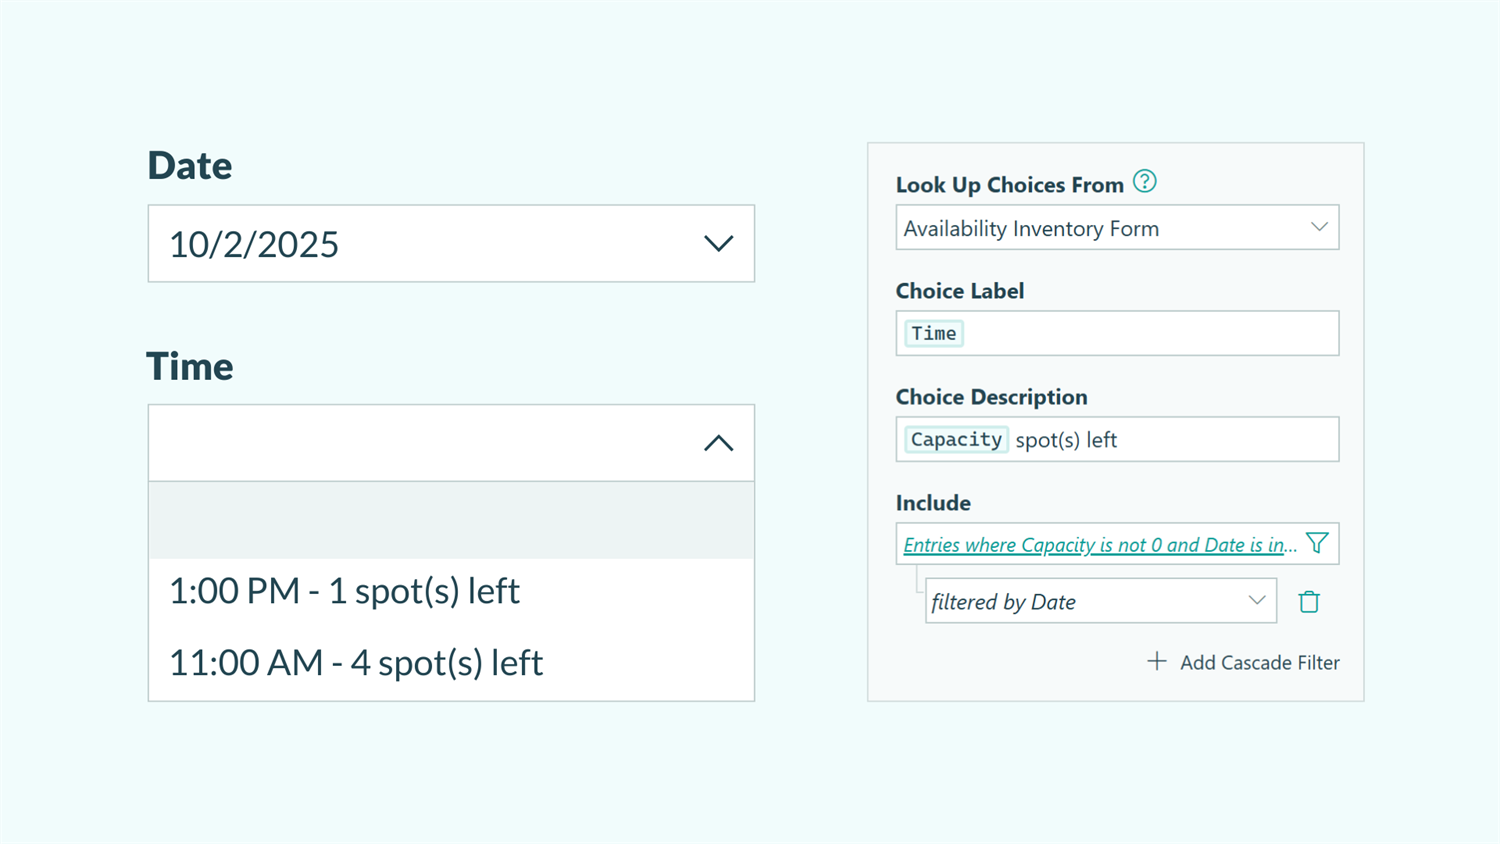
- Add a Lookup field and name the field (“Time” or “Appointment”).
- In the Lookup Choices From dropdown, select the “Availability Inventory” form you created earlier.
- For the Choice Label, use the Insert Field option to select the
Timefield. By doing this, you are designating your source form’s entry data for the “Time” field to appear as the choices for customers to select.
Step 3: Add filters to time choices
Next, add filtering to make booking easier for customers by showing only relevant timeslots based on the date they select.

- In the Lookup field settings, find the Include section.
- Click Add Cascade Filter and choose “Date.” This creates a two-step selection: first customers pick a date, then they see only times available on that specific date.
- Click the Include setting that says “All Entries.”
- Set the condition Only Include Choices When →
Capacity is not 0ANDDate is in the future. This hides timeslots that are full or already past today’s date.
Sort times chronologically for easier scanning:
- Find Sort By in the Lookup field settings.
- Select the “Time” field and then sort from Oldest to Newest.
This displays date and time options in order from earliest to latest.
Step 4: Prevent overbooking with Quantity Limits
Quantity limits ensure appointments can’t be double-booked by tracking how many spots remain for each timeslot.

- In the Lookup field settings, check Limit Quantity.
- For Quantity Available, select the “Capacity” field from your inventory form.
- For Quantity Exceeded, add an error message, such as: “This slot has been filled. Please select another time.”
Step 5: Set up automatic confirmation emails
Automatic confirmations keep customers informed and reduce no-shows by sending appointment details immediately after booking.

- Go to the “Submit” Action in the Workflow settings.
- Click + Add Email under Send Emails.
- Use the Insert Field option in the email to:
- Automatically configure the recipient to be the customer’s unique email address.
- Greet the customer by the name they typed into the Name field.
- Mention the customer’s selected appointment date and time in the email message.
Step 6: Test your new booking form
Testing ensures your booking form behaves correctly before customers use it. Before sharing your booking form with customers, open the Public Link and test it yourself by selecting different dates and testing different combinations. Be sure to:
- Check that the Lookup field filters the timeslots as expected.
- Book a test appointment and confirm the “Spot(s) left” count decreases for that timeslot.
- Verify that fully booked timeslots no longer appear.
- Check that confirmation emails send correctly with the right appointment details.
Smart Booking Forms In Action
Let’s look at how different businesses use booking forms to streamline scheduling across different industries and appointment types.
Classes and Workshops
A workshop with a capacity of 20 people per session displays remaining capacity next to each session (“15 spots left”) as sessions are booked. When a workshop fills, it automatically disappears from the dropdown, preventing overbooking.
Appointments with a specific provider
Patients select the type of care needed, then a provider in that specialty, and then times are filtered to show only that provider’s availability. Each provider has a limit of 1 patient per slot, preventing double-booking.
Room reservations
Members select a desired room, then see only that room’s available times. Cascade Filters allow filtering rooms by Location or equipment provided in the room. This ensures the room matches specific meeting requirements at the member’s preferred location.
Powerful Booking Form Customizations
These advanced features transform your basic booking form into a complete scheduling system that handles payments and rescheduling automatically. As your needs grow, you can expand this foundation with additional capabilities:
- Self-service rescheduling or cancellation. Include a Workflow Link in the confirmation email so customers can update or cancel their booking on their own.
- Collect payments for paid sessions. In the Lookup field settings, use Collect Payment and pull prices directly from your inventory form to charge for sessions when booking.
- Sync with your team’s calendar. Set up an integration to automatically create calendar events the moment someone books, eliminating manual entry.
Start Booking Smarter Today
You’ve built a professional booking form that manages availability automatically. No more double-bookings, no more scheduling emails, no more manual updates. Your customers see real-time availability and book instantly, while you gain hours every week to focus on delivering excellent service.
FAQ
The system immediately removes that timeslot from the booking form for everyone else. The timeslot becomes unavailable the moment the booking is submitted, preventing any possibility of double-booking.
Add Person fields for providers or Choice fields for locations to your Availability Inventory. Use Cascade Filters in your Booking Form so customers select location or provider first, then see only available times for their selection. This works for clinics with multiple therapists, consultants with office and virtual options, or businesses operating across different facilities.
Yes, include a Workflow Link in your confirmation email that lets customers access their booking entry. Then, make sure you have the following items set up according to your needs:
-
Configure field visibility so they can update their selected timeslot or cancel. Do this on each field or section’s Show This Field settings and/or Read-Only settings. Visit our user guides to learn more about showing and hiding fields or making fields Read-Only.
-
Use conditional logic in the Allow Action settings to restrict changes to specific time windows to protect your schedule. Select the desired Action from the form’s Workflow settings, find the Allow Action settings, and add your desired conditional logic.
- For example, if you don’t want customers to be able to use a “Cancel” Action when the appointment time is 24 hours or less away, set the logic to When >
AppointmentDate is not TomorrowANDAppointmentDate is in the future - Visit our User Guide on Workflow Actions to learn more.
- For example, if you don’t want customers to be able to use a “Cancel” Action when the appointment time is 24 hours or less away, set the logic to When >
Simply don’t add inventory entries for dates you’re unavailable, or delete existing entries for those dates. Alternatively, add an “Is Available?” Yes/No field to your Availability Inventory and set your Booking Form’s Include filter to only show entries where “Is Available?” equals “Yes.” This lets you temporarily block timeslots without deleting them.