Build one automated system that transforms service requests into branded invoices with integrated payment processing, eliminating manual invoice creation and reducing payment delays.
Build Time & Skill
60-90 min
Advanced
What you'll learn
How to create an end-to-end automated workflow that collects service requests, generates custom branded invoices, collects secure payments, and tracks everything in one place
Manually creating invoices drains hours from your week. You copy information from service requests into invoice templates, calculate totals in spreadsheets, chase customers for payment, and track everything across multiple disconnected systems. Every manual step introduces errors and delays payment. Clients wait days for invoices to arrive, and you’re left wondering who paid, who didn’t, and which invoices are overdue, all while tracking everything in scattered spreadsheets.
With Cognito Forms, you can automate the entire process from initial request to payment confirmation. This automated workflow helps you:
- Eliminate repetitive invoice creation. Generate professional invoices automatically from form data with your branding, pricing calculations, and service details (no copying and pasting).
- Get paid faster. Customers receive invoices immediately with a secure payment link, reducing the time between delivering services and collecting payment.
- Reduce payment friction. Customers pay securely online through Stripe, PayPal, or Square, with no checks to deposit or manual payment processing.
- Track everything in one place. See which requests need invoicing, which invoices are outstanding, and which payments have been received, all from one centralized view.
Understanding the Workflow Components
Five core features work together to create this automated system. Each handles a specific part of the process, and when combined, they transform a manual workflow into an efficient automation:
| Feature | What It Is | What It Does In This Workflow |
|---|---|---|
| Calculations | Automatically compute totals, multiply quantities by rates, and sum line items without manual entry | Use our calculation syntax to build pricing formulas that update instantly as staff add services |
| Custom Document Templates | Generate a branded invoice created using your form’s data | Generates branded invoices with your logo, formatting, and all transaction details |
| Payment Collection | Securely processes credit card payments through integrated processors | Connect your existing Stripe, PayPal, or Square account to collect payments directly through the form |
| Workflow Automation | Routes entries through your process automatically | As entries move from “Submitted” to “Invoice Sent” to “Paid,” the system triggers the right actions and notifications at the right time |
| Entry Views | Filtered, organized lists of your form submissions | Displays payment status in one place without spreadsheets |
Step-by-Step: Building Your Automated Payment Workflow
Follow these steps to build a system where service requests automatically become invoices, invoices become payments, and every step is tracked without manual intervention.
It often feels natural to add fields to the form before setting up the Workflow. However, to ensure seamless build process for the form, the steps will have you add Workflow items first. If you would prefer to set up your form’s fields first, follow the steps in this order:
- Complete steps 4 and 5, but skip the conditional logic mentioned.
- Complete steps 1-3.
- Go back and add the conditional logic outlined in steps 4 and 5.
- Finish up with steps 6-8.
Step 1: Configure Workflow Statuses and Roles
For the purpose of this guide, you will set up Workflow Statuses and Roles first. These will determine the path that entries follow from initial request through final payment, and define what each person can see and do at each stage.
Create workflow statuses
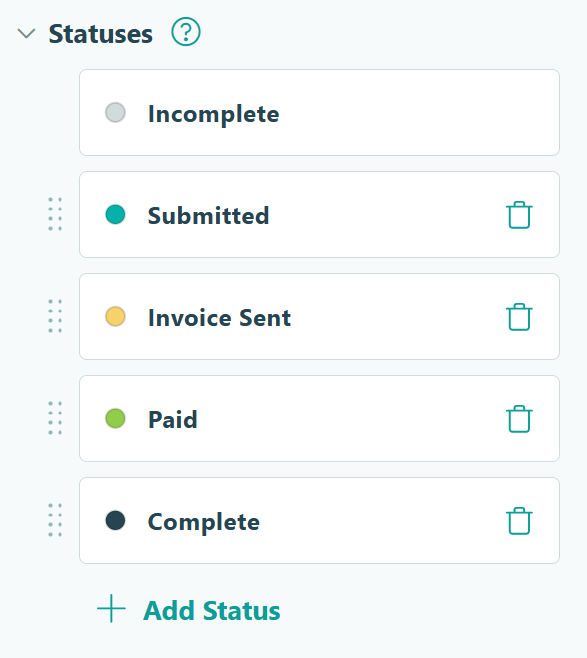
Statuses represent where an entry is in your process. Each entry moves through these stages: Incomplete → Submitted → Invoice Sent → Paid → Complete
To set this up:
- Go to Workflow and click Statuses
- Your form starts with “Incomplete” and “Submitted.” Keep these.
- Add these additional statuses:
- Invoice Sent: For when staff have generated and the invoice has been sent
- Paid: After the customer has made their payment
- Complete: Once service has been delivered and the transaction is closed
Configure workflow roles
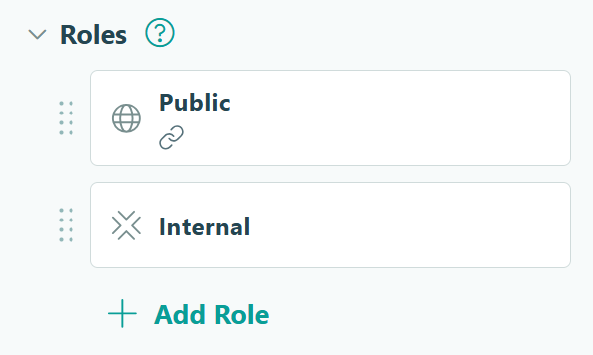
Roles control what different people can see and do throughout the Workflow.
To set this up:
- In Workflow, click Roles
- You’ll see two default Roles:
- Public: Represents the customer who submits the request
- Internal: Represents your staff who manage invoices
For this Workflow, we want the Public role to submit requests and pay invoices, while the Internal role can view all entries, add pricing, generate invoices, and mark work complete.
Step 2: Set up all Workflow Actions
Actions are buttons that move entries through your workflow. Configure the actions customers and staff use to advance entries through each stage.
Check the “Submit” Action (already configured)
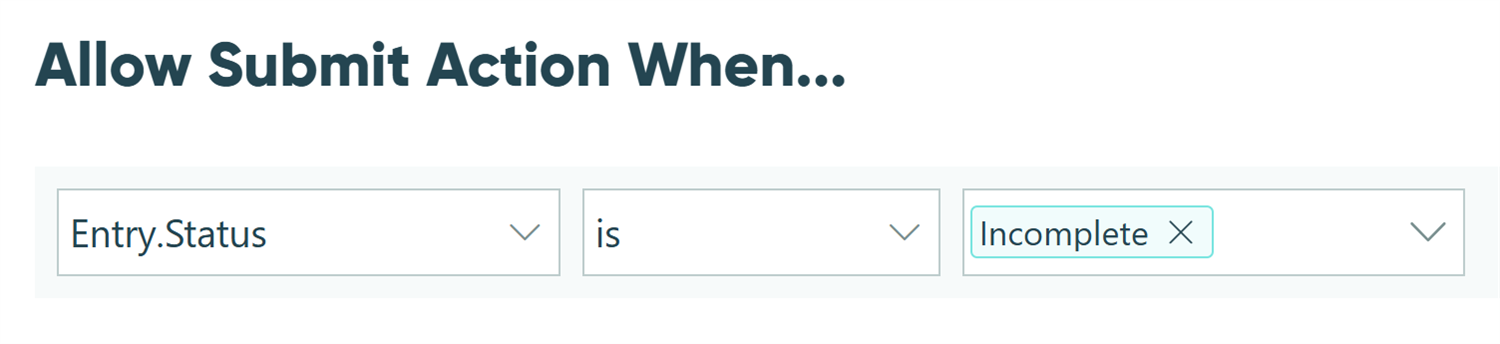
This default Action allows customers to submit their initial request.
- In Workflow , click Actions and open the Submit Action.
- Verify these settings:
-
Allow Action:
When
Entry.Status is Incomplete - Change Status To: Submitted
-
Allow Action:
When
Create the “Send Invoice” Action
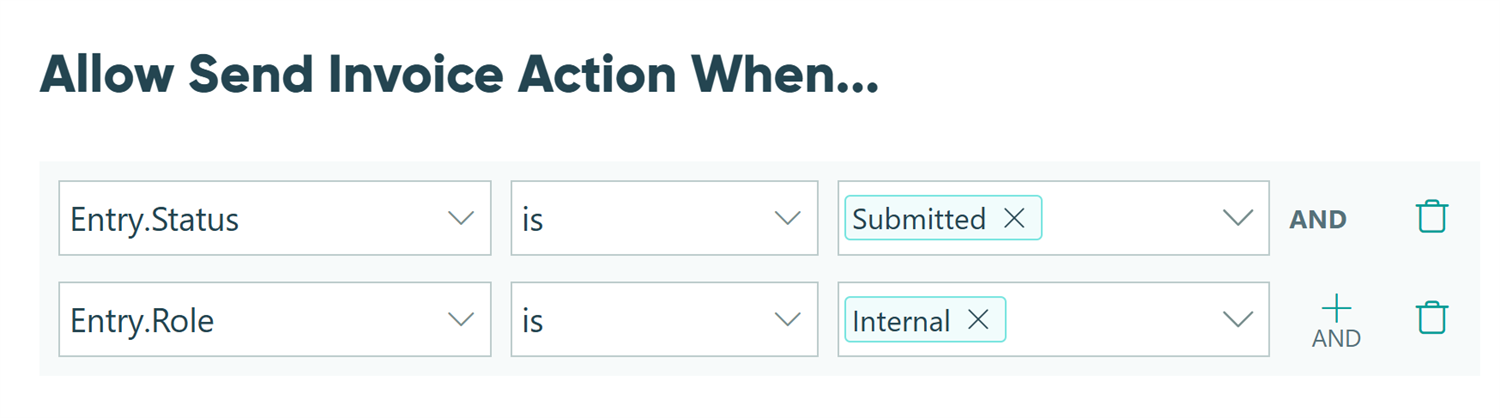
Add an Action that staff will use to send invoices after a request is submitted. You'll configure more on this Action later.
- Click + Add Action and name it "Send Invoice."
-
Set Allow Action
to
When
→
Entry.Status is SubmittedANDEntry.Role is Internal - Set Change Status To: Invoice Sent
Create a “Pay Invoice” Action
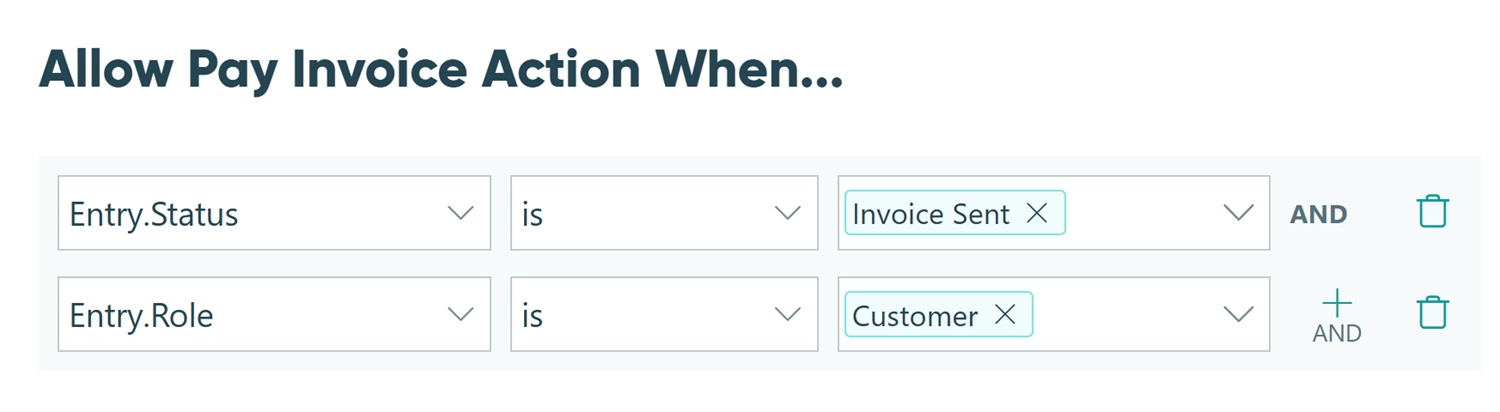
Create an Action for the customer to complete payment after receiving their invoice.
- Click + Add Action and name it "Pay Invoice"
-
Set Allow Action
to
When →
Entry.Status is Invoice SentANDEntry.Role is Public - Set Change Status To: Paid
Create a “Mark Complete” Action
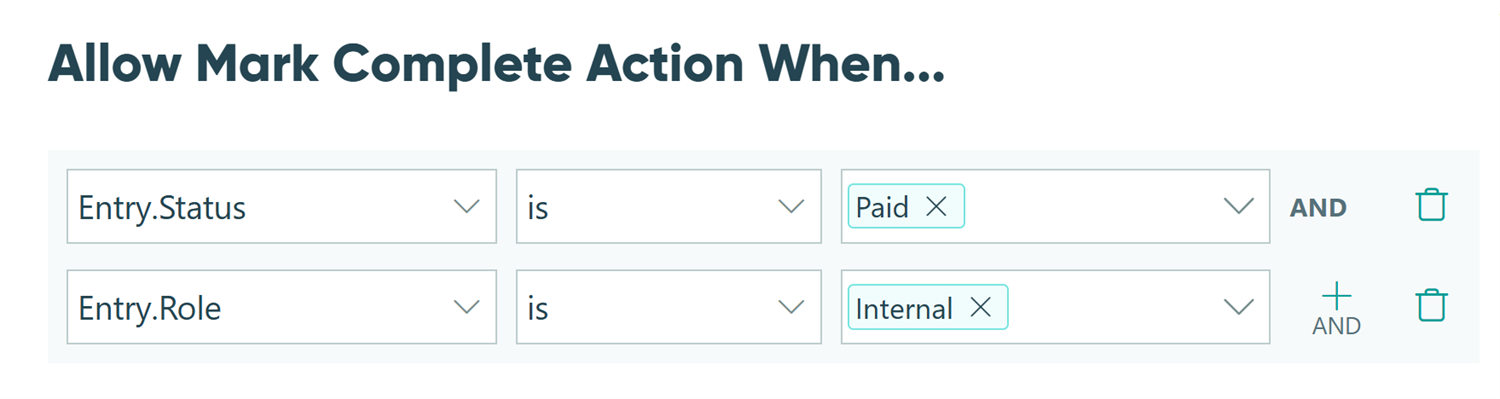
Add an Action for staff to close out an entry work after services have been completed.
- Click + Add Action and name it "Mark Complete."
-
Set Allow Action
to
When →
Entry.Status is PaidANDEntry.Role is Internal - Set Change Status To: Complete
Configure the Update Action
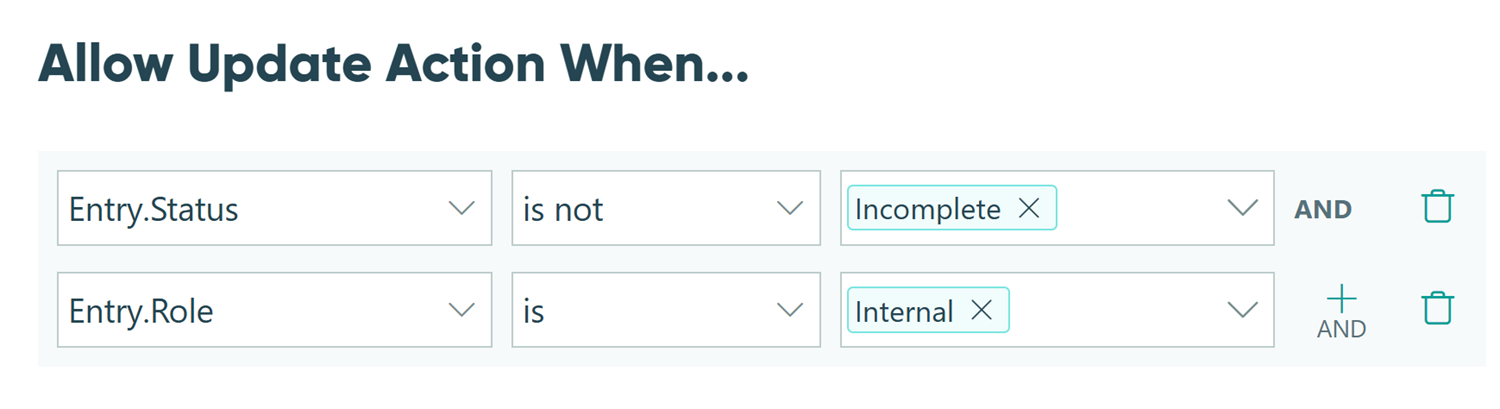
The default “Update” Action lets users make changes to entries. Add conditions to control who can use this Action and when it is available to them.
- Open the Update Action.
- Set Allow Action to For Roles and check Internal.
-
Or add When
conditions to allow updates only in specific statuses.
-
For example: When
Entry.Status is Submitted or Invoice SentANDEntry.Role is Internal. This would only let the “Internal” Role make updates to fields when the entry is in the “Submitted” or “Invoice Sent” Status, but not once the invoice has been paid.
-
For example: When
Check the “Submit” Action (already configured)
This default Action allows customers to submit their initial request.
- In Workflow , click Actions and open the Submit Action.
- Verify these settings:
-
Allow Action:
When
Entry.Status is Incomplete - Change Status To: Submitted
-
Allow Action:
When
Create the “Send Invoice” Action
Add an Action that staff will use to send invoices after a request is submitted. You'll configure more on this Action later.
- Click + Add Action and name it "Send Invoice."
-
Set Allow Action
to
When
→
Entry.Status is SubmittedANDEntry.Role is Internal - Set Change Status To: Invoice Sent
Create a “Pay Invoice” Action
Create an Action for the customer to complete payment after receiving their invoice.
- Click + Add Action and name it "Pay Invoice"
-
Set Allow Action
to
When →
Entry.Status is Invoice SentANDEntry.Role is Public - Set Change Status To: Paid
Create a “Mark Complete” Action
Add an Action for staff to close out an entry after services have been completed.
- Click + Add Action and name it "Mark Complete."
-
Set Allow Action
to
When →
Entry.Status is PaidANDEntry.Role is Internal - Set Change Status To: Complete
Configure the Update Action
The default “Update” Action lets users make changes to entries. Add conditions to control who can use this Action and when it is available to them.
- Open the Update Action.
- Set Allow Action to For Roles and check Internal.
-
Or add When
conditions to allow updates only in specific statuses.
-
For example: When
Entry.Status is Submitted or Invoice SentANDEntry.Role is Internal. This would only let the “Internal” Role make updates to fields when the entry is in the “Submitted” or “Invoice Sent” Status, but not once the invoice has been paid.
-
For example: When

Step 3: Build the basics of your service request form
Start with a form that collects initial customer information and provides space for staff to add invoice details. The same form serves both purposes: customers see only their inquiry fields, while staff see additional internal fields for service selection and invoice customization.
Add customer-facing inquiry fields
Create fields for the information customers provide when requesting services.
- Add fields for the customer’s contact information (like Name, Email, Phone, and Address)
- Add a Choice field labeled “What services are you interested in?”
- Use the “Card” Style for professional visual selections
- Set the Selection Type to “Multiple” if customers can request multiple services
- Don’t assign prices yet, you’ll do this later.
- Add a Text field (Multiple Lines) for customers to provide more context and details about their requirements or what they’re looking for.
- For all customer-facing inquiry fields added in the steps above, set the Read-Only setting to When:
Entry.Role is PublicANDEntry.Status is not one of Incomplete or Submitted- This conditional logic ensures that customer fields are editable during initial submission, but then become read-only once the request is submitted.
Create invoice line items
Now, create an internal Table field visible to staff only so they can add multiple services with individual pricing.

- Add a Table field and label it “Invoice Line Items”.
- Change the Item Label to “Service” for clearer display.
- Set Minimum Items to
1and enable Auto-hide buttons. - Configure the Show This Field logic to When →
Entry.Role is InternalOREntry.Role is PublicANDEntry.Status is one of Invoice Sent, Paid, or Complete- This ensures the Table is only shown on the form when the customer accesses the form after their invoice has been sent to them, or any time the Internal Role accesses the entry.
- Configure the Read-Only logic to When →
Entry.Status is Paid or CompleteOREntry.Role is Public- This conditional logic ensures the Table is always read-only for the customer, editable by the Internal Role when in the “Submitted” or “Invoice Sent” Status, and read-only for the Internal Role after the customer has paid the invoice.
- Inside the table, add these fields:
| Field Type | Its Purpose | Additional Customizations |
|---|---|---|
| Choice field labeled “Add Service” | Lets staff select from a list of service types |
|
| Number field labeled “Estimated Hours” | Allows staff to estimate the amount of time it will take to deliver the selected service |
1
when a service is selected
|
| Price field labeled “Service Total” | Calculates and collects payment for the total price of each service |
|
Step 4: Add calculations and connect payment
Now create additional fields to manage invoices and calculate totals to generate the final invoice amount. After the Table field, add these fields for invoice management:
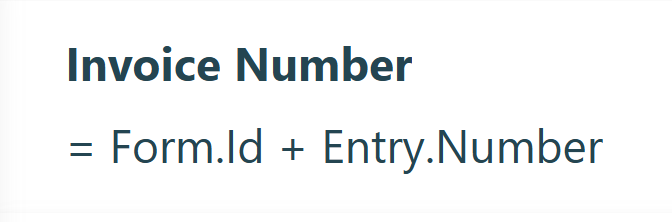
Auto-generate unique invoice numbers
- Add a Calculation Field and name it “Invoice Number.”
- You can come up with your own invoice number formula. An example of a calculation that would always be unique would be:
= Form.Id + Entry.Number
Keep in mind: The value for Entry.Number won’t display on the entry until after the entry has been created or updated.
Default the invoice’s creation date

- Add a Date Field and name it “Date Issued”
- Set Default Value to:
=if Entry.Action = "SendInvoice" then DateTime.Today else DateIssued- This will default the field to today’s date when your staff generate and send the invoice. It will also remain blank beforehand (when customers initially submit) and stay the same value afterwards (when customers go to make their payment).
- Optionally make this Read-Only if you don’t want staff changing it
Calculate a payment due date

- Add a Date Field titled “Payment Due Date.”
- Set Default Value to:
=DateIssued.AddDays(14). (Adjust the number of days to match your payment terms.) - Make the field Read-Only if you don’t want staff to edit the date, or leave it editable if staff need to customize terms per customer.
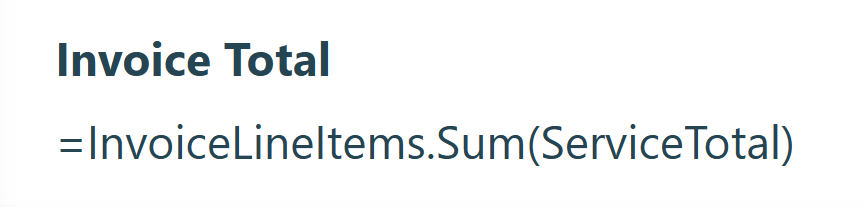
Calculate the total of all services
Set up an automatic calculation to sum all line item totals from the table you created.
- Add a Calculation Field of the Currency type and name it “Invoice Total.”
- Set the calculation to:
=InvoiceLineItems.Sum(ServiceTotal)
Using the AI Calculation Helper
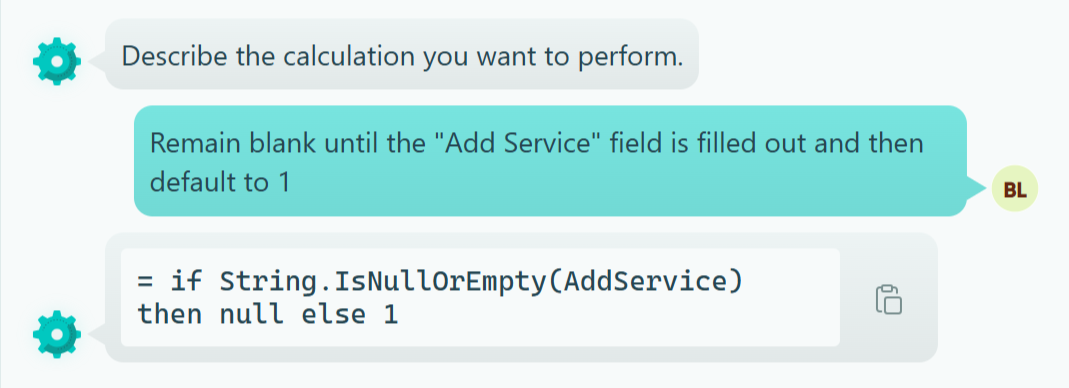
If you’re building complex pricing calculations (like tiered pricing, discounts, or tax calculations), try our AI Calculation Helper. Click the lightning bolt icon in any Calculation field, describe what you want to do in natural language, and our AI helper will generate the calculation syntax for you. Learn more about the AI Calculation Helper →
Add conditional logic to all four fields
Ensure all four fields you just created are only shown to the Internal Role, and only be editable for them when the request hasn’t been paid yet. For each field:
- Set the Show This Field setting to For Roles → Internal.
- Set the Read-Only setting to When →
Entry.Status is Paid or Complete
Connect Payment Processing
You’ve already added a Price field in the table that is collecting payment. Now, you need to configure your Payment settings to be sure it’s ready to go.

- Click on the Payment tab in the top left of your screen.
- If you haven’t selected and connected a payment provider yet, you should do this now by clicking + Add Payment Account.
- Optional: Map Billing Fields to the fields collecting customer information.
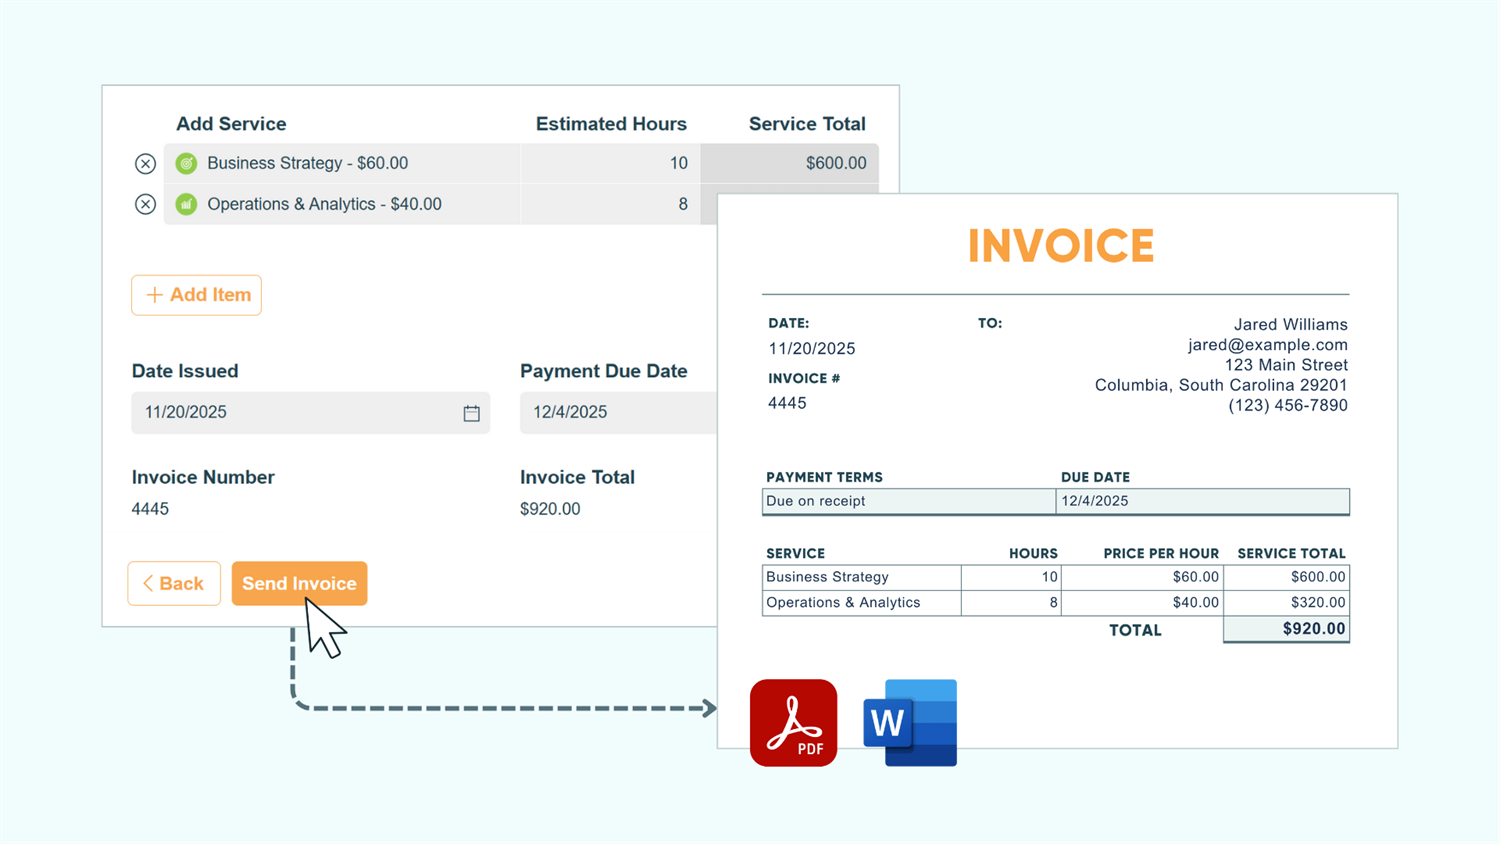
Step 5: Create your custom invoice template
Transform your form data into a professional invoice document with your branding. You’ll design the invoice once in Microsoft Word, Google Docs, or any other word processor. Then, Cognito Forms automatically populates it with customer details, selected services, and pricing for every transaction.
Download the standard template

- Go to your form’s Workflow settings.
- Open the “Submit” Action.
- Under Confirmation, select the Documents dropdown.
- Click Manage Templates.
- Choose Custom as the Template Type.
- Click Download to get a Word document with all your field names.
This template can be adjusted directly in the downloaded file, or you can reference your form’s field names in any other document template using this template as your guide.
Step 6: Format your custom invoice template
Start with a document template you like. You can use an existing template you already use for manual invoice creation or find a simple template online. Then, add field tokens throughout the document to pull in your form’s data dynamically. Walk through a full example of this below.
Title and a header or footer section

- Header or footer section: Add your business name and contact information at the top or bottom (whichever you prefer). This stays the same for every invoice.
- Title section: Add a title and place your logo next to it. This stays the same for every invoice.
Keep in mind: The header and footer you set up here will not show on generated documents when the document template is in Test mode. It will appear on generated documents after the template is switched to Live.
Billing details

Add customer information, such as Name, email, phone, and address. Here’s an example of how this might look when typed out in your document:
{Name}
{Address.Line1}
{Address.CityStatePostalCode}
{Email}
{Phone}
Invoice details

Add a section for dates, invoice numbers, or other invoice-specific information. Here’s an example of how this might look when typed out in your document:
Invoice Number: {InvoiceNumber}
Date Issued: {DateIssued}
Payment Due: {PaymentDueDate}
Add invoice line items

For repeating line items, create a table that automatically populates with all services.
- Insert a table with 3 columns.
- In the header row, type your column labels: Service, Estimated Hours, and Service Total.
- In the second row, add the repeating section/table syntax:
| Service | Price Per Hour | Estimated Hours | Service Total |
|---|---|---|---|
| {each InvoiceLineItems} {AddService} | {AddService_Price} | {EstimatedHours} | {ServiceTotal} {end each} |
| Service | Price Per Hour | Estimated Hours | Service Total |
|---|---|---|---|
| {each InvoiceLineItems} {AddService} | {AddService_Price} | {EstimatedHours} | {ServiceTotal} {end each} |
The {each InvoiceLineItems} tag at the very beginning tells Cognito Forms to repeat this row for every line item in the table. Close it with {end each} in the last column.
It’s important that your { each } tag and { end each } tag on the same line/level or within the same table of your document. Issues can arise if one of the tags are on a different “level” or outside the same table.
4. After your line items table, add the Invoice Total Calculation field to the document. To do this:
- Add a row to the end of the table.
- Insert this text in the last cell: "Total Amount Due:
{InvoiceTotal}"
Prevent your table from being cut off
To prevent line items from being cut off when a new page begins, follow the instructions below for your chosen word processor.
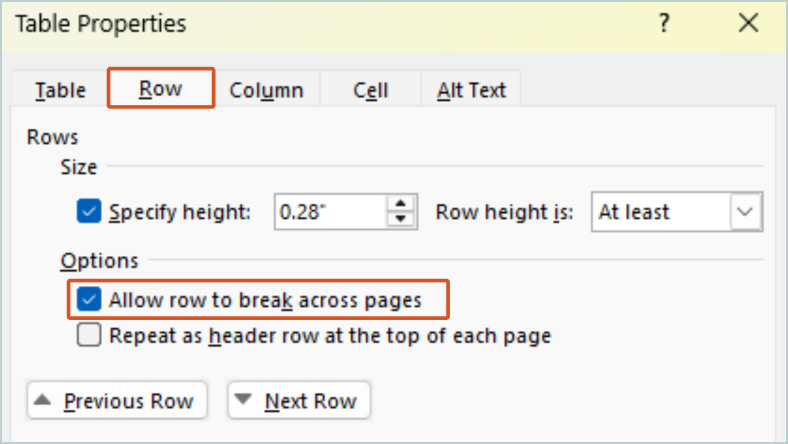
- Right click your table and select Table Properties.
- Open the Row tab.
- Check Allow row to break across pages.
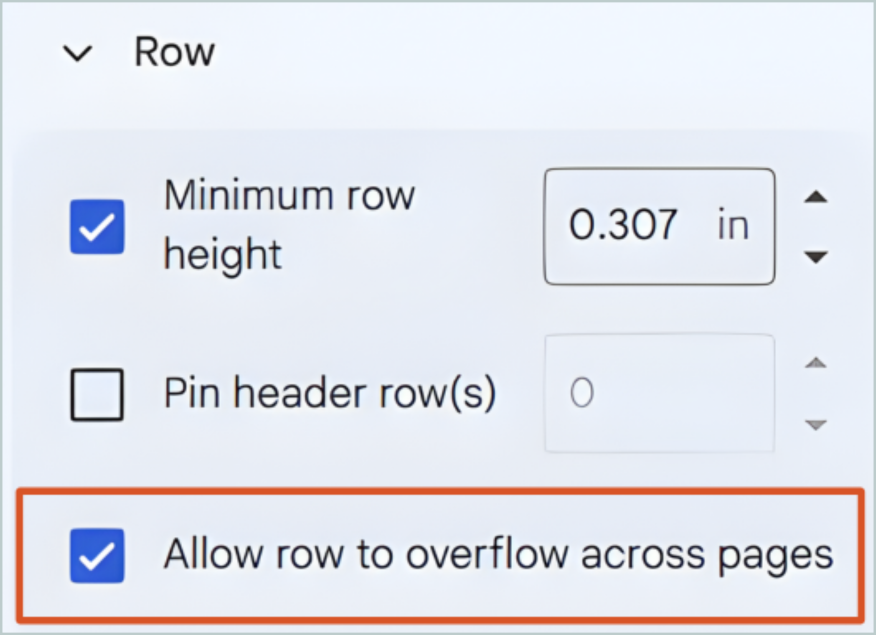
- Click somewhere in your table.
- In the Table options sidebar that pops up, open the Row settings.
- Check Allow row to overflow across pages.
Upload and test your template

- Download/export your finished invoice template as a Word document (
.docxfile). - Return to the Manage Templates dialog in Cognito Forms.
- Click Upload and select your customized Word document.
- If Cognito Forms finds any errors, download the annotated version that highlights issues. Fix these errors and reupload until no errors are returned.
- Select your desired Output Format:
- PDF for static documents
- Word document for editable documents
- Keep Billing Mode set to Test while you’re finalizing the design.
Test with multiple entries that have different numbers of line items to ensure your table formatting works correctly.
Include the invoice document in email notifications or confirmation messages
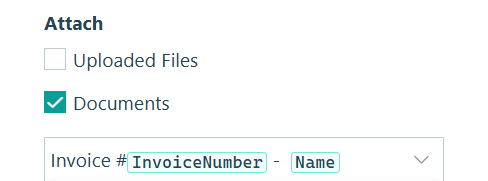
Attach your custom invoice document to the email going to the customer with the “Send Invoice” Action. You could also attach the generated document to the confirmation message of the same Action, so staff can download a copy of the invoice as well.
- Open the email you set up in Step 3 under the “Send Invoice” Action.
- Find Attach in the email settings and check Documents.
- Choose your custom invoice template.
Step 7: Set up email notifications and confirmation messages
Now that Actions and your invoice template are set up, you’ll want to create notifications to keep everyone informed. First, set up an email that sends a copy of the generated invoice to the customer, and then add additional emails throughout the Workflow as you see fit.
Create the email that sends the invoice to customers
Now, create the email that sends the invoice to customers when the “Send Invoice” Action is clicked by your staff.
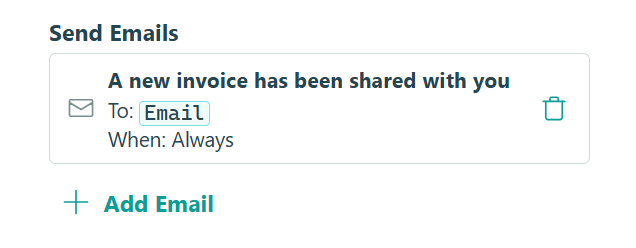
1. In the Send Invoice action settings, scroll to Send Emails .
2. Click + Add Email and configure the email:
- To: Click Insert Field and select the form’s Email field. This automatically sends to the customer who submitted the request.
- Subject: Write a clear, concise subject line. Use Insert Field options to add form data like the Invoice Number or Subtotal calculation.
- Message: Let them know the invoice is attached, how to make a payment, and use Insert Field to add their payment due date.
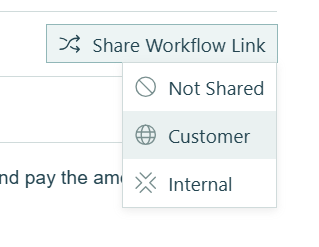
3. Click Share Workflow Link (next to the To field) and select Public as the Role.
- By doing so, this will include a button on the email that takes customers to their entry so they can securely pay the invoice.
4. Optionally customize the Workflow Button Text to "View & Pay Invoice"
Add a confirmation message for staff after the invoice is sent
After the “Send Invoice” button is clicked by a staff member, show them a confirmation message.
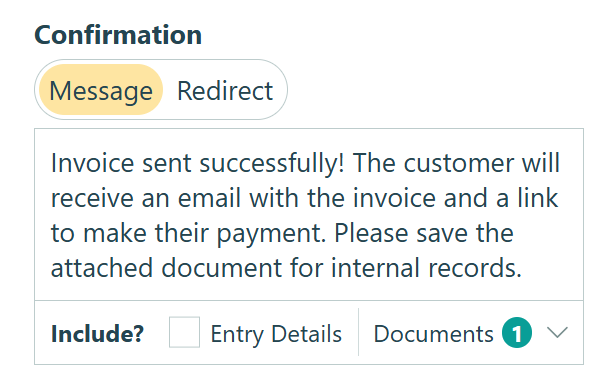
- In the Send Invoice Action, find Confirmation.
- In the textbox, add a message like: “Invoice sent successfully! The customer will receive an email with the invoice and a link to make their payment.”
- Optional: Attach the generated invoice to this confirmation so staff can see what was sent or download and save it for internal documentation.
- Optional: Set up a second email to notify and send a copy of the invoice to a staff member.
Set up emails and confirmation messages for the “Submit” Action
Customize the Confirmation Message or set up automatic email notifications after customers click “Submit.” Two ideas include:
- Show the customer an immediate confirmation with an estimated time frame for when to expect a reply.
- Send an email to alert your team when new requests come in, including key details of the request for their review.
After customers submit their initial request, instantly redirect them to your booking link or calendar so they can schedule a time to meet with you. Learn how to redirect customers upon submission.
Set up emails and confirmation messages for the “Pay Invoice” Action
Customize the Confirmation Message and set up automatic email notifications after customers click “Pay Invoice.” Some ideas include:
- Add a Confirmation Message that states, “Thank you for your payment! You’ll receive a receipt via email shortly.”
- Send customers an email with their receipt attached. Simply check Receipt under Include in the email settings.
- Notify staff when customers pay invoices with a copy of the receipt and invoice number.
Step 8: Create entry tracking views
Set up views that organize entries by status so you and your team can quickly see what needs attention and track payment history.
Task View for new requests needing invoices
Create a Task View that shows staff which requests need invoices generated.
- Go to the Entries page.
- Click + Create New View and select Task View.
- Name it “Pending Invoices” or “Needs Invoice.”
- Set Role to Internal and leave Assign as Tasks turned on.
- Filter the View to the “Submitted” Status.
- Click Save.
Staff assigned to this view will see pending requests in their Task Dashboard, making it easy to know what needs invoicing.
Grid View for paid invoices
- Create a new Grid View.
- Name it “Paid Invoices”.
- Filter by Status and keep Paid and Complete checked.
- Click Save.
The Complete Workflow In Action
Once configured, the entire workflow happens in one form with no manual invoice creation or payment tracking spreadsheets. Here’s how the entire process unfolds from start to finish:
1. Customer submits service request
The customer fills out the form with contact details and service preferences. They click “Submit” and immediately receive a confirmation email.

2. Staff builds and sends the invoice
The new request appears in the “Pending Invoices” Task View with all customer details already filled in and ready for review. Staff opens the entry, adds services to the line items table, adjusts hours if needed, and reviews the auto-calculated total. When they click “Send Invoice,” the system generates the custom invoice PDF and emails it to the customer with a secure payment link.

3. Customer receives invoice and makes a payment
The customer gets an email with a branded invoice PDF attached and a “View & Pay” button. They click the button, enter payment information, and click “Pay Invoice” to complete the transaction. The customer immediately gets a payment receipt via email and shown on the confirmation message. Staff can also view the entry from a “Paid Invoices” view with transaction details recorded.

Advanced Features to Enhance Your Workflow
Once your basic workflow is running smoothly, add these capabilities to handle more complex scenarios and improve the customer experience.
- Client portal access for invoice management: Set up a client portal using Guest Access so your customers can log in to view all their invoices and outstanding payments in one place. Portals work well for ongoing service relationships or when often customers have multiple invoices over time. Read more in our guide on How to Build A Client Portal.
- Automated payment reminders: Remind customers at regular intervals to pay their invoice using Task Reminders. You can schedule up to three reminders before, on, or after the payment due date.
- Multi-form workflows with Auto-Create Entries: Automatically create follow-up forms for ongoing projects. When a customer pays an invoice, auto-create their project tracking form or service delivery checklist.
- Integration with accounting systems: Export paid invoice data to QuickBooks, Xero, or other accounting software to keep your books current, using Zapier, Make, Power Automate, or the Cognito Forms API.
Start Automating Your Invoices Today
Manual invoice creation, scattered payment tracking, and endless email chains slow your business down and frustrate customers. This automated workflow eliminates all three problems by connecting service requests directly to invoice generation and payment processing.
Your customers get a professional experience with the ability to submit requests easily, receive branded invoices immediately, and pay securely online. You get time back in your day, faster payments, and complete visibility into your billing pipeline without juggling multiple systems.
FAQ
Yes, download the template at any time, make changes in your chosen word processor (Microsoft Word, Google Docs, Apple Pages, etc.), and upload the updated version. Cognito Forms will validate your changes and highlight any errors. All invoices generated after uploading the updated template will use the new template.
Customers can access their invoice to make a payment by opening the automated email you set up, viewing the attached invoice PDF, and clicking a secure Workflow Link button in the email. The link is unique to them and specific to that invoice. When they click the button, they see the payment form with the invoice amount pre-filled. They can then enter their credit card information and click “Pay Invoice” to complete the transaction.
The entry remains in the “Invoice Sent” Status until payment is received. You can set up automated payment reminders using Task Views with due dates to send reminder emails automatically (3 days before due date, on due date, 3 days after). You can also create a “Cancelled” or “Void” Action if you need to manually close unpaid invoices.