Collect waivers and release forms online before customers arrive. Eliminate paper chaos, speed up check-in, and meet legal requirements.
Build Time & Skill
15-20 min
Beginner
What you'll learn
How to build a digital waiver form that collects an electronic signature, automatically stamps the signature date, requires acknowledgment of liability terms, and shows terms conditionally based on activity type
Paper waivers and release forms create bottlenecks at check-in or cause scattered inboxes for your team. While fillable PDF waivers are digital and help reduce the chaos of paperwork, they still require the back-and-forth emails that take up time and become disorganized.
Digital waiver forms help solve these problems for you. Customers can complete your waiver online, before arrival, from the comfort of their home. Meanwhile, you store everything in one secure location without manually organizing folders and documents. With Cognito Forms, you can build online waiver forms that:
- Eliminate check-in delays. Customers can sign waivers from home on any device, arriving ready to start instead of filling out paperwork.
- Ensure data accuracy. Automatic date stamping and required fields create complete documentation that meets legal requirements.
- Keep records organized and accessible. All signed waivers live in one digital location, searchable by customer name, date, or activity type. Every waiver can also be exported as a PDF with the click of a button.
- Adapt to different activities. Show different release terms based on the activity customers select, handling multiple scenarios in one form.
Step-by-Step: Building Your Digital Waiver Form
Follow these six steps to create a complete waiver form with e-signature, automatic date stamping, and activity-specific terms.
Step 1: Create your form and add fields
Start by creating a new form and adding the standard information you need from every participant. These fields capture essential details for legal documentation and emergency situations.
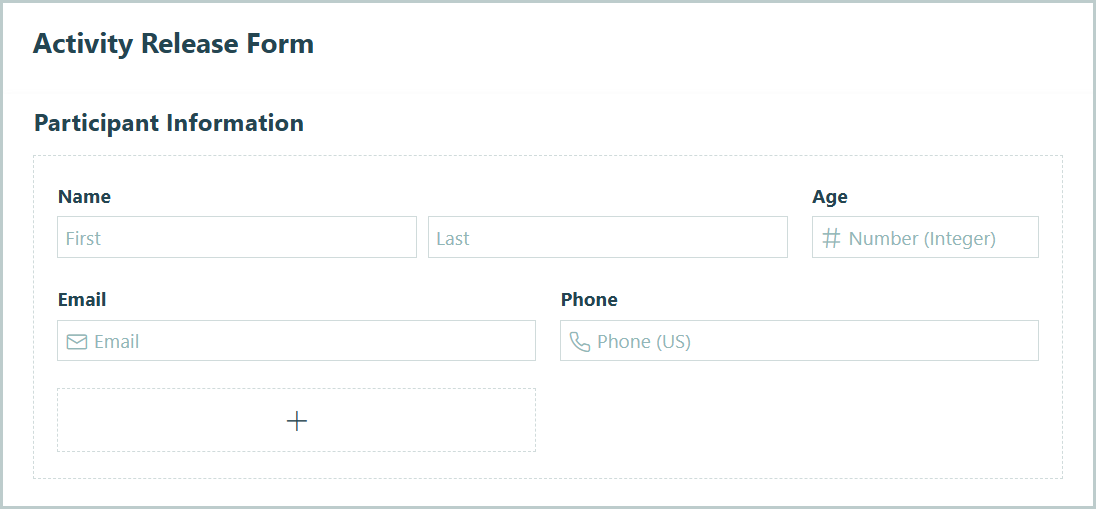
- Click + New Form and name it something clear like “Event Waiver” or “Activity Release Form.”
- Add these essential fields:
- Name field labeled “Participant Name”
- Email field for contact and confirmation
- Number field labeled “Age”
- Name field labeled “Emergency Contact Name”
- Phone field labeled “Emergency Contact Phone”
- Set the Require This Field setting for every field above to Always. This ensures participants complete all legally required information.
These fields serve two purposes beyond basic identification. Emergency contact information protects participants if something goes wrong. Age helps you identify if parent/guardian signatures are needed for minors.
Check out the FAQ section at the bottom of this page to learn more about how to show a hidden section only when the Age indicates that a signature from a parent or guardian is needed.
Step 2: Add your terms and conditions
Your waiver needs clear terms that customers can read before signing. Cognito Forms gives you two ways to present terms and conditions, each with specific advantages depending on your situation.
Method 1: Show your terms directly on the form
This method works best when you want everything visible on one page.

- Add a Content field to your form.
- Write or paste your waiver terms directly into the field’s text editor.
- Use the formatting toolbar to add headers, bold text, or bullet points for readability.
Break up terms with clear headers like “Assumption of Risk,” “Photo Release,” or “Cancellation Policy.” Dense paragraphs are hard to read and it’s important your customers understand what they’re signing.
Method 2: Link to an external terms document
This method works better for lengthy terms or documents that update frequently.

- Add a Content field to your form.
- Write introductory text like “Please review our full terms and conditions before signing.”
- Highlight text where you want the link (like “terms and conditions”).
- Click the link icon in the formatting toolbar.
- Paste the URL to your terms document (hosted on your website or document service).
- Optional: Set the link to open in a new tab so customers don’t lose their form progress.
Step 3: Add a required acknowledgment checkbox
The acknowledgment checkbox creates a clear record that customers actively agreed to your terms. This checkbox is separate from the signature and strengthens legal documentation.

- Add a Yes/No field to your form.
- Change the Type to Checkbox (not a toggle or radio buttons).
- Label it clearly: “I have read and agree to the terms and conditions above.”
- Set Require Yes Response to Always.
The checkbox forces a deliberate action beyond just signing. Courts tend to recognize that checking a box demonstrates active agreement rather than passive acceptance. This small field significantly strengthens the legal validity of your waiver.
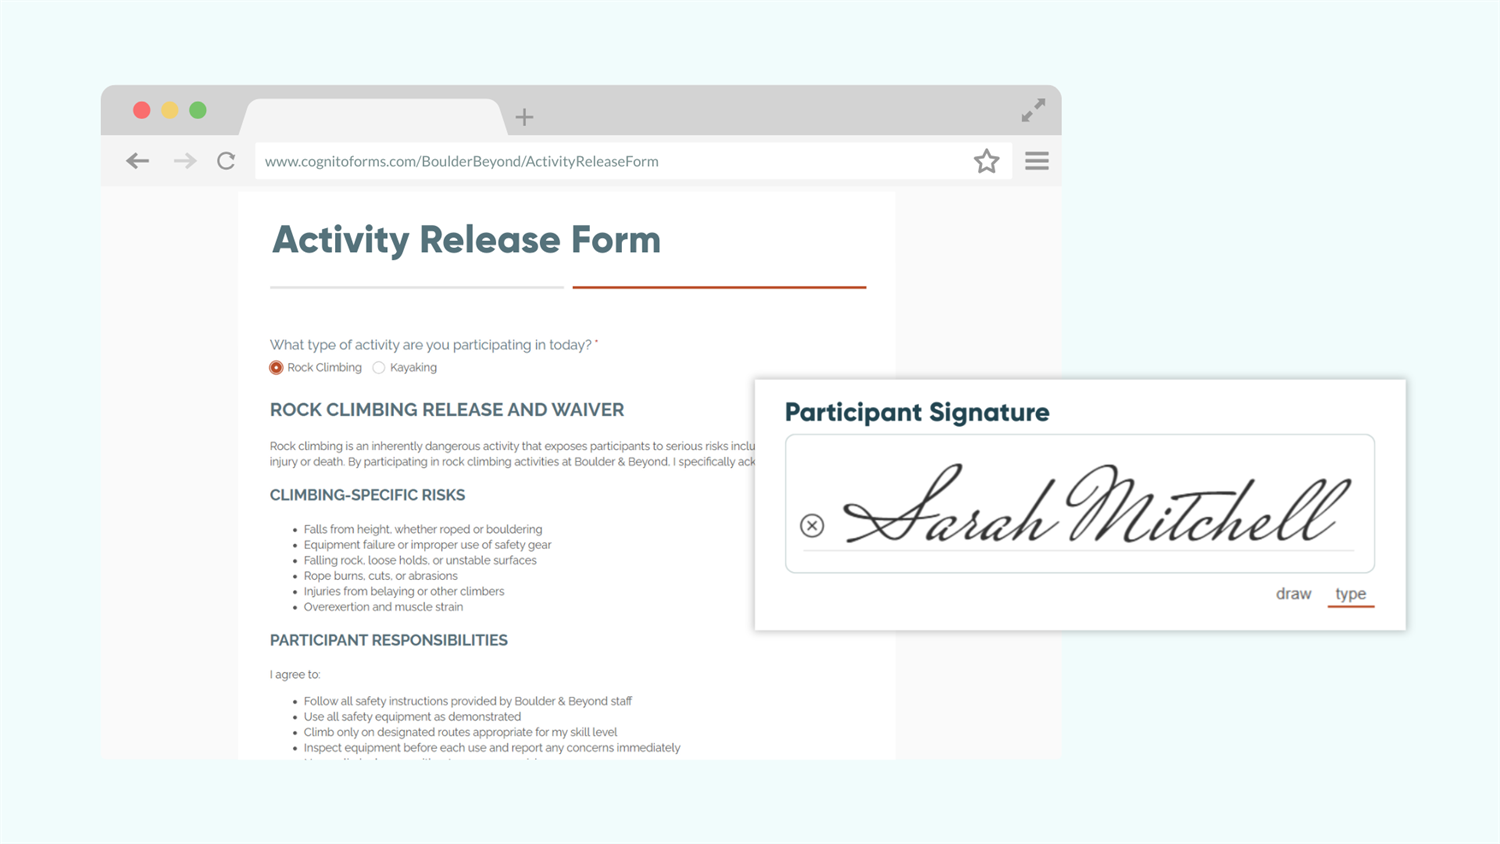
Step 4: Add a Signature field
The Signature field captures the legally binding commitment from your customer. Customers can easily add their signature from any device.

- Add a Signature field to your form.
- Label it clearly: “Participant Signature” or “Sign Below.”
- Keep the Input setting as Draw & Type (this lets customers draw with their finger on mobile or type their name on desktop).
- Set Require This Field to Always.
Step 5: Automatically add the date signed
Date stamps prove when customers signed your waiver. Cognito Forms can automatically capture and lock this date to prevent any changes after signing.

- Add a Date field next to your Signature field.
- Label it “Date Signed.”
- Set Default Value to
=if ParticipantSignature.Svg != null then DateTime.Today else null - Set Read-Only to Always.
Now the Date field records today’s date automatically when someone signs, remaining blank until then. Setting Read-Only to Always prevents anyone from accidentally changing the date.
Step 6: Show different terms based on activity type
This step is optional, but if you offer multiple activities then you might need multiple different release terms for each one. Conditional logic gives you the ability to show the right waiver terms based on what customers select.
Set up an activity selection field

- Add a Choice field at the top of your form (before the terms section).
- Label it “Activity Type” or “Select Your Activity.”
- Add your activities as choices (examples: “Rock Climbing,” “Kayaking,” “Zip Line,” “General Recreation”).
- Set Require This Field to Always.
Add separate waiver terms for each activity

- Add a Content field for your first activity’s waiver terms.
- Write or paste the waiver text for that specific activity (like rock climbing risks).
- Set Show This Content to When
Activity Type is [Activity Name]. - Repeat these steps for each activity type, changing the waiver content and the condition each time.
Your form now shows only the relevant terms based on the activity customers select. Someone selecting “Kayaking” sees water safety terms, while someone selecting “Rock Climbing” sees different risk language about falls and equipment.
What Customers Experience
Customers receive a clean, mobile-friendly form they can quickly complete from any device. They fill in their information, select their activity, and the form automatically displays the relevant waiver terms for what they chose. After reading the terms, they check the acknowledgment box and add their signature, with the date prefilling once they sign. The entire process only takes a couple of minutes, and customers arrive at your location with all paperwork complete.

Using Your Completed Waiver Submissions
Once customers sign your waiver, you can immediately put those submissions to work. Here are the most common ways organizations use their signed waivers:
- Save as PDF: Go to the Entries page, select specific entries or all entries, click Actions, then click Download and select the document template you want to use. Save these files for your records or print them if required by your insurance or legal team.
- Auto-email a signed copy to the customer: Set up an email notification on the “Submit” Action that automatically sends customers a confirmation with their completed waiver details. This gives them immediate proof of completion and reduces any “I never signed that” claims.
- Notify your staff when signed: Add email notifications that alert your team when new waivers are complete. Front desk staff can verify completion before customers arrive, or managers can review waivers for specific activities requiring additional approval.
Real-World Examples of Digital Waivers
Digital waivers transform how different types of organizations handle risk management and customer check-in. Here’s how three common industries use waiver forms:
- Service Companies: Home service providers, contractors, and delivery companies use waivers to cover property damage liability, outline insurance coverage, and confirm customers understand service limitations. Customers sign before the appointment, and technicians verify completion upon arrival without handling paperwork.
- Fitness Studios and Adventure Activities: Gyms, yoga studios, rock climbing facilities, and zip-lining companies collect waivers acknowledging physical risk and injury liability. Members sign once when joining, or customers sign before each visit for drop-in activities. Digital waivers eliminate the clipboard stack at the front desk and create searchable records when reviewing incident reports.
- Camps and Youth Programs: Summer camps, after-school programs, and youth sports organizations collect waivers from parents or guardians on behalf of minor participants. The waiver typically includes medical information, emergency contacts, photo release consent, and assumption of risk for activities. Parents complete everything online during registration, ensuring complete documentation before activities begin.
Additional Features to Improve Digital Waiver Efficiency
Once you’re comfortable with basic waiver forms, these features help you expand on your new setup and improve your workflow efficiency:
- Set up a Client Portal for streamlined registration: If your customers have multiple forms to complete, they can view all assigned tasks from one easily accessible view. Their information can be pre-filled across forms with complete history of assigned forms available to them.
- Integrate with your CRM or file storage: Immediately send signed waivers to systems like Google Drive, Dropbox, Salesforce, or HubSpot. Your team can see signed waivers in customer records and maintain organized folders without manual file management.
- Track waiver expiration: Use Workflow Tasks to automatically identify expired annual waivers. Create a filtered view showing waivers older than one year, set up automated emails 30 days before expiration, or assign renewal tasks to staff members responsible for specific customers.
Start Building Your Digital Waiver Today
Traditional paper waivers waste time at check-in or create inbox chaos for your team. Digital waivers solve these issues while improving your customer experience. Build your waiver form in Cognito Forms, and watch check-in lines disappear as customers arrive with completed paperwork. You’ll spend less time managing paper or scattered emails and more time focusing on delivering great experiences for your customers.
FAQ
Yes, digital waivers with Cognito Forms automatically work on any device (phone, tablet, or computer). All fields are fully responsive. The Signature Field even allows customers to sign with their finger on a touchscreen or use their mouse on desktop. Forms automatically adjust to screen size, making them easy to read and complete whether customers are at home on their laptop or in your parking lot on their phone moments before arrival.
To require a parent or guardian to sign on the minor’s behalf, you can show a section of fields on the form only when the Age field is under the legal age of an adult. Follow these steps to set this up:
- Add a Section and label it “Parent or Guardian.”
- Add a Name field and a Text field labeled “Relationship to Participant.”
- Set the Section’s Show This Field setting and Require setting to When →
Age is less than 18
This will show and require the fields in the section only when the Age indicated is younger than 18 years old. Now you can store both the participant’s information and the guardian’s signature in the same entry.
Electronic signatures are considered legally binding for nearly every business or personal transaction in the United States and around the world.
The eSIGN act of 2000 established the legal basis for the use of electronic signatures in the United States as an alternative to paper signatures. In the United Kingdom, the equivalent legislation to the ESIGN Act was the Electronic Communications Act 2000.
When using Cognito Forms’ Signature fields to capture a signature, take the following additional steps to ensure full compliance with eSIGN:
- Inform the person filling out the form that the signature will be legally binding and provide a paper-based alternative if possible (the consent provision).
- Include a date next to the signature to show when the document was signed.
- Include a PDF copy of the signed form in the confirmation email sent to the customer/user (the retention provision).
- Additionally, send a PDF copy to yourself (or to a cloud service via Zapier) for your own records.
Following these simple steps ensures that you have notified your customers that the form submission will be legally binding, and have provided them with an electronic copy of the signed contract; thus fulfilling the basic requirements of the eSIGN act. Learn more about collecting electronic signatures.