Build sequential signature workflows that automatically route to the next person in your process. All within one form, without document forwarding or version control chaos.
Build Time & Skill
20-30 min
Intermediate
What you'll learn
How to set up a sequential multi-signature workflow that automatically routes between signers using role-based visibility and workflow automation
Managing documents that require multiple signatures often means endless email chains will be going back and forth, confusion about who’s signed and who hasn’t, and the nightmare of tracking different document versions. With Cognito Forms, you can build one form that automatically handles the entire signing process. Each person sees only what they need, signs their section, and the form automatically routes to the next signer without any manual forwarding.
This approach helps you:
- Eliminate document forwarding and version confusion. Everyone works from the same entry, so there’s no question about which version is current or who still needs to sign.
- Automatically route to the next signer. When each person completes their section, the workflow notifies the next person in line without you lifting a finger.
- Control exactly what each signer sees and can edit. Show managers only the fields they need, hide internal notes from external clients, and prevent anyone from changing previous signatures.
- Track progress in real-time. See exactly where each entry is in your workflow and know immediately when signatures are pending or complete.
Understanding the Key Components
These three features work together to create automatic signature routing. One person signs, and the system handles everything else: notifying the next signer, locking previous signatures, and tracking progress through each approval stage. Before building, understand how these features combine:
| Feature | What it does | Its role in signature workflows |
|---|---|---|
| Workflow Automation | Manages multi-step processes with Roles, Statuses, and automated Actions that route entries between participants | Creates the sequential signing chain where each signature triggers automatic status changes and email notifications to the next signer |
| Signature Fields | Captures legally binding electronic signatures that users can draw or type, displaying as images in entries and PDFs | Collects each person’s signature, locked in place after submission with a full audit trail showing who signed what and when |
| Conditional Logic | Shows or hides fields and controls editing permissions based on specific conditions like Role, Status, or field values | Ensures each signer sees only their relevant section at the right time, makes previous signatures visible but read-only to later signers, and controls when Action buttons appear based on who’s viewing |
Workflow Automation
Workflow Automation manages multi-step processes with Roles, Statuses, and automated Actions that route entries between participants.
In signature workflows, it creates the sequential signing chain where each signature triggers automatic status changes and email notifications to the next signer.
Signature Fields
With Signature fields , you can capture legally binding electronic signatures directly on your form. Users can draw or type their signature, and it will display as image in your form entries and PDFs.
In signature workflows, they collect each person's signature, locked in place after submission with a full audit trail showing who signed what and when.
Conditional Logic
Conditional Logic enables you to show or hide fields on a form and control editing permissions based on specific conditions like Role, Status, or field values.
In signature workflows, this ensures each signer sees only their relevant section at the right time, makes previous signatures visible but read-only to later signers, and controls when Action buttons appear based on who's viewing.
Step-by-Step: How to Build A Sequential Signature Workflow
Building a sequential signature workflow involves creating the signing chain, configuring visibility for each stage, and setting up automatic routing between signers. Follow these steps to transform a scattered approval process into an automated system where signatures flow seamlessly from one person to the next.
Step 1: Set up Roles
Roles define who participates in the signing chain and determine what each person can see and do at each stage. You’ll create one Role for each distinct participant in your approval process.
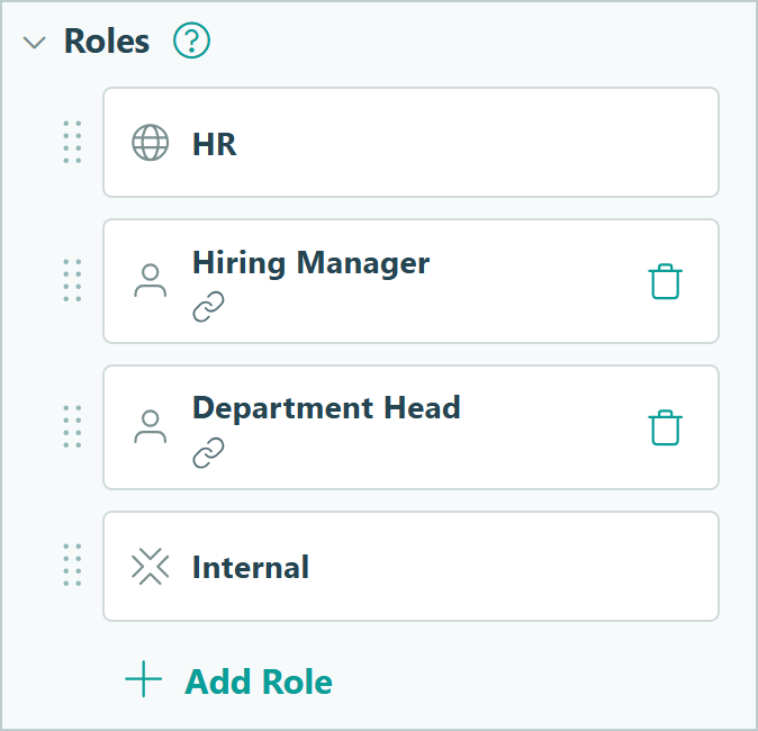
- Navigate to Workflow in your form’s Build page.
- Click Roles.
- Add a role for each person in your signing sequence:
- Keep the Public Role for the initial requestor or submitter.
- Add Other Roles for each approver or signer in your chain (Manager, Executive, Legal, Finance, etc.).
- Give each role a clear, descriptive name that indicates their position in the approval process.
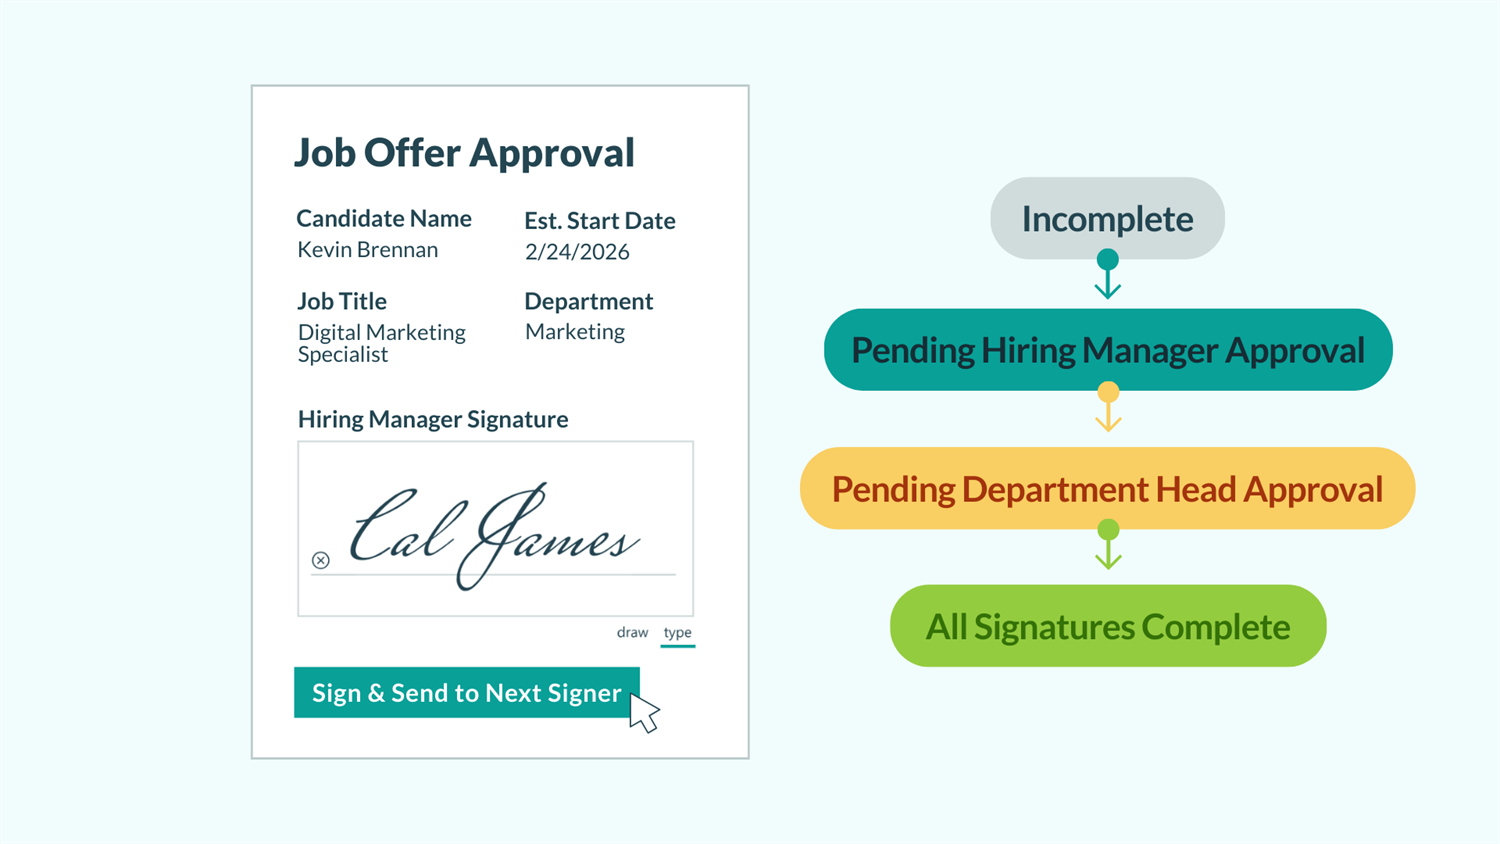
For an HR job offer approval workflow, you might have these Roles:
- Public (renamed to HR) - the person initiating the request
- Hiring Manager - first level approval
- Department Head - final sign-off
- Internal - included by default (recommended to always leave this role as-is)
Step 2: Create Statuses for each signing stage
Statuses track where the entry is in your signing process and control when certain sections and Actions become available. You’ll create one Status for each stage of your approval chain, plus a Status for completed entries.
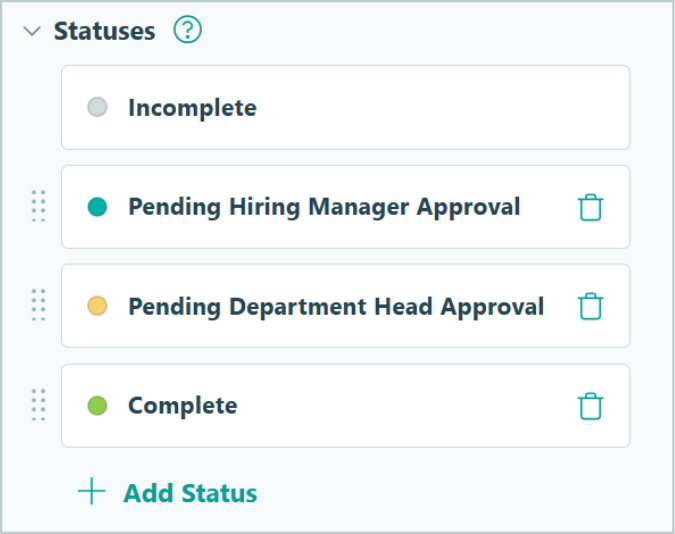
- In Workflow, click Statuses.
- Keep the default Incomplete Status for draft entries that haven’t been submitted yet.
- Create a Status for the initial submission stage. This is the Status entries move to after the requestor submits. In our job offer workflow, the request goes to the hiring manager, so we named this “Pending Hiring Manager Approval.”
- Create a Status for each subsequent review stage. In our job offer workflow, we created a “Pending Department Head Approval” Status for the next signing stage.
- Create a final Status for when all signatures are collected. Label it something like “Completed,” “Fully Executed,” or “All Signatures Collected.”
- Arrange Statuses in order from top to bottom to match your signing flow.
Status names should clearly indicate what’s happening and who needs to act next. “Awaiting Manager Signature” immediately tells you what’s needed, while generic names like “Stage 2” require mental translation. Clear names help everyone understand the workflow at a glance.
Step 3: Build signature sections for each Role
Each signer needs their own section containing their Signature field and any information they need to complete. These sections will later be configured to only appear for specific Roles at specific stages, ensuring each person sees just what’s relevant to them.

- Add a Section for the requestor, and give it a clear label.
- Inside this section, add the fields the requestor needs to complete:
- Name field or Person field
- Email field (if you need their contact information)
- Any other fields specific to the request (project details, expense amounts, request description, etc.)
- Signature field, if the requestor should also sign
- Add a second Section for your first approver (e.g., “Hiring Manager Approval”).
- Inside this section, add:
- Name field or Person field
- Signature field for the manager’s signature
- Date field to capture the date the manager signed
- Optional: Text field for approval comments or notes
- Repeat for each subsequent signer, creating separate sections following the same pattern.
- At a minimum, each approval section needs: A way to identify the signer (Name field or Person field) and a Signature field for their actual signature.
Your form now has all the signature sections, but they’re visible to everyone all the time. In the next step, you’ll configure who can see each section and when.
Step 4: Configure field visibility and permissions
Now you’ll control who can see and edit each section using conditional logic. This ensures each signer sees only what’s relevant to them and prevents anyone from changing previous signatures.

Configure visibility for each approval section
For each signature section after the initial requestor section (Manager Approval, Executive Sign-Off, etc.):
- Select the Section.
- Under Show This Field, click When.
- In the conditional logic builder, set conditions so the section shows when:
- The current user’s Role matches the Role the section is intended for AND
- The entry is in the appropriate Status for that Role (or any status after)
- OR the entry is in any later Status where any Role should be able to see the section
- Under Read-Only, click For Roles.
- Select all Roles that should see this section but not be able to edit it.
This means managers see their section when it’s their turn to sign, but the section also remains visible (read-only) to later approvers and in the completed entry.
Example for a Hiring Manager Approval section
- Show This Field → When →
Entry.Role is Hiring ManagerANDEntry.Status is one of Pending Hiring Manager ApprovalOREntry.Status is one of Pending Department Head Approval, Completed - Read Only → For Roles → Internal, HR, and Department Head
Configure visibility and permissions for the requestor section
The initial requestor section works differently because it should be visible to everyone (so all approvers see the original request), but editable only by the requestor during initial submission.
- Select the requestor section.
- Under Show This Field, keep it set to Always (everyone needs to see the original request details).
- Under Read-Only, click When.
- Set the condition to:
Entry.Status is not Incomplete. This makes the section editable only when the entry is still in draft form. After submission, all fields in this section become locked.
This setup ensures that each signer can only edit their section when it’s their turn, later approvers can see all previous signatures and context without being able to edit them, and the original request cannot be changed once submitted.
Make previous signatures always visible, but Read-Only to later signers. This maintains transparency throughout the approval chain while preventing anyone from altering signatures or decisions made earlier in the process. If a manager approves a $5,000 expense, the executive reviewing it next needs to see that approval but shouldn’t be able to change what the manager signed.
Step 5: Create Actions that route the form between signers
Actions are the buttons people click to move the entry forward. Each Action changes the entry’s status and triggers email notifications to the next person in the signing chain. You’ll create one Action for each transition in your workflow.

| Action Name | Its Purpose | Allow Action Logic | Change Status To | Email Notification |
|---|---|---|---|---|
| Submit & Send to Manager | This Action allows the original requestor to submit their request and notify the next person in the chain that their signature or approval is required. |
When
→
Entry.Status is Incomplete
|
Select your first review status (e.g., “Pending Hiring Manager Approval”) | Notify the first approver that their signature is required. Add their email address in the To field, share a Workflow Link for their Role, and customize the message they receive to explain what they need to do |
| Sign & Send to Department Head | This Action helps move the entry to the next stage and notifies the next person that their signature is required. |
When
→
Entry.Status is Pending Hiring Manager Approval
AND
Entry.Role is Hiring Manager
|
The next status in your chain (e.g., “Pending Department Head Signature”) | Notify the next person in the chain that their signature is required. Add their email address in the To setting, share a Workflow Link for their Role, and customize the message they receive. |
| Sign & Complete | This Action marks the process as complete, not forwarding the entry to another person. |
When
→
Entry.Status is Pending Department Head Approval
AND
Entry.Role is Department Head
|
Whatever your last Status in the chain is (e.g., “Complete”) | Send a confirmation notification to participants, or just the original requestor (whichever you prefer), to confirm all signatures have been collected and the process is finished. |
Step 6: Test your workflow
Before rolling out your multi-signature form to real users, test the entire flow to catch any visibility issues, permission problems, or routing errors. Testing helps you experience the workflow from each person’s perspective.

- Click Preview in your form builder. Use the role selector in preview mode to view the form as different roles.
- Walk through the full Workflow using the form’s live Public Link. Temporarily set each email to send to your email address to confirm that notifications arrive at the right time, include the correct Workflow Links, and display the right content. Check that entries also appear in Entry Views when expected.
Refer to our Workflow Pre-Launch Checklist as you test each step to ensure you don't miss critical configuration items.
Step 7: Track submissions with Entry Views
The entry’s Status shows exactly where it sits in your signing process. When you look at your Entries page, you’ll see each entry’s current status (Pending Hiring Manager Signature, Pending Department Head Signature, Completed, etc.). From here, you can create custom Entry Views filtered by status to see all entries waiting at each stage.

- Go to the form’s Entries page.
- Click + New View and select the type of View you want. Choose a:
- Grid View to display entries in a spreadsheet-like format.
- Task View to transform entries into action items that appear on approvers’ Task Dashboards.
- Form View to allow users or guests to submit forms from directly inside Cognito Forms (instead of opening the Public Link).
- Choose the right Role for who will be accessing this View.
- Filter the view by Status so only entries in a relevant Status appear in this View.
- You can also filter by specific fields on your form that match certain criteria, using the Advanced Filter option.
How the Complete Workflow Works
Once you’re all set up, your sequential signature form operates automatically.

Signatures route through each step
When someone submits the initial request, the system immediately changes the Status and sends an email to the first approver with a secure link to their section. That approver signs and clicks the forward button, triggering the next notification and routing to the next person. Each signature locks in place as the entry moves forward, and everyone can see the previous approvals while only editing their own section.
View and track your signatures
The final signature changes the status to Completed, and you have one unified entry showing the entire approval chain with timestamps and all signatures in one place. No forwarded emails, no version confusion, just a clear audit trail of who signed what and when.
Real-World Examples of Multi-Signature Workflows
Here’s how organizations implement sequential signature workflows:
- Service Agreement Approval: A marketing agency uses sequential signatures for client proposals. When sales reps submit an agreement, internal fields remain hidden from the client throughout the entire workflow. Management and legal teams review and sign off on the contract, both seeing all internal notes. The fully-approved agreement routes to the client for their signature, without ever seeing internal fields.
- Project Proposal Chain: A consulting firm conditionally routes proposals through a workflow, depending on the dollar amount of the project. Their workflow requires larger projects to receive finance and executive sign-offs. Each approver sees previous fields as read-only for context, but can edit their own section. This prevents accidental changes, while still giving full visibility into what was previously approved.
- Employment Contract Process: An HR team creates an employment offer approval workflow with sensitive details visible only to internal roles. The hiring manager, legal team, and the executive all review the offer and sign off. The signing date is automatically captured on the form. Once all internal signatures are collected, the candidate receives a fully-executed offer letter, created with Custom Document Generation.
Additional Features to Take Your Workflow Further
Once your sequential signature workflow runs smoothly, enhance it with these capabilities:
- Set up a portal for external signers (clients, vendors, contractors) so they can participate in your workflow and receive assigned tasks in one space. Without Guest Access, external people can still sign via Workflow Links in email, but they won’t see signatures as organized tasks or have a central dashboard. Guest Access creates a professional portal experience where they can track all their pending signatures in one place.
- Automatically generate signed PDFs with all signatures embedded when the workflow reaches the “Completed” Status using Document Generation. This creates a polished final document you can download or send to all parties.
- Send automated reminder emails for pending signatures using Task Views. If someone hasn’t signed within a certain timeframe, the system sends them a gentle reminder to keep your approval chain moving.
Start Building Sequential Signature Workflows Today
Sequential signature workflows eliminate the chaos of document forwarding, ensure every signature happens in the right order with the right permissions at each approval level, and give you complete visibility into where each approval sits in the workflow. No more wondering if the executive has seen the manager’s approval or whether you’re working from the latest version.
Build your first multi-signature form and experience how automatic routing transforms your approval process from a scattered email thread into an organized, professional workflow. Each person signs their section, the system handles the routing, and you gain peace of mind knowing nothing falls through the cracks.
FAQ
There’s no hard limit on the number of sequential signatures you can collect. Most organizations use 2-4 signatures in their approval chains (requestor → manager → executive), but you can create as many Roles and approval stages as your process requires. Each additional signature just needs its own section, Role, Status, and Action in your workflow configuration. The system handles 10-person approval chains as smoothly as 2-person chains.
Yes, you have two options for external signers:
Option 1: Create a Portal with Guest Access (recommended for ongoing relationships)
Enable Guest Access to give external signers (clients, vendors, contractors) their own portal where signatures appear as assigned tasks. They log in securely with their email address without needing a Cognito Forms account. This works well for people who will sign multiple documents over time, as they get a professional dashboard showing all pending signatures in one place. Learn more about how to create a client portal.
Option 2: Workflow Link Only (best for one-time or simple signatures)
Share a Workflow Link via email without requiring any login or Guest Access. External signers click the link, complete their signature section, and submit (no authentication required). This works well for simple, one-time signatures where you don’t need the structure of a portal or task assignment. Learn more about Workflow Links.
Both options are secure, but Guest Access provides a more organized experience for external signers who participate in multiple workflows.
Use the Read-Only setting on signature sections to lock them for everyone except the designated signer. Configure each section to be Read-Only for all roles except the one responsible for signing it. Once a signature is captured and the entry moves to the next status, that signature section becomes permanently locked for all subsequent signers. They can view the signature and see what was approved, but they cannot edit or remove it.