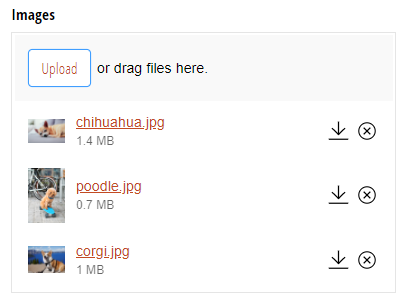
While full of great potential, HTML5 is not a magical panacea that makes everything awesome and easy. It simply is a new set of tools that can be used to build great applications. Also, when targeting the general population of users, you must account for older browsers like Internet Explorer 8 & 9 that do not support some of the features. Here is how we implemented a number of file upload features leveraging HTML5 while still providing a great experience for older browsers.
Multi-File Uploads
Uploading single files is great, but many scenarios—think photo contests or documentation requests—require a better experience supporting multiple files. HTML5 introduced support for the File API, which provides a way for JavaScript in the page to interact with the list of files selected for upload by users. Support for multiple files is enabled by adding the multiple attribute to the underlying <input type='file'/>
field. Cognito Forms automatically enables multi-file upload for file upload fields allowing more than one file.
Showing File Progress
HTML5 introduced the support for Progress Events to provide event-driven updates to the status of files being uploaded. This event is supported in recent versions of FireFox, Chrome, Safari, and IE 10 and above. We leverage jQuery to handle XMLHttpRequest calls, so we simply have to pass an additional parameter to our upload request:
// Update the progress bar during the upload
uploadProgress: function (event, position, total, percentComplete) {
fileData.set_Progress((percentComplete > 98 ? 98 : percentComplete) + “%”);
}
This event is raised periodically while the file set is uploading, reporting on the percent completion. In our case we chose to upload multiple files in separate asynchronous requests in order to show progress on a file by file basis. Here is how this looks while a file is uploading:
For older browsers we still show a progress bar for consistency, but show progress as 98% until complete since there is no way to monitor progress.
Drag & Drop Support
Alongside the File API, HTML5 extended Drag & Drop events to support dragging files from the desktop to initiate uploads. Cognito Forms subscribes to these events on a large “drop zone” that provides visual feedback to users when they are dragging files. Again, we use jQuery to simplify subscribing to events, such as the drop event:
// Dropping into dropzone
.on('drop', '.c-fileupload-dropzone', function(e) {
e.stopPropagation();
e.preventDefault();
// Remove the dropzone active class
$(this).removeClass(“c-fileupload-dropzone-active”);
// Get the file upload corresponding to the current drop event
var fileUpload = getFileUpload(e);
// Upload the files
upload(fileUpload, e.originalEvent.dataTransfer.files);
});
The key here is that the drop event exposes a dataTransfer object with the set of files being dropped, which allows us to initiate file uploads identically to how we handle them for the standard file input HTML element.
Automatic Uploads
We decided early on that we did not want users to have to wait until the very end to upload files when they clicked Submit. If we did, we could not easily show upload status and provide meaningful feedback on failed uploads. It would also have been awkward for multi-page forms, which we plan to release later this year. However, it is actually incredibly difficult to automatically upload files before the form has been submitted, for a number of reasons:
- Since the form entry has not been saved, there is nothing to associate the file with!
- If the entry is never submitted, what happens to the file? How do we know to get rid of it?
- Older browsers like IE 8 & 9 do not support uploading files asynchronously—you actually have to post a real form to the server to upload individual files.
We solved the first problem by leveraging our amazing application architecture for Cognito, based on Azure Table and Blob storage, to allow users to upload files before saving the entries. First, we pull information about the files being uploaded and update the display to show the user what we are uploading, including upload progress. Then we initiate the upload process file by file, saving the files securely and separately for each organization, and return the identifier of the file back to the client. This way, the entry maintains a relationship to the uploaded file.
The second problem is a little trickier. When files are uploaded, we track them as pending in storage, knowing that users may or may not actually save the entry. When entries are saved, we clear this pending status for the files referenced by the entry and actually delete files that are no longer referenced (important when editing entries). Any files that remain pending for more than an hour are automatically deleted, because we know that the entry changes have been abandoned.
The final problem was a real doozy, because we really wanted a consistent experience, even for older browsers, so we figured out how to make it work. To add to the difficulty, our forms embed directly into your website, so we must do special things to address cross-site security restrictions placed on our code by browsers (for good reason). The solution was wickedly difficult, requiring the following magical steps:
- The underlying file input element that the user used to pick the file to upload is contained within a form.
- This form in turn is configured to post to a hidden iframe element injected into the page.
- When our script detects that the user has selected a file, we cause this form to post to the iframe, thereby uploading the file in the background.
- We immediately replace the form with a new form, so users can then upload another file.
- Due to cross-site security restrictions, we cannot detect if/when the iframe post has completed successfully or failed, so instead the server returns script to the iframe window which uses window.postMessage() to send a message to our form code letting us know that the file has uploaded successfully.
- We then update the UI to reflect that the file has uploaded successfully!
Whew, lots of work to make a great experience, but well worth it!
Thumbnails
Thumbnails were another key requirement for us to provide great usability. Since our files automatically upload, we simply have to provide thumbnails (for images) for files that have already been uploaded. We elected to handle the thumbnails on the server to reduce page load times for our users and also are caching the thumbnails in blob storage to improve performance. The thumbnails themselves are generated using the Image Resizer Nuget package, which was fast and efficient for our usage and stood up to stress testing. The thumbnails are also automatically deleted when you delete the associated images/entries, to avoid storing thumbnails for files that are no longer available. Now that this feature is implemented and in use, I cannot see how file upload of images can be used without it!
Office Documents
Though a simple thing to implement, having Office documents open in the browser provides a big improvement in usability over the alternative. Especially for tasks like resume reviewing (which I must do myself from time to time) it is really nice being able to open documents as a new browser tab and quickly switch back and forth. Also, while temporary internet files delete themselves eventually, files we actually download and open are notorious for staying stuck permanently in our downloads folder. And finally, who really wants to open an Office document from an unknown source just to read it if you do not have too!
As I said, the implementation for this is really straight forward. Both Google and Microsoft support viewing documents in the cloud for free. We chose to use Office Online for Cognito Forms because it was much faster in our tests, possibly because Cognito runs in the same Azure environment, and documents, spreadsheets, and presentations rendered more accurately. Hopefully we will see a lot more cross-pollination of cloud services like this in Cognito Forms and amongst other online services in the future.
Consistent UI
As you may have noticed, our file upload does not look like your standard file upload. In fact, it looks nothing like it because we completely hide the standard file input element because it looks so bad and looks different in every browser and on every device! Instead, we use a neat trick where we wrap a DIV element containing the word Upload around our file upload form and assign it relative positioning. We then style this DIV to look like a button, including changing the mouse cursor so you think it is clickable. We then make the file input element be fixed positioned such that it fills the entire button DIV at a higher z-index (so it is actually above the upload button and can be clicked). As one last step, we make the file input element transparent so it can still be clicked but also completely disappears from view. Is this a hack? Yes! Did we invent it? No! Is it awesome? Most definitely!
Easter Egg
Finally, I will leave you with one last Easter Egg. There is one feature that exists but is completely hidden from our users because we were not convinced that it was intuitive for forms with lots of input fields. So here goes:
- If you are using a recent version of Chrome
- And you have moved your mouse over a file upload field
- And you have copied an image to the clipboard (taken a screenshot for example)
- And you perform the paste command (Ctrl-V)
- Then your copied image will automatically be uploaded
Maybe one day if/when this becomes a standard browser feature we will make this more discoverable for our users. In the meantime, I hope you have enjoyed this recounting of how we leveraged HTML5 to implement the best file upload for form builders on the web!