Create professional, easy-to-manage order forms without writing code or investing in e-commerce software.
Build Time & Skill
20-30 min
Beginner
What you'll learn
How to build a complete order form with product selection, price and tax calculations, and integrated payment processing that you can share via link or QR code
If you’re looking for an easy way to accept orders online, there’s no need to rely on complicated e-commerce tools or expensive developers. Whether you’re selling tickets, services, or physical products, you need a system that looks professional, calculates pricing accurately, and processes payments securely.
With Cognito Forms, you can create a custom online order form without complicated setup. When customers choose what they want, inventory updates automatically, prices calculate instantly, and payments are processed securely through your connected payment provider. You also get a clean, organized space to manage every step, from the moment an order is submitted to when it’s fulfilled.
This approach helps you:
- Accept orders 24/7 without manual work. Customers place orders anytime while Cognito Forms tracks inventory and processes payments automatically, eliminating back-and-forth emails and manual invoicing.
- Reduce pricing errors and disputes. Automated calculations ensure accurate totals before payment, preventing mistakes that create customer service headaches.
- Look professional without high costs. Deliver a polished ordering experience that builds trust with customers, without paying for expensive e-commerce platforms or custom development.
- Track orders efficiently in one place. View all order details, payment status, and customer information from a single, organized view, making fulfillment and accounting straightforward.
Step-by-Step: Building Your Order Form
Create a professional order form by adding the services or products you offer, setting up quantity tracking and price calculations, connecting your payment processor, and creating an organized view to manage orders.
Step 1: Create your form and add products
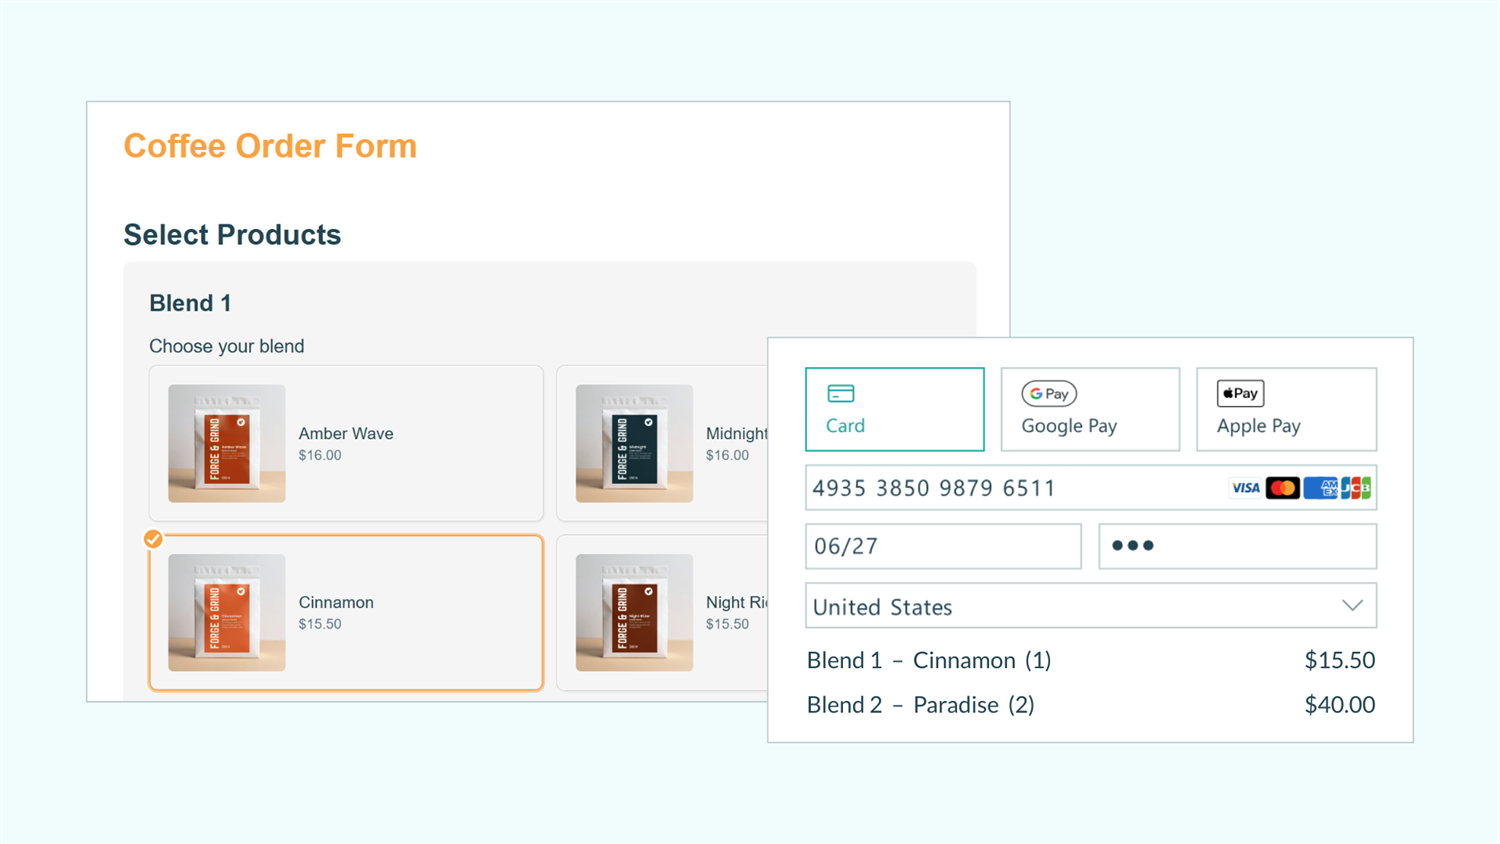
Start by creating a new form and adding a Choice field that professionally displays your products with images.
Set up the form and Choice field

- Create a new form and give it a name that makes sense for you.
- Add a Choice field and label it “Select Products” or “Choose Services.”
- For the Style setting, choose the style you like best. Our Card layout works well for order forms by presenting your products with organized, labeled images.
- Set up your field for multiple item selections, if desired. You have a couple of options here. If you want customers to:
- Specify different quantities for multiple products, place your Choice field inside a Repeating Section or Table.
- Select multiple items with the same quantity for each item, choose Multiple under the Choice field’s Selection Type setting.
Add products and images

- Add each product as a Choice.
- Add an image for each product. You can click the image icon to the left of the option’s name, or drag your image and drop it onto the icon.
- Check Show Images, adjust the Image Size, and choose your desired Label Position.
Use consistent, high-quality images that clearly show each product. This dramatically improves the ordering experience and reduces customer questions about what they’re buying. Images help customers make confident purchase decisions and give your form a professional, polished appearance.
You can easily copy and paste your choices from Excel or another text editor. Ensure each choice is separated by a line break, copy all the lines you want to add, click into the first line of the Choices, and paste. Each line item will populate into the list as its own choice, eliminating the need to manually copy every item individually.
Step 2: Set prices and enable quantity limits
Assign a price to each product and set Quantity Limits to prevent overselling. This keeps your inventory accurate and protects you from accepting orders you can’t fulfill.
Assign prices to products

- In your Choice field settings, locate Choice Options.
- Check Assign Prices.
- This adds a price field next to each product option.
- Enter the price for each product. These will appear in your form’s configured currency.
- Optionally, check Show Prices in Choice Field to display each product’s price to customers.
Enable quantity limits

- In the same Choice Options section, check Limit Quantities.
- A quantity field appears next to each product.
- Enter the available quantity for each product.
- When quantities run out, customers can no longer select that product.
- Optional: Add a custom Quantity Exceeded message that displays when a product is out of stock. For example: “Sorry, this item is currently out of stock. Please select another option.”
Step 3: Connect your payment processor
Enable secure payment collection by connecting your account to your desired payment processor (Stripe, PayPal, or Square). All sensitive payment data is transmitted directly to your payment processor (never stored by Cognito Forms or your website). This ensures PCI compliance and protects both you and your customers.

- In your Choice field settings (where you assigned prices), check Collect Payment for This Field.
- Click on the Payment tab in the top left of your form.
- Select your preferred payment processor (Stripe, PayPal, or Square). Follow the prompts to link your account.
- A payment section automatically appears at the bottom of your form showing:
- Order summary with line items
- Credit card input fields
- Total amount due
Step 4: Calculate order totals and taxes
Once your form is connected to your payment account, and you have enabled Collect Payment, your form will automatically calculate the customer’s total. A list of all charges will appear at the bottom of your form, and customers will see exactly what they’ll pay before entering their payment information.

Collect sales tax
If you want to add sales tax to your orders, follow these steps:
- Under Payment, find Additional fees.
- Label it “Sales Tax.”
- Add your state or location’s sales tax percentage or static amount.
Step 5: Set up order management
Create an organized Entry View to track and manage incoming orders efficiently. This gives you a clear dashboard where you can see all orders, filter by status, and quickly find the information you need.

- Go to the Entries page for your form.
- Click + Create New View and select Grid View.
- Name it “All Orders” or “Order Dashboard.”
- Click Columns to customize which information displays. Check the columns you want to show on the entry view, and uncheck the columns you don’t want to show.
- Keep in mind: When opening an individual entry for full details, you will be able to see all fields available according to the Role, Status, or any other conditional logic you’ve set up.
- Add Filters to create useful views, like
Payment Status = Paidto see completed orders orDateSubmitted is on or after 1 month agofor orders within the last month.
You can create multiple views for different purposes, such as: one for all orders, one for pending orders requiring action, and one for completed orders ready for fulfillment. Each team member can have their own customized views based on their role in the order fulfillment process.
Step 6: Share your order form with customers
Make your order form accessible to customers through direct links, QR codes, and website embeds. The more places you share your form, the easier it is for customers to place orders.

Send a direct link
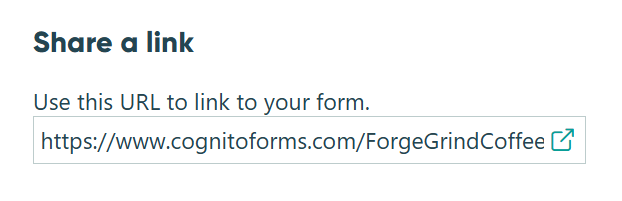
- Go to the Publish page for your form.
- Find the section titled Share a link.
- Copy the form URL to share directly or paste it into:
- Social media posts, profile links, and ads
- Email signatures and newsletters
- Email marketing campaigns
- Online directory listings

Share QR Codes
- From the Publish page, find Share a QR code.
- Click the auto-generated QR code to copy it as a PNG, or click one of the Download options.
- Place your QR code on printed materials (like business cards, flyers, or receipts) or digitally (like in an email, on social media posts, or in a video).
QR codes make ordering effortless for customers. They scan the code with their phone’s camera and immediately access your order form, no typing required. This is particularly effective for in-person marketing where customers want to place orders on the spot.
Embed in your website
- From the Publish page, find Embed in your site.
- Copy the embed code you want to use and paste it into your website.
Looking for detailed instructions about how to embed your forms?
Get Started with an Order Form Template
Skip building a form from scratch by using one of our pre-built order form templates. Customize with your products and pricing in minutes.
-
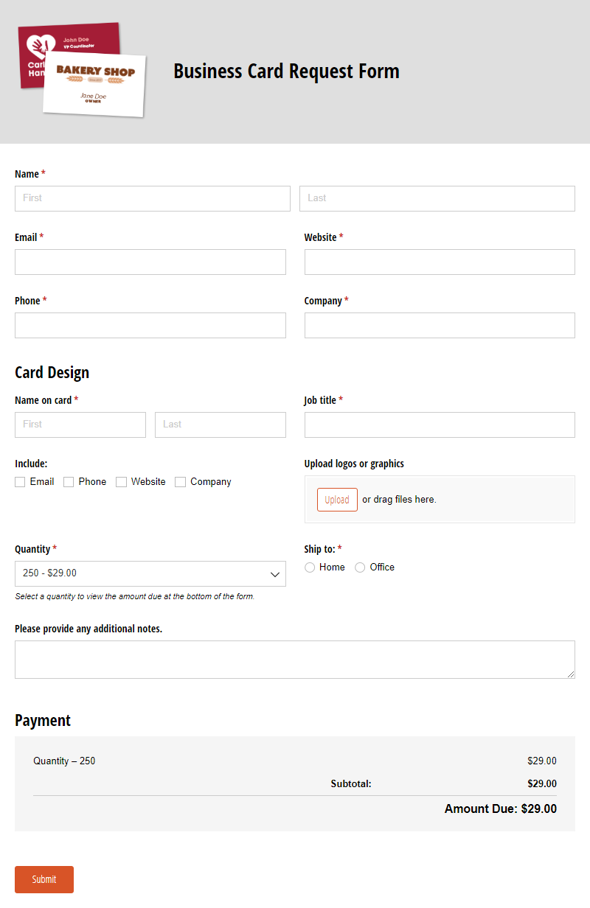
Business Card Request Form
Use our free business card request form template to enable customers to easily order custom business cards online. Simply customize it with your options.
Preview -
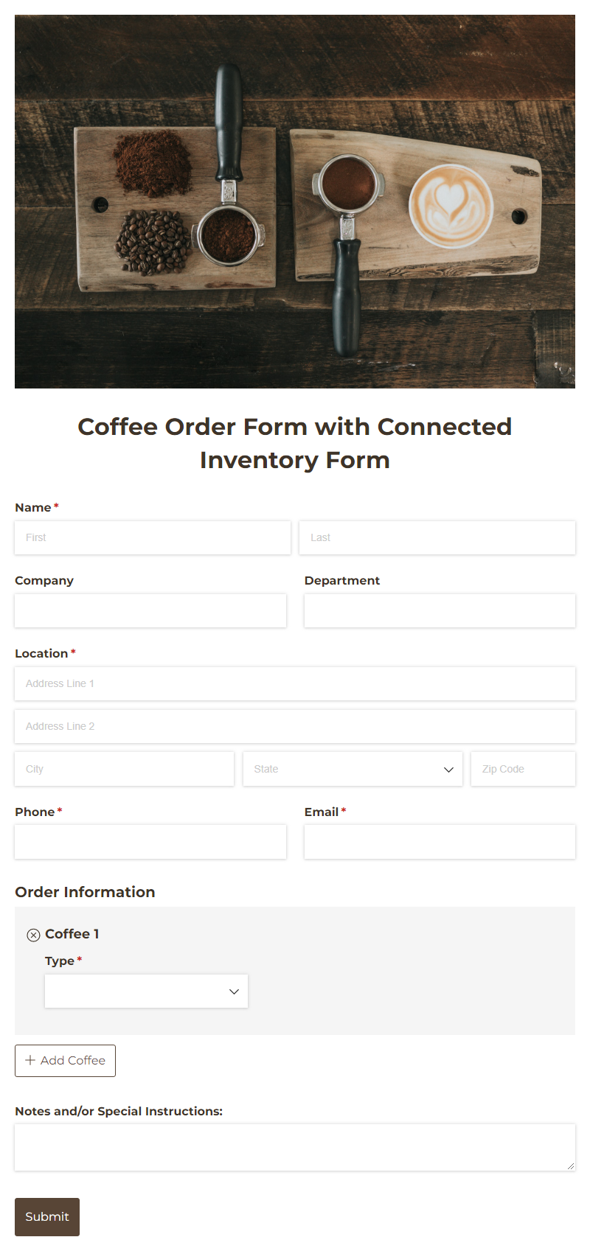
Coffee Order Form with Connected Inventory Form
Use our free Cognito Coffee Order Form template to easily collect and process bulk coffee orders.
Preview -
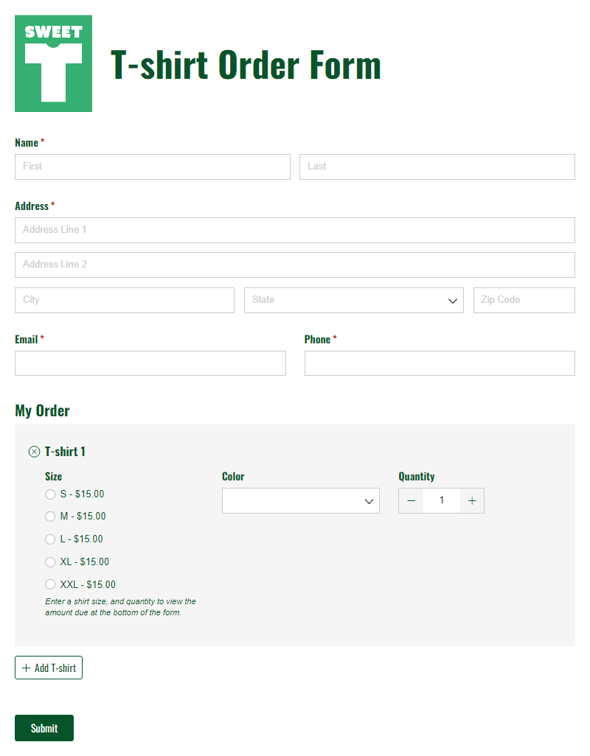
T-shirt Order Form
Use our free t-shirt order form to launch your business online. Customize it for your products and company, and integrate online payment. It’s easy.
Preview
Real-World Examples
Businesses use order forms in different ways, but most businesses have a similar goal: Streamline sales and service processes while delivering professional customer experiences.
Event tickets
Create event order forms with multiple ticket tiers, each with clear pricing. Allow registrants to specify the number of tickets they want to purchase and pay in full, while Workflow statuses track registrations and Quantity Limits prevent overselling.
Custom printing services
Allow your customers to place orders for custom stationary, apparel, or any other products you offer. Add fields for the customizations you offer (like paper type, font, or color), apply volume discounts automatically with built-in Calculations, and prevent accepting orders beyond production capacity with Quantity Limits.
Physical products and merchandise
Sell physical products and merchandise online, enabling customers to select multiple products. Pricing Calculations handle size variations and Entry Views organize orders by fulfillment status.
Advanced Features to Enhance Your Order Form
Once your online order form is running smoothly, add these powerful capabilities to create even more sophisticated and professional ordering systems that scale with your business:
- Organize large product catalogs with Lookup fields: If you have an extensive product line or frequently changing inventory, create a master “Product Catalog” form and reference it using Lookup fields on your order form. This approach lets you update product information, pricing, images, and inventory quantities in one place, with changes appearing instantly across all forms that reference your catalog.
- Give customers a portal to track their orders: Enable Guest Access to create a customer portal where people can log in to view their complete order history, track current orders in real-time, and see status updates as orders move through your process.
- Auto-generate custom order summaries or invoices: Create professional invoice or order summary PDFs that automatically generate when orders are placed. These documents can be attached to confirmation emails or made available for download, giving customers official records of their purchases.
Start Taking Online Orders Today
Stop juggling scattered spreadsheets, manual invoices, and payment collection emails. With a custom order form through Cognito Forms, your customers get a professional ordering experience while you gain an organized system that handles pricing, payment, and order management.
Whether you’re selling event tickets, custom printing services, or physical products, this approach transforms your ordering process from scattered and manual to streamlined and professional, without expensive e-commerce platforms or custom development.
FAQ
Yes. Use additional Choice fields or Yes/No fields to offer customization options (like sizes, colors, finishes, or add-ons) and assign prices to each option. Those prices automatically add to your order total. For more complex pricing scenarios, like charging more for certain sizes, applying bulk discounts at certain quantities, or offering tiered pricing structures, use Calculation fields with conditional logic to adjust pricing based on customer selections.
For a single, flat tax rate: Use the “Additional Fees” option shown in Step 4, which applies one percentage to all orders regardless of customer location.
For different tax rates based on location: Add conditional logic to charge different percentages based on where customers are located. Here’s how:
- Add a Price field and label it “Sales tax.”
- Set your desired equation as the Amount. Create logic that applies different rates based on the customer’s location.
- Example:
if Address.State="South Carolina" then (Subtotal*.07) else if Address.State="North Carolina" then (Subtotal*.09) else 0 - This charges 7% tax for South Carolina, 9% for North Carolina, and 0% for all other states.
- Example:
- The calculated tax automatically adds to the order total.
You can expand this logic to include as many states, regions, or ZIP codes as needed for your business.
Tax compliance disclaimer: Sales tax requirements vary by jurisdiction and business structure. We’re not tax professionals, and nothing here should be considered tax advice. Consult your tax advisor to ensure your tax collection complies with applicable laws and regulations.
Our integration with Stripe includes support for both Google Pay and Apple Pay. Once you connect your Stripe account to your form, Google Pay and/or Apple Pay will appear as an option in the payment section. You can turn Google Pay off and on from your Stripe dashboard.
- Log in to your Stripe account and go to Settings.
- Under Product settings > Payments, select Payment methods.
- Under Select your platform, select Cognito.
- Under Wallets, locate Apple Pay and/or Google Pay and turn the integration(s) off or on.