Build professional quizzes with multiple question types and automatic scoring. With Cognito Forms, your quizzes can calculate results instantly and provide students with immediate results.
Build Time & Skill
30-40 min
Intermediate
What you'll learn
How to create a quiz with various question types (multiple choice, multi-select, numerical, text-based, and image-based questions), set up automatic scoring calculations, and display results after submission.

Manual grading is time consuming and delays feedback to students. With Cognito Forms, you can build quizzes that automatically score responses, calculate percentages, and show students their results immediately after submission. Whether you’re creating a certification exam, training assessment, or classroom quiz, this automated approach helps you:
- Eliminate manual grading. Assign point values to correct answers and let calculations do the work, instantly scoring submissions without reviewing each response.
- Provide immediate feedback. Students see their scores as soon as they submit, rather than waiting to know how they did on the assessment.
- Maintain consistency. Every quiz is scored the same way using your defined criteria, removing subjective grading and ensuring fairness.
- Save time on routine assessments. Focus on teaching and curriculum development instead of spending hours calculating scores and providing feedback.
How Quiz Scoring Works in Cognito Forms
Before building your quiz, understand the two features that work together to automatically calculate quiz results without manual scoring or delays in providing feedback:
| Choice fields with assigned values | Calculation fields |
|---|---|
| By assigning point values to choice options, the system records the associated point value when someone selects an answer. | Calculation fields add up all the point values from the quiz questions to display the total score. |
| This allows you to reward points for correct answers, while incorrect answers receive zero points. | This allows you to instantly calculate the total points earned and the percentage score for your quiz. |
| Learn more about Choice fields → | Learn more about Calculations → |
Choice fields with assigned values
By assigning point values to choice options, the system records the associated point value when someone selects an answer. This allows you to reward points for correct answers, while incorrect answers receive zero points.
Learn more about Choice fields →
Calculation fields
Calculation fields add up all the point values from the quiz questions to display the total score. This allows you to instantly calculate the total points earned and the percentage score for your quiz.
Setting Up Your Quiz: Step-by-Step
Create your form structure, add basic student information fields, configure scoring calculations, and set up the confirmation message to provide a score. These foundational steps establish the framework that all your quiz questions will plug into.

Step 1: Create your form and add student information fields
Start with a new form and add fields to capture who’s taking the quiz. This information helps you track results and send score notifications.
- Create a new form and name it appropriately.
- Add fields for student identification. You can choose one of these two options:
- A Name field for their name and an Email field to send score notifications.
- A Person field connected to a list of your students and set to the Current User. Use this option if you want students to verify their email address as a Guest and have the form automatically identify who is logged in.
- Add a Date field with the Default Value set to
=DateTime.Todayto record when the quiz was taken. - Set the Name, Email, or Person field to Required → Always.
- Make the Date field Read-Only → Always to prevent accidental changes.
Step 2: Add quiz questions
Now add your quiz questions using the appropriate question type for each scenario. Add as many questions as your assessment requires. You’ll reference all of them when completing your scoring calculations in the next step.
The next section (Question Types: Five Ways to Test Knowledge) explains five different question types and when to use each one. Here is a quick-reference to take you directly to each question type’s section:
- Method 1: Multiple choice questions (single correct answer)
- Method 2: Multi-select questions (multiple correct answers)
- Method 3: Numerical answer questions
- Method 4: Image-based questions
- Method 5: Open-ended text questions
Step 3: Set up scoring calculations
After adding questions, create the hidden Calculation fields that will automatically tally the score. You’ll create two calculations: one for the number of points earned and one for the percentage score.
Calculate the number of points earned
- Add a Calculation field and name it “Points Earned.”
- Set the Type to Number (Integer, zero decimals).
- Click the lightning bolt icon to open the calculation editor.
- Create a calculation that adds the
_Valueof each question field:=Question1_Value + Question2_Value + Question3_Value + Question4_Value + Question5_Value
Calculate the percentage score
- Add a Calculation field and name it “Percentage.”
- Set the Type to Percent and change the Decimal Places setting, if desired.
- In the Calculation field, click the lightning bolt icon to open the calculation editor.
- Create a calculation that divides the number of points earned by the total possible points:
=(Question1_Value + Question2_Value + Question3_Value + Question4_Value + Question5_Value) / 5- (Replace “5” with your actual number of possible points.)
Long field names can make writing Calculations more difficult. Enable Developer mode to assign shorter internal names for easier, cleaner Calculation formulas. For example, reference a Choice field as Question1 (instead of something long like Question1NickCarrawaysRoleAsNarratorIsSignificantBecauseHeIs) without changing the field label that students see on the form.
Step 4: Configure submission settings
Set up what happens when students submit the quiz. You’ll make the entry read-only after submission and configure the confirmation message to display their score.
Set up Read-Only settings
Making the form read-only after submission ensures students can’t change their answers after submission.
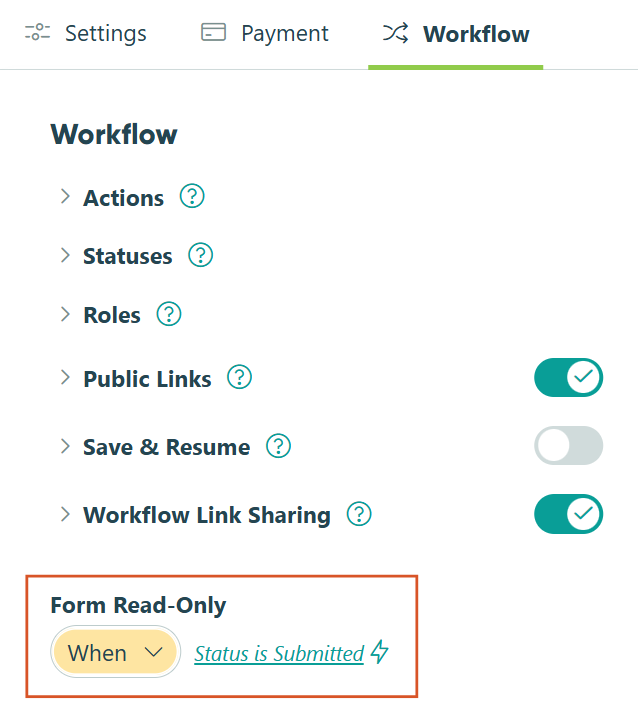
- Navigate to Workflow .
-
Set Form Read-Only
to
When
→
Entry.Status is Submitted
Add a custom confirmation message
Adding the calculated scores to an instant confirmation message provides students with immediate, real-time results.
- Find Actions and click on the "Submit" Action.
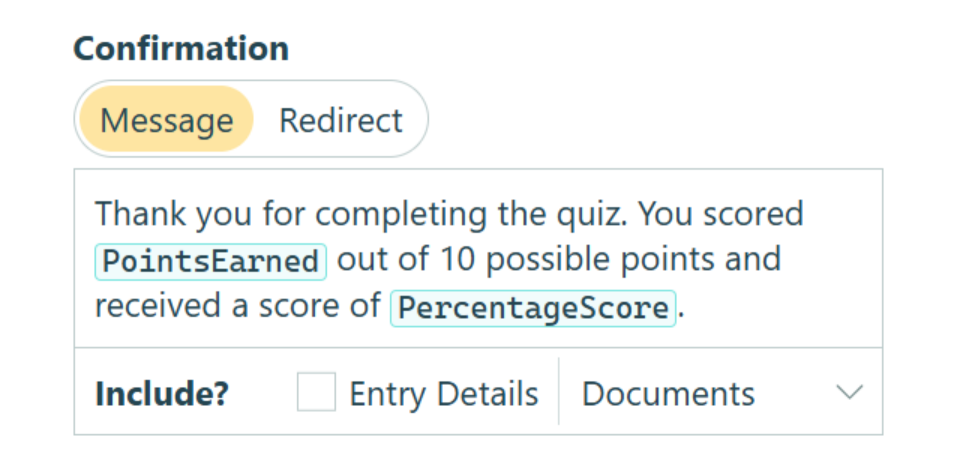
- Under Confirmation make sure Message is selected.
- Click into the Message textbox and write your confirmation message.
- Use the Insert Field button to dynamically show the student’s name and the calculated scores.
-
Example confirmation message: "Thank you for completing the quiz,
[Student.Name]. You scored[PointsEarned]out of 10 points and received a score of[PercentageScore]."
Set up Read-Only settings
Making the form read-only after submission ensures students can’t change their answers after submission.
- Navigate to Workflow .
-
Set Form Read-Only
to
When
→
Entry.Status is Submitted
Add a custom confirmation message
Adding the calculated scores to an instant confirmation message provides students with immediate, real-time results.
- Find Actions and click on the "Submit" Action.
- Under Confirmation make sure Message is selected.
- Click into the Message textbox and write your confirmation message.
- Use the Insert Field button to dynamically show the student’s name and the calculated scores.
-
Example confirmation message: "Thank you for completing the quiz,
[Student.Name]. You scored[PointsEarned]out of 10 points and received a score of[PercentageScore]."
Question Types: Five Ways to Test Knowledge
Choose from five different question formats based on what you’re testing. Each type serves different assessment needs.
Method 1: Multiple choice questions (single correct answer)
Use a Choice field with a single selection type when only one answer is correct. Students see all options at once but can only select one response, making it ideal for questions where you need them to identify the single correct answer from among several options. This format works well for fact-based questions, definitions, or scenarios with a single best answer.

How to set it up
- Add a Choice field and enter your question as the field label.
- Set the Type to Radio Buttons.
- Add your answer options in the Choices section (click the + icon to add more).
- Check Assign Values in the field settings.
- For the correct answer, set the Value to 1.
- You can set the Value to any amount. This will determine how many points the correct answer will be worth in the automatic scoring.
- For all incorrect answers, set the Value to 0, or leave the Value blank.
- Set Require This Field to Always.
Method 2: Multi-select questions (multiple correct answers)
Use checkbox-style questions when multiple answers are correct. Students must identify all correct options while avoiding incorrect ones. Multi-select questions test students’ comprehensive understanding rather than single-fact recall, making this question type more challenging and better suited for testing deeper knowledge.

How to set it up
- Add a Choice field and enter your question as the field label.
- Change Selection Type to Multiple.
- You can choose either Style option here: Checkboxes or Cards.
- Add your answer options (include both correct and incorrect choices).
- Under Choice Options, check Assign Values.
- For each Choice you added, assign 1 to correct answers and 0 to incorrect answers.
- Under Require This Field, select Always.
Method 3: Numerical answer questions
Use Number fields when students must calculate or type a specific numerical answer. Unlike multiple choice questions where students select from provided options, numerical questions require students to perform calculations and enter the answer themselves. These work best for math problems, data analysis, measurement conversions, or any question requiring a numeric response.

Add a Number field
- Add a Number field and enter your question as the field label.
- Set the Type to Integer or Decimal as appropriate for your question.
Set the Number field’s correct answer
- Add a Calculation field of the Number type.
- Set the Type to Number and Decimal Places to 0.
- In the Calculation field, click the lightning bolt icon to open the calculation editor.
- Create a calculation that lists a numerical score based on the answer provided in the Number field:
= if NumberFieldQuestion = Answer then 1 else 0 - Set Show This Field to Never.
Method 4: Image-based questions
Use image-based questions to test your students’ ability to apply knowledge to visual information rather than just recalling text-based facts. Image selections work well when students need to identify visual elements, match images to concepts, or demonstrate visual recognition skills.

How to set it up
- Add a Choice field and enter your question as the field label (e.g., “Which image shows a cumulus cloud?”)
- Under Selection Type, keep it set to Single if only one image is correct or change it to Multiple if you want students to select multiple answers.
- You can choose any Style option here, but Cards tend to look the nicest when displaying images in Choice fields.
- For each choice option:
- Type a brief label. (You can check Hide Labels if you want only images visible, but you still need to give each Choice a unique label.)
- Click the image icon next to the choice label.
- Upload the corresponding image file.
- Under Choice Options, check Assign Values.
- Assign 1 to the correct answer(s) and 0 to the incorrect answer(s).
- Set Require This Field to Always.
- Optional: Adjust the Image Size to a larger size for better visibility. (Use Preview mode to see how large the images will appear on your public form.)
Use consistent image dimensions. Upload images of similar sizes to create a professional, uniform appearance. If images vary widely in dimensions, they may display awkwardly. Consider cropping or resizing images before uploading them to your quiz.
Method 5: Open-ended text questions
Use Textbox fields when you want students to write answers in their own words. While these cannot be auto-scored, you can set character requirements to ensure substantive responses. Text questions are valuable for assessing understanding that goes beyond selecting from provided options. They require students to articulate ideas, explain concepts, or demonstrate critical thinking.

How to set it up
- Add a Textbox field and enter your question as the field label.
- Set the Type to Multiple Lines.
- Optional: Set character limits under Number of Characters:
- Set a Minimum to require substantive responses (e.g., 100 characters for short answer, 250+ for paragraph responses)
- Set a Maximum to keep responses focused (e.g., 500 characters to encourage concise writing)
- Set Require This Field to Always.
Important: These questions require manual review and grading. Do not include Textbox fields in your scoring calculations, because they don’t have _Value properties. Consider these as bonus opportunities for additional assessment beyond the auto-scored questions, or use them in quizzes where some manual grading is acceptable.
Additional Quiz Customizations
Once your quiz is working as you expect, these techniques can add sophistication and improve the test-taking experience. A simple assessment can become a powerful learning tool that provides detailed feedback and guides students toward mastery.
Add Help Text to provide context
Help Text appears in lighter text below the question, providing guidance so students understand what’s expected and to reduce anxiety about unclear questions. This is particularly useful for complex numerical questions where students need to know how to format their answer, or for multi-select questions where you want to clarify how many choices to select.

How to do this
- Click on any field and find Help Text in the field settings.
- Add information such as:
- "Round your answer to two decimal places.”
- "Select all that apply.”
- “Hint: Consider the relationship between X and Y when answering.”
Values from protected fields cannot be inserted into the help text.
Show correct/incorrect answers after submission
Let students review which questions they answered correctly after submitting the quiz. This provides valuable learning feedback without allowing them to change their answers. Students can see where they went wrong and understand what they missed, turning the quiz into both an assessment tool and a learning resource.
How to do this
- For each question field, add a Calculation field immediately after it.
- Name it descriptively like “Question 1 Result.”
- Set the Type to Text.
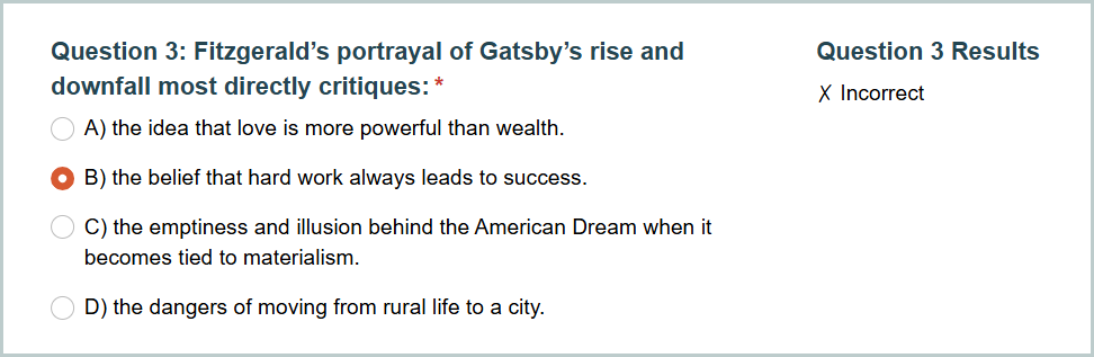
- Create a calculation that checks if the answer was correct. For example:
=if Question1_Value = 1 then "✓ Correct" else if Question1_Value != 1 then "✗ Incorrect" else null - Set Show This Field to When →
Entry.Status is not Incomplete - Repeat for each question you want to provide feedback on.
Students can reopen their read-only entry (via a Workflow Link or in their portal) to see which questions they got right or wrong. The checkmarks and X marks appear next to each question, providing clear visual feedback about their performance without revealing the actual correct answers.
Email students their score and a copy of their answers
Automatically send students their score via email after they complete the quiz, creating a permanent record of their results that doesn’t require them to log back into the form. This is especially valuable for certification exams or compliance training where documentation is important.
How to do this
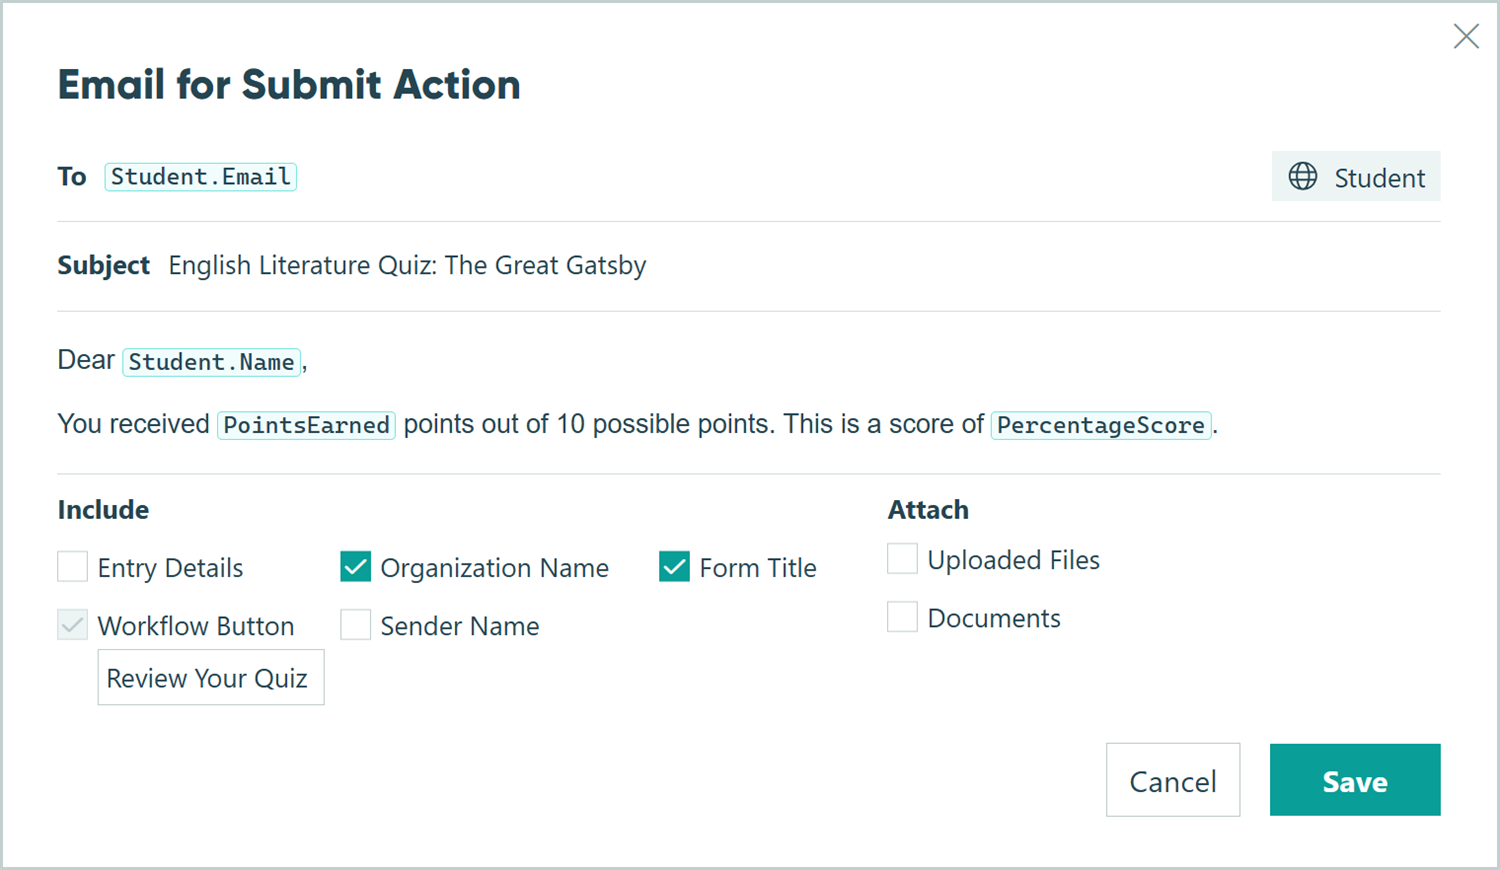
- Navigate to Workflow → Actions and open the Submit action.
- Scroll to Send Emails and click + Add Email.
- Set To to the Email or Person field that students filled out.
- In the message body, write your message using the Insert Field option to include:
- Student name:
[Student.Name]or[Name] - Points earned:
[PointsEarned] - Percentage:
[PercentageScore]
- Student name:
- Optional: Click Share Workflow Link next to the To field, select the Public role, and customize the button text to “Review Your Quiz.”
Students receive an email immediately after submission with their complete results. If you included a workflow link, they can click through to see their completed quiz with all the correct/incorrect indicators you set up in the first advanced customization.
Real-World Examples
See how quizzes work across different scenarios. Each example demonstrates how the question types combine to create effective assessments for different industries and purposes.
- K-12 and higher education assessments: A high school English teacher creates a quiz on “The Great Gatsby” using multiple question types to assess different levels of understanding. The quiz automatically scores the objective questions while the teacher manually reviews the written response questions, combining efficiency with deeper assessment of literary analysis skills.
- Employee training knowledge checks: A manufacturing company builds a safety quiz that employees must pass before operating equipment. Several question types are used to comprehensively test their safety knowledge. Notably, image-based questions ask employees to identify safety violations, testing their ability to recognize hazards visually. A score of 90% is required and a lower scores trigger an automated email so their manager can administer additional training.
- Professional certification exams: A project management training organization creates certification practice exams that mirror the real certification exam’s format. The percentage score determines pass/fail status (passing requires 70%). The quiz provides immediate feedback showing which topics need more study, helping candidates focus their preparation before the actual certification exam.
Start Building Automated Quizzes Today
Stop spending hours manually calculating quiz scores and providing delayed feedback. With Cognito Forms’ automatic scoring, you can create professional assessments that instantly calculate scores and show students their results immediately after submission. Whether you’re building classroom quizzes, certification exams, or compliance training assessments, automated scoring transforms your testing process from time-consuming to efficient.
The combination of multiple question types, from multiple choice and multi-select to numerical calculations and image recognition, lets you thoroughly assess knowledge while maintaining the efficiency of automatic grading. Set up your scoring calculations once, and every submission scores itself instantly, freeing you to focus on what matters: teaching, training, and helping students improve.
Start with a ready-made template
Skip the setup and start with a template. Customize the questions to match your content, and you’ll have a professional quiz ready in minutes.
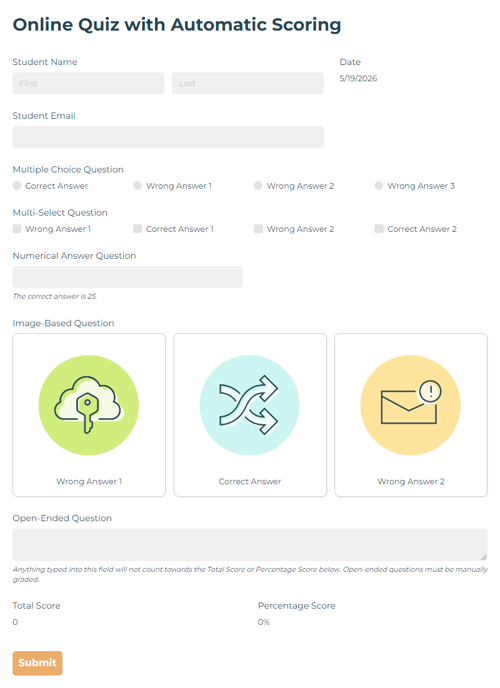
Online Quiz with Automatic Scoring
- All 5 question types
- Automatic scoring calculations
- Instant feedback
FAQ
Yes, assign different point values to make some questions worth more than others. For high-value questions, set the correct answer’s Value to 2, 3, or any number reflecting its importance. Then adjust your Percentage Score calculation to divide by the new total possible points. For example, if you have three 1-point questions and two 3-point questions, your total is 9 points, so divide by 9 instead of 5 in your percentage calculation.
Unanswered questions are treated as zero points in calculations because blank fields have no value. If you want to ensure students answer everything, set all question fields to Require This Field → Always. This prevents submission until every question has a response, ensuring you’re scoring complete quizzes rather than partial attempts.
Simply remove the references of the Points Earned and Percentage Score calculation fields from the confirmation message and email notification. You can change this to a generic “Thank you for submitting” message.