Link related entries across two forms and keep them in sync, automatically. With Linked Lookups, a change made on either form updates both sides instantly, so your data is always accurate no matter where it lives.
Build Time & Skill
10-15 min
Intermediate
What you'll learn
How to create a two-way connection between entries on different forms so your records stay accurate without duplicate data entry
Most form tools move data in one direction. You submit a form, that information lands somewhere, and if something changes later, someone has to go find it and update it manually. For teams managing clients, staff, students, or volunteers across multiple forms, that process breaks down fast. Something always seems to slip through the cracks.
Linked Lookups create a live, two-way connection between entries on different forms. Update a record on one form, and the linked record on the other form reflects it automatically. No extra steps, no manual cross-referencing, and no outdated information floating around somewhere else.
This is the right tool when you need to:
- Manage relationships between people and what’s assigned to them, like clients and invoices, staff and work orders, or families and case files.
- Give different teams access to different forms while everyone works from the same accurate data.
- Update a record from whichever form is most convenient and trust that the other side reflects it.
- Build a single source of truth without building a full custom database.
What Are Linked Lookups?
Linked Lookups by Cognito Forms creates a two-way relationship between entries on two different forms. When you update the linked field on one form, the connected entry on the other form updates automatically, and every change creates an audit record so you can track what happened and when.
This is different from a standard Lookup field or Person field. Those move data in one direction only. With Linked Lookups, both forms stay in sync regardless of which side the update comes from.
Heads up: If you link an existing field that already has data, that field will update to match values from the linked form to get both sides in sync. You’ll see a warning before this happens so you can confirm.
Six Ways to Link Forms Together with Linked Lookups
Linked Lookups work across a wide range of business relationships. Whether you’re connecting clients to their invoices, staff to their work orders, or teachers to student records, the setup follows the same pattern: two forms, two fields, and a two-way connection that stays accurate on its own.
Assign technicians or staff to work orders
Link each work order to an assigned technician or staff member. Managers can see every open job from a technician’s profile. Each work order always shows the right person, even after last-minute reassignments happen in the field.

Setup overview
- You need two forms ready:
- A Work Order form to receive entries for new work orders submitted and power your internal workflow.
- A Technicians form to store each technician’s profile information.
- Your Work Order form needs a Person field pointing to the Technicians form. Set the Selection Type to:
- Single: if there should only be one technician assigned to each work order
- Multiple: if there could be multiple technicians on a single work order
- The Technicians form needs a Lookup field pointing to your Work Order form. Set the Selection Type to:
- Single: if technicians only have a single work order assigned to them at once
- Multiple: if technicians have multiple work orders assigned to them at once
- From either form, open the Lookup or Person field and enable Link With Another Field.
- Select the matching field on the other form and save your changes.
What this looks like in practice
A dispatcher reassigns a work order from one technician to another directly on the work order form. The first technician’s profile removes the job from their list instantly. The second technician’s profile adds it. Both records are accurate before anyone picks up the phone.
Every Linked Lookup update creates an automatic audit record. You’ll always have a clear history of who was assigned to what, and when on the entry’s Audit Log. This is useful for accountability, billing disputes, and compliance documentation.
Link clients to their support inquiries
Connect each client record to every support ticket they’ve submitted. Your team can open a client’s profile and see their full request history in one place. No searching through inboxes or separate systems. Each ticket always traces back to the right client, and the client record always reflects an updated ticket history.

Setup overview
- This setup will need two forms:
- A Client Information form to store each individual client’s contact information and any other details you need.
- A Support Tickets form that collects the information about the client’s issue or inquiry.
- Your Client form needs a Lookup field connected to your Support Tickets form. Set the Selection Type to Multiple, since each client can have multiple tickets.
- Your Support Tickets form needs a Person field pointing to your Client form. Set the Selection Type to Single, since each ticket connects to one client. (Set Default To
Current Userif clients are submitting the form and you want this field to prefill with the logged-in guest.) - Open the Lookup field or Person field from either form and check the box next to Link With Another Field.
- Select the opposite form in the settings and Save your changes.
What this looks like in practice
A client submits a new ticket and their client record updates immediately to show the open ticket. Support staff can pull up the client’s profile and see every request they’ve ever submitted, without asking the client to repeat their history.
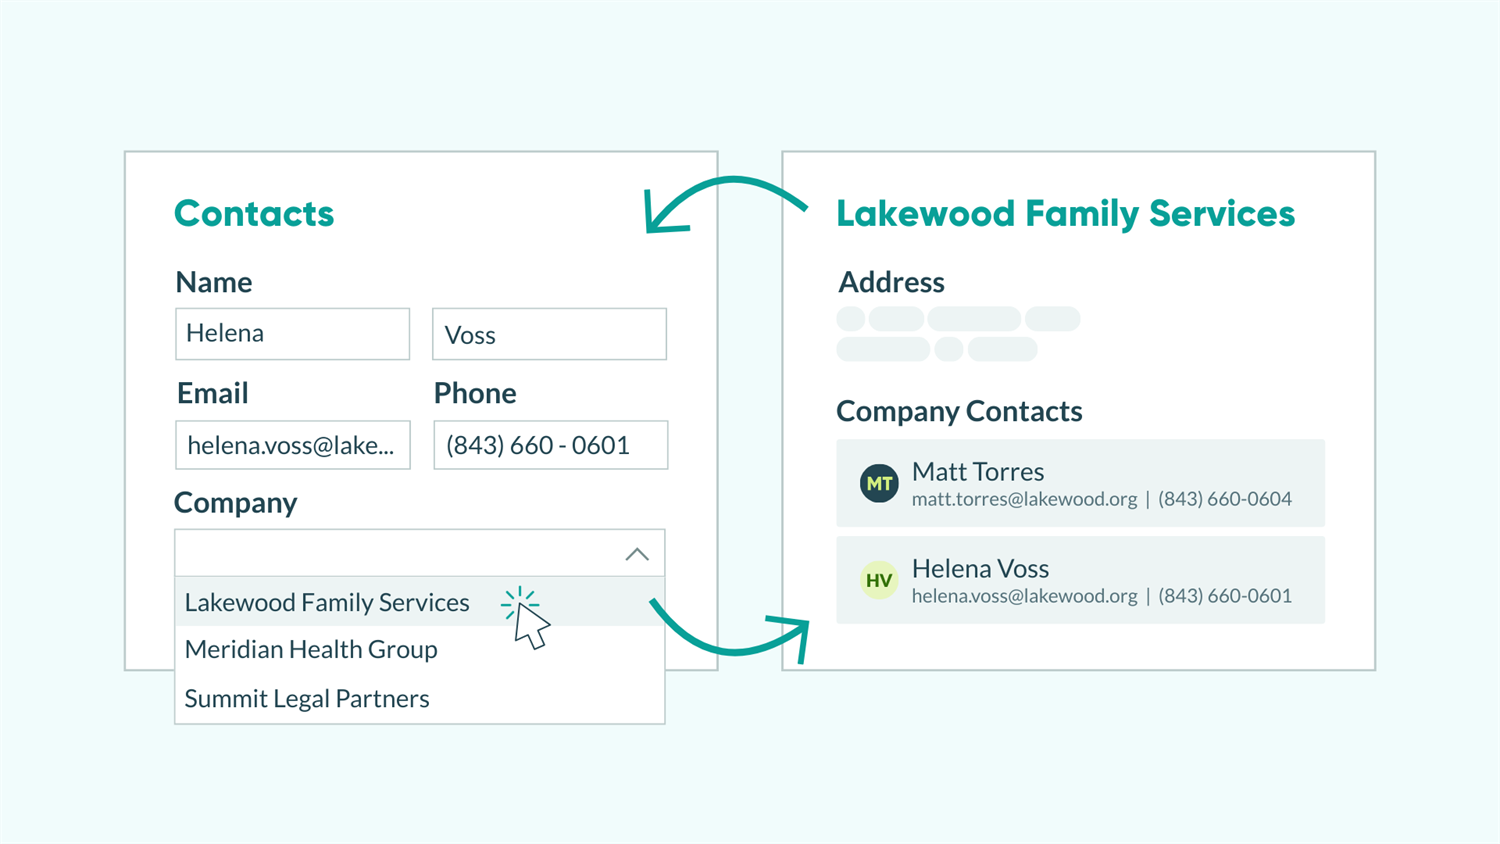
Link company accounts to their contacts
Connect each contact to the company account they belong to. Account managers can open a company record and see every associated contact in one place. Each contact always traces back to the right account, even as teams grow or relationships change.

Setup overview
- You need two forms ready:
- An Accounts form that represents the company or account in which your contacts are associated with.
- A Contacts form that will store each individual person’s contact information.
- The Accounts form needs a Person field that points to your Contacts form. Set the Selection Type to Multiple, since there will be multiple contacts for each company or account.
- Your Contacts form needs a Lookup field connected to your Accounts form. Set the Selection Type to Single, since each contact will belong to a single account.
- Open the Lookup field or Person field from either form and check the box next to Link With Another Field.
- Select the opposite form in the settings and Save your changes.
What this looks like in practice
A new point of contact joins an existing client account. A team member adds them to the Contacts form and selects the account from the Lookup field. The Account record updates immediately to include the new contact. No one has to go back and add them to the company record separately.
Reference contact data directly on the account record by adding the email or phone number as the Description in the Person field settings.
Connect teachers to their students
Link each student record to their assigned teacher or homeroom. Teachers can open their profile and see their full class roster at a glance. Each student always points back to the right teacher, and when enrollment changes mid-year, both sides update from a single edit.

Setup overview
- You need two forms ready:
- A Homeroom form that represents a single classroom and shows each teacher’s full class roster.
- A Student Information form for each child. This form will be filled out by parents during enrollment and store each child’s information.
- Your Homeroom form needs a Person field connected to the Student Information form. Set the Selection Type to Multiple, since one teacher has many students.
- The Student Information form needs a Lookup field connected to the Homeroom form. Set the Selection Type to Single, since each student will only have one homeroom teacher.
- Open the Lookup field or Person field from either form and check the box next to Link With Another Field.
- Select the opposite form in the settings and Save your changes.
What this looks like in practice
A student transfers from one homeroom to another mid-semester. A staff member updates the student’s record and selects the new teacher from the Lookup field. The original teacher’s roster removes the student automatically. The new teacher’s roster adds them. No one has to open the teacher’s form to make it accurate.
Track tasks within a larger project
Link each task to its parent project so both sides of the relationship stay connected. Project managers can open a project record and see every associated task at a glance. Each task always points back to the right project. When work shifts, the project entry updates without any manual editing.

Setup overview
- This setup will need two forms:
- A Projects form for each overarching project your team will work on. Add any fields you need to capture the information important to you.
- A Tasks form for each individual task to be done by your team. Add fields for name, date, team or staff assignment, etc.
- Your Projects form needs a Lookup field set to Multiple selection, since one project has many tasks.
- The Tasks form needs a Lookup field set to Single selection, since each task belongs to one project.
- Open the Lookup field from either form and check the box next to Link With Another Field.
- Select the opposite form in the settings and Save your changes.
What this looks like in practice
A project manager opens a project record mid-sprint and sees the full task list: what’s in progress, what’s waiting, and what’s done. A team member adds a new task and selects the project from the Lookup field. The project record updates immediately to include it. No one has to manually add it to a separate tracker or ping the project manager to update the list.
Manage volunteers and event shifts
Link volunteer records to their assigned event shifts. Coordinators can pull up a full schedule from a volunteer’s profile, and each shift always reflects who’s actually covering it. Last-minute changes update both sides without a second edit.

Setup overview
- This setup will need two forms:
- A Volunteer Profile form that includes all profile information for each individual volunteer.
- An Event Shifts form where each entry represents a single shift that needs to be covered be one of the organization’s volunteers.
- Your Volunteer Profile form needs a Lookup field connected to the Event Shifts form. Set the Selection Type to:
- Single: if each volunteer will only cover a single shift
- Multiple: if each volunteer will cover multiple shifts
- The Event Shifts form needs a Person field pointing to the Volunteer Profile form. Set the Selection Type to:
- Single: if you only need one volunteer per shift
- Multiple: if multiple volunteers can cover a single shift
- From either form’s Lookup or Person field, enable Link With Another Field.
- Select the matching field on the other form and save your changes.
What this looks like in practice
A volunteer coordinator moves someone from Saturday’s morning shift to Sunday’s afternoon slot, right on the event record. Saturday’s shift removes them from the roster instantly. Sunday’s shift adds them. The volunteer’s profile reflects the change, all from one update.
Use the Include filter on your Lookup field to display only upcoming or active shifts in the dropdown. Volunteers won’t see expired events cluttering their options, and coordinators won’t accidentally assign someone to a shift that’s already passed.
Additional Features that Go Beyond Linked Lookups
Once your forms are connected, these features pair naturally with Linked Lookups to build more complete, automated workflows:
- Pull data across forms using calculations that reference a Linked Lookup field. For example, reference a client’s service tier from their linked client record to calculate invoice totals automatically, with no manual data entry required.
- Automatically generate a linked record when a new entry is added. Add a new employee and trigger the creation of their onboarding task list with Auto-Create Entries. From the moment the new entry is created it can be pre-connected through the Linked Lookup field.
- Turn linked entries into organized task lists. With Task Views, each person sees exactly what’s assigned to them, and completed tasks disappear automatically as they work through the list.
- Give your customers a secure portal where they see only the entries linked to them. With Guest Access combined with Linked Lookups, every record they view stays accurate without any manual updates.
Start Connecting Your Forms Today
Disconnected records create extra work and introduce errors that are hard to catch until they turn into a real problem. Linked Lookups give you one place where everything stays accurate. Data is updated from whichever form makes the most sense in the moment, with no duplicate entry and no manual syncing.
Create two-way connections between your forms in Cognito Forms and see how much simpler it is to manage the relationships between your data.
FAQ
Yes. A single form can have multiple Linked Lookup connections, each pointing to a different field or form. However, each individual Lookup field or Person field can only be linked to one other field at a time. If you need to change which fields are connected, remove the existing link and create a new one.
Each Linked Lookup automatically connects up to 100 selected entries. If an automatic update would exceed that limit, the 100 most recent entries are kept and older ones are unselected first. You can still manually select more than 100 entries when needed. A single change can also trigger up to 1,000 Linked Lookup updates across your forms.