Automatically score website leads and route them to your sales team based on qualification criteria—no manual sorting required.
Build Time & Skill
20-30 min
Intermediate
What you'll learn
How to build a contact form that automatically scores leads based on five qualification criteria, assigns priority levels, and routes qualified prospects to the appropriate sales team member
Manual lead qualification wastes hours every week. Your sales team spends valuable time reviewing every contact form submission, trying to determine which leads deserve immediate attention and which need nurturing. Meanwhile, high-value prospects wait for responses while your team sorts through unqualified inquiries.
With Cognito Forms, you can build an intelligent contact form that automatically qualifies leads for you. The form assigns point values to prospect characteristics, calculates a qualification score behind the scenes, and routes qualified leads to the right team member. Your team can focus on the leads that meet your criteria, without prospects knowing they’re being scored.
This automated approach helps you:
- Focus on qualified leads only. Your sales team receives only prospects who meet your qualification threshold.
- Set your own scoring criteria. Customize which questions are used to determine if leads are qualified, ensuring the form fits your exact needs.
- Respond faster to top prospects. High-scoring leads trigger immediate notifications, so your team contacts them while they’re actively looking.
Understand Lead Scoring
Lead scoring assigns point values to prospect characteristics, creating a numerical qualification score that determines whether a lead is ready for sales outreach or needs more nurturing. In Cognito Forms, lead scoring works through three components working together:
| Choice fields with hidden point values | Hidden Calculation field |
|---|---|
| Each answer option in a Choice field will have an assigned numeric value that prospects never see. | Calculations allow you to automatically sum all the point values based on selected answers. |
| Learn more about Choice fields → | Learn more about Calculations → |
Choice fields with hidden point values
Each answer option in a Choice field will have an assigned numeric value that prospects never see.
Learn more about Choice fields →
Hidden Calculation field
Calculations allow you to automatically sum all the point values based on selected answers.
Step-by-Step: Building Your Lead Scoring Contact Form
Follow these eight steps to transform a basic contact form into an intelligent lead qualification system.
Step 1: Set up your contact form structure
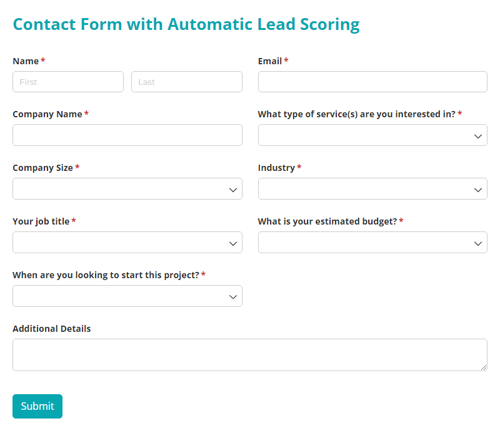
Create the foundation of your contact form with standard fields that collect basic information from every prospect.
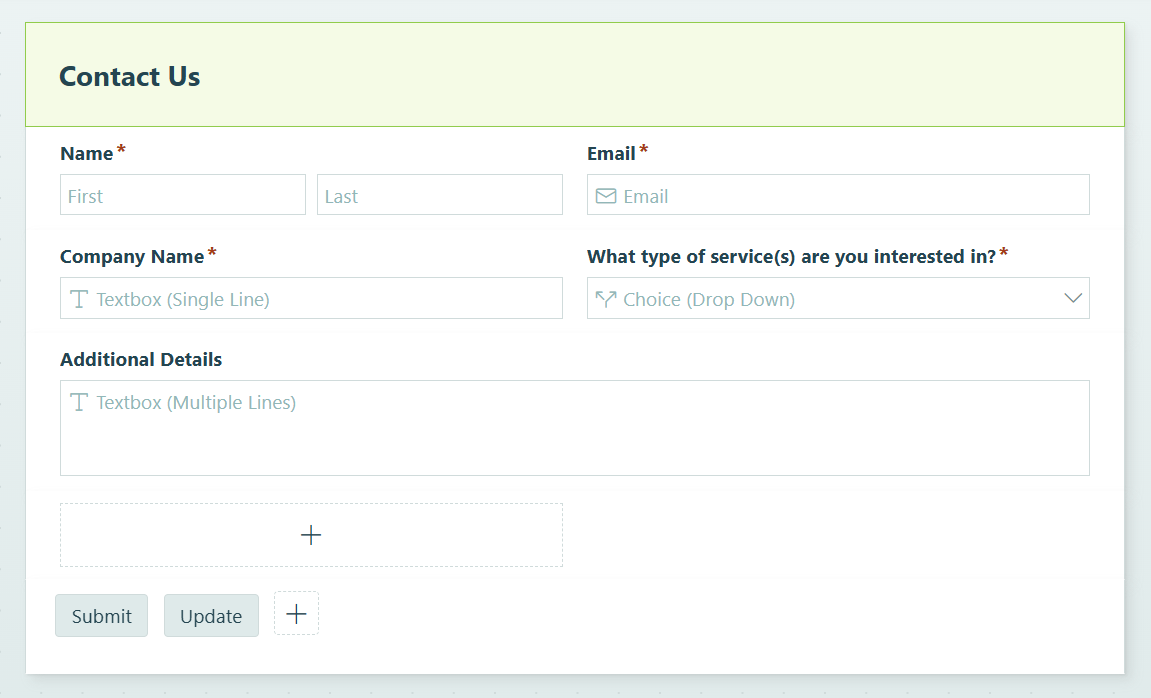
- Create a new form and name it “Website Contact Form,” “Contact Us,” or "Lead Qualification Form.”
- Add these essential fields:
- Name field (set to required)
- Email field (set to required)
- Company Name as a Text field (set to required)
- Service Interest as a Choice field with radio buttons. Include options like “Web Design,” “Digital Marketing,” “Branding,” or whatever services you offer.
- Message/Additional Details as a multi-line Text field (leave optional)
Step 2: Add Choice fields for lead scoring criteria
Add Choice fields that will drive your qualification score. These fields appear as typical form fields to prospects, but each answer has a hidden point value.

In our example, these are the fields we’re adding to the form:
| Field Name | Options |
|---|---|
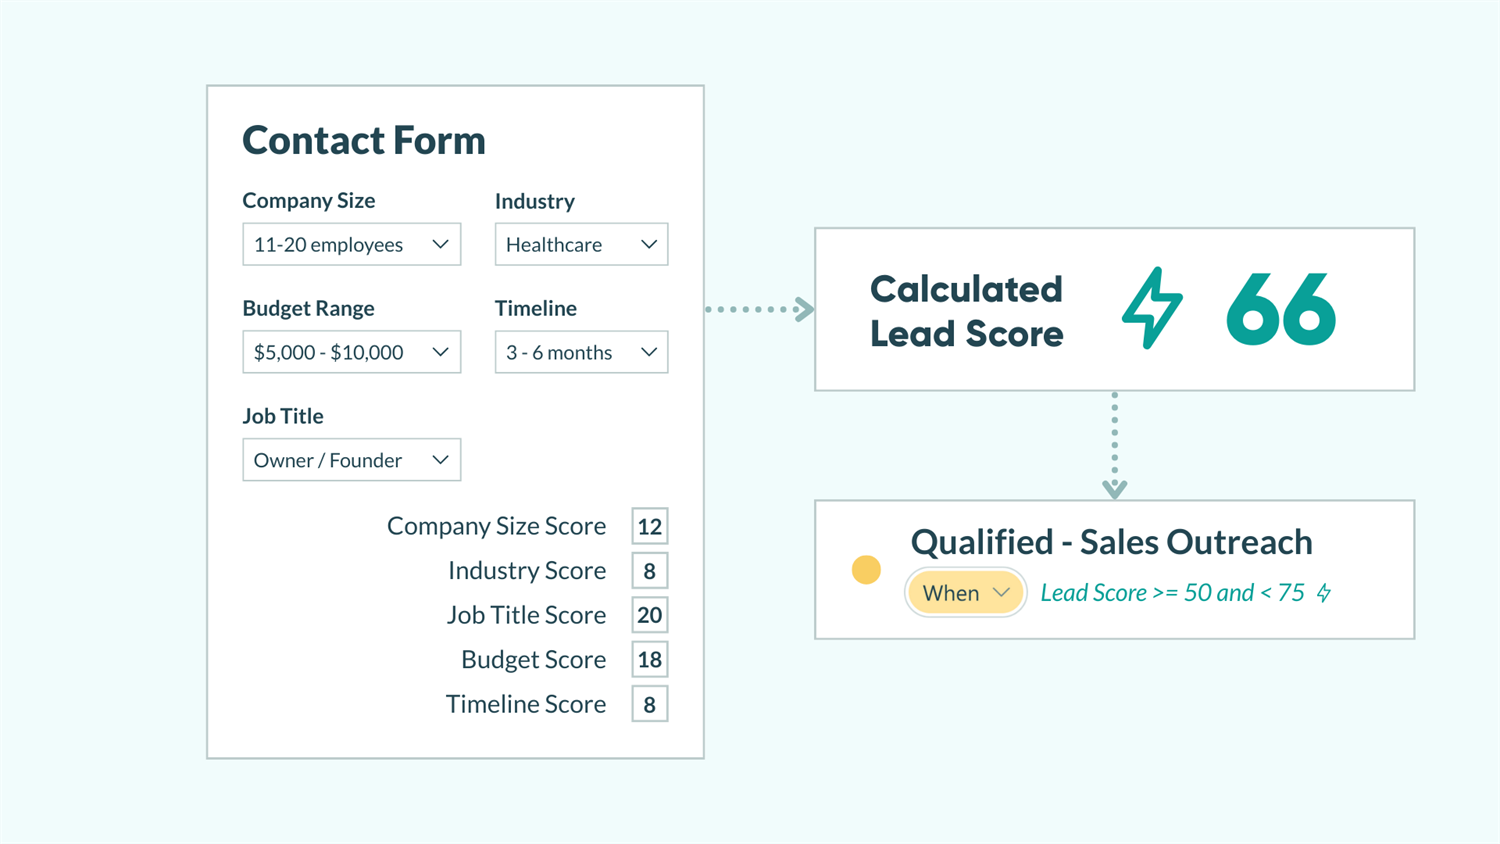
| Company Size | Solo business owner, 2-10 employees, 11-20 employees, 21+ employees |
| Industry | List industries relevant to your business, such as: Professional Services, Healthcare, Retail, Nonprofit |
| What is your estimated budget? | Under $2,000; $2,000 - $5,000; $5,000 - $10,000; $10,000+ |
| Your job title | Owner/Founder, Manager, Individual Contributor, Other |
| When are you looking to start your project? | Immediately (within 2 weeks), Within 1-3 months, 3-6 months, Just researching |
Make all scoring fields required to ensure you have complete qualification data for every lead.
Step 3: Assign point values to each option
Now comes the scoring magic. You’ll assign hidden numeric values to each answer option.

- Click on one of the Choice fields you just set up.
- Under Choice Options, check the box next to Assign Values.
- In the Value column that appears, enter the point value for each option.
- Repeat for all five scoring fields.
Here are recommended point values aligned with typical business priorities:
| Choice Option | Value | Rationale |
|---|---|---|
| Solo business owner | 3 | Small business; one-off projects are more likely |
| 2-10 employees | 7 | Small business, but consistent projects likely |
| 11-20 employees | 12 | Mid-range opportunity |
| 21+ employees | 15 | Larger opportunity |
| Choice Option | Value | Rationale |
|---|---|---|
| Your ideal industries | 15 | Perfect fit for your services |
| Adjacent industries | 8 | Good fit, less specialized |
| Other industries | 0 | Still possible, but harder |
| Choice Option | Value | Rationale |
|---|---|---|
| Under $2,000 | 0 | Below your ideal threshold |
| $2,000-$5,000 | 10 | Entry level |
| $5,000-$10,000 | 18 | Sweet spot |
| $10,000+ | 25 | High value |
| Choice Option | Value | Rationale |
|---|---|---|
| Owner/Founder | 20 | Decision maker |
| Manager | 12 | Strong/some influence |
| Individual Contributor | 5 | Limited authority |
| Choice Option | Value | Rationale |
|---|---|---|
| Immediately (within 2 weeks) | 25 | Ready to book |
| Within 1-3 months | 15 | Active buyer |
| 3-6 months | 8 | Future prospect |
| Just researching | 0 | Not ready |
Using the values outlined above, an example of score thresholds might look like:
- 70+ points: Hot lead (Urgent sales outreach)
- 50+ points: Qualified lead (sales outreach)
- 30-39 points: Warm lead (nurture)
- Under 30 points: Low priority (periodic review)
Align point values with your business priorities. If immediate timeline matters more than company size for your business, weight those points accordingly. The example above assumes budget and urgency are top priorities, with a maximum possible score of 100 points.
Step 4: Create a hidden Calculation field to total the score
Add a Calculation field that automatically sums all the point values based on what prospects select. This field remains hidden to anyone filling out your form.

- Add a Calculation field and set the type to Number.
- Label it “Lead Score” (this label is just for your reference).
- In the Calculation textbox, enter this formula:
=CompanySize_Value + Industry_Value + BudgetRange_Value + JobTitle_Value + Timeline_Value(Make sure you use your actual field names with “_Value” after it, which you can see in the field picker that shows up when typing.)- Alternatively, open the Advanced Calculation Editor by clicking the lightning bolt icon and then describe in natural language what you want to calculate. Our AI Calculation Helper will think about what you want to do and write a formula for you!
- Keep the score completely hidden from prospects by setting Show This Field to For Roles → Internal.
Now when someone fills out your form, Cognito Forms automatically adds up all their point values and stores the total in this hidden field.
Want to see the scoring in action while building? Temporarily set the field to “Always” visible, preview your form, and test different answer combinations. Watch the score update in real-time as you change answers. Just remember to hide it again before publishing!
Step 5: Configure Workflow Statuses to prioritize leads based on score
Set up Workflow Automation that changes the entry status based on the lead score, organizing your leads into clear categories.
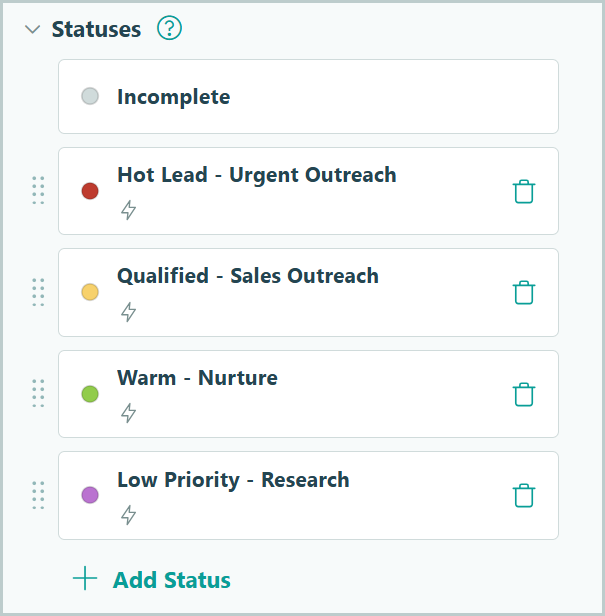
- Navigate to Workflow → Status.
- Add a Status for each priority level. For example, you might add “Hot Lead - Urgent Outreach,” “Qualified - Sales Outreach," “Warm - Nurture,” and “Low Priority - Research.”
- Set Automatically Assign Status to When →
LeadScore is [Insert Value Here]. If you set this up for the Statuses above, it would look like this:- Hot Lead - Urgent Outreach: When →
LeadScore is >= 75 - Qualified - Sales Outreach: When →
LeadScore is >= 50 and <= 74 - Warm - Nurture: When →
LeadScore is >= 35 and <= 49 - Low Priority - Research: When →
LeadScore is <= 34
- Hot Lead - Urgent Outreach: When →
Now every submission automatically gets categorized based on qualification score, making it easy to filter and manage different lead types.
Important: Be sure to keep the Submitted Status and the Submit Action changing the status to “Submitted.” This will ensure every entry is assigned a status other than “Incomplete.”
Step 6: Route Leads to Specific Team Members
Set up email notifications that route leads to your sales team if their qualification score meets your criteria.
Create a Role for your sales team
- In Workflow, click Roles and then click + Add Role.
- Name it “Sales.”
Set up an email notification to send to Sales

- In Workflow → Actions, open your "Submit” Action.
- Scroll to Send Emails and click + Add Email.
- Set up your first routing rule for qualified leads:
- To: Enter your sales team’s email address
- Click Share Workflow Link and select the “Sales” Role
- Send When →
LeadScore is >= 50 - Subject: “New Qualified Lead - {Name}”
- Message: Include key details using the Insert Field option
- Repeat this process for any other emails you want to send, or send to different teams depending on a service type selected in the form.
Now when a qualified lead submits your form, your sales team receives an immediate notification with all the qualification data they need to reach out. When a warm or cold lead submits the form, consider sending them to your email marketing platform for nurturing, or simply having them appear in a filtered entry view for periodic review.
Step 7: Create A Task View for lead management
Set up a filtered Task View that shows the Sales Role only qualified leads, helping them stay on top of their outreach efforts. When a new high-priority lead comes in, the task count increases and a notification badge appears instantly.

- Go to the Entries page for your form.
- Click the + button at the top and select New Task View.
- Create your first task view for high-priority leads:
- Name: Outreach Needed
- Role: Sales
- Turn on Assign As Tasks
- Filter the view to only show relevant leads. Select only the “Qualified - Sales Outreach” and “Hot Lead - Urgent Outreach” Statuses.
- Sort the view by Lead Score, with the highest score first. This will show your team see the highest scoring leads at the top.
- Click Columns and deselect any fields you don’t want to appear in this View.
Now your team members see clear dashboards showing which leads need their attention, organized by priority. Task Views display notification badges when new qualified leads arrive, so your team can respond immediately.
Step 8: Embed your contact form on your website
Embed your lead scoring form onto your website so prospects can start submitting qualified leads.
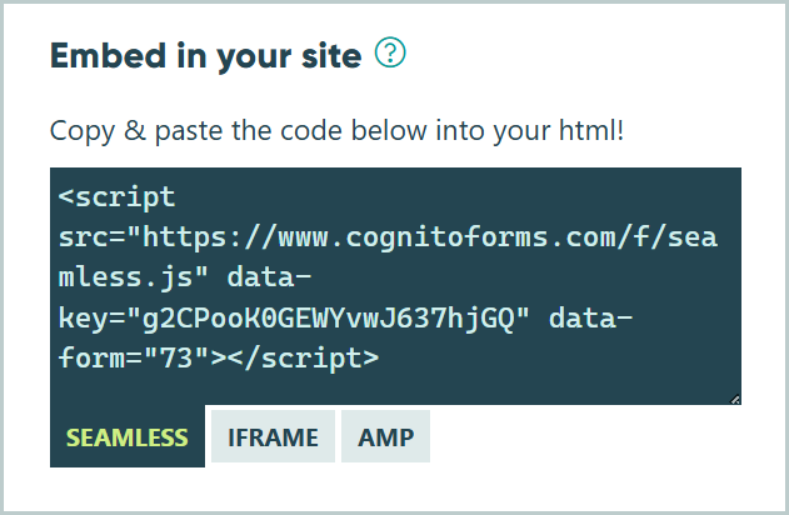
- Hover over your form name in the sidebar and select Publish Form. Alternatively, click Publish in the top toolbar on either the Build or Entries page.
- Choose your embed method under Publish Code:
- Seamless (recommended): Inherits your website’s styling and loads faster
- Iframe: Better compatibility if seamless embedding causes issues with your website
- AMP: For accelerated mobile pages only
- Copy the embed code provided.
- Paste the code into your website’s HTML where you want the form to appear. This is typically your Contact page, but you might also embed it on service-specific landing pages.
- If you want to hide the form’s header when it is embedded, go to your form’s Header Styles tab and check the box labeled “Hide header when embedded?”
- Optional: Customize the form’s appearance using CSS to match your branding. The Seamless embed option automatically adapts to your site’s fonts and colors, but you can override specific elements if needed.
With your form embedded on your website, it’s now live and ready to score incoming leads! Test it by submitting a few entries with different answer combinations to verify that scoring, routing, and notifications work correctly.
How Your New Automated Lead Scoring Works
Your contact form has now become an intelligent lead qualification tool that instantly qualifies and routes every prospect for you.

What happens when someone submits your form
The moment a prospect clicks Submit, Cognito Forms instantly totals their hidden point values, assigns a priority level, and sets the appropriate workflow status. For qualified leads scoring 40+ points, the system automatically sends an email notification to your sales team for faster responses.
What your team sees in the entries view
When your team opens the Entries page, they see leads organized by priority instead of an undifferentiated list. High-priority qualified leads appear in a Task View with notification badges, while warm and low-priority leads filter into separate views. All qualification data visible at a glance. No more manually sorting through dozens of submissions to find the few prospects worth pursuing.
Real-World Examples of Lead Scoring
Here’s how different businesses use automated lead scoring to qualify and route prospects more effectively.
Marketing agency client screening
A marketing agency receives 50+ contact form submissions monthly but only has capacity for 8-10 new clients. They prioritize larger companies with substantial budgets and decision-making authority. Warm leads automatically go into their email marketing platform for nurturing campaigns, while their sales team reaches out to qualified leads immediately.
Professional services lead routing
A professional services firm offers legal, accounting, and business consulting services with separate teams for each. They use lead scoring to both qualify and route in one automated system. Specialists only receive pre-qualified leads in their area of expertise, which reduces their response time and improves their conversion rate.
Additional Features to Enhance Lead Scoring
Once your basic lead scoring system runs smoothly, these advanced techniques take your qualification process even further:
- Add conditional follow-up questions based on service interest. Use conditional logic to show additional qualification questions specific to each service type. For example, if someone selects “Web Design,” show questions about their current website, desired features, and whether they need e-commerce functionality.
- Integrate with your email marketing platform and CRM. Connect to the Cognito Forms API or third-party integrations to automatically route leads into nurture campaigns or your CRM with complete qualification data. This eliminates manual data entry while ensuring every prospect receives appropriate follow-up.
- Export and analyze scoring patterns in Excel or Power BI. Export your form entries to Excel to analyze which qualification factors most strongly predict closed deals. Connect to Power BI using OData for visual dashboards showing whether high-budget leads actually convert better than those with ideal timelines.
Start Qualifying Leads Automatically Today
Stop manually sorting through every website inquiry hoping to find your next qualified prospect. With automated lead scoring in Cognito Forms, your contact form becomes an intelligent qualification system that identifies your best opportunities, routes them to the right team member, and lets your sales team focus their energy on closing deals. Build your first lead scoring form today and watch your conversion rates climb while your team’s workload decreases.
Contact Form with Automatic Lead Scoring
- Automatic lead scoring logic
- Notes which leads are qualified
- Notification emails to staff
FAQ
Start with your best current customers and work backward. Look at common characteristics among clients who converted quickly and paid your full rates, and give those attributes the highest points. For example, if your best clients are always companies with 50+ employees who need immediate help, weight company size and timeline heavily. You can always adjust point values after comparing lead scores against actual conversions.
You have complete control over how to handle lower-scoring leads. Most businesses either send them to their email marketing platform for automated nurture campaigns (multiple educational emails over time) or place them in a separate entry view for periodic manual review. Some businesses simply send a polite “we’ll be in touch” auto-response and reach out to them if they have capacity to work with them and after they’ve reached out to all qualified leads. Choose the approach that matches your capacity and business model.
Yes. Create multiple Calculation fields with different names (like “WebDesignScore” and “MarketingScore”) that add up different combinations of fields. Then Automatically Assign Statuses based on the score(s) in these new Calculation fields, setting different thresholds within the conditional logic you set up. For example, web design leads might become a “Qualified Lead” at 40+ points while consulting leads need 50+ points because consulting requires higher budgets and longer timelines.