Transform your paper intake process into secure, HIPAA-compliant digital forms that protect patient data and handle everything from medical history to e-signatures.
Build Time & Skill
30-45 min
Intermediate
What you'll learn
How to set up HIPAA compliance in Cognito Forms, build secure patient intake forms, and protect sensitive patient data from collection through storage
Switching from paper to digital intake forms is essential for efficiency and growth, but healthcare providers face unique challenges with patient privacy regulations. HIPAA requirements can be overwhelming, especially for small practices without dedicated IT staff or compliance professionals. The good news is that with the right approach, you can create secure, compliant digital intake forms that protect patient data while streamlining your workflow.
Digital patient intake forms help your practice by:
- Reducing administrative burden by eliminating manual data entry from paper forms.
- Improving day-of-appointment wait times, since patients can complete forms before appointments.
- Ensuring compliance with federal regulations through built-in security features like encryption, access controls, and audit trails (without requiring technical expertise).
- Improving the patient experience with convenient online forms that patients can complete on their own schedule from any device.
Understanding HIPAA-Compliance for Online Forms

Before building your intake forms, understand what makes a digital form HIPAA compliant. HIPAA (Health Insurance Portability and Accountability Act) protects patient privacy by requiring specific safeguards for Protected Health Information (PHI). PHI includes any health information that can identify a patient. PHI is not just obvious medical data like diagnoses and medications, but also identifiers like names, birthdates, addresses, and phone numbers when combined with health information.
When you use an online form builder to collect patient information, you’re working with a “business associate” under HIPAA rules. This means the form provider must sign a Business Associate Agreement (BAA) that legally obligates them to protect PHI according to HIPAA standards. Without a signed BAA, using that platform for patient data violates HIPAA regulations, even if the platform claims to be “secure.”
Key compliance requirements for online forms include:
- Encryption of data both in transit (when being submitted) and at rest (when stored)
- Access controls that restrict who can view patient information
- Audit trails that track who accessed what data and when
- Automatic timeouts to prevent unauthorized access from unattended devices
- Secure transmission methods that protect data as it moves between systems
Cognito Forms provides all these safeguards and requires a signed BAA for any organization collecting PHI, giving you confidence that your patient data stays protected.
Learn more about how Cognito Forms enforces HIPAA-Compliance.
Building HIPAA-Compliant Intake Forms: Step-by-Step
Creating a HIPAA-compliant patient intake form involves more than just building a form with medical questions. You’ll need to enable compliance features in your account, carefully configure security settings, and test everything before patients start submitting sensitive information. Follow these steps to create intake forms that protect patient privacy while streamlining your workflow.
Step 1: Enable HIPAA-compliance in your account
Before creating any forms that collect patient information, activate HIPAA compliance for your Cognito Forms organization. This changes several security settings and enables features specifically designed for healthcare data protection.

- Verify your organization is on the Enterprise plan. HIPAA features are only available at this subscription level because they require enhanced security infrastructure.
- Go to your organization’s Settings.
- Navigate to Plan & Billing, then find the Compliance section.
- Click Sign our BAA to get started to review the Business Associate Agreement.
- Read through the BAA carefully, then provide your title and signature at the bottom.
- Click I Agree to execute the agreement.
- Download a PDF copy of your signed BAA for your records. You’ll also receive a copy via email.
Important: The person signing the BAA must be an owner of your account and have the authority to sign legally binding contracts for your organization. This is typically the practice owner or an authorized administrator. See our sample standard agreement for your reference.
Once you establish the BAA, several security features activate automatically:
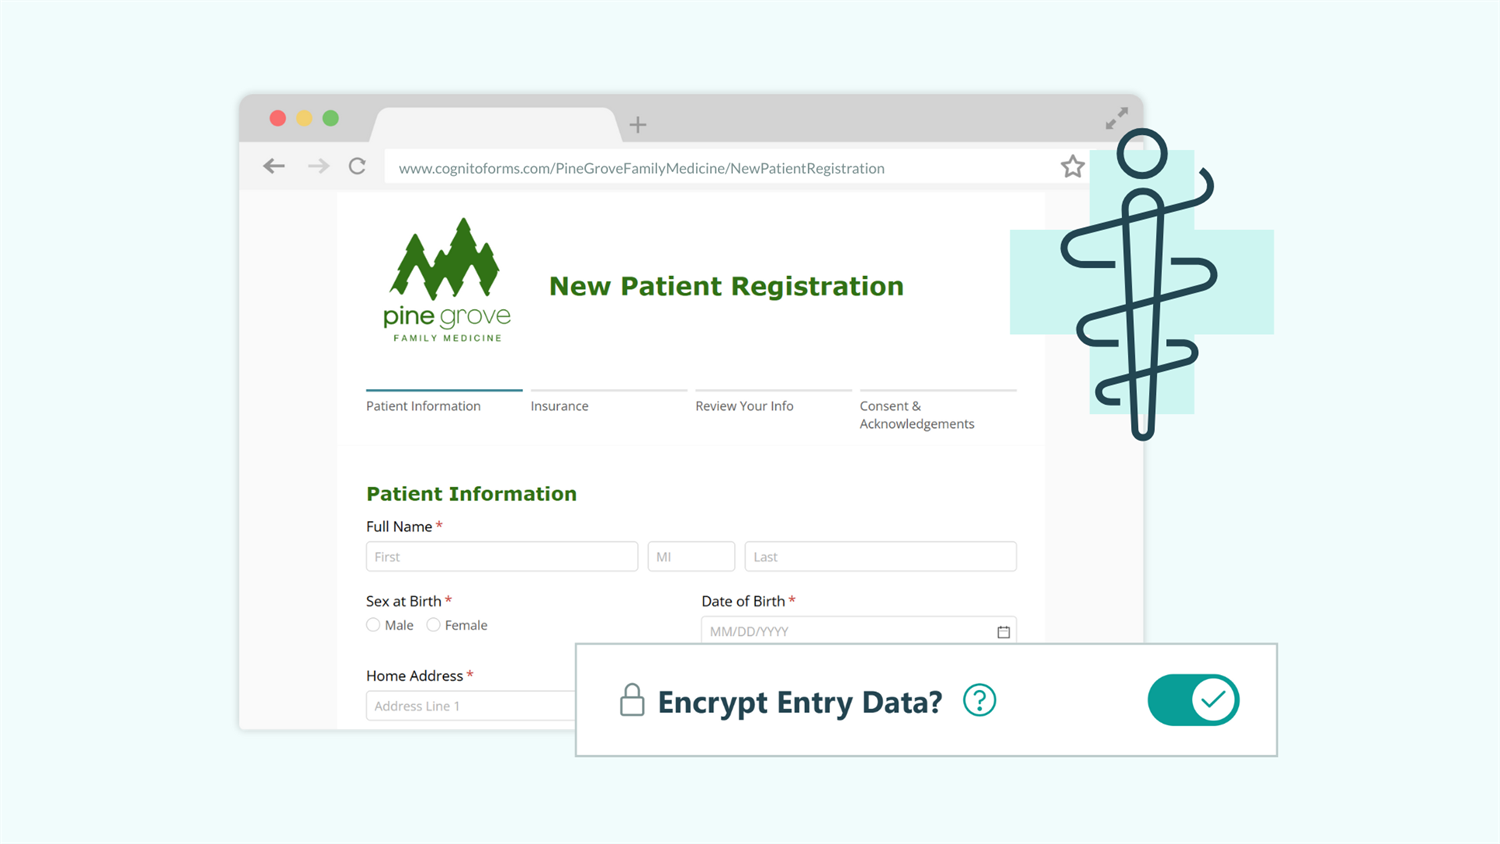
- All new and existing forms immediately become encrypted at rest, including any files patients upload.
- User sessions automatically time out after 1 hour of inactivity (instead of 8 hours).
- Guest Access is enabled, requiring authentication for Workflow links in the Public role and Save & Resume links.
- Certain features become restricted or require additional configuration for compliance.
Plan ahead: When copying forms, you cannot copy any associated form entry data. If you have existing forms with data, they’ll remain accessible, but entries will not be copied over if you copy the form. This protects patient information from being inadvertently copied.
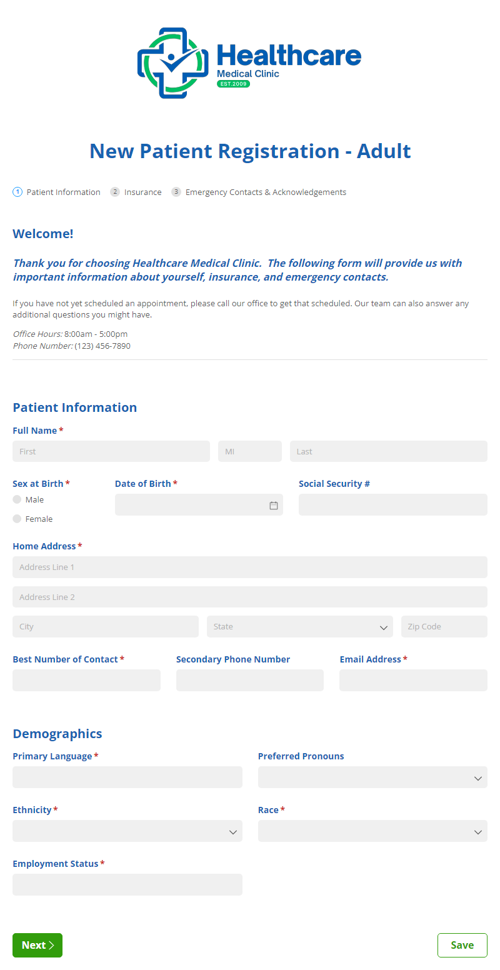
Step 2: Plan your intake form structure
Before building your form, map out exactly what information you need to collect and how patients will move through the questions. Good planning prevents you from rebuilding the form later when you realize you’re missing critical fields or collecting unnecessary information. Use the questions below as a starting point for planning your intake form.
Many practices set up intake forms differently and want to collect specific information that varies across practices. Here are some common pieces of information healthcare providers collect in their intake forms, but you can include anything your practice finds useful:
- Demographic information: full name, date of birth, gender, address, phone number, email
- Insurance details: provider name, policy number, group number, subscriber information
- Medical history: current medications, allergies, existing conditions, previous surgeries
- Emergency contact information
- Reason for visit
- Consent and authorization acknowledgments
Any field combining a patient identifier (name, DOB, address) with health information should have additional protection. This includes things like:
- Insurance information
- Medical history details
- Contact information when associated with health data
Depending on the intake form and how your practice runs, some people will need to be able to access the entire form submission, while others will only need to access specific sections within the intake form. Some examples include:
- Front desk staff for demographic and insurance verification
- Clinical staff for medical history and clinical notes
- Billing department for insurance and payment information
- Specific providers or departments based on specialty
Think about the following questions when setting up your intake form:
- Will you manually enter information into your EMR, or will you connect to an integration for automatic data transfer?
- Do you need to export data regularly?
- Are there specific team members who process new patient information?
Step 3: Build your patient intake form
Now you’re ready to create the actual form. This step involves adding fields, organizing sections, and using features like Conditional Logic to keep the form relevant to each patient.
Create your form and add fields
- Create a new form and give it a clear, descriptive name like “New Patient Intake” or “Patient Registration Form.”
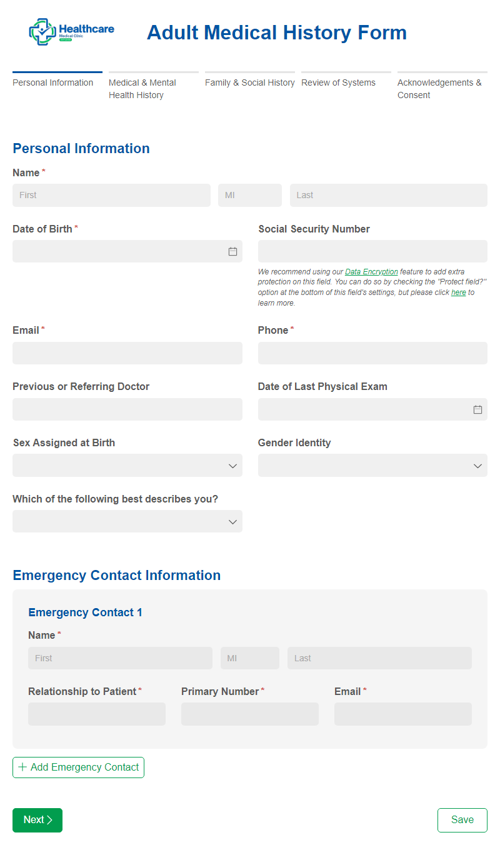
- Add fields for all of the information you want to collect, such as:
| Common information collected | Field type to use |
|---|---|
| Patient's full name | Name field |
| Date of birth | Date field |
| Mailing address | Address field |
| Contact information | Email field and Phone field |
| Photo(s) of identification | File Upload field |
| Common information collected | Field type to use |
|---|---|
| Name of insurance provider | Textbox field |
| Policy number and group number | Textbox field |
| Photo(s) of insurance card | File Upload field |
| Common information collected | Field type to use |
|---|---|
| List of current medications | Repeating Section with fields for medication name, dosage, and frequency |
| List of allergies | Repeating Section with fields for allergen and reaction type |
| Previous surgeries or hospitalizations | Repeating Section with fields for the reason and relevant dates |
| Current symptoms | Choice field - Multiple selection type |
| Common information collected | Field type to use |
|---|---|
| Name of contact | Name field |
| Contact information | Email field and/or Phone field |
| Relationship to patient | Choice field - Single selection type |
| Common information collected | Field type to use |
|---|---|
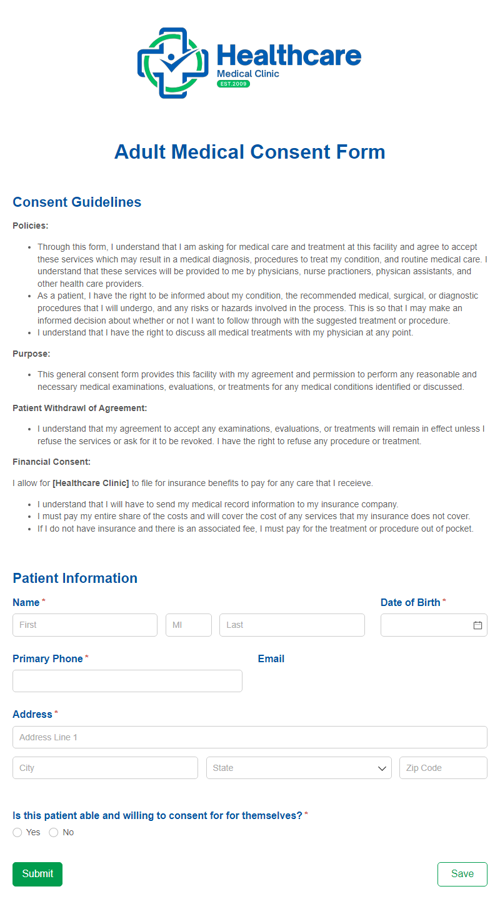
| Your practice's privacy notice text directly on the form | Content field |
| Patient signatures | Signature field |
| Consent to appointment reminders via email or text | Yes/No field |
Rather than creating 10 separate “Medication” fields (which wastes space for patients with no medications and limits patients with many medications), Repeating Sections and Tables let patients add exactly as many items as they need. This keeps your form clean and flexible. Learn more about Repeating Sections and Tables.
Use conditional logic for relevant questions only
Conditional logic shows or hides fields based on previous answers, keeping your form focused and preventing patients from seeing irrelevant questions. Focus on hiding entire sections or groups of related fields that only apply to specific patient populations. Reserve conditional logic for cases where showing unnecessary questions would genuinely confuse or frustrate patients.
Common conditional logic scenarios for intake forms:
- Show pregnancy-related questions only for patients who indicate female gender
- Display pediatric-specific questions only when the patient’s age is under 18
- Ask about specific symptoms based on the selected appointment type or reason for visit
- Show additional insurance fields only if the patient indicates they have secondary insurance

How to add conditional logic
- Click on the field you want to show or hide conditionally.
- Find the Show This Field setting in the field properties.
- Select When instead of “Always.”
- Build your condition using the dropdown menus. For example:
- Show a “Parent Signature” field only when
PatientAge < 18 - Show a “Pregnancy History” section only when
Gender = "Female"
- Show a “Parent Signature” field only when
- Test the logic thoroughly by previewing your form and entering different scenarios.
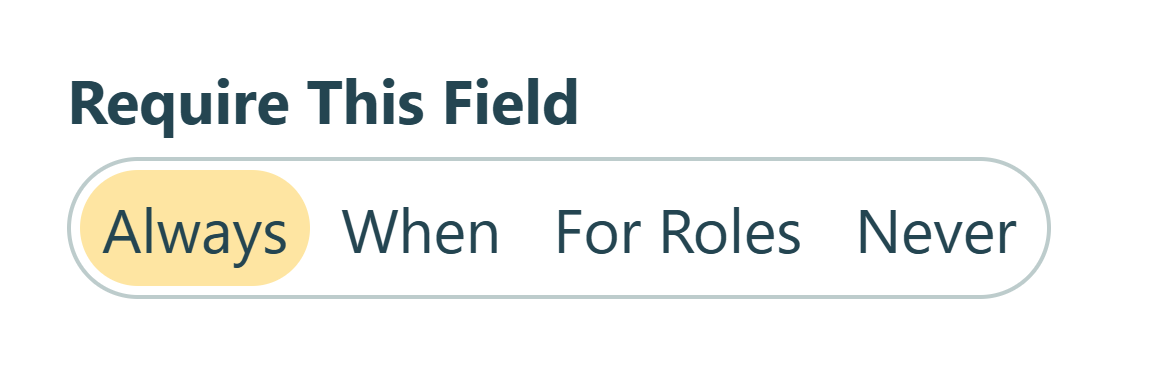
Make critical fields required
Ensure you receive complete information and prevent patients from accidentally skipping critical fields.
- Go through the fields on your form and find the Require This Field setting.
- Select Always or For Roles > Public for any field you want to be required by the patient.
Set up field validation for data accuracy
- For fields where format matters, add validation rules:
- Email fields automatically require an email format ("@" and “.” in the text).
- Phone fields of the US type require ten digits, while International type are not formatted.
- Date fields can be set to only accept dates in the past (like for date of birth or past surgeries).
- For Textbox fields where you need specific formats (like insurance policy numbers), use the Format Validation setting.
- Add helpful Placeholder Text to guide patients on what information to enter, like “MM/DD/YYYY” for Date fields.
Learn more about the Textbox field's Format Validation setting.
Step 4: Configure field security and validation
Once your form structure is complete, configure which fields are protected from appearing in email notifications and generated documents. This prevents sensitive patient information from being transmitted, which could violate HIPAA if not handled carefully.
Understanding protected fields
In HIPAA-compliant organizations, you can mark individual fields as “Protected” to prevent their data from appearing in email notification content or generated documents. When you sign a BAA, the entire form submission remains secure and encrypted by default. Protected field settings specifically control whether that field’s data can be included in emails sent by your forms or included in generated documents.
Common fields to protect on patient intake forms include: medical history sections, current medications, allergies, reason for visit, insurance policy numbers, date of birth, and Social Security Number (if collected).

How to configure protected fields
- Ensure that Data Encryption is enabled in Form Settings.
- Click on a field that contains or could contain PHI.
- Select the Protect Field? option at the bottom of the field settings.
- The field will display a lock icon, indicating that it is protected.
Step 5: Set up secure access and sharing
Control who can access your form and how patients can view or update their information after submission. These settings determine whether your form is publicly available or requires email verification, how submitted data is shared with patients, and how that data can be accessed after submission.

Configure form access settings
- Go to your form’s Workflow settings.
- Under Public Links, decide which option for Require Authentication makes the most sense for you.
Here’s a breakdown of how each authentication type works and when to use them:
| Authentication type | How it works | When to use this method |
|---|---|---|
| Never | Anyone on the internet can access this form if they have the form’s Public Link, with no authentication required. | If you want patients to be able to open and complete the form without verifying their email address. |
| Users Only | Access to this form is only allowed for users of your Cognito Forms organization. They must log in to open the form. | If you want your staff to be the only people to be able to open and complete the form (unlikely for intake forms). |
| Guests & Users | Anyone can access the form via the Public Link, but they must first verify their email via login providers (Microsoft, Google, Facebook) or a device verification code. | If you want anyone on the internet to be able to open and complete the form, but also track the submitter’s email address. |
Set up Workflow Link Sharing
Workflow Links let you send patients secure, personalized links to view or update their specific form submission. This is useful when patients need to review what they submitted or update information.
- Navigate to Workflow in your form’s settings.
- Toggle Workflow Link Sharing to On.
- Configure Allow Links settings:
- Always if patients can access their submission indefinitely.
- When or By Date if you want to set conditions, such as only allowing access until their appointment date.
- Decide whether to Require Authentication for Workflow Links:
- Changing this to Always adds extra security by requiring patients to verify their email before accessing the link. The submission can only be opened when the email address the form was sent to is the same email that is verified and accessing the link.
- Most practices enable this for patient submissions containing detailed medical information.

Configure user permissions for staff
User permissions are an important aspect of security and protecting PHI. Each user in your organization can be assigned a Global Permission Level and more granular permissions on the form and folder levels.
- Go to your organization’s Users & Authentication settings (not form-specific settings).
- Review which team members have access to your organization.
- Assign each user a Global Permission Level that fits their necessary access to PHI. Use the Override option to assign different permission levels for specific forms or folders.
- For granular control on individual entries, create Entry Views using the Shared with Current User filter.
Refer to our Help Topic to understand what can and cannot be accessed at each permission level.
Enable Two-Factor Authentication
This is an optional, but beneficial security feature. Two-factor authentication adds significant security by requiring both a password and a time-based code, protecting against unauthorized access even if a password is compromised.
- Go to Organization Settings > Users & Authentication.
- Switch the toggle to “On” for the “Require two-factor authentication for all users in your organization” option.
- Each team member will need to set up 2FA when they next log in, using an authenticator app.
Step 6: Configure email notifications carefully
Email notifications can alert staff when patients submit forms and send confirmations to patients. However, you must configure these carefully to avoid sending PHI via email without proper consent.

- Go to Workflow > Actions.
- Click on the Submit Action (this triggers when patients submit the form) or any other Action that you want to send an email.
- Under Send Emails, click + Add Email.
- Configure your notification’s To, Subject, and Message.
- Instead of including patient data in the email, Share Workflow Link that for staff or patients to click on and securely view the full submission.
- Be sure you select the correct Role for who is accessing the link. This ensures they only see and can edit the fields intended for them.
Cognito Forms prevents protected field data from appearing elsewhere. Therefore, Protected Fields will not be available to select in the Insert Field picker when adding content to email notifications, confirmation messages, and text piping.
Step 7: Test your form before going live
Thorough testing catches issues before patients encounter them, ensuring your form works correctly and complies with your security requirements.

- Use Preview mode to test fields, sections, Workflow logic, and more, with the ability to easily make changes in the form builder as needed.
- Submit real sample entries to confirm the submission appears in the Entries page correctly. Check email notifications, task assignments, Workflow Links, and file uploads.
- After submitting a test entry, use View As User to see your organization from another user’s perspective, seeing what they can and cannot access or edit.
Real-World Examples: HIPAA-Compliant Intake Forms in Action
Digital, HIPAA-compliant patient intake forms are important to all healthcare practices, regardless of your specialty, size, or services offered.
Multi-specialty and multi-provider clinics
A practice with pediatrics, general medicine, and women’s health uses conditional logic on a single intake form to show relevant questions based on appointment type selected. Pediatric patients see immunization history fields while women’s health appointments show OB/GYN-specific questions. This eliminates the need for separate intake forms while ensuring each patient only answers relevant questions.
Solo mental health practitioners
A therapist transitions from paper to digital with a streamlined intake form collecting contact information, insurance details, therapy goals, mental health history, and Signature fields for treatment consent and HIPAA acknowledgments. The digital forms reduce first-session paperwork time and lets the therapist focus on the patient instead of clipboards, while all sensitive information stays encrypted and secure.
Home health companies
A home health agency collects patient and caregiver information in their intake form. Repeating Sections flexibly handle information for multiple caregivers, File Uploads capture insurance cards and physician authorization forms, and secure Workflow Links allow family members to update information as patient care needs evolve. The form ensures all staff working with the patient see consistent, current information.
Enhance Your Intake Forms with These Additional Features
Once your basic HIPAA-compliant intake form works smoothly, these features create more sophisticated workflows:
- Create a patient portal with Guest Access: Instead of sending separate form links for intake, consent forms, and follow-up questionnaires, assign all forms as tasks to access from a secure patient portal. Patients see a personalized dashboard with their pending forms and completed submissions.
- Set up automated Workflows: Route completed intake forms to the appropriate department or provider automatically based on appointment type.
- Integration with practice management systems: Connect Cognito Forms to your EMR or scheduling software using one of our integration options: Zapier, Make, Power Automate, webhooks, or the Cognito Forms API.
Start Building HIPAA-Compliant Intake Forms Today
Moving your patient intake process from paper to digital protects sensitive health information while creating a better experience for patients and staff. With HIPAA compliance built directly into Cognito Forms on the Enterprise plan, you don’t need technical expertise or expensive consultants to create secure forms.
Whether you’re a solo practitioner creating your first digital form or a multi-provider clinic streamlining intake for different specialties, HIPAA-compliant forms save time, reduce errors, and demonstrate your commitment to patient privacy. Patients appreciate the convenience of completing forms on their own schedule while you gain the efficiency of automated data collection and secure digital records.
Start with a customizable template
Get a head start with our pre-built patient intake forms. New Patient Registration, Medical Consent, and Medical History forms include all the essential fields discussed in this guide, ready to customize for your practice's specific needs.
FAQ
You must be on the Cognito Forms Enterprise plan to access HIPAA compliance features. This plan includes the required Business Associate Agreement, automatic encryption at rest, 1-hour session timeouts, protected field capabilities, and other security features mandated by HIPAA. Individual, Pro, and Team plans should not collect protected health information since these plans are not protected by all HIPAA-compliance requirements and do not have a signed BAA.
Yes, federal law requires a signed Business Associate Agreement (BAA) between your practice and any vendor that handles protected health information on your behalf. The BAA legally obligates Cognito Forms to protect patient data according to HIPAA standards and establishes responsibilities for both parties. You can sign the BAA directly in your account by going to your Settings, opening the Plan & Billing section, and finding the link for a BAA signature under Compliance. The person signing must have the authority to enter into legally binding contracts for your organization.
You should only send protected health information via email if patients have explicitly consented to email communication of their health data through a signed waiver. Best practice is to mark all PHI-containing fields as “Protected” so they never appear in email content. Instead, send emails with Authenticated Workflow Links that staff or patients can click to view information in the HIPAA-compliant system. Over 90% of email providers support end-to-end encryption, making Workflow Links a secure option when patients consent to email communication.